A few weeks ago we announced on our Facebook Fan Page that we were teaming up with Newark.com to review some of the new products that they carry. After browsing their new products section we noticed a development board branded with Newark's Element14 brand. For those of you who have been living under a rock lately, Element14 is Newark / Farnel's community for DIY electronics enthusiast as well as professional electronic engineers. Naturally after seeing this board we had to check it out first, so we requested the Element14 STAR-XL-S08 Development Board as our first review item.
Introduction
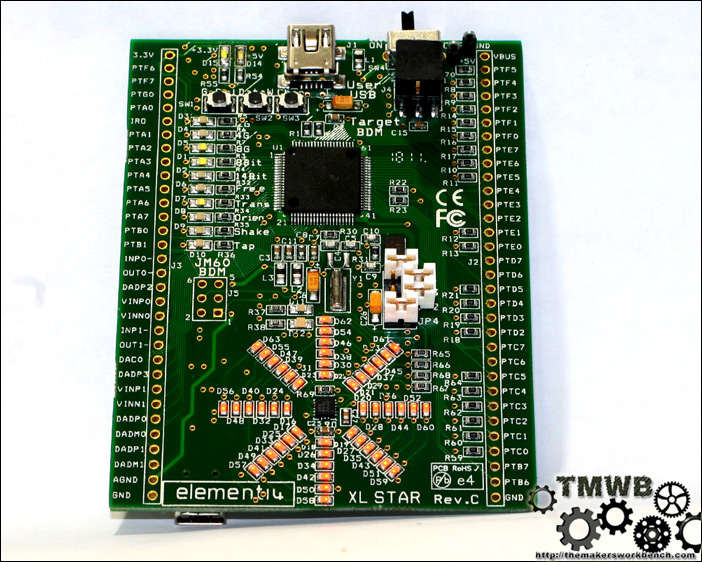
The XL_STAR board allows a user to develop, download and debug up to 64KBytes of 'C' or assembler object code for the MC9S08MM128 MCU using Freescale's CodeWarrior for MCUs V6.3 Special Edition, a professional IDE, for just the cost of the board. Connected to the MM128 MCU, via I2C, is the MMA8451Q a three axes accelerometer. The board is pre-programmed with firmware that uses the MM128 MCU and MMA8451Q accelerometer to drive a star array of LEDs.
The firmware demonstrates the various modes that the accelerometer can be operated in and the results are displayed via the LED array. The complete source code is available to users of the board. Supplied with the board are an installation CD and a USB cable, allowing users to connect the XL_STAR to a Windows PC for immediate development.
The XL_STAR is designed to allow both hardware and software engineers to work in parallel during project development. Once the CodeWarrior development software is loaded the software engineer can initiate either a new project or use the example project provided as a starting point.
For the hardware engineer all the signals from the MM128 MCU are brought out to 0.1” pitch plated through holes down two sides of the PCB. With the addition of 2x 32-way SIL sockets the hardware engineer can place the XL_STAR into a prototyping ‘bread board’ to add external circuitry before committing to prototype PCBs.
Once the prototype PCBs are ready, by removing two resistors from XL_STAR the board can be used, via an OSBDM (Open Source Background Debug Mode) connection, to debug the developers target hardware with the addition of a 6-way ribbon cable.
Applications
- Portable designs – the MM128 MCU and MMA8451Q accelerometer have very low power modes, measured using jumpers and an ammeter on the XL_STAR board
- Applications requiring movement detection and interpretation – the MMA8451Q allows free fall, shake, tap, transient and orientation detection for embedded applications
- Embedded designs requiring USB connectivity – the MM128 MCU also contains a USB OTG on-chip module, which integrates the USB transceiver. Together with a certified free of charge USB OTG stack from Freescale, the XL_STAR offers fast time to market for embedded USB applications
Photos
Now that we have the formalities out of the way lets take a closer look at the XL_STAR board.
The XL_Star Development Board arrived in a cute little white box.
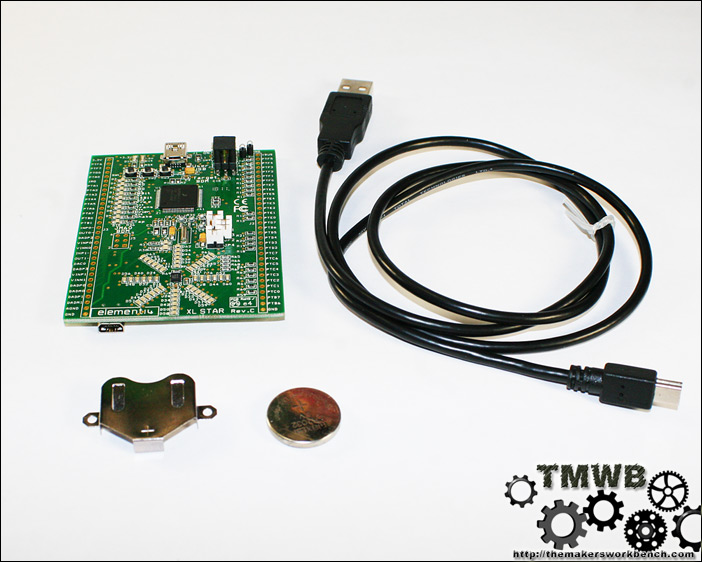
The cute little whte box includes the XL_Star Board, a USB cable, a coin cell battery holder and a rechargable litium ion coin cell battery.
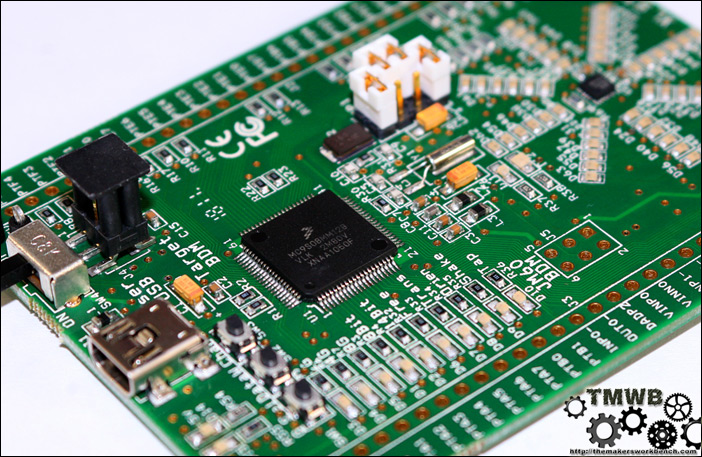
The XL_STAR is based around a Freescale MM128 MCU which provides 128 KB of Flash, 12 KB of RAM, and a processor speed configurable up to 48 MHz.
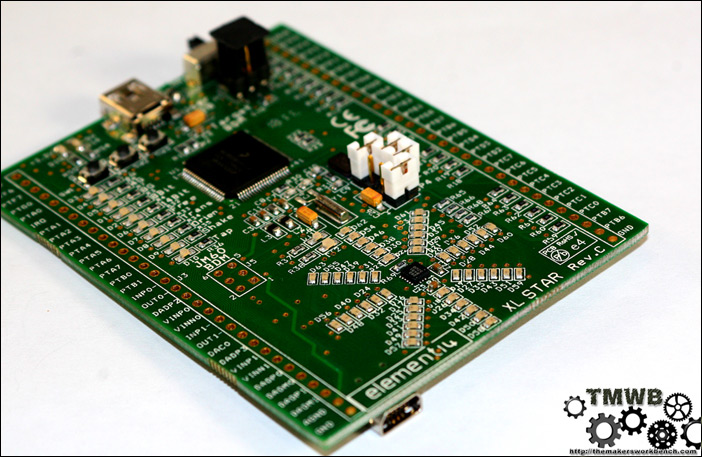
The XL_STAR board also features a Freescale MMA8451Q accelerometer, which detects both its orientation, through the static pull of gravity, and any movement of the board which causes acceleration or deceleration. Surrounding the accelerometer star pattern made up of 48 orange LEDs which can be addressed individually. The orange LEDs are arranged in an 8-pointed star. Each of the 8 ‘spokes’ of the star is connected to a GPIO pin. For example, LEDs D62, D54, D46, D38, D30 and D22 are all connected to Port D Pin 4 (PTD4) Similarly, each of the 6 concentric ‘circles’ is connected to another GPIO pin. For example the outer circle D56-D63 is connected to Port C Pin 5 (PTC5). Thus to illuminate D62 you would drive PTD4 low and PTC5 high.
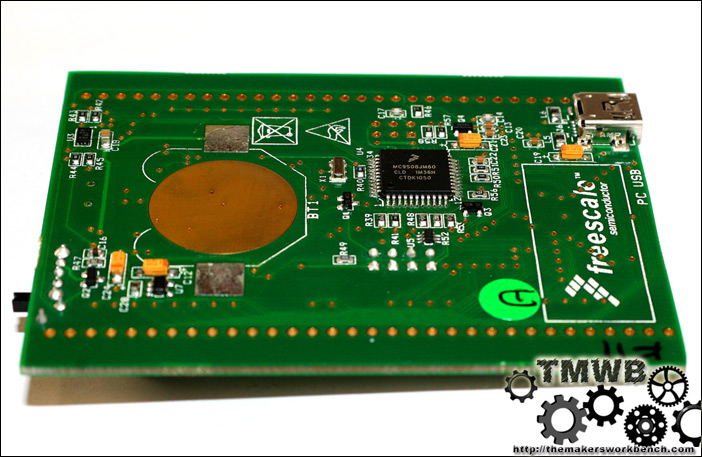
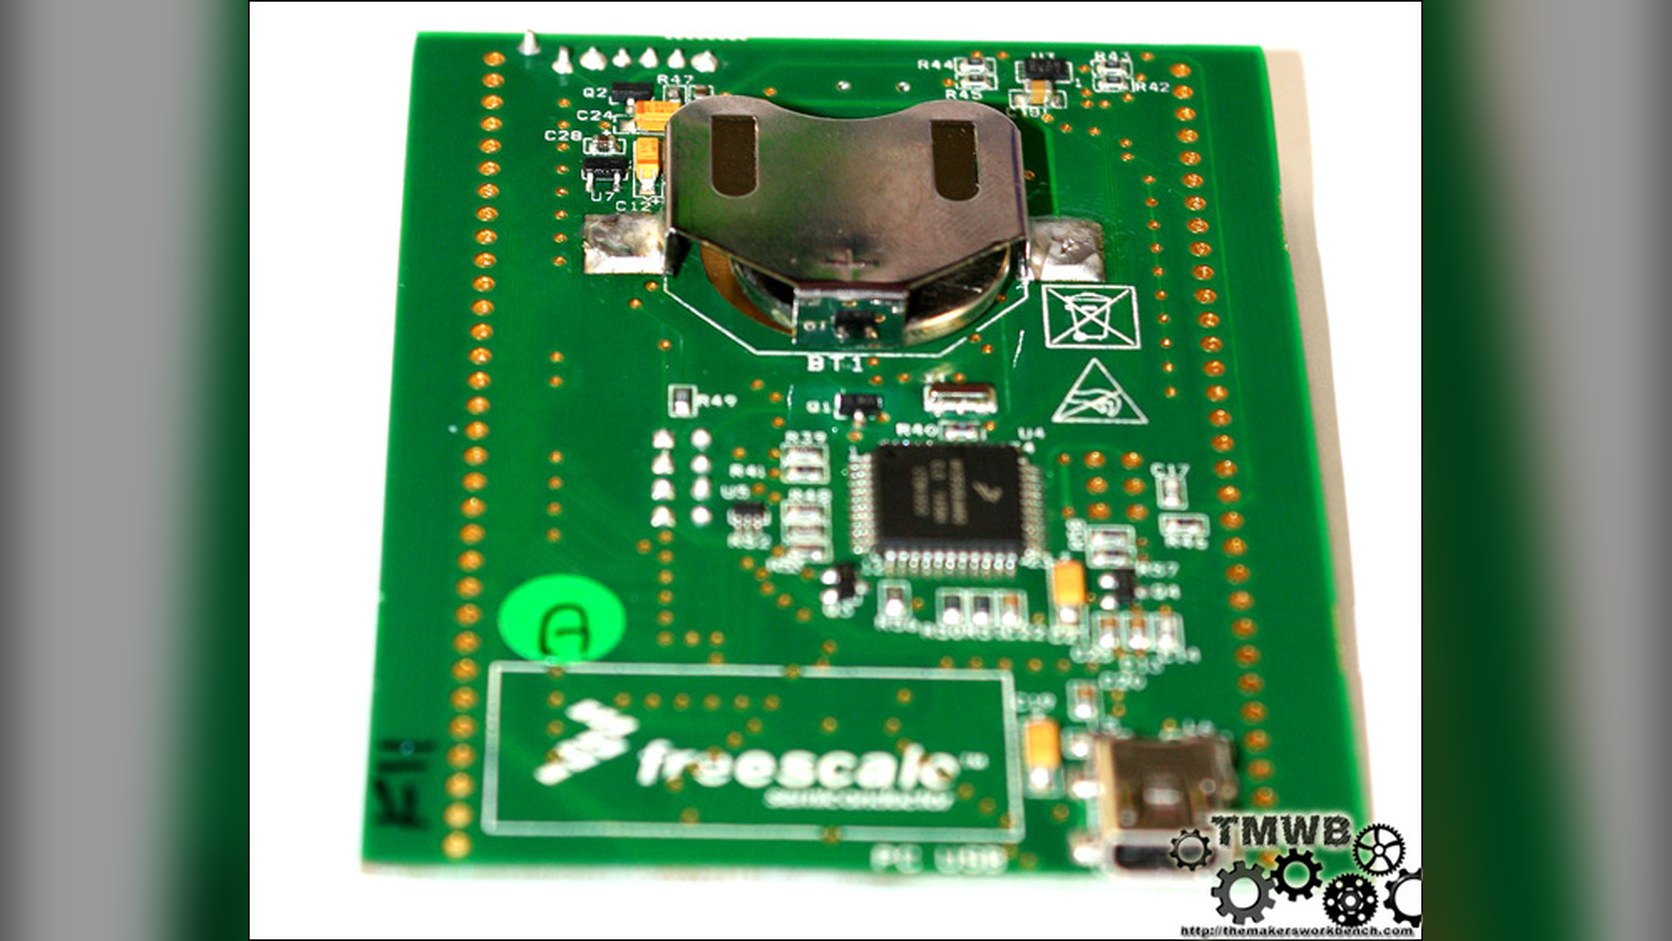
Flipping the board over we find a secondary 8-bit microcontroller (a Freescale MC9S08JM60) which accepts debugging commands from the PC and forms the Open Source Background Debug Mode (OSBDM) interface. The JM60 then controls the main MCU on the top side of the board using its BDM interface. Also located on the back is the coin cell battery holder, (not soldered on in this photo) and the USB port used for programming the MM128 MCU on the front of the board.
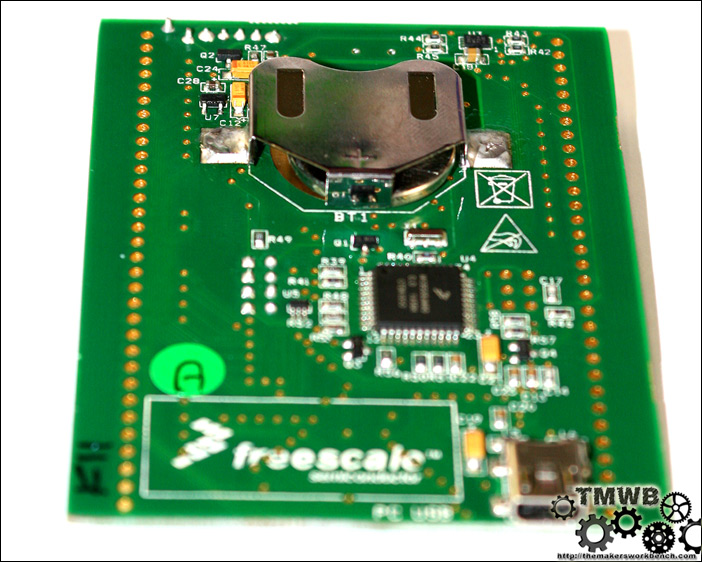
We had to solder the coin cell battery clip onto the XL-STAR Development board. It only took a few seconds with our Sparkfun 939 Soldering Station set to about 450c. The coin cell battery clip holds a lithium ion battery which is charged by the onboard Freescale MC34673 battery charger.
Using the Element 14 XL_STAR Preinstalled Demo Code
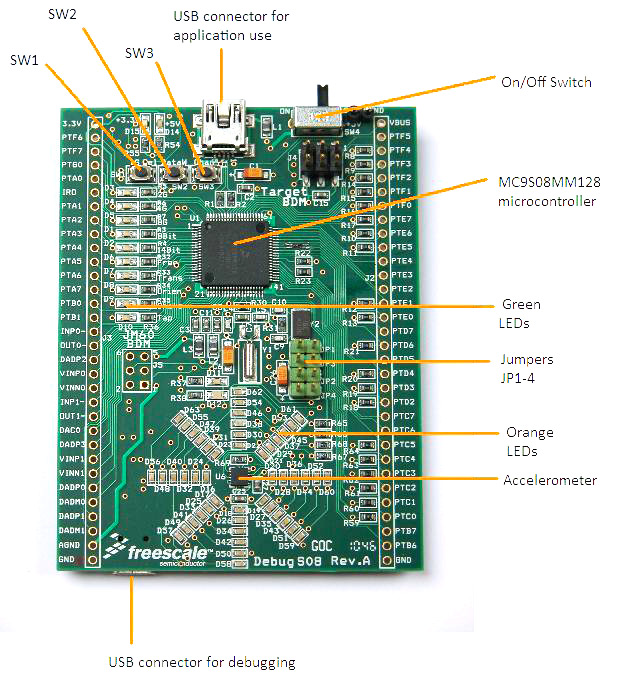
The XL_STAR comes preprogrammed with sample code which utilizes the accelerometer and the LED array. The accelerometer can be utilized to demo five different triggers. You can cycle through each demo by pressing SW3. Green LEDs D6-D10 will light up depending on which demo is selected. The accelerometer sensitivity can be changed by pressing button SW1, labelled G sel. This selects which multiple of normal gravity corresponds to a full-scale accelerometer reading. The options are 2g, 4g and 8g as indicated by the green LEDs D3-D5. Note that changing the sensitivity only affects the 'Orient' demo, because the other accelerometer functions used here don't depend on the sensitivity setting.
- Orient: Try tipping the board and watch the orange LEDs indicate the direction and magnitude of tip
- Shake: Try flicking the board in a direction, either up or down, left or right, or forward or back. You need to use a sharp flick, like striking a ball in a game of table tennis. The orange LEDs will point in the direction of the initial flick, re-setting after a couple of seconds. If the initial flick is not fast enough, the accelerometer may instead detect the rebound event as your hand stops the board’s movement. In this case the reverse direction will be illuminated.
- Tap: Hold the board loosely and tap it once with your finger; the LEDs will show a 'pulse' pattern. Tap twice in quick succession (double tap) to get a different animated pattern.
- Freefall: Drop the board from the height of a few centimetres or more. The freefall event will be detected and displayed on the LEDs for a couple of seconds.
- Transient: The orange LEDs will all illuminate if the board is moving (strictly, if it is accelerating or decelerating) and turns off after a short while if the board is stationary.
If you are interested in the sample code we have included it below.
/**************************************************************************
* MAIN.C
* Top level routines for XL_STAR board accelerometer demo
*
* Copyright (c) 2011 Freescale Semiconductor
* All Rights Reserved
*
***************************************************************************
*
* THIS SOFTWARE IS PROVIDED BY FREESCALE "AS IS" AND ANY EXPRESSED OR
* IMPLIED WARRANTIES, INCLUDING, BUT NOT LIMITED TO, THE IMPLIED WARRANTIES
* OF MERCHANTABILITY AND FITNESS FOR A PARTICULAR PURPOSE ARE DISCLAIMED.
* IN NO EVENT SHALL FREESCALE OR ITS CONTRIBUTORS BE LIABLE FOR ANY DIRECT,
* INDIRECT, INCIDENTAL, SPECIAL, EXEMPLARY, OR CONSEQUENTIAL DAMAGES
* (INCLUDING, BUT NOT LIMITED TO, PROCUREMENT OF SUBSTITUTE GOODS OR
* SERVICES; LOSS OF USE, DATA, OR PROFITS; OR BUSINESS INTERRUPTION)
* HOWEVER CAUSED AND ON ANY THEORY OF LIABILITY, WHETHER IN CONTRACT,
* STRICT LIABILITY, OR TORT (INCLUDING NEGLIGENCE OR OTHERWISE) ARISING
* IN ANY WAY OUT OF THE USE OF THIS SOFTWARE, EVEN IF ADVISED OF
* THE POSSIBILITY OF SUCH DAMAGE.
*
**************************************************************************
* Comments:
* Developed by MicroAPL Ltd on behalf of Freescale Semiconductor
*
* Revision History
* 06/01/11 SDM Initial version
* 14/01/11 SDM (1.0.0) First release
*
* HOW TO USE THE DEMO PROGRAM
* ---------------------------
* This program is designed to run on Freescale's XL_STAR board, and
* shows how to use the MMA8451Q accelerometer.
*
* When first powered on, the board will go into an 'orientation' demo mode.
* Try picking the board up and tipping it in different directions. You should
* see that the orange LEDs illuminate to indicate the direction of the tip
* and its magnitude.
*
* You can select between five different demos by repeatedly pressing button SW3,
* labelled 'Chan'. The current demo mode will be indicated by the green LEDs
* D6-D10. The available demo modes are:
*
* Orient - Try tipping the board and watch the orange LEDs indicate
* the direction and magnitude of tip
*
* Shake - Try flicking the board in a direction, either up or down,
* left or right, or forward or back, like striking a ball in
* a game of table tennis. The orange LEDs will point in
* the direction of the initial flick, re-setting after a
* couple of seconds.
*
* Tap - Hold the board loosely and tap it once with your finger;
* the LEDs will show a 'pulse' pattern.
* Tap twice in quick succession (double tap) to get a
* different animated pattern.
*
* Freefall - Drop the board from the height of a few centimetres or more.
* The freefall event will be detected and displayed on the LEDs
* for a couple of seconds.
*
* Transient - The orange LEDs will all illuminate if the board is moving,
* (strictly, if it is accelerating or decelerating) and turn
* off after a short while if you stand still.
*
* The accelerometer sensitivity can be changed by pressing button SW1, labelled
* 'G sel'. This selects which multiple of normal gravity corresponds to a
* full-scale accelerometer reading. The options are 2g, 4g and 8g as indicated
* by the green LEDs D3-D5.
*
* The accelerometer can return 8-bit or 14-bit data to the main CPU. Applications
* requiring more accuracy can use 14-bit data; otherwise it's faster to read 8-bit
* data. You can select between the two options by pressing the SW2 button, labelled
* 'DataW'. The current selection is shown on the green LEDs D1-D2.
*
* Note that changing the sensitivity only affects the 'Orient' demo, because
* the other accelerometer functions used here don't depend on the sensitivity setting.
*
* Changing between 8-bit and 14-bit data also only affects the 'Orient' demo, but
* although the data width setting is honoured you probably won't notice the
* difference.
*
* When the accelerometer doesn't detect any interesting events for around 20 seconds,
* software will put the board into a power-saving mode. So that you can see this
* happening, an 'X' pattern is displayed briefly before almost all the LEDs turn off.
*
* To wake the board up, just pick it. A '+' pattern is displayed briefly to indicate
* that the board is awake again, and the current demo mode is then resumed.
*
*
* SOME NOTES ON PROGRAM STRUCTURE
* -------------------------------
* The following notes might be helpful for getting an understanding of the demo code.
*
* (1) On power-on reset, execution starts at label '_Startup' in Start08.c. This file
* is common to many CodeWarrior HCS08 programs. Its main purpose is to set up the
* runtime environment of the C program (stack, initialised data, etc).
*
* (2) Control then transfers to our 'main' routine below. This sets up the hardware
* and then enters an endless loop.
*
* Within the loop, everything is interrupt driven. The microprocessor executes
* the WAIT instruction in order to sleep when there's no new information from
* the accelerometer. It is woken from sleep by an interrupt, either from the
* accelerometer or caused by a button press. The interrupt service routines
* are 'accelerometer_isr' and 'button_press_isr.'
*
* (3) The accelerometer is configured differently each time a new demo mode is
* selected. It would be possible to detect multiple events at once - e.g. single
* and double taps, orientation changes *and* freefall - by careful configuration.
* To make it easier to understand the code, each demo mode only configures one
* type of event.
*
* (4) After some seconds of inactivity the accelerometer will transition from
* Wake to Sleep mode, and this will be indicated by an interrupt. The software
* transfers control to the routine 'wait_for_movement' which reconfigures the
* accelerometer to detect any movement and then puts both the accelerometer and
* the board into low power modes.
*
* (5) There are a number of routines with names like 'leds_circle' which are used
* to display different patterns on the orange LEDs. These are all straightforward
* except 'leds_show_tilt'. For added interest this uses the fact that the GPIO
* pins driving the LEDs can also be reconfigured as outputs of the Timer/Pulse
* Width Modulator modules (TPMs). By driving the pins with a pulse-width modulated
* signal the brightness of the LEDs can be controlled.
*
* (6) This demo program is unusual in that it makes use of the ANSI C 'double' floating
* point data type, which is not typically the case for embedded software.
* Floating point code is needed here to calculate tilt angles in the 'Orient'
* demo, and requires the use of a version of the ANSI library which includes maths
* routines like 'cos' and 'atan2'.
*
* The library which includes floating point support is called 'ansifs.lib'.
* For most embedded applications you can make use of 'ansiis.lib', a simpler library
* which leads to slightly smaller code sizes. See the compiler documentation for
* more details.
*
*/
#include
#include "derivative.h"
#include
Conclusion
We really like the XL_Star board and we are going to continue playing with it over the next few weeks and hopefully provide a tutorial on using it as a debugger. This first offering from Elelment 14 is proving to be a big hit across the electronics enthusiast community and we can not wait to see what they have instore next. If you are looking for a compact Freescale S08 Development Platform that can be used after the development stage we highly reccomend this board.
The Element14 XL_STAR board is avaliable from Newark.com and is a bargan for about $32.00 USD.
If you are outside of the USA and would like to purchase the XL_STAR it can be found on Farnell.com for £19.99.
Element14 has a community page for the XL_STAR development board so hop in and join the discussion.
This product was provided free of charge by its manufacturer or retailer for the purpose of review.
TheMakersWorkbench.com strives to provide non biased reviews and thus does not accept any form of monitary payment for the reviews appearing on its pages. If you would like to have your product evaluated, showcased, or reviewed on TheMakersWorkbench.com please feel free to contact us by clicking on the contact us tab at the top of the page.