

CI/CD is two abbreviations people glue together.
CI, continuous integration: every change is built (and maybe tested) automatically so a broken sketch cannot hide on main.
CD, continuous delivery or deployment: the built firmware is packaged, and sometimes installed, without a ritual of mystery clicks.
On a web app, CD might mean "ship to the server." On Arduino, GitHub's rented computers do not have your Uno. An honest pipeline is:
- Compile every pull request (CI).
- Save the
.hex/.binas an artifact so a human can download it (the start of CD). - Flash on a bench, or on a self-hosted runner that actually has USB, if you ever go that far.
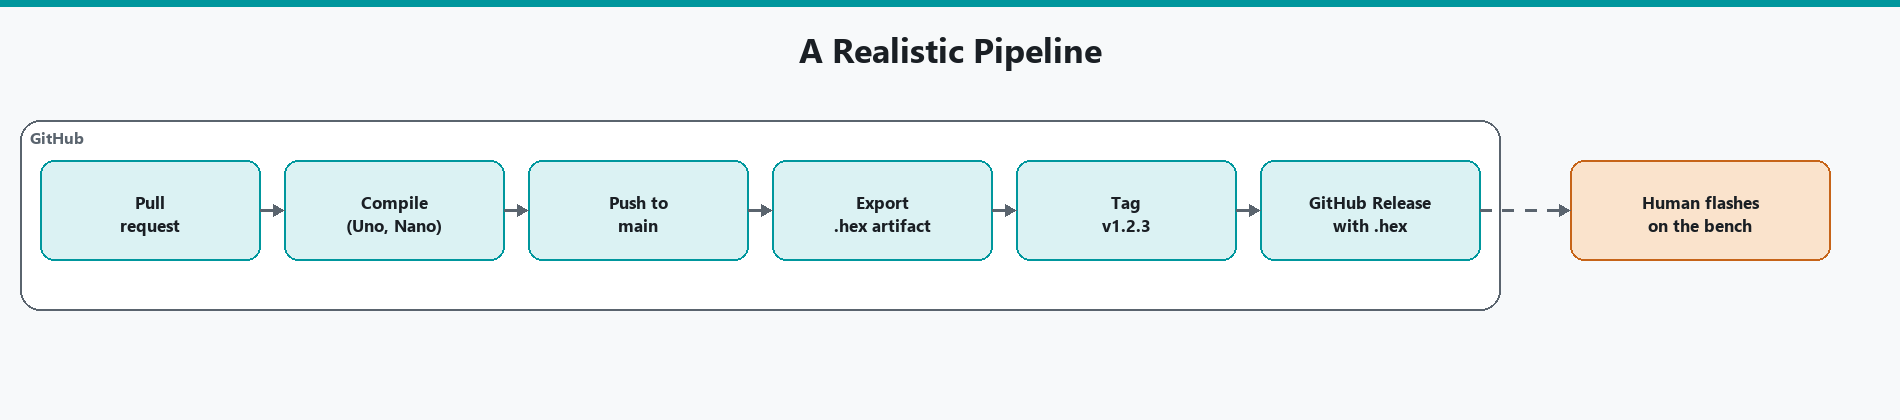
This article is that pipeline with GitHub Actions and Arduino CLI. The GitHub Actions article in this folder is the compile-only starter. Part 3 of the Mastery Series is still the firmware you are gating.
Stage 1: compile is the gate
Keep the compile workflow from the previous article. Nothing merges to main if Uno (and Nano, if you care) fail to compile. That is already CI.
Add paths filters if the repo also has docs and you do not want a README typo to compile ESP32 for eight minutes:
on:
  pull_request:
    paths:                        # Only run when files under these paths change
      - "CliBlink/**"             # ** means "anything inside this folder"
      - "Dht22Bench/**"
      - ".github/workflows/**"    # Also re-run if the workflow itself changes
Stage 2: export binaries as artifacts
Locally:
# Compile, and also save the finished .hex files into CliBlink\build\
arduino-cli compile --fqbn arduino:avr:uno --export-binaries .\CliBlink
That writes under CliBlink\build\.... In Actions, using the raw CLI:
      - uses: arduino/setup-arduino-cli@v2

      - name: Install AVR core
        run: |
          arduino-cli core update-index
          arduino-cli core install arduino:avr

      - name: Compile and export
        run: arduino-cli compile --fqbn arduino:avr:uno --export-binaries ./CliBlink

      - uses: actions/upload-artifact@v4   # GitHub's official "save files from this run" Action
        with:
          name: cliblink-uno-hex           # Name shown in the Artifacts list
          path: CliBlink/build/**          # Everything the export step wrote
After the job, Actions → the run → Artifacts. A person downloads the hex and uploads with arduino-cli upload or IDE 2. That is delivery: the firmware file is named, dated, and tied to a git SHA (the unique ID of the exact commit it was built from).
compile-sketches can record size reports. If you use that Action, read its README for report paths instead of inventing --export-binaries on top unless you confirmed it passes cli-compile-flags.
Keep artifacts a few days, not forever, unless you have a compliance reason. GitHub's retention settings are in the repo.
Stage 3: more than one job
A small pipeline as three jobs:
- lint / format (optional).
arduino-cliis not a full C++ linter. Some people runarduino/arduino-linton library repos. For a sketch repo, compile with--warnings allis the practical lint. Treat warnings as failures only when the team agreed to that. - compile Uno.
- compile Nano (or ESP32),
needs: compile-unoonly if you want a chain. Usually they run in parallel in a matrix instead.
Do not add a "test" job that claims to run the sketch on GitHub-hosted hardware. There is no board. Unit-testing (automatically checking small pieces of code, such as a single function, against known answers) is possible for C++ that does not touch hardware registers, using a test harness that runs on a desktop. That is a different, larger project. Say you do not have on-target tests yet. Honesty beats a green job named test that only compiles.
Version your firmware so artifacts mean something
A pile of artifacts named CliBlink.ino.hex is hard to trust a month later. Give the firmware a version string that you print at boot and tie to the git tag. Then when a board misbehaves, one line in the Serial Monitor tells you exactly which build it is running.
// Bump this in the same commit you tag. The Serial banner proves which build
// is actually on the board, which is the first thing to check in any bug report.
const char FW_VERSION[] = "1.2.0";

void setup() {
  Serial.begin(115200);
  Serial.print(F("firmware v"));
  Serial.println(FW_VERSION);
}
It is a small discipline, but it turns an anonymous .hex file into something you can reason about.
A release workflow you can copy
Here is the "tag a release" option from above as a complete file. It runs only when you push a tag that starts with v, compiles, and attaches the hex file to a GitHub Release page where anyone can download it.
name: Release firmware

on:
  push:
    tags: ["v*"]            # Runs on tags like v1.2.0, never on ordinary pushes

permissions:
  contents: write           # Needed so the workflow may create a Release

jobs:
  release:
    runs-on: ubuntu-latest
    steps:
      - uses: actions/checkout@v4
      - uses: arduino/setup-arduino-cli@v2

      - name: Build
        run: |
          arduino-cli core update-index
          arduino-cli core install arduino:avr
          arduino-cli compile --fqbn arduino:avr:uno --export-binaries ./CliBlink

      - uses: softprops/action-gh-release@v2   # Creates the Release and uploads files
        with:
          files: CliBlink/build/**/*.hex
You trigger it from your PC by creating and pushing a tag:
# Marks the current commit as release 1.2.0, then sends that mark to GitHub.
# The push of the tag is what starts the workflow above.
git tag v1.2.0
git push origin v1.2.0
Flashing a downloaded artifact at the bench
Someone downloads the zip, unpacks it, and uploads without compiling anything. The CLI can upload straight from a folder of build output:
# --input-dir points at the exported build folder, so no sketch source or
# compiler is needed on this machine, only the CLI and the right core.
arduino-cli upload -p COM3 --fqbn arduino:avr:uno --input-dir .\build\arduino.avr.uno
That separation is the real payoff of this pipeline. The machine that builds and the machine that flashes no longer have to be the same one.
Stage 4: when does flashing happen?
Options, from safest to most machinery:
- Human on the bench. Download artifact,
arduino-cli upload --fqbn ... --port COMx. Default for makers. - Tag a release. On
pushofv1.2.3, compile, upload-artifact, and create a GitHub Release with the hex attached (softprops/action-gh-releaseor similar). Still a human flashes. - Self-hosted runner (your own computer registered with GitHub to run jobs) in the lab, with Linux USB permissions set up (udev rules and the
dialoutgroup) and a known COM device. A workflow canarduino-cli uploadthere. Label the runner. Protectmain. Know that a bad sketch can brick a device that is plugged in. I would not start here.
GitHub-hosted ubuntu-latest cannot be option three.
Make the compile check mandatory
A pipeline only protects main if the repository actually refuses broken changes. GitHub calls this a branch protection rule. In the repository settings, open Branches, add a rule for main, and turn on the option that requires status checks to pass before merging. Then pick your compile job from the list. From that moment, a pull request with a red X cannot be merged until someone fixes it.
For a solo project this can feel like overkill, since nobody is stopping you from merging anyway. I still turn it on, because it removes the temptation to merge "just this once" at the end of a long day. The point of automation is that it does not get tired, and neither does a rule that says no.
If the job name does not appear in the picker, the workflow has not run on that branch yet. Push a small change, let it finish once, and the check becomes selectable.
Secrets and extra URLs
ESP32 index URLs are public. Put them in the YAML. Private library tokens go in GitHub Secrets, then ${{ secrets.NAME }} in the workflow. Never commit a password for a board or a Cloud API key in a sketch that Actions will log.
A realistic first pipeline
For a TMWB-style sketch repo:
| Event | What runs |
|---|---|
| Pull request | Compile Uno (and Nano if the sketch claims both) |
Push to main |
Same compile, plus export hex artifact |
Git tag v* |
Compile, artifact, attach to a Release |
No auto-flash. No pretend tests. That is already more discipline than most Arduino GitHub repos.
Local same as CI
Run the same arduino-cli compile --fqbn ... on your PC before you push. CI should not be the first compiler you used that day. If local passes and CI fails, the usual causes are: missing lib install on the runner, different FQBN, or a file you never git added.
Wrap-up
An Arduino CI/CD pipeline is compile-on-every-PR, hex files saved as artifacts, optional releases, and flashing kept where there is a USB cable. Arduino CLI is the compiler in every stage. GitHub-hosted runners do CI and packaging. They do not replace the bench.
Start with the compile Action from the previous article. Add --export-binaries and upload-artifact when you want a file you can flash without rebuilding. Stop before auto-upload until you have a runner that owns the hardware on purpose.
Hack The World and Make Awesome.




