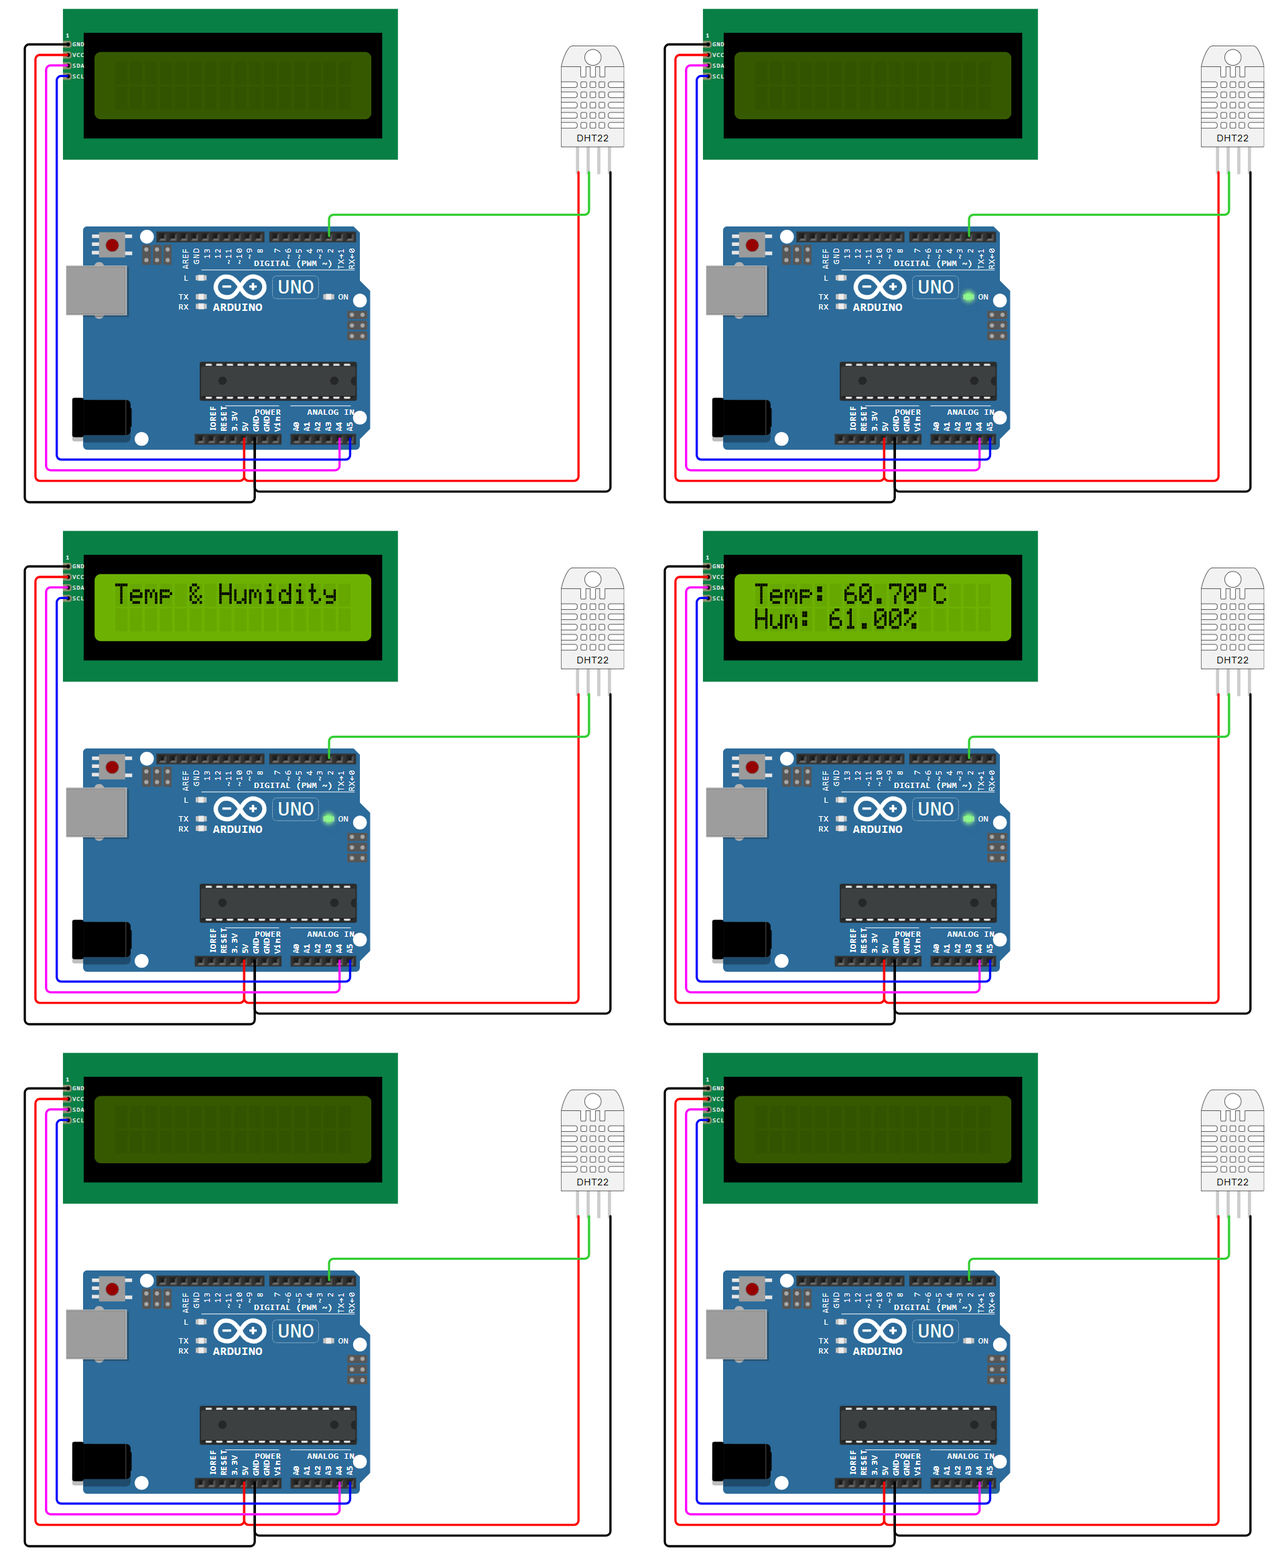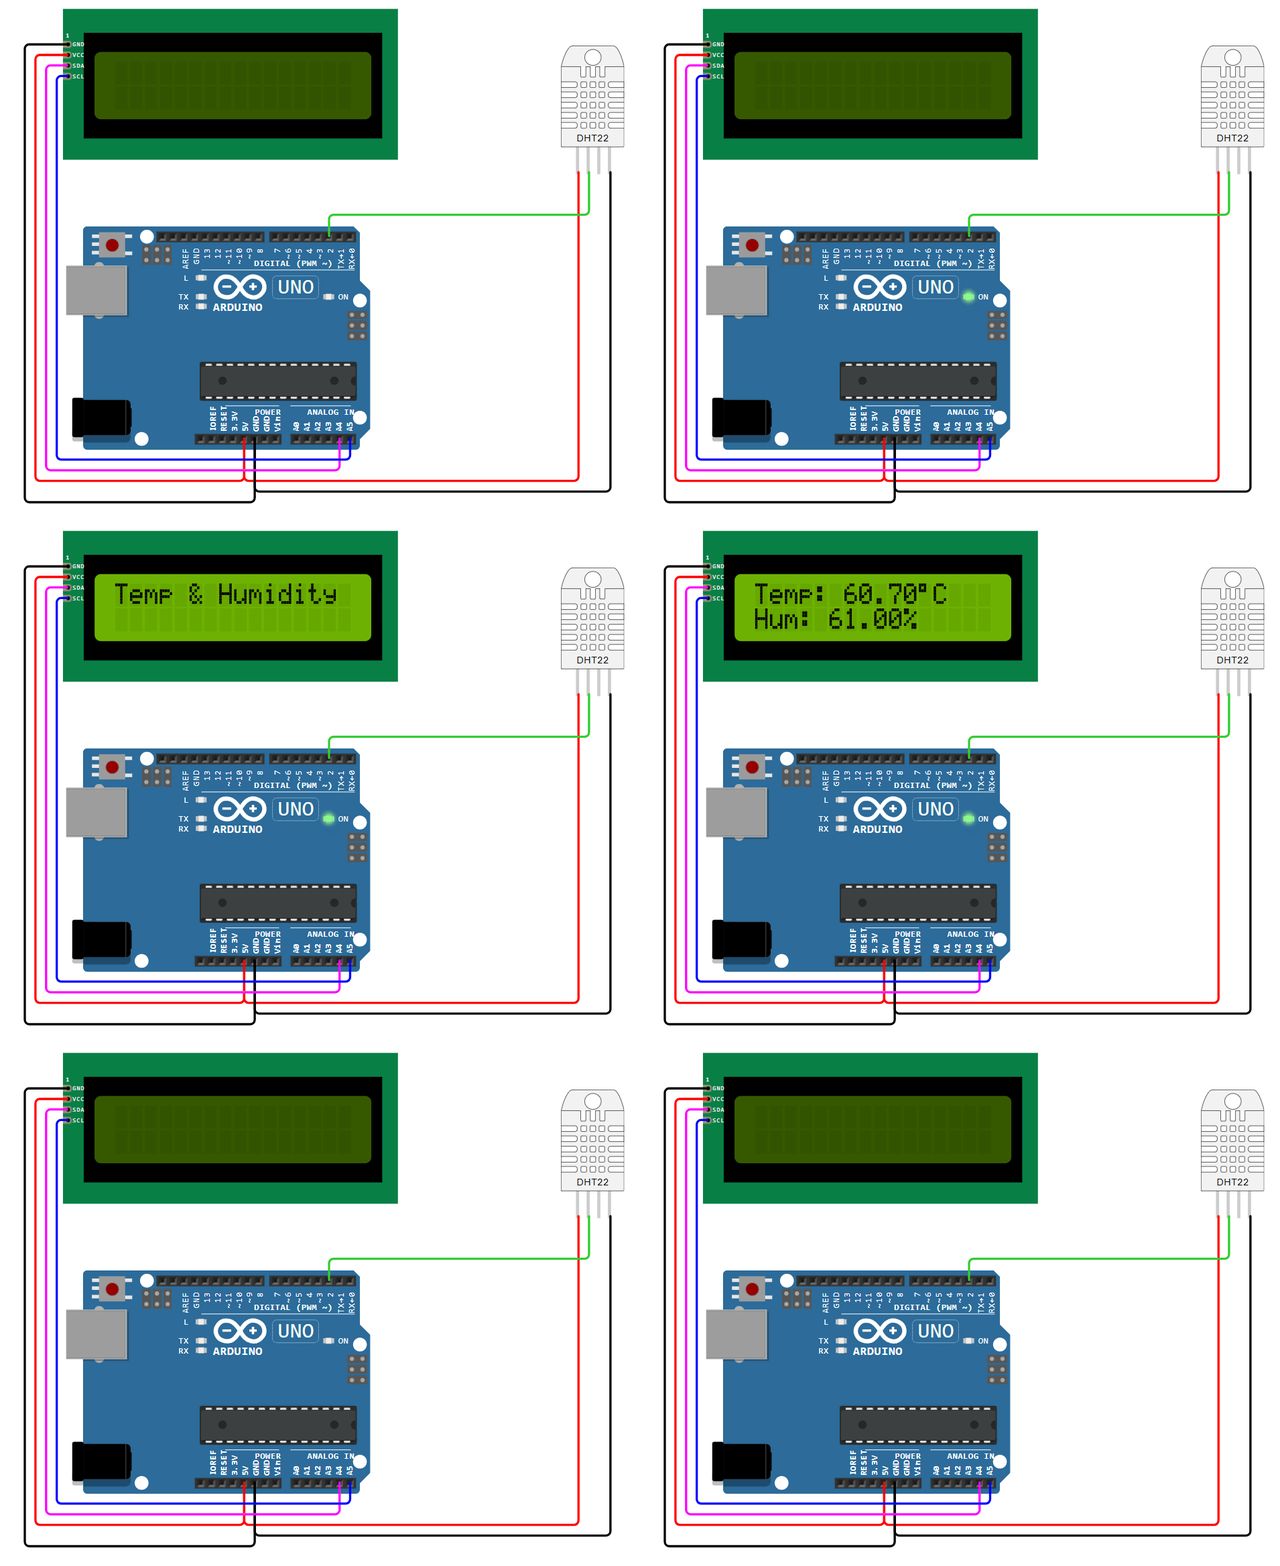
An Intuitive Environmental Monitoring Project
Environmental monitoring is one of the most practical applications for microcontrollers like Arduino. By tracking temperature and humidity, you can create everything from simple weather displays to complex climate control systems. In this project, we'll build a system that reads temperature and humidity data from a DHT22 sensor and displays it both through the Serial Monitor and on an LCD display.
Project Overview
We'll build a device that:
- Measures temperature and humidity using a DHT22 sensor
- Displays readings on the Serial Monitor
- Shows real-time data on a 1602 I2C LCD display
- Converts between Celsius and Fahrenheit
- Provides immediate visual feedback about environmental conditions
Bill of Materials
| Component | Description | Buy on Amazon | Buy on Temu | Buy on SparkFun | Buy on Seeed Studio |
|---|---|---|---|---|---|
| Arduino Uno | Standard microcontroller board | Amazon Link | Temu Link | SparkFun Link | Seeed Link |
| DHT22 Sensor | Temperature & humidity sensor | Amazon Link | Temu Link | Not yet available | Seeed Link |
| 1602 I2C LCD Display | 16×2 character display with I2C adapter | Amazon Link | Temu Link | Not yet available | Seeed Link |
| 10kΩ Resistor | Pull-up resistor for DHT22 (if needed) | Amazon Link | Temu Link | SparkFun Link | Seeed Link |
| Breadboard & Jumper Wires | For prototyping connections | Amazon Link | Temu Link | SparkFun Link | Seeed Link |
Wiring Instructions
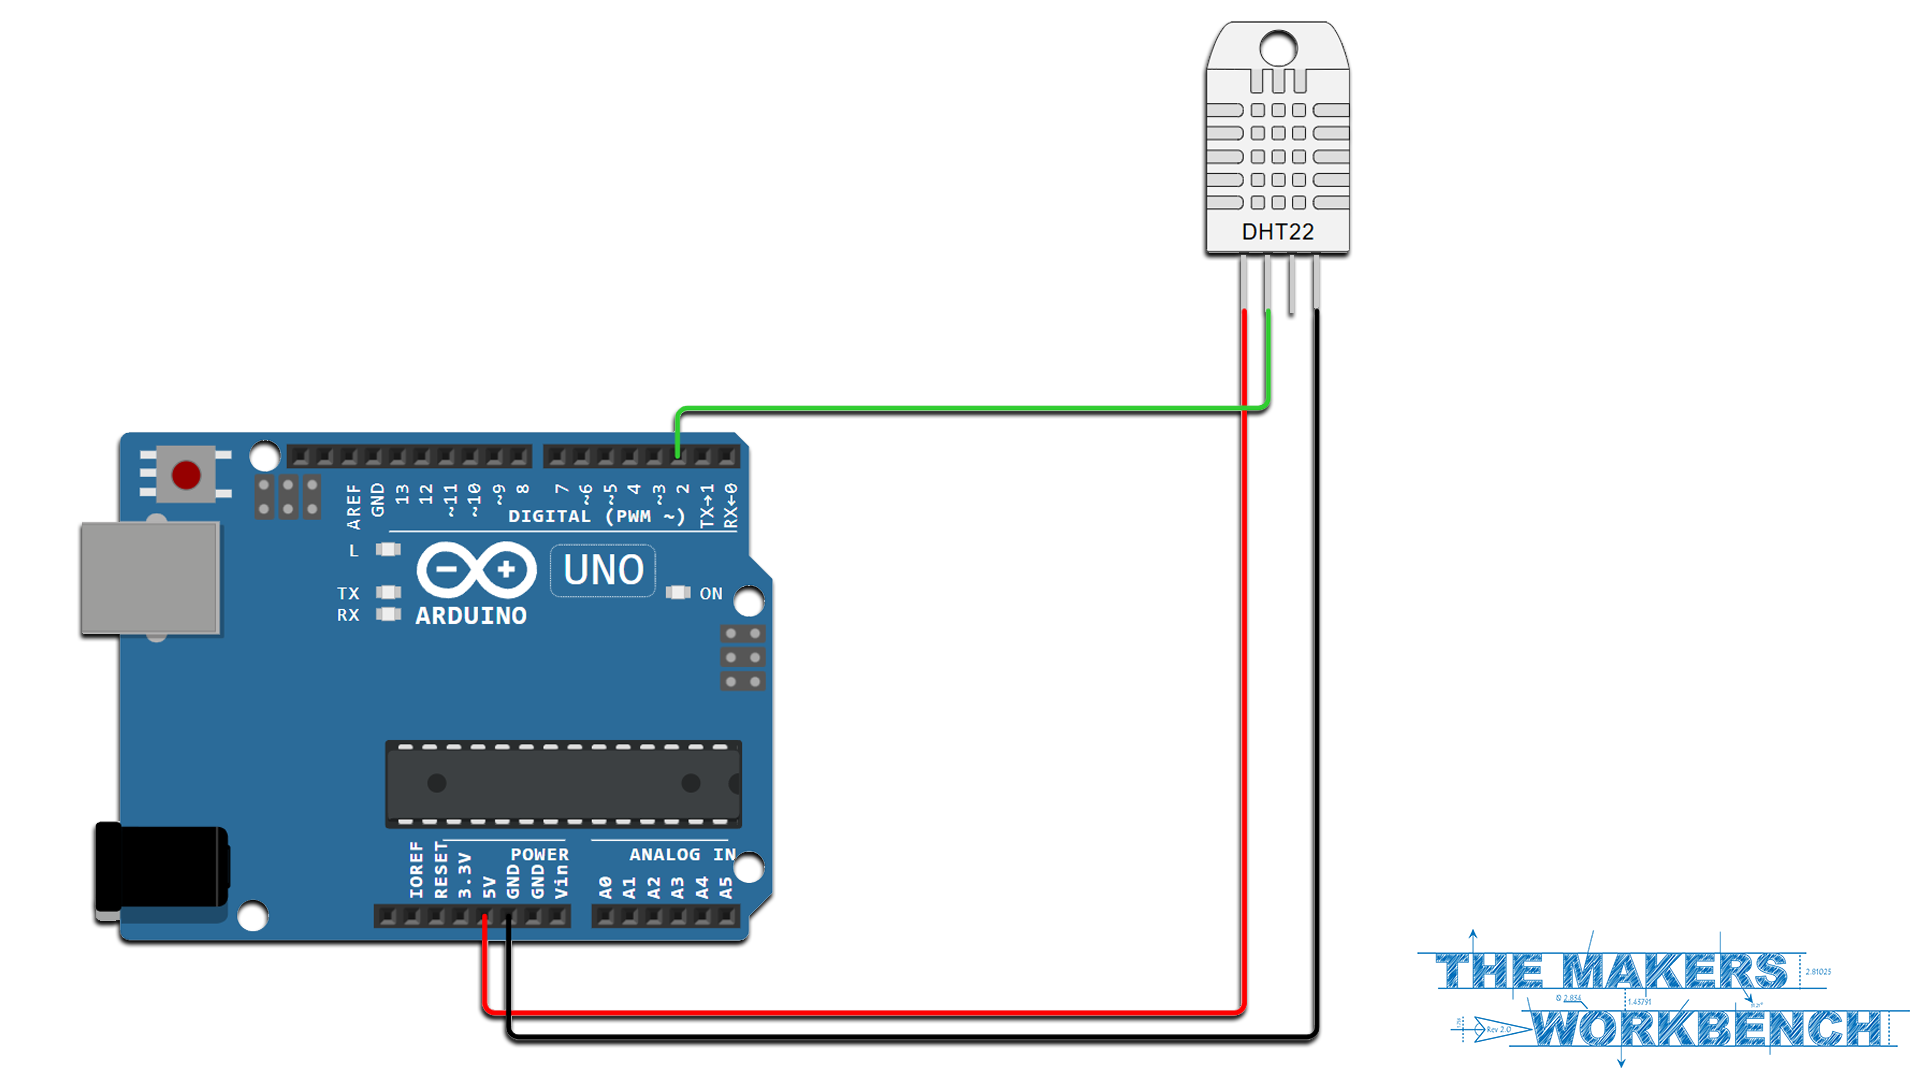
Basic DHT22 Connection
| Component | Connection Point |
|---|---|
| DHT22 VCC | Arduino 5V |
| DHT22 GND | Arduino GND |
| DHT22 DATA | Arduino Digital Pin 2 |
| 10kΩ Resistor | Between VCC and DATA (if needed) |
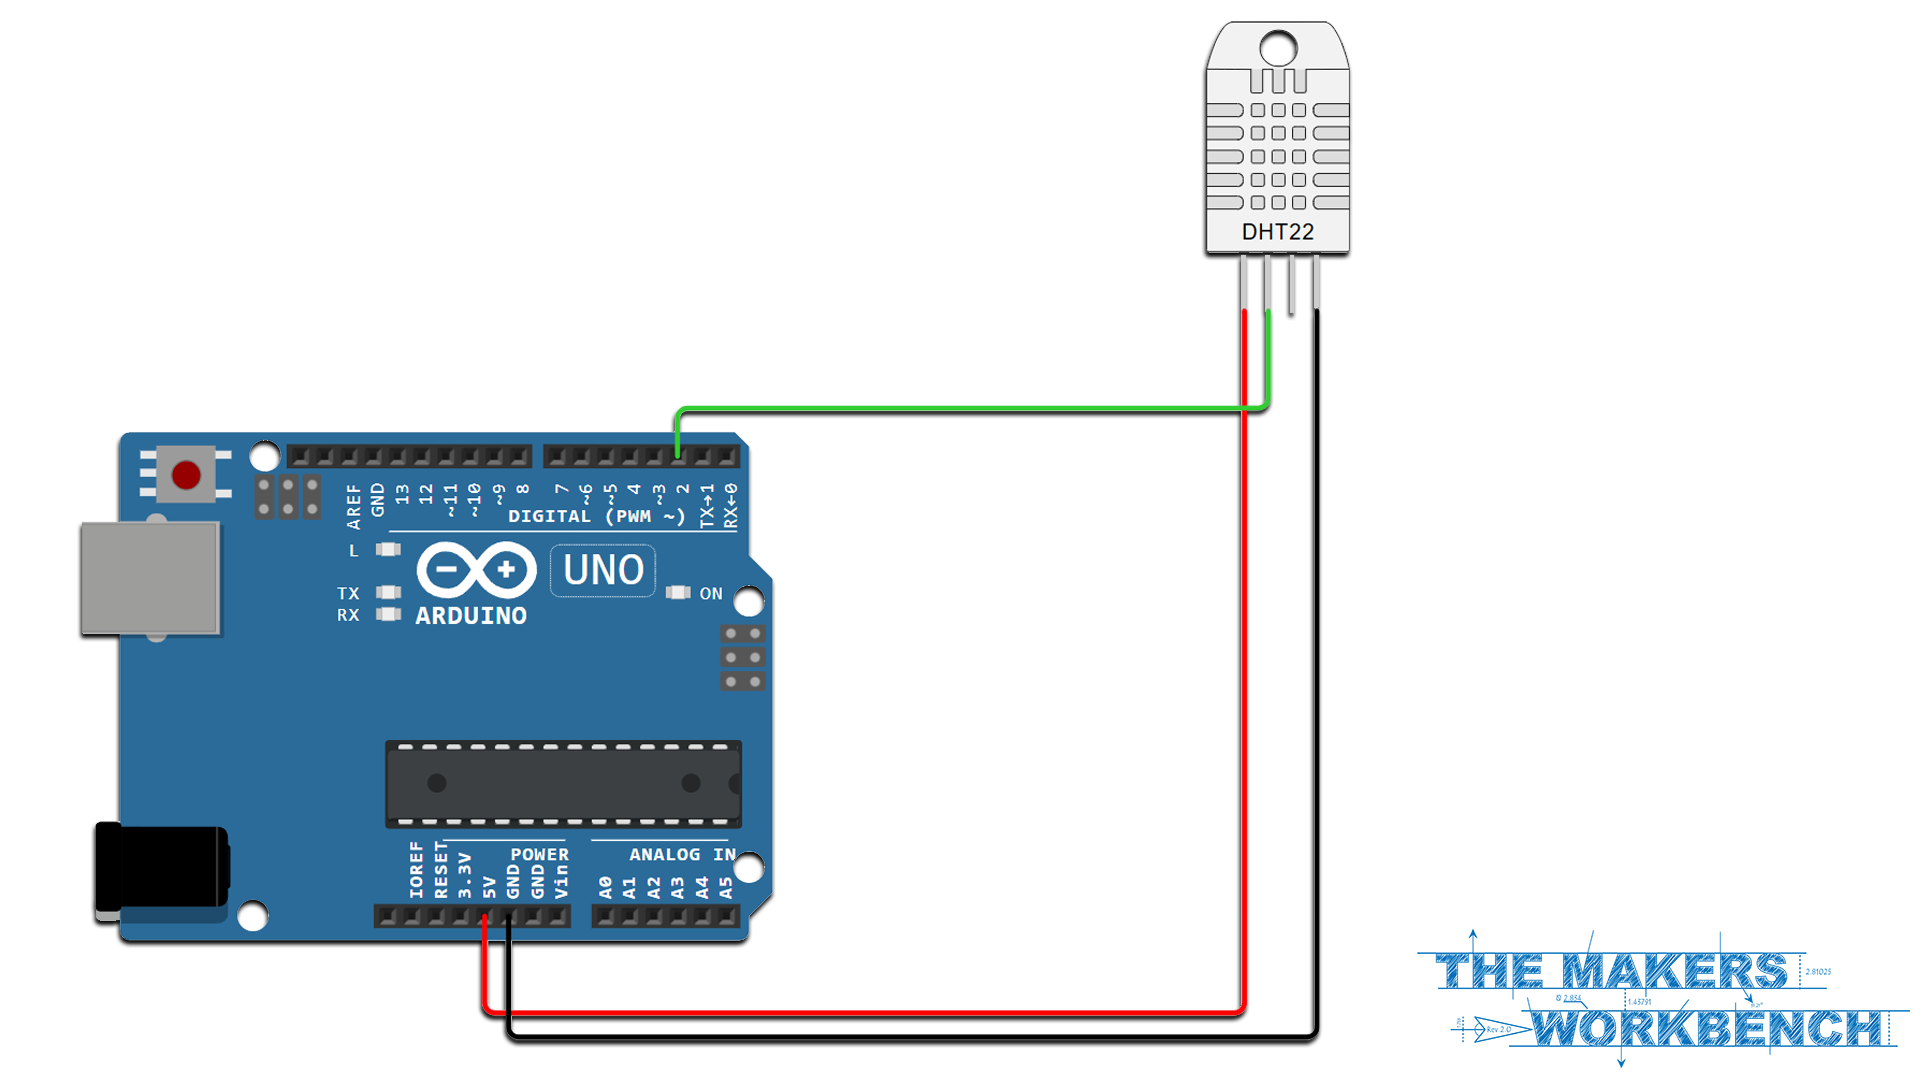
IMPORTANT: Some DHT22 modules come with built-in pull-up resistors and filtering capacitors. If you're using a raw sensor without these components, you'll need to add the 10kΩ pull-up resistor yourself.
Required Libraries
Before starting, install these libraries through the Arduino Library Manager:
Core Project: Basic Implementation
Let's start with a simple sketch that reads the DHT22 and outputs to the Serial Monitor:
#include <DHT.h>

// Pin and sensor type definitions
#define DHTPIN 2      // Digital pin connected to the DHT sensor
#define DHTTYPE DHT22 // DHT 22 (AM2302)

// Initialize DHT sensor
DHT dht(DHTPIN, DHTTYPE);

// Timing variables (all in milliseconds)
unsigned long previousReadTime = 0;
const long readInterval = 10000; // Read sensor every 10 seconds

void setup() {
    Serial.begin(9600);
    Serial.println(F("DHT22 Temperature & Humidity Monitor"));
    dht.begin();
}

void loop() {
    unsigned long currentMillis = millis();
    if (currentMillis - previousReadTime >= readInterval) {
        previousReadTime = currentMillis;
        readSensor();
    }
}

void readSensor() {
    float humidity     = dht.readHumidity();
    float temperatureC = dht.readTemperature();

    if (isnan(humidity) || isnan(temperatureC)) {
        Serial.println(F("Failed to read from DHT sensor!"));
        return;
    }

    float temperatureF = convertCtoF(temperatureC);

    Serial.print(F("Humidity: "));
    Serial.print(humidity);
    Serial.print(F("% | "));
    Serial.print(F("Temperature: "));
    Serial.print(temperatureC);
    Serial.print(F("°C / "));
    Serial.print(temperatureF);
    Serial.println(F("°F"));
}

// Convert Celsius to Fahrenheit
float convertCtoF(float celsius) {
    return celsius * 9.0 / 5.0 + 32.0;
}
This basic implementation:
- Reads temperature and humidity every 10 seconds
- Displays the values in both Celsius and Fahrenheit
- Uses non-blocking code with
millis()timing - Includes error checking for failed sensor readings
Understanding Temperature Conversion
The conversion between Celsius and Fahrenheit follows a simple mathematical formula:
- °F = (°C × 9/5) + 32
In our code, we implement this as:
float convertCtoF(float celsius) {
    return celsius * 9.0 / 5.0 + 32.0;
}
We use floating-point arithmetic for accuracy and separate the function for clarity and reusability. This modular approach makes the code more maintainable and easier to understand.
Project Expansion: Adding an I2C LCD Display
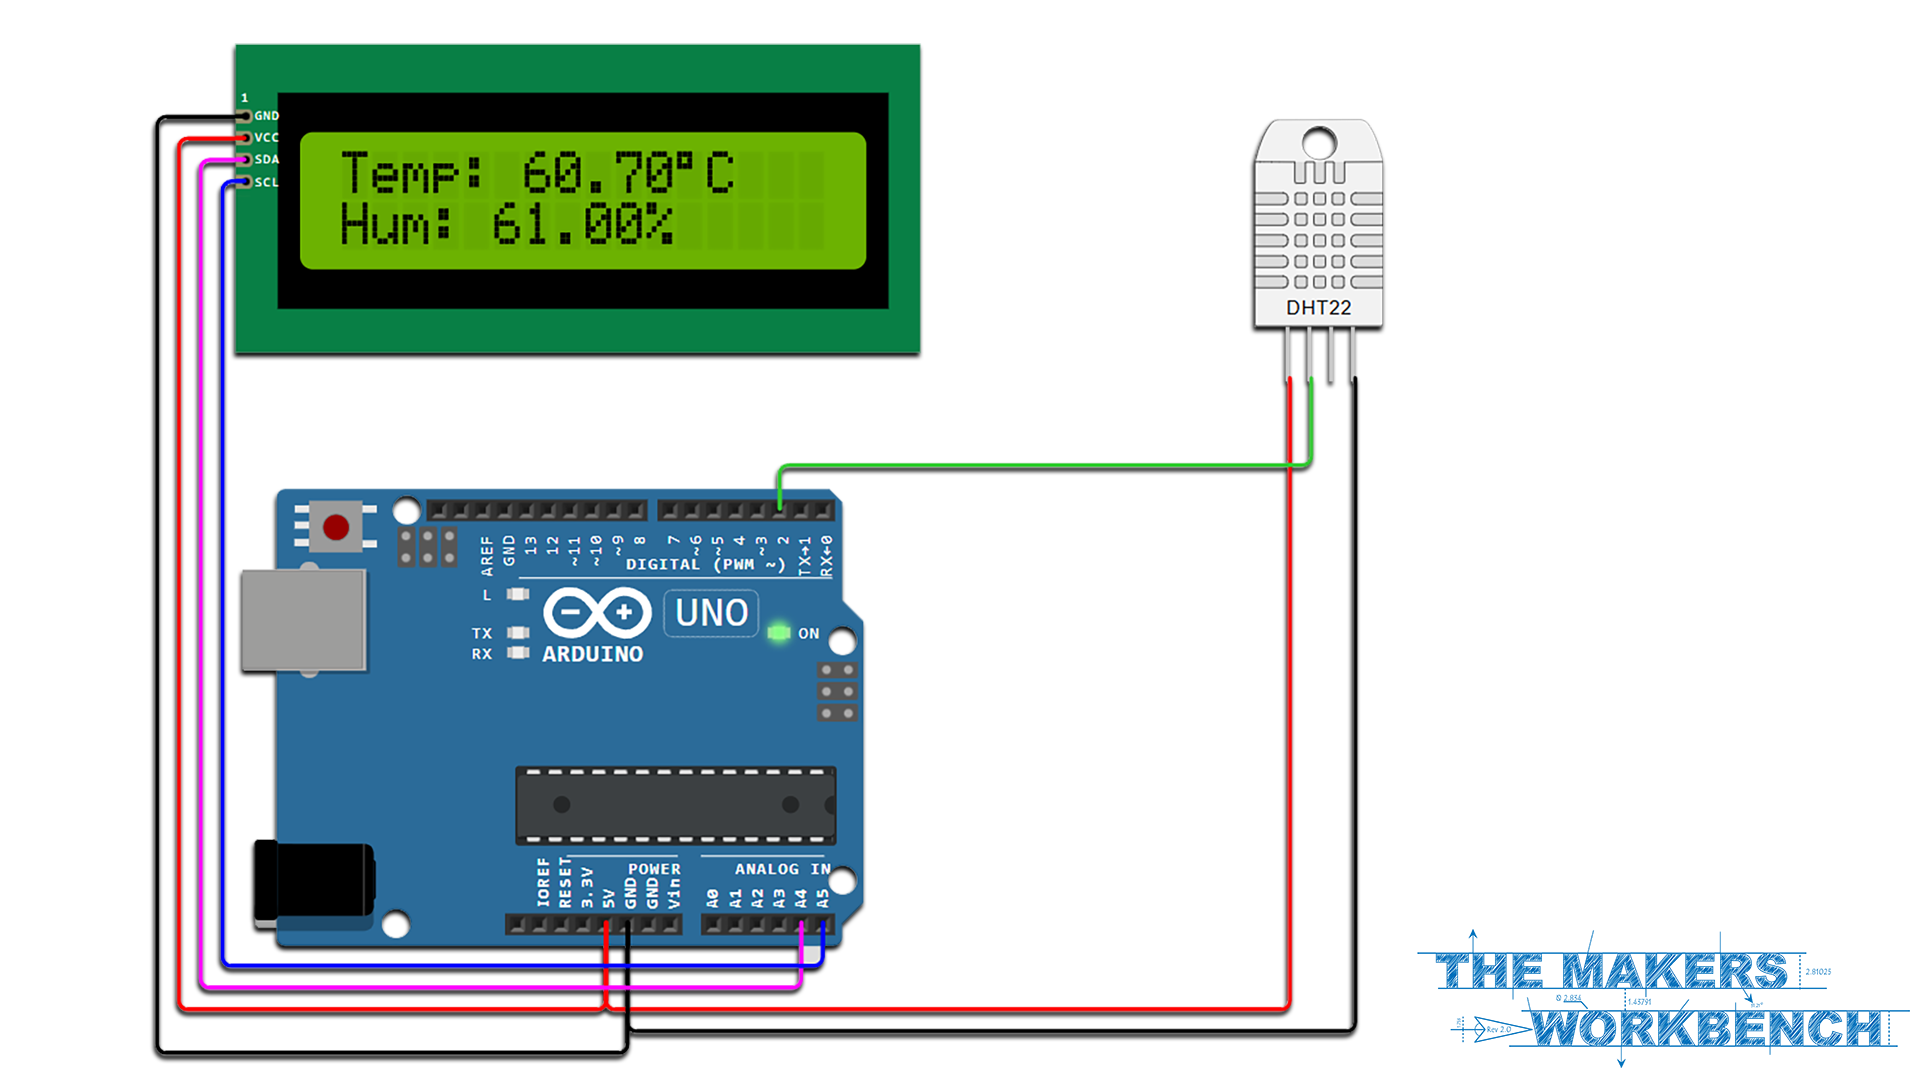
Now, let's enhance our project by adding a 1602 I2C LCD display to show the readings without needing a computer connection.
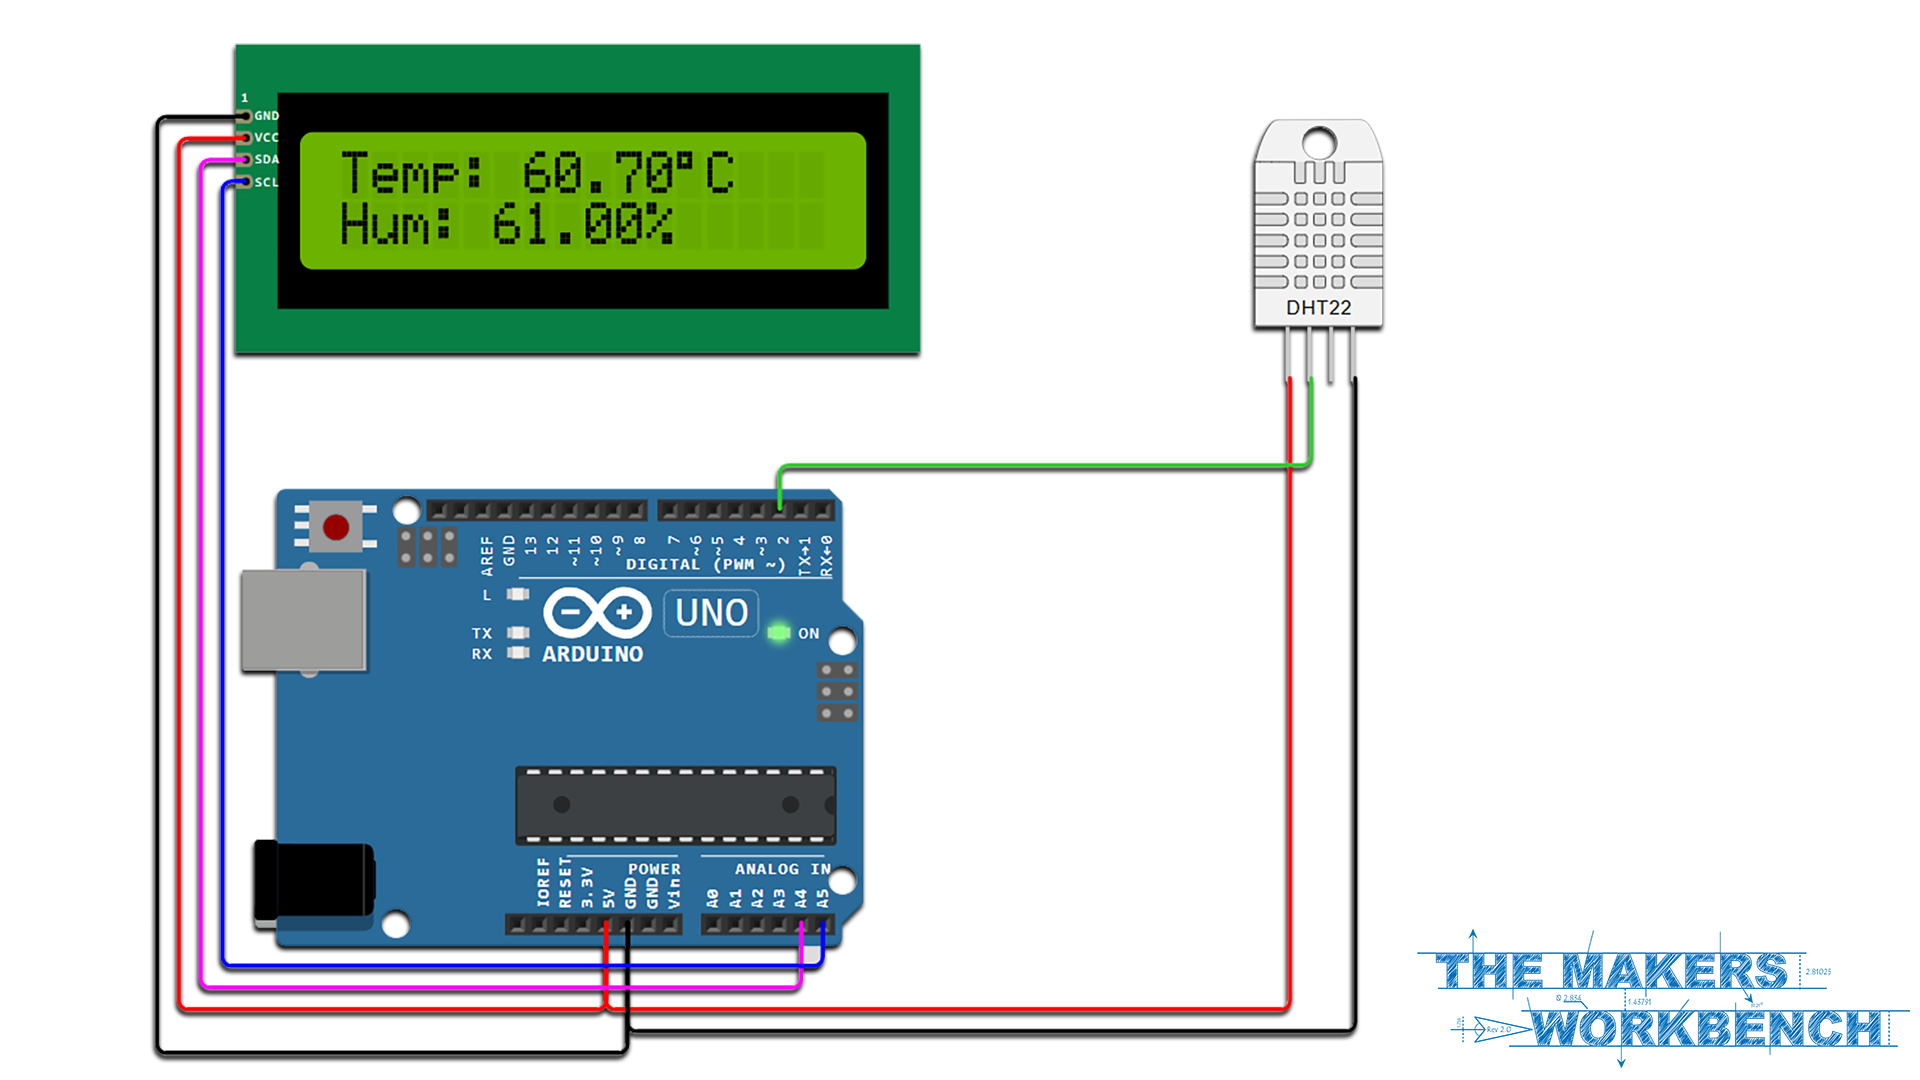
LCD Wiring
| Component | Connection Point |
|---|---|
| LCD VCC | Arduino 5V |
| LCD GND | Arduino GND |
| LCD SDA | Arduino A4 |
| LCD SCL | Arduino A5 |
Required Additional Library
Lab Project
Enhanced Code with LCD Display
#include <Wire.h>
#include <LiquidCrystal_I2C.h>
#include <DHT.h>

// Pin and sensor type definitions
#define DHTPIN 2      // Digital pin connected to the DHT sensor
#define DHTTYPE DHT22 // DHT 22 (AM2302)

// Initialize DHT sensor
DHT dht(DHTPIN, DHTTYPE);

// Initialize LCD — address may vary depending on your I2C module
// Common addresses are 0x27 and 0x3F
LiquidCrystal_I2C lcd(0x27, 16, 2);

// Timing variables (all in milliseconds)
unsigned long previousReadTime = 0;
const long readInterval = 10000; // Read sensor every 10 seconds

void setup() {
    Serial.begin(9600);
    Serial.println(F("DHT22 Temperature & Humidity Monitor with LCD"));

    dht.begin();
    Wire.begin();

    lcd.init();
    lcd.backlight();

    lcd.setCursor(0, 0);
    lcd.print("Temp & Humidity");
    lcd.setCursor(0, 1);
    lcd.print("Monitor v1.0");
    delay(2000);
    lcd.clear();
}

void loop() {
    unsigned long currentMillis = millis();
    if (currentMillis - previousReadTime >= readInterval) {
        previousReadTime = currentMillis;
        readSensor();
    }
}

void readSensor() {
    float humidity     = dht.readHumidity();
    float temperatureC = dht.readTemperature();
    float temperatureF = convertCtoF(temperatureC);

    if (isnan(humidity) || isnan(temperatureC)) {
        Serial.println(F("Failed to read from DHT sensor!"));
        lcd.clear();
        lcd.setCursor(0, 0);
        lcd.print("Sensor Error!");
        return;
    }

    Serial.print(F("Humidity: "));
    Serial.print(humidity);
    Serial.print(F("% | "));
    Serial.print(F("Temperature: "));
    Serial.print(temperatureC);
    Serial.print(F("°C / "));
    Serial.print(temperatureF);
    Serial.println(F("°F"));

    updateLCD(temperatureC, temperatureF, humidity);
}

// Convert Celsius to Fahrenheit
float convertCtoF(float celsius) {
    return celsius * 9.0 / 5.0 + 32.0;
}

// Update the LCD display
void updateLCD(float tempC, float tempF, float humidity) {
    lcd.clear();

    lcd.setCursor(0, 0);
    lcd.print(tempC, 1);
    lcd.print((char)223); // Degree symbol
    lcd.print("C ");
    lcd.print(tempF, 1);
    lcd.print((char)223);
    lcd.print("F");  // e.g. "23.5°C 74.3°F" fits 16 columns

    lcd.setCursor(0, 1);
    lcd.print("RH ");
    lcd.print(humidity, 1);
    lcd.print("%");
}
Finding Your I2C LCD Address
If your LCD isn't working with the default address, check out our detailed guide: Finding I2C Device Addresses: The Arduino I2C Scanner Guide to help you identify the correct address for your display.
Troubleshooting Tips
Problem: No readings or "Failed to read from DHT sensor!"
- Solution: Check wiring connections and ensure the pull-up resistor is in place if needed
- Solution: Make sure the DHT22 pin definition in the code matches your wiring
Problem: LCD not displaying anything
- Solution: Verify the I2C address using the scanner sketch from our I2C guide
- Solution: Check SDA and SCL connections
- Solution: Ensure the I2C LCD library is properly installed
Problem: Inaccurate temperature readings
- Solution: Keep the sensor away from heat sources, including the Arduino itself
- Solution: Allow 1-2 seconds between readings to get stable measurements
- Solution: Consider calibrating the sensor if you have a reference thermometer
Project Expansions
1. Add Data Logging
Expand your project to record environmental data over time by adding an SD card module to log readings with timestamps.
2. Add Internet Connectivity
Connect your environmental monitor to the internet to track data remotely or receive alerts by upgrading to an ESP8266 or ESP32 board.
3. Create a Multi-Sensor Network
Build a network of sensors throughout your home or workspace by implementing a multi-node sensing system.
4. Add Visual Indicators
Enhance your display with LED status indicators that visually represent environmental conditions.
Performance Considerations
The DHT22 sensor has some limitations to keep in mind:
- Sampling Rate: The DHT22 can only provide new readings every 2 seconds
- Accuracy: ±0.5°C for temperature and ±2-5% for humidity
- Range: Temperature: -40 to 80°C, Humidity: 0-100% RH
This project uses approximately:
- Program storage: ~9KB (of 32KB available on Arduino Uno)
- SRAM usage: ~500 bytes (of 2KB available)
Conclusion
This project provides a solid foundation for environmental monitoring with Arduino. By combining the DHT22 sensor with an I2C LCD display, we've created a standalone device that provides immediate visual feedback about temperature and humidity conditions.
The modular approach to our code, with separate functions for sensor reading, display updates, and temperature conversion, makes it easy to expand the project with additional features as your skills develop.
Whether you're monitoring a greenhouse, tracking home comfort levels, or creating an educational tool, this environmental monitor provides practical utility while introducing fundamental concepts in sensor integration and data visualization.
Happy Making!