

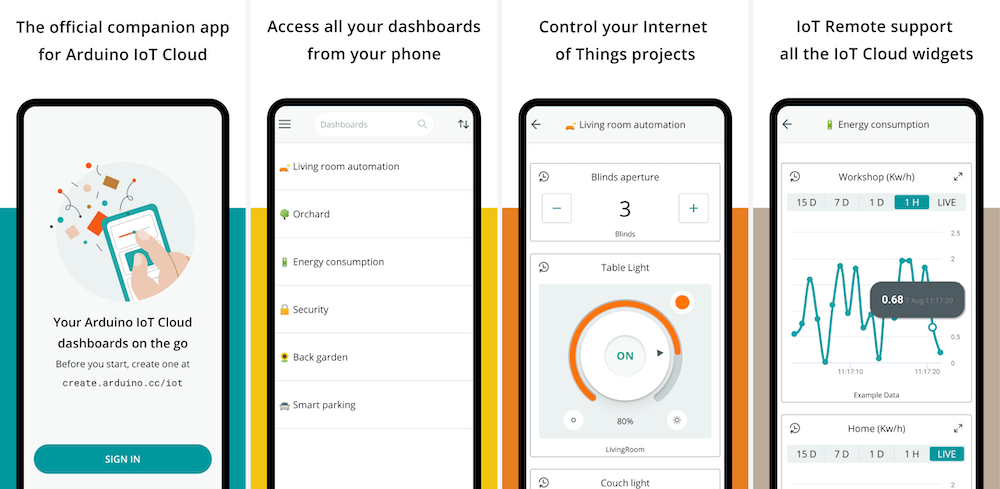
The useful version of "I want to see my project on my phone" is not another IDE. It is a dashboard you already built in Arduino Cloud, opened in an app that does not make you sit at the laptop.
Arduino IoT Remote is that app. Arduino describes it as the mobile companion to Arduino Cloud: access, monitor, and control Cloud dashboards from Android or iOS (phones and, in current versions, tablets). It can also publish the phone's own sensors (GPS, light, IMU, and whatever that model exposes) into Cloud variables. IMU means inertial measurement unit: the accelerometer, gyro, and related motion sensors in the phone.
It is not a code editor. It does not compile sketches. It does not replace Arduino IDE 2. If you do not have an Arduino Cloud project, you do not need this app yet.
This article is the phone side: what IoT Remote is, how Cloud pieces fit (Thing, variable, dashboard, widget), what the app cannot do, Phone as Device, and a project path I would build: a Wi-Fi Arduino, a DHT22 temperature and humidity sensor, a Cloud dashboard, then IoT Remote. The DHT22 wiring and library work is already on this site in Reading Temperature and Humidity with Arduino and the DHT22. This page is how that data leaves the bench.
You need a Cloud-capable board for the Arduino half: Uno R4 WiFi, Nano ESP32, a supported ESP32, and the rest of Cloud's device list. A USB-only classic Uno cannot talk to Cloud by itself. Part 2 is the board-family discussion if you do not own Wi-Fi hardware yet.
What is Arduino IoT Remote?
You build dashboards in a browser at app.arduino.cc. A dashboard is a page of widgets (gauges, switches, charts, maps) bound to Cloud variables. A Cloud variable is a named value that exists on the board and in the Cloud, and stays in sync while the board is connected. Those variables live inside a Thing, which is Cloud's virtual twin of a physical setup: device, variables, sketch, network settings.
IoT Remote logs in with the same Arduino account and shows those dashboards. You can flip a switch widget on the phone and the boolean on the board changes. You can watch a temperature gauge without opening a laptop. Arduino's Play Store listing (updated through 2026) still describes it that way: monitor and control dashboards with the widget set Cloud already has (switch, gauge, chart, map, scheduler, and the rest).
The app is free to download. Arduino Cloud itself has free and paid plans. I am not going to recap plan limits here because they change. Check Cloud's plans page when a feature is greyed out. Background "phone as a device" (the phone keeping sensors streaming with the screen off) is one of the pieces that has historically sat on a paid plan. Viewing a dashboard you already own is the free-app job.
That split, free app versus paid Cloud tier, trips people up because it is easy to blame the wrong half when something is greyed out. IoT Remote itself has no separate subscription; downloading it and logging in costs nothing regardless of which Cloud plan your account has. What changes with plan level is what Arduino Cloud lets your account do underneath the app: how many Things you can create, how much data history you can keep, whether background phone-sensor streaming is unlocked. A feature missing in the app is almost always a Cloud plan limit showing through, not the app itself asking for money.
Create Agent, Cloud Editor, and OTA updates are Cloud-on-the-computer (or in the browser). IoT Remote does not replace them. It is the pocket screen.
What the app cannot do
Arduino's own docs and FAQ-style notes are consistent on this: you create dashboards in the browser, not in the phone app. The phone is for viewing, controlling, and (if you enable it) contributing phone-sensor data.
You also cannot:
-
Write or upload the board's sketch from IoT Remote (use Cloud Editor, IDE 2, or the CLI).
-
Invent Cloud variables only on the phone. Variables are created in the Thing, in the browser.
-
Talk to a board that is not in Arduino Cloud. A USB serial project in IDE 2 has nothing for this app to show.
If the app is empty after login, you do not have a dashboard yet, or you are in the wrong Cloud Space / account (a Space is Cloud's name for a separate workspace, such as a personal one and a school or company one under the same login). Build the dashboard on a computer first.
Phone as Device
IoT Remote can turn the phone into a Cloud device. Arduino's getting-started guide: open settings, Phone as Device, finish the wizard. The app creates a Thing and a dashboard named after you and the phone. Widgets show GPS, accelerometer, compass, light, and whatever that phone has.
Those values are Cloud variables. You can synchronize a phone variable with a variable on another Thing. Arduino's example is a phone compass driving a servo on a board. Synchronization means: when this variable changes, that one follows, while both stay connected.
This is a real feature. It is also how people start a Cloud project without a Wi-Fi board yet. The phone is the sensor. Later you link a board.
Gotcha: phone sensors depend on the handset and on permissions. GPS will not update if you denied location. "IMU" on a cheap tablet may be a subset of what a flagship phone has. Trust the dashboard that appeared after the wizard, not a generic sensor list from a blog.
Gotcha: Phone as Device is not the same as viewing a dashboard. You can use IoT Remote for months as a dashboard viewer and never enable phone sensors. Enable it when you want the phone in the system, not because the setup wizard looks mandatory.
A project: temperature on the phone
The project I would build to learn IoT Remote is small on purpose.
Hardware
-
A Cloud-supported Wi-Fi board (Uno R4 WiFi is the Arduino-shaped example. A Nano ESP32 or a supported ESP32 module also works.)
-
DHT22 temperature and humidity sensor, wired as in the DHT22 article (data pin, 3.3 V or 5 V per that board, ground, pull-up as that article specifies)
-
USB cable for the first upload
-
Wi-Fi you know the password to
Cloud, on a computer
- Create or log into Arduino Cloud.
- Add a device (the Wi-Fi board). Finish the network credentials when Cloud asks.
- Create a Thing. Add two Cloud variables, for example
temperature(float, read-only) andhumidity(float, read-only). Read-only means the dashboard displays them. The board writes them. You do not type them on the phone. - Let Cloud generate the sketch stub. It will include
thingProperties.handArduinoCloud.update()inloop(). That call is how variables stay in sync. If you delete it, the dashboard dies while the sketch still "runs." - Add the DHT22 read in
loop(), using the library and timing from the DHT22 article. Assign the results to the Cloud variables. Do not calldelay(10000)if Cloud's connection needs regularArduinoCloud.update(). Use amillis()-based interval so you read the sensor every few seconds without blocking the Cloud client. Part 4 of the Mastery Series is the timing pattern. If you have not read it, the short version: storelastRead, and only read the DHT whenmillis() - lastReadis large enough. The Arduino Cloud complete guide in this cluster has the full commented sketch for exactly this project. - Upload from the Cloud Editor (needs Create Agent on the PC for USB) or copy the Thing sketch into IDE 2 if that is your habit. First upload is usually USB. Later, if the board supports OTA (over-the-air: upload over the network), you can skip the cable.
- Create a dashboard. Add a gauge for temperature, a gauge or percentage widget for humidity, maybe a chart. Link each widget to the matching variable. Use Cloud's mobile layout preview if you want to see how cramped the phone view will be.
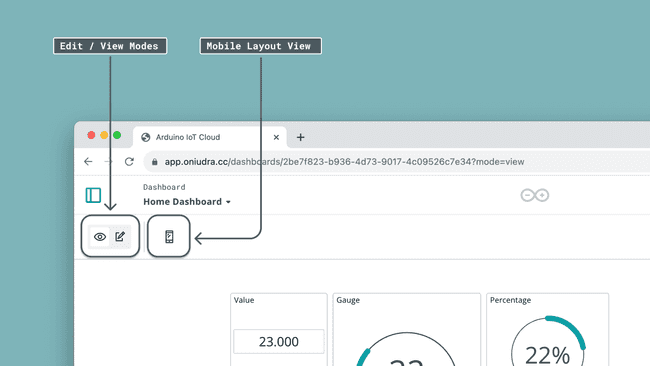
Image: Arduino
Phone
- Install IoT Remote from the App Store or Google Play. The Cloud dashboard product page and Play listing both point at this app. Older "Create Editor" store entries are a different product.
- Log in with the same Arduino account.
- Open the dashboard. If the board is online, the gauges should move when the room changes (hold the DHT22, or breathe on it). If they sit at zero, the Thing is not updating: board offline, wrong Wi-Fi, sketch not calling
ArduinoCloud.update(), or variables never assigned.
That is the whole loop. It is worth being clear about who did what, because it helps when something breaks. The board read the DHT22 and sent the numbers to Cloud. Cloud stored them in the Thing's variables. IoT Remote only displayed what Cloud already had.
Adding a switch later
So far the phone can only watch. Adding a switch lets it change something on the board, too.
Add a boolean Cloud variable, fanOn or ledOn, as read/write. Put a switch widget on the dashboard. In the sketch, digitalWrite a pin from that variable. Cloud generates an empty function for each read/write variable (for ledOn it is onLedOnChange()), and that function is the natural place to put the digitalWrite. On the phone, flip the switch. If the pin does not change, the variable is not linked, or the sketch is not reading it each loop() after ArduinoCloud.update().
Do this second, not first. Prove the DHT22 path so you trust the dashboard before you add an output that could sit on a relay.
Notifications
Arduino Cloud supports triggers: a rule that fires when a variable crosses a threshold (email, webhook, and, in current IoT Remote versions, a push path Arduino has been rolling out). Set those in the browser. The phone is where you feel them if push is enabled for your plan.
A trigger is not IoT Remote inventing an alarm. It is Cloud watching a variable. Configure it when temperature above a number should bother you. Do not hunt for a "set alarm" button only in the app. The evaluation happens in Cloud whether or not IoT Remote is even open on your phone at that moment, which is exactly why it can wake you up: it never depended on the app being in the foreground to notice the threshold was crossed.
What "online" means on the phone
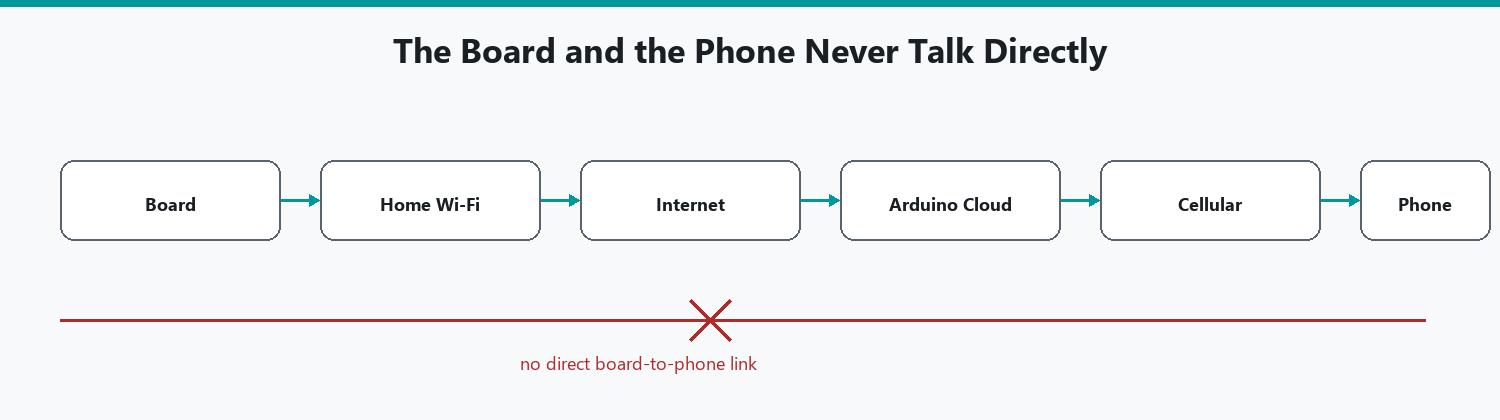
The board has to reach Arduino Cloud on the network. Your phone has to reach Arduino Cloud on cellular or Wi-Fi. They do not talk to each other over Bluetooth in this product. If the greenhouse board is on Wi-Fi and your phone is on cellular data (LTE or 5G) in the driveway, both are going through Cloud. If Cloud is unreachable, the gauges freeze on the last value the app has, or they show the device offline. That is not IoT Remote failing as an editor. That is the network path.
Keep the board's Wi-Fi credentials in the Thing, not in a sketch you only tested on USB. A board that prints beautiful DHT22 numbers over Serial and never joined Wi-Fi will never move a phone gauge.
Tablets run a larger layout of the same dashboards. Arduino shipped a native tablet version of IoT Remote (v3) so you are not pinching a phone UI on an iPad. You still create the dashboard in the browser. The tablet is a bigger viewer. Multi-page dashboards (Cloud added pages on the web) show up in the app as page switching. Build pages on the computer. Flip them on the phone.
Choosing the right widget
Cloud offers more widget types than the temperature project above uses, and picking the wrong one is a common first mistake, not because it breaks anything but because it makes a dashboard harder to actually read at a glance.
A gauge is right for a single number with a meaningful range, temperature, humidity, battery percentage, where seeing "close to the top" matters as much as the exact digits. A value or percentage widget is a plainer choice for the same kind of number when you just want the digits without a dial. A chart is for watching a number change over time, worth adding once you care whether the greenhouse has been climbing all afternoon rather than just what it reads right now; a gauge alone cannot answer that question no matter how often you refresh it. A switch or push button is for a boolean the phone should control, a light or a relay. A scheduler widget lets you set times for a read/write variable to change on its own, useful for "turn the lights on at 6pm" without writing that logic into the sketch yourself, since Cloud handles the timing server-side. A map widget expects location data, most naturally the GPS variables Phone as Device already produces, and is overkill for anything that never moves.
The mistake worth avoiding specifically: stacking a dozen gauges on one dashboard because gauges were the first widget you learned. A dashboard with too many same-shaped widgets is no easier to read on a phone screen than a wall of numbers would be. Mix the type to the job. Group by page if the project has more than about half a dozen values worth watching, since Cloud's multi-page dashboards exist exactly for that.
Sharing a dashboard with someone else
A common next step, once the temperature project is running, is wanting a family member or a housemate to see it too without handing them your Arduino account password. Arduino Cloud supports sharing a dashboard, generating a link (or, on some plans, inviting a specific email) that lets someone view the dashboard, and in some cases control read/write widgets, without creating a Thing of their own or needing edit access to your Cloud account.
This is worth doing in the browser, from Cloud's dashboard sharing option, before you tell someone to just download IoT Remote and log in as you. Sharing your own login is a real account, with edit access to every Thing and every sketch you own, handed to someone who may only ever want to check whether the greenhouse is too hot. A shared dashboard link gives them exactly the view you intended and nothing else. What a shared viewer can and cannot do (view-only versus also flipping switches) depends on how you configured the share and on your Cloud plan, so check the specific sharing option you used rather than assuming.
IoT Remote vs sitting at the laptop
| Job | Browser (Cloud) | IoT Remote |
|---|---|---|
| Create Thing, variables, dashboard | Yes | No |
| Edit widgets, mobile layout | Yes (edit mode) | View / control |
| Watch gauges on the couch | Yes, if you like a browser | Yes, that is the point |
| Flip a switch | Yes | Yes |
| Phone GPS / IMU as Cloud data | Not without the app | Phone as Device |
| Upload a sketch | Cloud Editor / IDE 2 | No |
| First-time Cloud setup | Yes | After the dashboard exists |
In practice, I do all the building in the browser and then mostly use the phone once the project is running.
Troubleshooting
| Symptom | Likely cause | Fix |
|---|---|---|
| App has no dashboards | None created, or wrong account / Space | Create the dashboard in the browser. Confirm the login |
| Gauges stuck | Board offline, sketch not updating Cloud | Check device online in Cloud. Confirm ArduinoCloud.update() and variable assignments |
| Switch on phone does nothing | Variable is read-only, or sketch ignores it | Read/write variable. Write the pin from that variable every loop |
| Phone as Device has empty sensors | Permissions, or that phone lacks the sensor | Grant location / motion. Read the dashboard Cloud generated, not a generic list |
| DHT22 works in Serial Monitor, Cloud stays zero | Two different sketches, or Cloud variables never set | The Cloud Thing sketch must read the sensor. Serial-only sketch will not fill Cloud |
| App vs "Create Editor" confusion | Wrong store listing | IoT Remote / IoT Cloud Remote, not the Chromebook Cloud Editor app |
Wrap-up
Arduino IoT Remote is the phone screen for Arduino Cloud dashboards. You build Things, variables, and widgets in a browser. You open the same dashboard on Android or iOS. You can also let the phone publish its own sensors into Cloud. You cannot create the dashboard in the app, and you cannot skip Cloud.
A Wi-Fi board, a DHT22, two Cloud variables, a pair of gauges, and this app make a complete first project. The DHT22 article covers the wiring and the sensor code. This article covers getting those readings onto your phone.
Official app docs: docs.arduino.cc Arduino Cloud, IoT Remote. Store links live on Arduino's software and Cloud pages. When the in-app menus move, trust those over a cached screenshot.
Hack The World and Make Awesome.




