

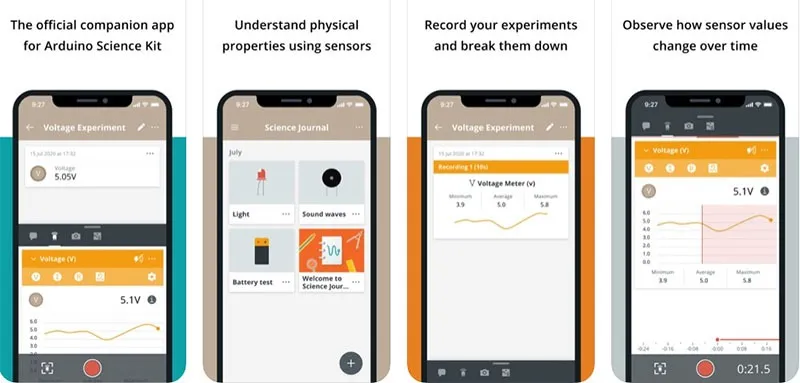
Most of this software cluster is about writing programs: IDE 2, CLI, Cloud Editor, App Lab. Arduino Science Journal is the odd one on Arduino's software page, and that is the point. It is not a code editor. It is a data notebook that lives on a phone or tablet.
Arduino's own line: gather data from sensors already in a smartphone, and from sensors connected to Arduino hardware. Graph it, annotate it, export it. Google started Science Journal. Arduino maintains it now as a free, open-source app (Android source is on GitHub). The App Store still notes the Google origin.
If you came here to compile a sketch, this is the wrong download. If you came here with a class that needs to measure light, sound, or motion this period, and maybe attach a Nano 33 BLE Sense later, this is the tool Arduino built for that.
Part 1 of the Mastery Series is still the place to learn what a board is. This article is the journal app, the phone sensors, the Bluetooth link, and a set of experiments that do not require setup() on day one.
What is Arduino Science Journal?
Think of a lab notebook that can also be a meter. You open an experiment, you pick a sensor, you record, you get a graph. You can add notes and photos. You can export or back up to Google Drive. Arduino Education also publishes ready-made experiments on science-journal.arduino.cc covering light, sound, motion, and electricity.
The app runs on:
- Android 5 or newer
- iOS 12 or newer
- ChromeOS that can run Android apps
Arduino says the app is in English. Curriculum grids exist for NGSS (U.S. K-12 Next Generation Science Standards) and the National Curriculum of England. I am not going to pretend those PDFs replace your school's scope and sequence. They are Arduino's alignment documents if you need them for a curriculum committee.
It is classroom-shaped: sign in, experiments follow the student, not the shared tablet, if you use that sign-in. It is also homeschool-shaped: one phone, no extra hardware required to start.
This is not IoT Remote, and not IDE 2
Arduino IDE 2 writes firmware. You upload a sketch. Serial Monitor prints numbers. You are a programmer.
Arduino Cloud / IoT Remote keep live variables on a network dashboard. You need a Cloud-capable board, a Thing, and usually Wi-Fi. You are building an internet gadget.
Science Journal records sensor streams into an experiment file, mostly over the phone's own sensors or over Bluetooth Low Energy (BLE). BLE is a Bluetooth mode meant for small, low-power gadgets talking to a phone. You are doing a science activity. The graph is the product, not a deployed device.
You can use all three in a school. Do not install Science Journal expecting Tools → Port. Do not install IoT Remote expecting a magnetometer lab with no Cloud account.
Phone sensors, before you buy a board
Arduino's FAQ: the sensors you get depend on the handset. Common ones:
- Magnetometer (magnetic field, the same family of sensor as a compass)
- Compass heading
- Sound intensity (how loud) and, on some devices, pitch
- Ambient light
- Motion / accelerometer (how the phone is accelerating, including gravity)
Not every tablet has a magnetometer. Not every Chromebook has a useful light sensor. Open the app, look at which sensors it lists, and treat that list as the truth for that device. A physics teacher should test the class set of phones before promising "we will all measure magnetic field."
First experiments I would run with no Arduino at all:
-
Light vs distance. Phone light sensor, a lamp, a meter stick. Move the phone in 10 cm steps. Record. Ask whether intensity falls off the way the textbook inverse-square law suggests (double the distance and the light should drop to a quarter), and why a phone sensor will not match a proper lab light sensor.
-
Sound level. Quiet room vs hallway vs next to a speaker (not so loud you damage hearing). Science Journal graphs amplitude over time. Talk about units, background noise, and why "quiet" on a phone is not the same as a reading from a calibrated sound level meter (the kind an inspector uses to measure noise in decibels).
- Pitch and bottles. Water in a bottle, blow across the top, watch pitch if the phone exposes it. Variables: water height. Constants: bottle, distance to phone.
- Magnetometer and a fridge magnet. Sweep an ordinary kitchen magnet slowly past the phone. See the field spike. Then try Earth's field by rotating the phone. Scale difference is the lesson.
- Accelerometer on a drop or a cart. Phone on a dynamics cart, or a careful drop onto a cushion. The spike is the interesting bit. Tape the phone down. Do not throw a class set of phones.
Those five are enough to teach what a sensor is, what a time series is (a list of measurements, each stamped with the moment it was taken, which is exactly what the graph draws), and what a fair test is, before anyone solders.
A fair test, in this notebook, means you change one thing on purpose and keep the rest still. Distance to the lamp changes. The lamp, the room lights, and how you hold the phone do not. Students will rotate the phone and cover the light sensor with a finger and call it "data." The journal will graph that finger. Your job is to make the setup photo show the meter stick and the tape that holds the phone.
The numbers are also not lab-grade. A phone's "lux" reading (lux is the standard unit of how much light lands on a surface) comes from a cheap sensor sitting behind the screen glass, run through the manufacturer's software. Use it to compare conditions (window vs closet), not to certify a lighting design. Same warning for magnetometer readings in microteslas and for decibels (dB) if the app shows them. Science Journal is a tool for reasoning with data and comparing conditions. It is not a calibrated meter unless you check it against one.
Arduino's in-app walkthrough and the experiment library are the official activity list. Use them. The list above is how I would sequence a first week, not a replacement for their write-ups.
When Arduino hardware enters the picture
Phone sensors are convenient and poorly placed. The light sensor is on the front of a slab you are holding. The microphone hears the student talking. External sensors let you put a thermometer in water or a magnetometer away from the phone's own speakers.
Arduino's FAQ and Education pages name hardware that talks to the app over Bluetooth, including:
- Arduino Nano 33 BLE Sense (and the BLE Sense family): onboard accelerometer, gyroscope, magnetometer, light, temperature, and more, plus BLE. This is the board I would buy for a Science Journal extension, not a classic Uno.
- Arduino Science Kit Physics Lab, which Arduino documents with an MKR WiFi 1010 in the kit path.
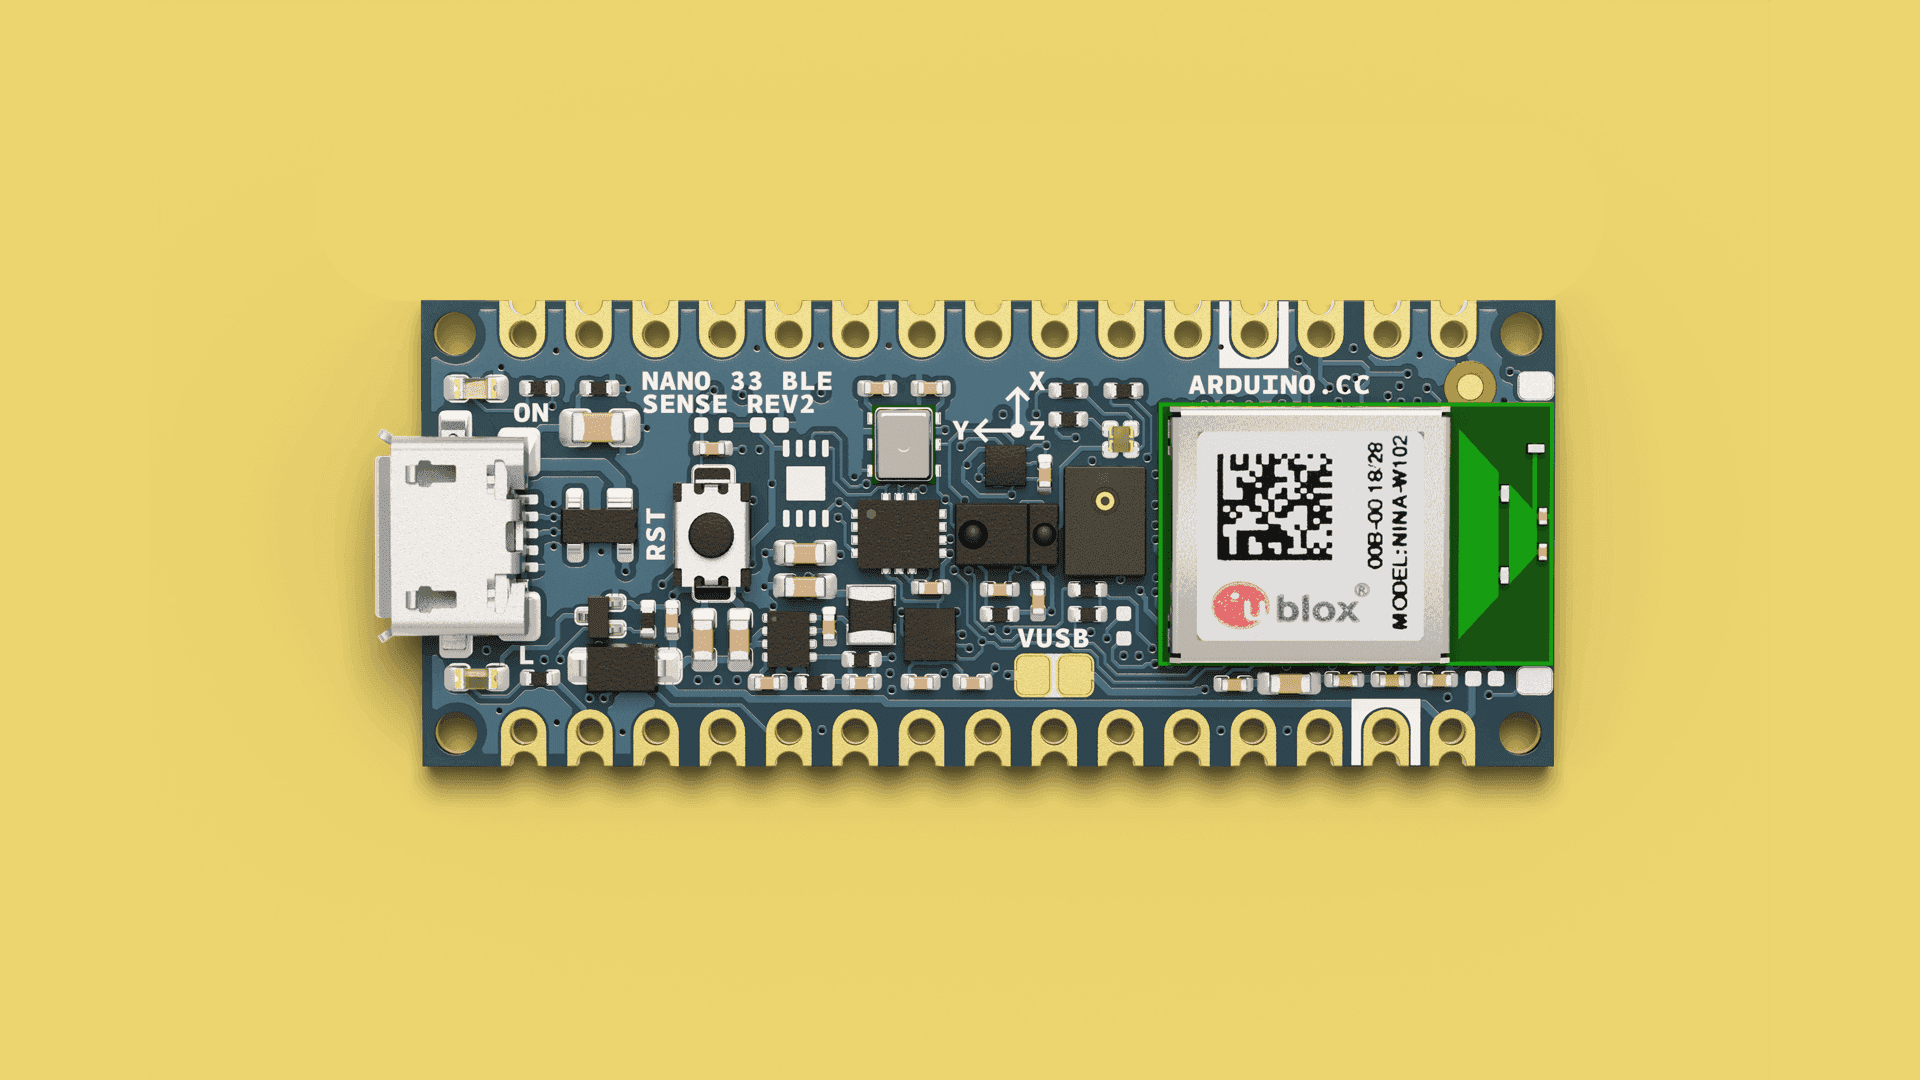
Image: Arduino
A classic Uno R3 has no BLE radio. Science Journal will not see it over Bluetooth. You would be in IDE 2 and Serial Plotter instead. Part 2 is the place that board difference belongs. If the purchase order says "Arduino" and the lesson plan says Science Journal, specify Nano 33 BLE Sense or the Science Kit, not a bag of Unos.
Connection is BLE, not a USB cable into the phone for this app's documented Arduino path. Pairing happens in the journal app's hardware / sensor flow (follow the current in-app steps; menus move). The phone must be close, BLE must be on, and the board must be running firmware the journal expects (Science Kit boards often ship ready; a bare Nano 33 BLE Sense may need the firmware Arduino documents for Science Journal). I am not going to freeze a sketch filename here that Arduino can rename. Use Arduino's current Science Journal / Nano 33 BLE Sense getting-started page on the day you flash.
Gotcha: IoT Remote's "Phone as Device" also uses phone sensors, but it publishes them into Arduino Cloud. Science Journal stores them in an experiment. Different destination. Different lesson.
Experiments that want an Arduino
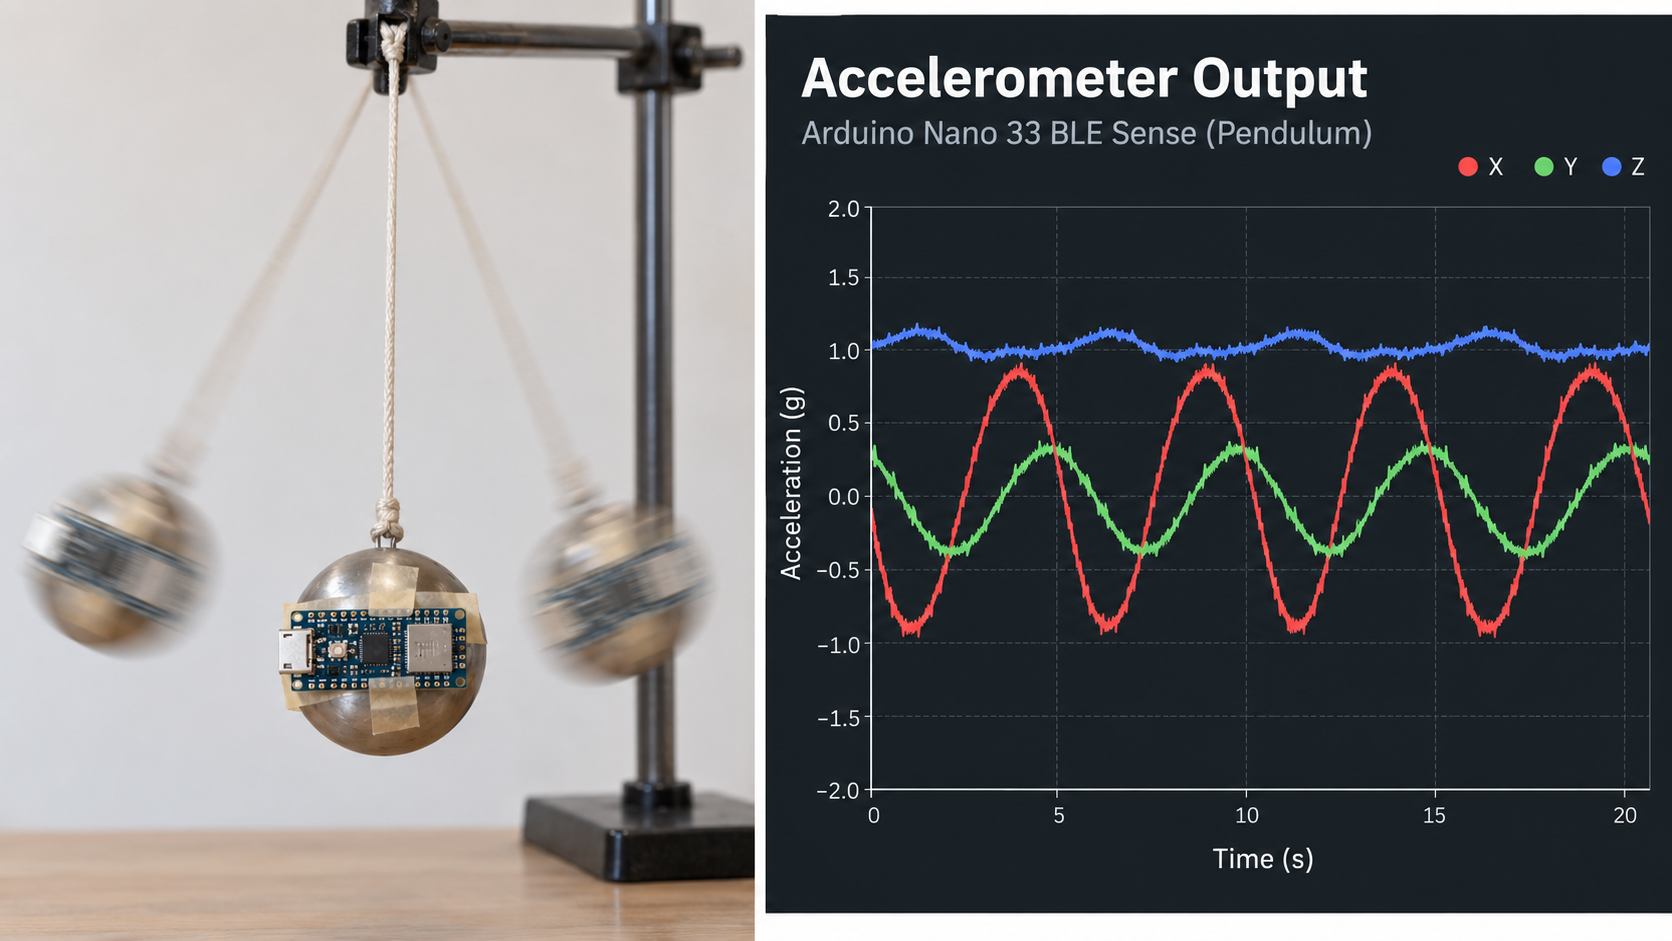
Once BLE works, the journal can plot board sensors Arduino lists for Nano 33 BLE Sense: accelerometer, gyroscope, magnetometer, light, temperature.
Ideas that pay off that hardware:
- Temperature of a palm vs a desk with the board's temperature sensor. Talk about the sensor sitting on a PCB (the printed circuit board itself), where the board's own chips warm it slightly, so its numbers will not match a glass lab thermometer exactly.
- Humidity and "weather" if that Sense revision exposes humidity. Compare to the room thermostat. Calibration is the discussion, not "the phone is wrong."
- Motion of a pendulum or a cart with the board taped on, accelerometer axes labeled on the tape so students know which way is X.
- Magnetic field of a coil if you have a battery and wire and a teacher who is happy with current. A coil of bare wire across a battery is a short circuit. It gets hot fast and can burn fingers, so keep connections brief and use a battery holder with a switch. Magnetometer on the BLE Sense, coil on the bench, phone still in someone's pocket so the phone's own magnetometer is not the one you meant.
- Light through colored filters with the board's light sensor in a shoebox, hole, flashlight. Phone light sensor is a backup if BLE is flaky that day.
Arduino also mentions more ambitious kit experiments (forces, a spectrometer path in older FAQ language). Use the Science Kit write-ups for those. Do not improvise a spectrometer from a FAQ sentence.
Triggers in the journal (Arduino's product sheet: set triggers to tell the app when to record) are for catching an event: start recording when sound crosses a level, for example. That is not Cloud Triggers. Same English word, different product.
How data leaves the phone
Arduino documents record, store, export, graphs, notes, photos, Google Drive backup/sync, local download, and sharing. For a class, pick one path before the bell:
- Export a CSV (a plain spreadsheet file that Excel or Google Sheets can open) or the journal's own export format to Drive if the school uses Google.
- Photos of the graph as a fallback when export fights a managed iPad.
Science Journal is not a live Cloud dashboard parents can open from a URL unless you export and post that yourself. If the assignment is "family can see the greenhouse overnight," you want Arduino Cloud and IoT Remote, plus a Wi-Fi board.
A CSV export is worth understanding as the actual bridge between "a fun phone app" and "a real science project," because it is what turns a squiggly line on a screen into something a spreadsheet, or a student's own graphing exercise, can actually work with. Opened in Sheets or Excel, each row is one logged reading with a timestamp, which is exactly the raw material a class needs if the assignment goes beyond "look at the pretty graph" into calculating a rate of change, plotting two experiments on the same axes for comparison, or averaging several trials, none of which the app itself is built to do inside its own graph view.
A reasonable first hour
- Install Arduino Science Journal from the App Store or Play Store. Links live on Arduino's Science Journal page and on the software page.
- Grant microphone, motion, and Bluetooth permissions the lesson needs. Denying motion then asking for accelerometer data is a support ticket you gave yourself.
- Run the in-app walkthrough.
- Record 30 seconds of ambient light while someone walks in front of a window. Save. Add one sentence of notes and one photo of the setup.
- Only then pair a Nano 33 BLE Sense if you have one.
If step 4 already produced a graph, the app works. Hardware is extra.
Zero the sensor before you trust it
A phone's light meter, accelerometer, or barometer was not calibrated for your specific experiment, it was calibrated at the factory for general phone use. Before recording a real run, take a short baseline reading in the actual resting condition the experiment starts from: light level in the room before the lamp turns on, accelerometer reading with the phone sitting still on the table. If that baseline is not close to what you expect (zero acceleration at rest, a stable light number in a steady room), the sensor or the app's current settings are drifting, and it is worth knowing that before you collect ten minutes of data built on a bad starting point.
Troubleshooting
| Symptom | Likely cause | Fix |
|---|---|---|
| No magnetometer in the list | That phone or tablet has none | Use a different device, or a BLE Sense for magnetic field |
| Arduino board never appears | No BLE, Uno instead of BLE Sense, firmware, distance | Confirm Nano 33 BLE Sense or Science Kit. BLE on. Close to the phone. Arduino's current pairing guide |
| Graph is a flat line | Permission denied, or sensor covered | App permissions. Uncover the light sensor (often near the earpiece) |
| Students compare numbers across brands | Different sensors, no calibration | Teach relative change, not "the true lux" |
| You wanted Serial Plotter | Wrong tool | IDE 2 on a computer |
| You wanted a phone dashboard for a Wi-Fi greenhouse | Wrong tool | Arduino Cloud and IoT Remote |
Wrap-up
Arduino Science Journal turns a phone into a logging meter and a lab notebook. Start with built-in sensors. Add a BLE Arduino (Nano 33 BLE Sense or the Science Kit) when the experiment needs a sensor that is not stuck in a handset. It does not replace IDE 2, and it does not replace Cloud.
Official experiments and store links: science-journal.arduino.cc and arduino.cc/education/science-journal. When in-app menus move, trust those plus the in-app walkthrough.
Hack The World and Make Awesome.




