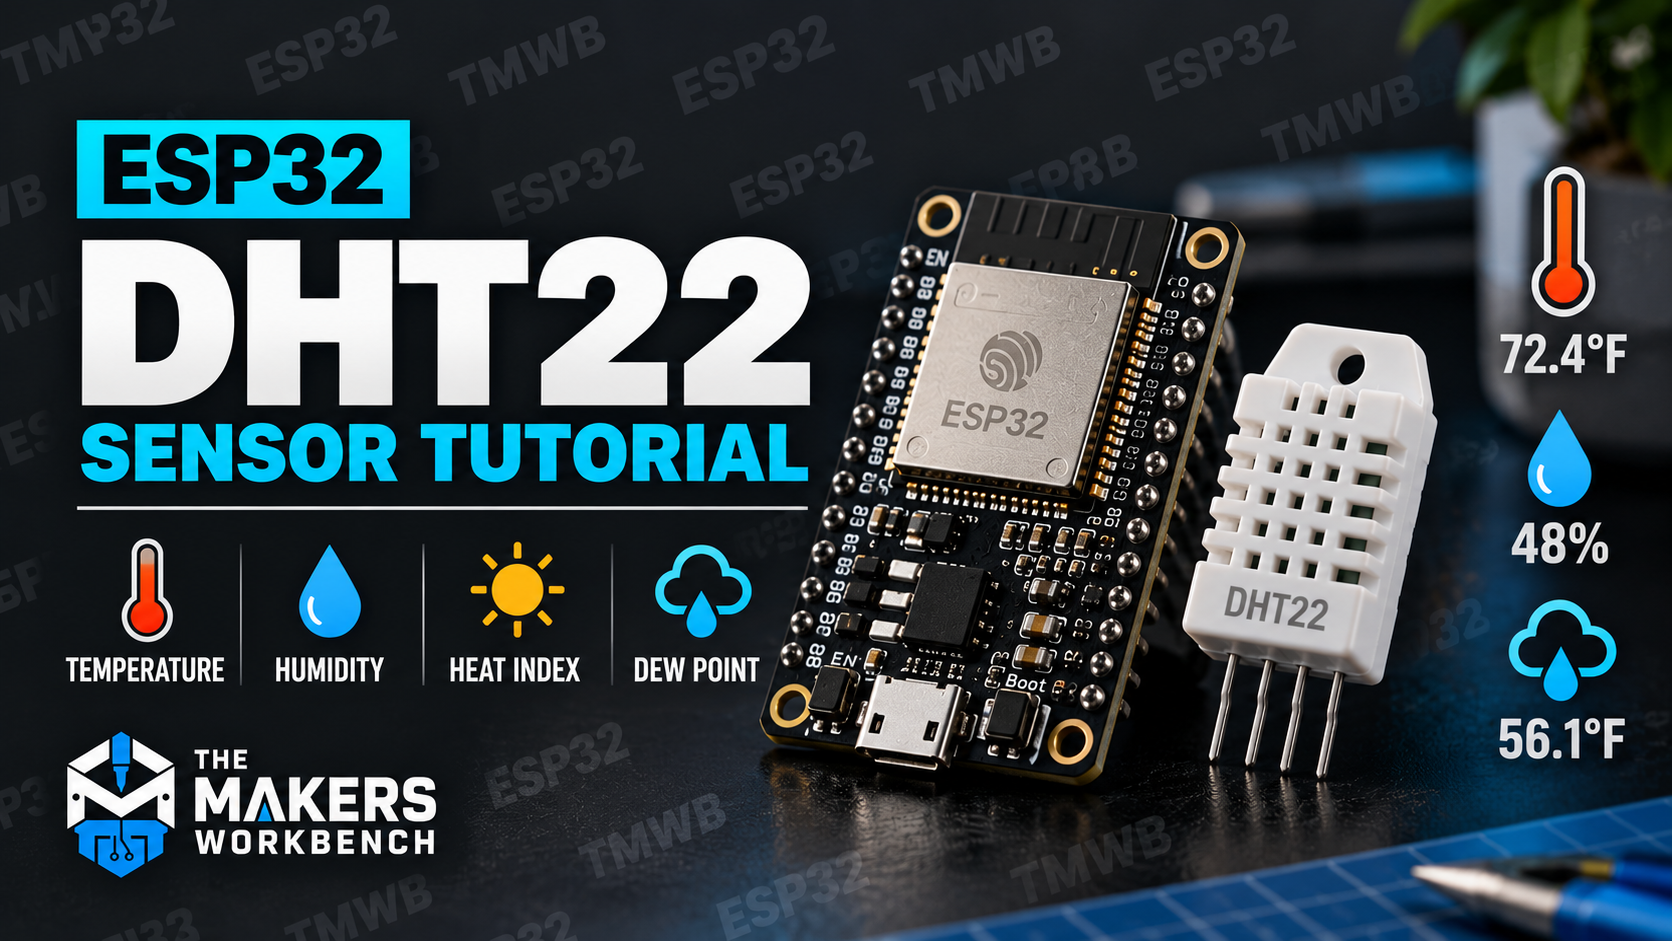
The ESP32 is a great platform for projects that monitor environmental conditions. Its built-in Wi-Fi and Bluetooth make it especially useful for connected sensor projects, but before you send measurements to a web dashboard, an MQTT broker, or a home automation system, you first need a reliable way to collect the data. (MQTT is a lightweight messaging system that many smart home setups use to pass sensor readings around.)
Think of the thermostat on your wall. Somewhere inside it, a small sensor is constantly answering one question: how warm and how humid is it in here right now? The AM2302, commonly sold as the wired version of the DHT22, is an inexpensive digital temperature and humidity sensor that lets your ESP32 answer that same question. It's one of the friendliest ways to learn how a microcontroller collects data from the real world. (A microcontroller is the small programmable chip at the heart of a board like the ESP32. It runs your code and reads and controls the electronics connected to it.)
In this tutorial, we'll connect an AM2302/DHT22 to an ESP32, install the Arduino library that does the talking, read temperature and relative humidity, and display the results in the Arduino IDE's Serial Monitor.
We'll also calculate two useful values from those measurements: the heat index (how hot it feels) and the dew point (the temperature at which water starts condensing out of the air).
What You'll Learn
By the end of this tutorial, you will know how to:
- Connect an AM2302/DHT22 to an ESP32
- Read digital sensor data with an ESP32
- Install and use the DHT sensor library
- Measure relative humidity
- Measure temperature in Celsius and Fahrenheit
- Calculate the heat index
- Calculate the dew point
- Detect failed sensor readings
- Troubleshoot common AM2302/DHT22 problems
What Is the AM2302/DHT22?
Picture a tiny weather station sealed inside a plastic case about the size of a sugar cube. It holds a thermometer, a humidity gauge, and a little brain that reads both and reports the numbers. That's the DHT22. You'll find it in Arduino, ESP32, and Raspberry Pi projects everywhere.
Unlike a simple analog temperature sensor, the DHT22 performs the measurement internally and sends the result to the microcontroller digitally. An analog sensor outputs a varying voltage that your board has to measure and convert into a number, a job called analog-to-digital conversion. The DHT22 skips that. The ESP32 receives finished numbers.
Inside the case are two sensing parts. The humidity sensor is a small capacitive element, which means its electrical properties shift slightly as it absorbs moisture from the air. The temperature sensor is a thermistor, a resistor whose resistance changes with temperature. A small chip inside reads both, processes the measurements, and sends the results over a proprietary single-wire digital protocol. ("Proprietary" means it's a design specific to this family of sensors, not a standard like I²C or SPI.)
Both measurements travel through a single data connection, which keeps the circuit simple.
How Does Single Wire Communication Work?
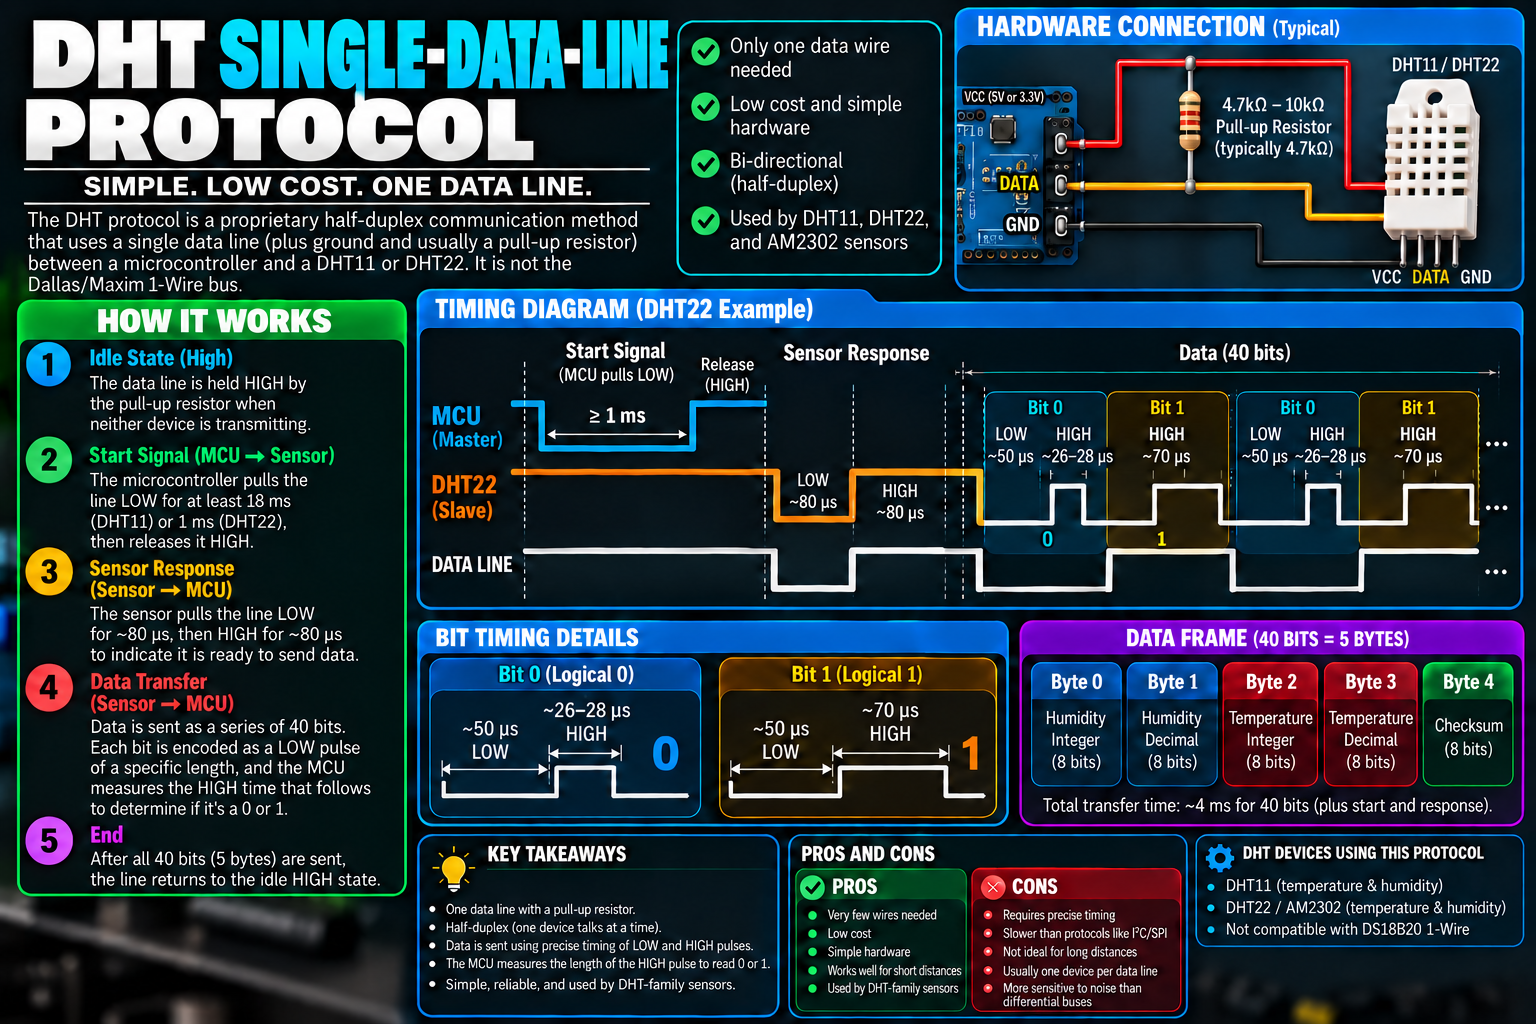
Imagine two people sharing one walkie-talkie channel. Only one of them can talk at a time, so they take turns: one asks a question, lets go of the button, and the other answers. The ESP32 and the DHT22 communicate the same way. They share a single DATA wire for everything, with no separate wire for sending, none for receiving, and no extra wire carrying a timing signal. (I²C and SPI, two other common ways for chips to communicate, do use extra wires, and this sensor uses neither.)
Here is one complete exchange, from the ESP32's request to the sensor's answer:
- The ESP32 pulls the data line low for about a millisecond, which is like knocking on the sensor's door.
- The sensor answers with a brief low and high pulse, saying "I'm here."
- The sensor then sends 40 bits of data, one after another. The first 16 bits are the humidity, the next 16 are the temperature, and the last 8 are a checksum, a small safety number calculated from the other 32 bits so the receiver can check that nothing got corrupted along the way.
- Each bit is encoded in how long the line stays high. A short pulse (roughly 26 to 28 microseconds) means 0, and a longer one (roughly 70 microseconds) means 1. A microsecond is one millionth of a second.
Reading those pulses means timing them to within a few microseconds, which is fiddly to do by hand. That's the hard way, and it's exactly what the library will save you from in a few sections.
AM2302 vs. DHT22
The names AM2302 and DHT22 are used interchangeably because the two are based on essentially the same sensing technology. The difference is mostly packaging.
The familiar DHT22 is usually a small vented plastic sensor with four pins. The AM2302 is the wired version, with the sensing element in a vented plastic housing and a cable extending from it, which is handy when you want the sensor away from the board.
You may also run into DHT22 modules mounted on small breakout boards. These often include the required pull-up resistor (a part I explain in the wiring section), which simplifies the connection.
The wiring therefore depends a little on which version you have, and I'll cover all three below.
DHT22 Specifications
The DHT22 offers considerably better measurement capabilities than the entry-level DHT11.
| Specification | DHT22 / AM2302 |
|---|---|
| Supply voltage | Approximately 3.3–6 V |
| Temperature range | -40°C to 80°C |
| Temperature resolution | 0.1°C |
| Typical temperature accuracy | ±0.5°C |
| Humidity range | 0–100% RH |
| Humidity resolution | 0.1% RH |
| Typical humidity accuracy | approximately ±2–5% RH |
| Interface | Digital |
| Recommended sampling interval | About 2 seconds |
A few of those terms need unpacking:
- RH is relative humidity, the amount of water vapor in the air as a percentage of the most the air could hold at that temperature. 100% RH means the air is saturated.
- Resolution is the smallest change the sensor can report (0.1°C here).
- Accuracy is how close a reported number is to the truth. A sensor can report in tiny steps and still be off by a degree or two, so the two aren't the same thing.
Exact specifications vary slightly between manufacturers and modules, so check the documentation for your sensor when accuracy is important.
The sampling rate is the spec that surprises people. The DHT22 needs about two seconds between readings, and asking sooner returns the previous reading or fails. That sounds slow, but think about how fast a room's temperature actually changes. It doesn't swing from one second to the next. A new measurement every couple of seconds is plenty for room monitoring, weather stations, equipment enclosures, greenhouses, and environmental dashboards. If you need dozens or hundreds of measurements per second, this isn't the right sensor.
DHT11 vs. DHT22
The DHT11 and DHT22 look similar and are programmed in nearly the same way (the same library drives both), but their capabilities differ.
| Feature | DHT11 | DHT22 / AM2302 |
|---|---|---|
| Temperature range | 0–50°C | -40–80°C |
| Temperature accuracy | approximately ±2°C | approximately ±0.5°C |
| Humidity range | approximately 20–80% RH | 0–100% RH |
| Humidity accuracy | approximately ±5% RH | approximately ±2–5% RH |
| Sampling rate | Faster | Approximately one reading every 2 seconds |
| Cost | Lower | Higher |
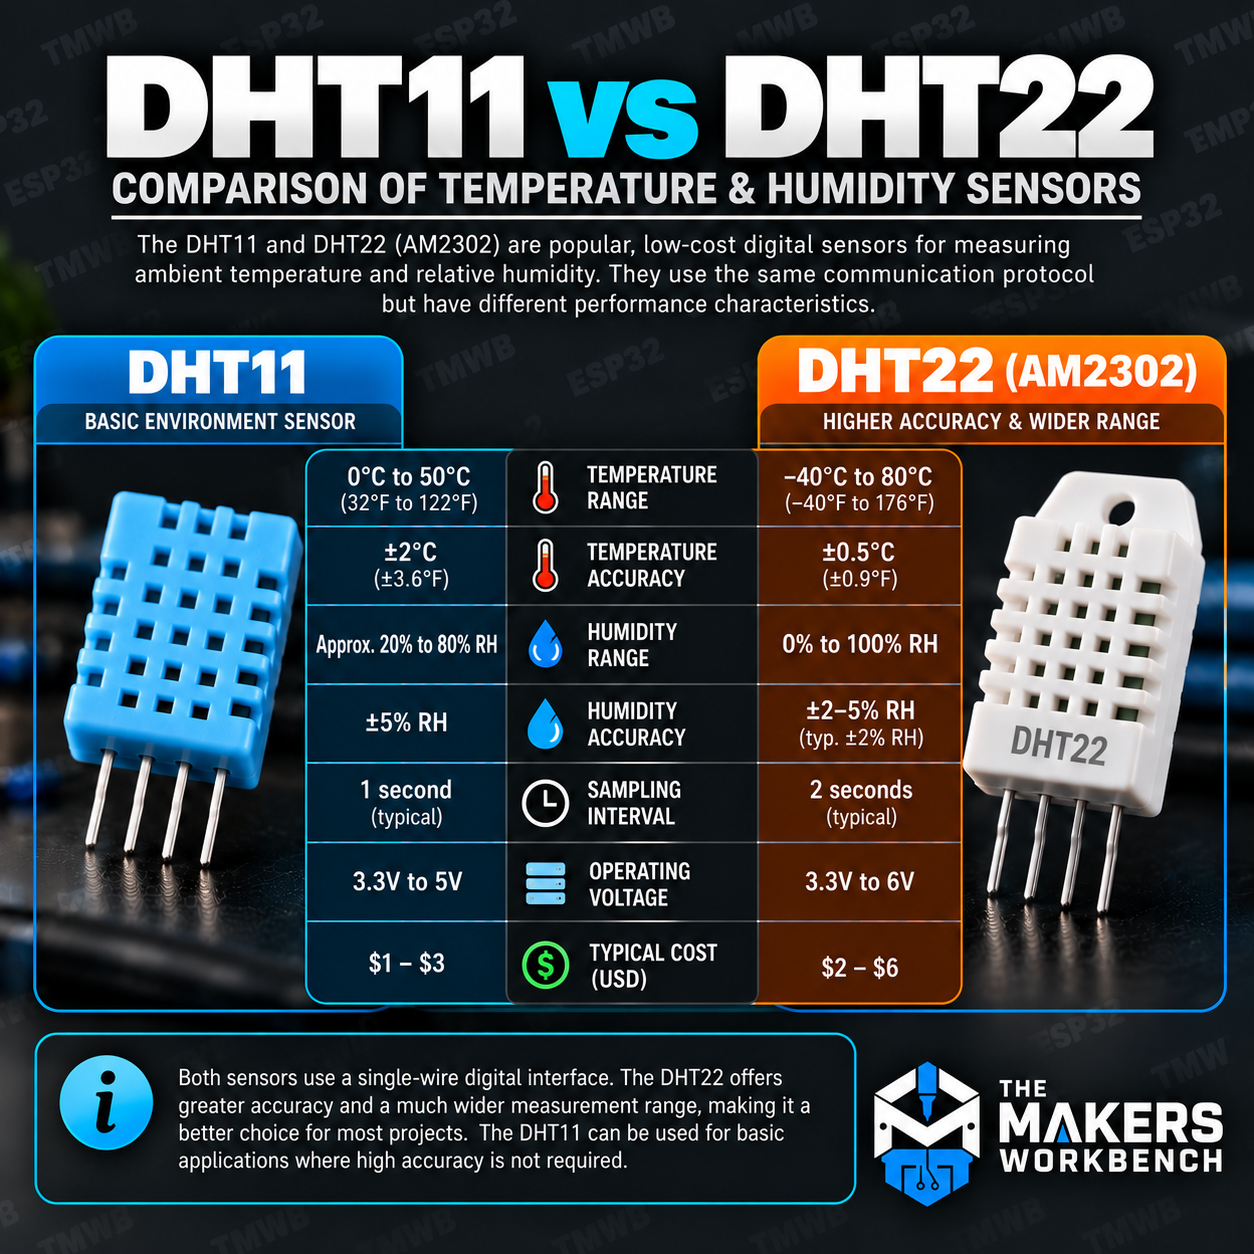
For very basic experiments, the DHT11 can be enough. But it can't read below freezing, and it can't see humidity below roughly 20%, which rules it out for a winter garage or an outdoor enclosure. For most practical ESP32 projects, the DHT22 is the better choice thanks to its wider ranges and better accuracy.
Neither is a precision laboratory instrument. If your project needs highly accurate environmental measurements, there are more capable sensors available. For general DIY electronics, the DHT22 remains inexpensive, widely available, and easy to use.
Bill of Materials
For this project you will need the parts below. We're using the ESP32-DevKitC, Espressif's own ESP32 development board, and Espressif's official ESP32-DevKitC documentation covers the board in full detail. If your sensor is a three-pin breakout board or a wired AM2302, it very likely has the pull-up resistor built in, and you can skip the resistor. Check what you have before buying extras.
| Component | Description | Buy on Amazon | Buy on Temu | Buy on SparkFun | Buy on Seeed Studio | Datasheet |
|---|---|---|---|---|---|---|
| ESP32-DevKitC development board | Espressif's official ESP32 development board (ESP32-WROOM module, Micro-USB, Wi-Fi and Bluetooth) | Amazon Link | Temu Link | Temu Link | Temu Link | ESP32 datasheet, DevKitC docs |
| AM2302/DHT22 sensor | Digital temperature and humidity sensor | Amazon Link | Temu Link | N/A | Seeed Link | AM2302/DHT22 datasheet |
| 10kΩ resistor | Pull-up resistor for the data line, only if your sensor doesn't already include one | Amazon Link | Temu Link | SparkFun Link | Seeed Link | N/A |
| Breadboard & jumper wires | For prototyping connections without soldering | Amazon Link | Temu Link | SparkFun Link | Seeed Link | N/A |
| USB data cable | Powers the ESP32 and uploads your code. Match your board's connector (Micro-USB or USB-C), and make sure it carries data, not just power. | Amazon Link | Temu Link | SparkFun Link | Temu Link | N/A |
The products linked above may contain affiliate links. The Makers Workbench earns from qualifying purchases when these links are used.
About that USB cable: some cables, especially the thin ones bundled with cheap gadgets, only carry power and have no data wires inside. They'll light up your ESP32, and then the Arduino IDE will insist the board doesn't exist. If your computer can't see the board, swap the cable first.
Understanding the DHT22 Connections
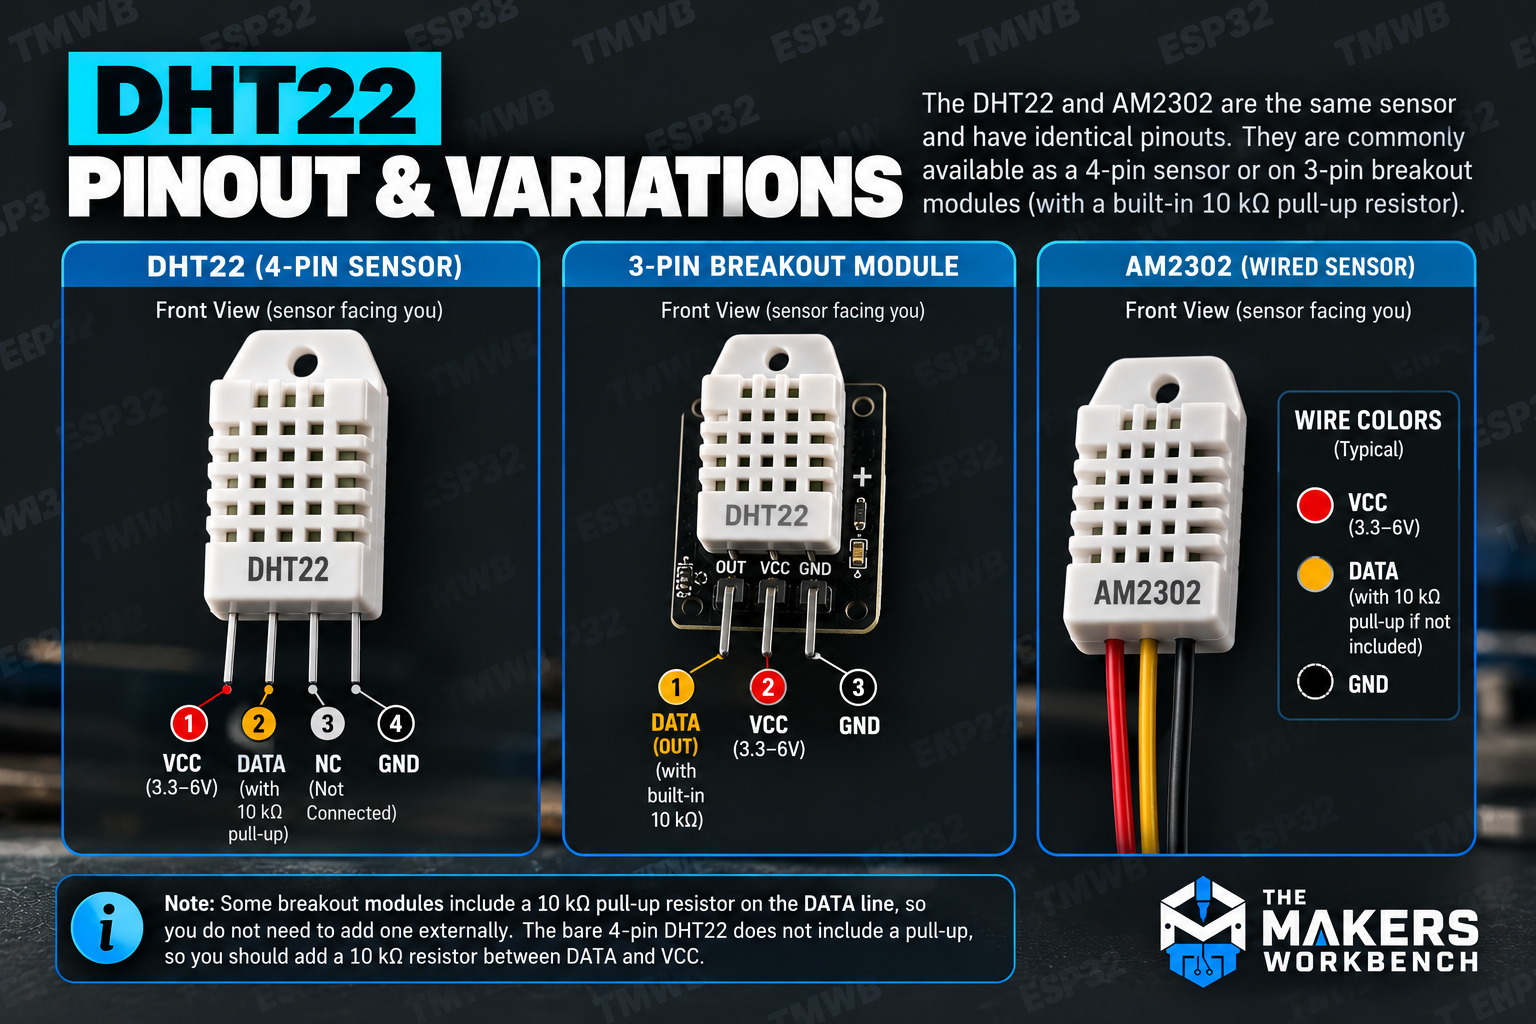
A bare four-pin DHT22 has the following pin order when you look at the front of the sensor (the grid-patterned side) with the pins pointing down, counting left to right:
- VCC (power)
- DATA (the single wire the readings travel on)
- Not connected
- GND (ground, the return path for current)
The third pin isn't used.
If you're using a three-pin DHT22 breakout module, the board will normally expose connections similar to:
- VCC (sometimes labeled +)
- DATA (sometimes labeled OUT or S)
- GND (sometimes labeled -)
Pin order varies between boards, so read the labels printed on yours instead of assuming.
Wired AM2302 sensors typically have three conductors rather than four exposed pins. They're commonly red for power, yellow for data, and black for ground, but wire colors aren't standardized between manufacturers. Verify the connections against whatever documentation came with your sensor before applying power.
What Is a Pull-Up Resistor, and Why Does the DATA Line Need One?
The DATA line normally needs a pull-up resistor: a resistor connected between the data line and the power supply (VCC). Typical values run from 4.7 kΩ to 10 kΩ. (The Ω symbol means ohms, the unit of resistance, and "k" means thousand, so 10 kΩ is 10,000 ohms.)
Here's the reason. The DHT22 sends data by pulling the line low (to ground) and then letting go. When it lets go, something has to bring the line back up to a high voltage. Without that, the line drifts unpredictably and picks up stray electrical noise. The pull-up resistor holds the line high whenever nobody is pulling it low.
This is the gotcha behind more failed DHT22 projects than anything else, so check it before you wire anything. Does your sensor already include the resistor?
- Bare four-pin sensor: Usually no. Add a 10 kΩ resistor between DATA and VCC yourself.
- Three-pin breakout module: Usually yes. Don't add another one.
- Wired AM2302: Often yes, but it depends on the seller. If your readings fail, adding the resistor is a safe test.
Connecting the AM2302/DHT22 to the ESP32
For this tutorial, we'll connect the sensor's DATA line to GPIO 4 on the ESP32. (GPIO stands for General Purpose Input/Output, the numbered pins on the board that your code can read from or control.)
| AM2302/DHT22 | ESP32 |
|---|---|
| VCC | 3.3 V |
| DATA | GPIO 4 |
| GND | GND |
If your sensor requires an external pull-up resistor, connect a 10 kΩ resistor between VCC and DATA. On a breadboard, that means one resistor leg in the same row as the DATA wire and the other leg in the same row as the VCC wire.
Wire everything up while the ESP32 is unplugged from USB. Swapping VCC and GND can damage the sensor, and that's an easy mistake to make with unlabeled wires.
Here is the pinout for the ESP32-DevKitC. With the USB port at the bottom, GPIO 4 is on the right-hand header, and the pin labeled 3V3 is the top pin on the left-hand header. There are several GND pins on both sides, and any one of them works.
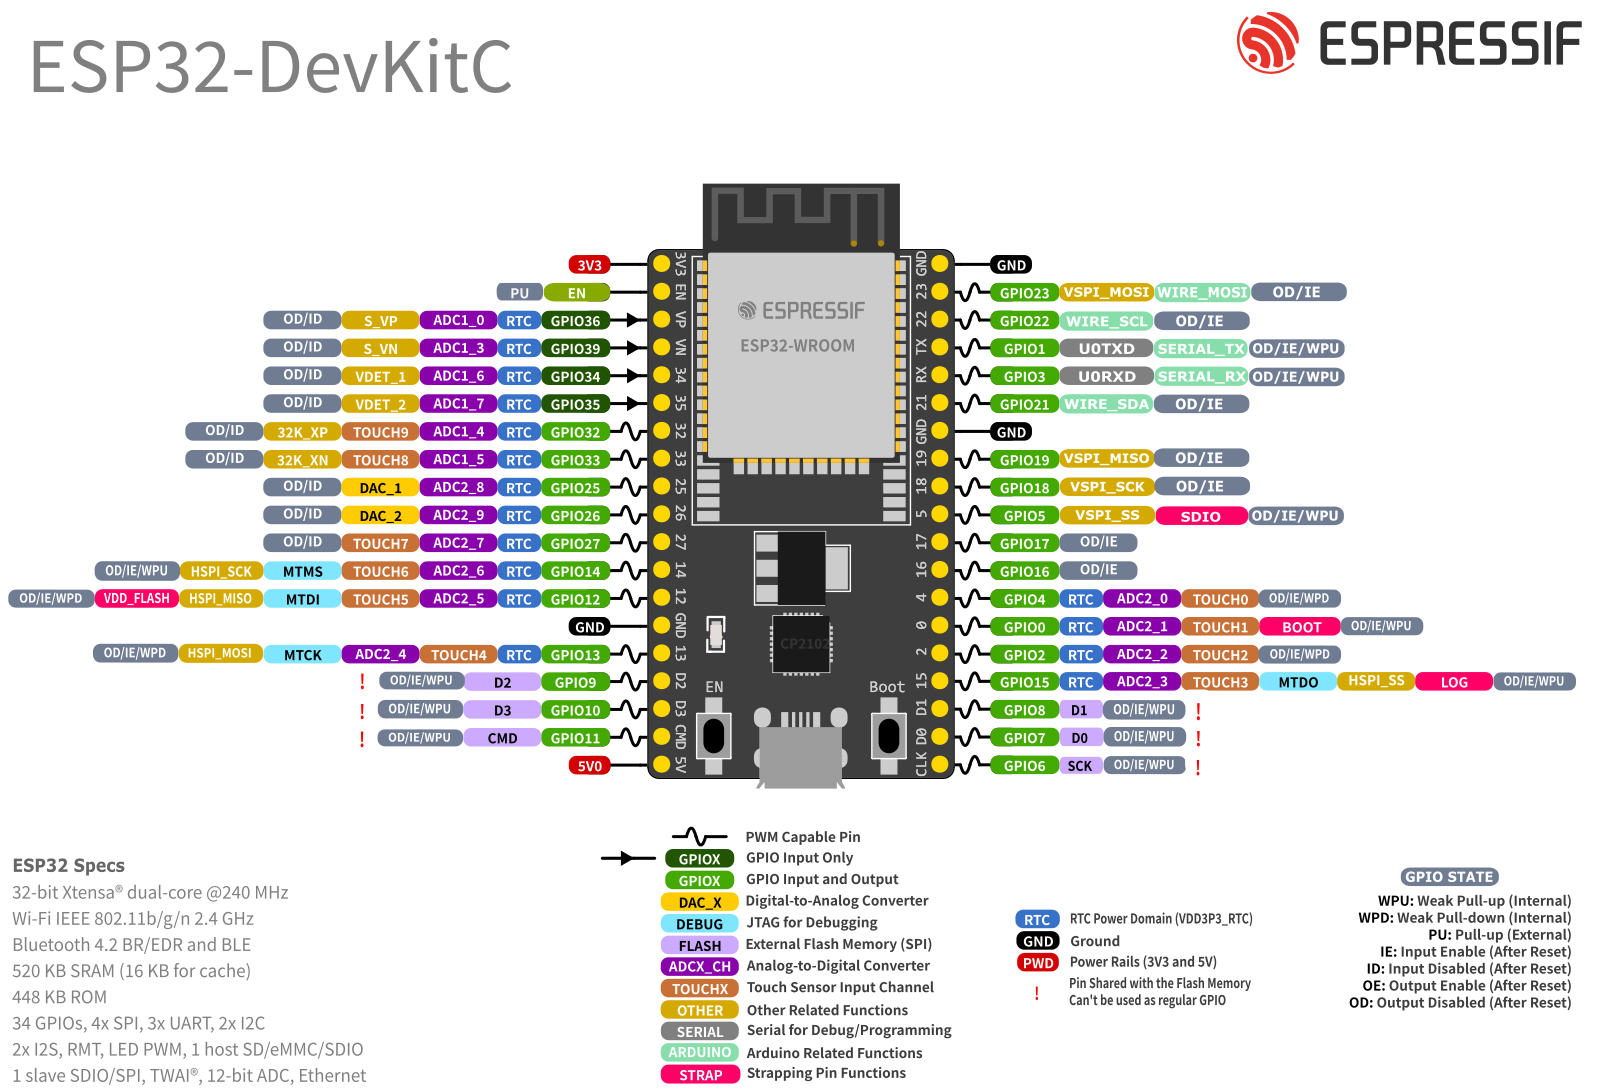
Pinout: Espressif Systems, ESP32-DevKitC.
GPIO 4 isn't mandatory, and many ESP32 pins can be used with the DHT22. The pinout above shows two groups worth avoiding, though:
- GPIO 6 to 11 connect to the DevKitC's onboard flash memory. The pinout marks them with a red exclamation point, and using them as regular pins will crash your program.
- GPIO 34 to 39 are input-only (the DevKitC exposes 34, 35, 36, and 39). The pinout draws an arrow into these pins to show they can only receive signals. The library needs to drive the data pin as well as read it, so these won't work.
If you choose another pin, change the GPIO number in the program to match.
Why Power the DHT22 from 3.3 V?
Many DHT22 devices can run from either 3.3 V or 5 V, so you might wonder which to pick.
For an ESP32 project, use 3.3 V. The ESP32 itself uses 3.3 V logic, and its GPIO pins aren't designed to receive 5 V signals. If you power the sensor from 5 V, the pull-up resistor lifts the data line to 5 V too, and that voltage lands directly on an ESP32 pin. Powering the sensor from 3.3 V keeps the pull-up and the data signal inside the range the ESP32 expects.
Installing the DHT Sensor Library
Before the library, one setup step. If this is your first ESP32 project in the Arduino IDE, you need to tell the IDE how to build code for the ESP32. If you've already uploaded a sketch to one, skip ahead.
- Open Tools > Board > Boards Manager and search for esp32.
- Install esp32 by Espressif Systems. It's a large download, so give it a few minutes.
- Choose your board under Tools > Board. For the DevKitC, choose ESP32 Dev Module.
- Plug the board in and choose its port under Tools > Port.
One ESP32 quirk to know now: on some boards, an upload hangs on "Connecting..." forever. If that happens, hold the BOOT button on the board while the IDE says "Connecting..." and release it when the upload starts.
Now the library. Let me show you what it saves you from. Without it, you'd write code to pull the pin low for a millisecond, switch the pin to input, wait for the response, time forty separate pulses in microseconds, build the numbers from the bits, and verify the checksum. That's a few dozen lines of delicate, timing-sensitive code. With the library, it's one line: dht.readTemperature().
To install it, open the Arduino IDE Library Manager (Sketch > Include Library > Manage Libraries, or the books icon in the left sidebar) and search for:
DHT sensor library
Install DHT sensor library by Adafruit.
The library depends on the Adafruit Unified Sensor library. When the IDE offers to install dependencies, click Install all. The code won't compile without it.
Here's the gotcha: the Arduino IDE only checks its list of libraries at startup. If you've installed the library and the IDE still can't find DHT.h, close the IDE and reopen it.
ESP32 DHT22 Example Code
Let's start with the simplest sketch that works. It reads humidity and temperature, checks that the read succeeded, and prints the results to the Serial Monitor. Heat index and dew point come later, once this part is running. I've commented every line that isn't obvious.
#include <DHT.h>   // Adafruit's library that handles the DHT22's single-wire protocol

#define DHTPIN 4        // The ESP32 GPIO pin the sensor's DATA line is connected to
#define DHTTYPE DHT22   // Tells the library which sensor we have (the DHT22 and AM2302 are the same here)

DHT dht(DHTPIN, DHTTYPE);  // Create a sensor object named "dht" using the pin and type above

void setup() {
  Serial.begin(115200);  // Start serial communication at 115200 baud (the Serial Monitor must match)
  dht.begin();           // Start the sensor

  Serial.println("ESP32 Environmental Monitor");
  Serial.println("---------------------------");
}

void loop() {
  delay(2000);  // The DHT22 needs about 2 seconds between readings

  float humidity = dht.readHumidity();               // Relative humidity in percent
  float temperatureC = dht.readTemperature();        // Temperature in Celsius (the default)
  float temperatureF = dht.readTemperature(true);    // Passing true asks for Fahrenheit instead

  // isnan() means "is not a number". The library returns NaN when a reading fails,
  // so if any of the three failed, skip this round and try again in 2 seconds.
  if (isnan(humidity) || isnan(temperatureC) || isnan(temperatureF)) {
    Serial.println("Failed to read from DHT22 sensor!");
    return;  // Leave loop() early so we never use bad data
  }

  // Print the results. The second number in each print() is how many decimal places to show.
  Serial.print("Temperature: ");
  Serial.print(temperatureC, 1);
  Serial.print(" °C / ");
  Serial.print(temperatureF, 1);
  Serial.println(" °F");

  Serial.print("Humidity: ");
  Serial.print(humidity, 1);
  Serial.println(" %");

  Serial.println();  // Blank line to separate each set of readings
}
Upload the sketch, then open Tools > Serial Monitor and set the baud rate in the bottom-right corner to 115200. That last step trips people up. Baud rate is the speed at which the ESP32 and your computer exchange text, and both sides have to agree. If the Serial Monitor is set to a different speed than Serial.begin(115200), you'll see garbage characters instead of text. That's not a wiring problem, so don't start pulling wires.
Typical output might look like this:
Temperature: 23.6 °C / 74.5 °F
Humidity: 47.3 %
A new set of readings should appear every two seconds.
You may notice the code asks the sensor for humidity, Celsius, and Fahrenheit separately and wonder if that's three slow reads. It isn't. The library reads the sensor once, remembers the result, and answers repeat requests inside that two-second window from memory.
Try the Basic Sketch in the Lab
No hardware on hand, or want to see the circuit run before you wire it? Run this basic sketch in The Makers Workbench Electronics Lab.
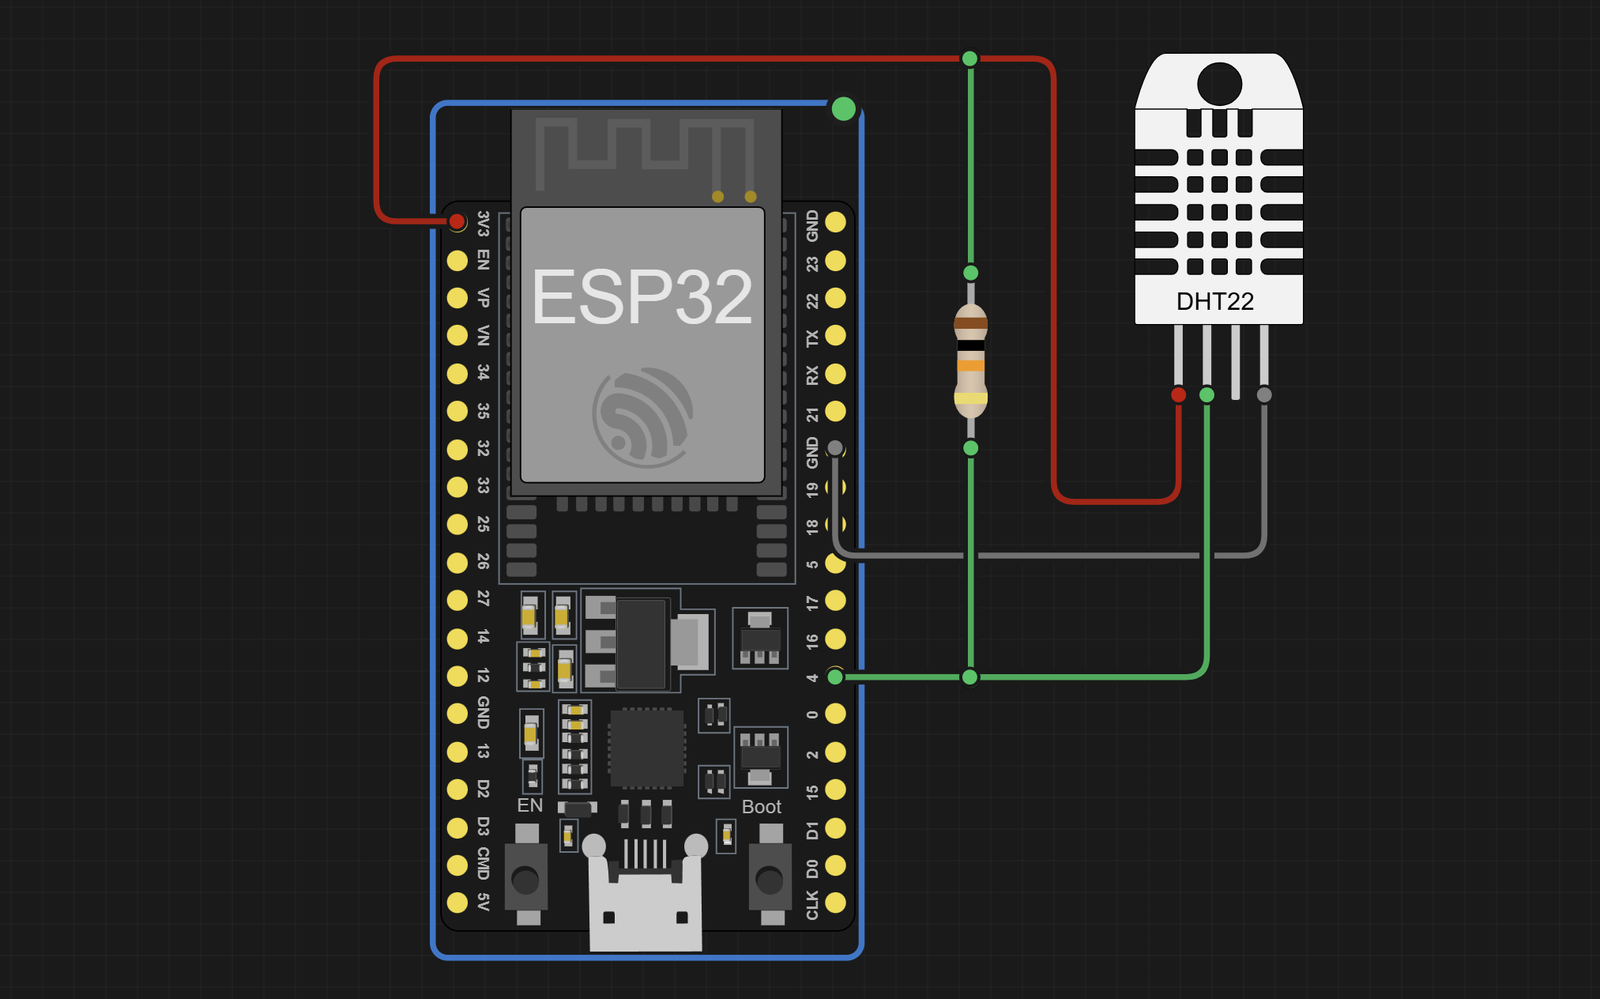
The Lab project below has this circuit wired and the basic sketch loaded. Press Run and open the Serial Monitor.
The Lab circuit is wired like this:
| From | To | Why |
|---|---|---|
| DHT22 VCC | ESP32 3V3 | Power for the sensor |
| DHT22 DATA | ESP32 GPIO 4 | The readings travel on this single wire |
| DHT22 GND | ESP32 GND | The sensor's return path |
| 10 kΩ resistor | Between DHT22 DATA and 3V3 | Pull-up for the data line (skip it if the Lab's sensor part already includes one) |
You should see Temperature: 25.0 °C / 77.0 °F and Humidity: 50.0 % every two seconds. Click the DHT22 in the Lab to open its controls, then move the Temperature (-40 to 80 °C) or Humidity (0 to 100 %) slider. The readings follow your change on the next pass through the loop.
Calculating the Heat Index
Think about a 90°F day in a dry desert versus a 90°F day on the Gulf Coast. The thermometer says the same thing, but the coast feels far worse. Your body cools itself by sweating, and sweat only works if it can evaporate. In humid air it can't evaporate easily, so you feel hotter than the thermometer says.
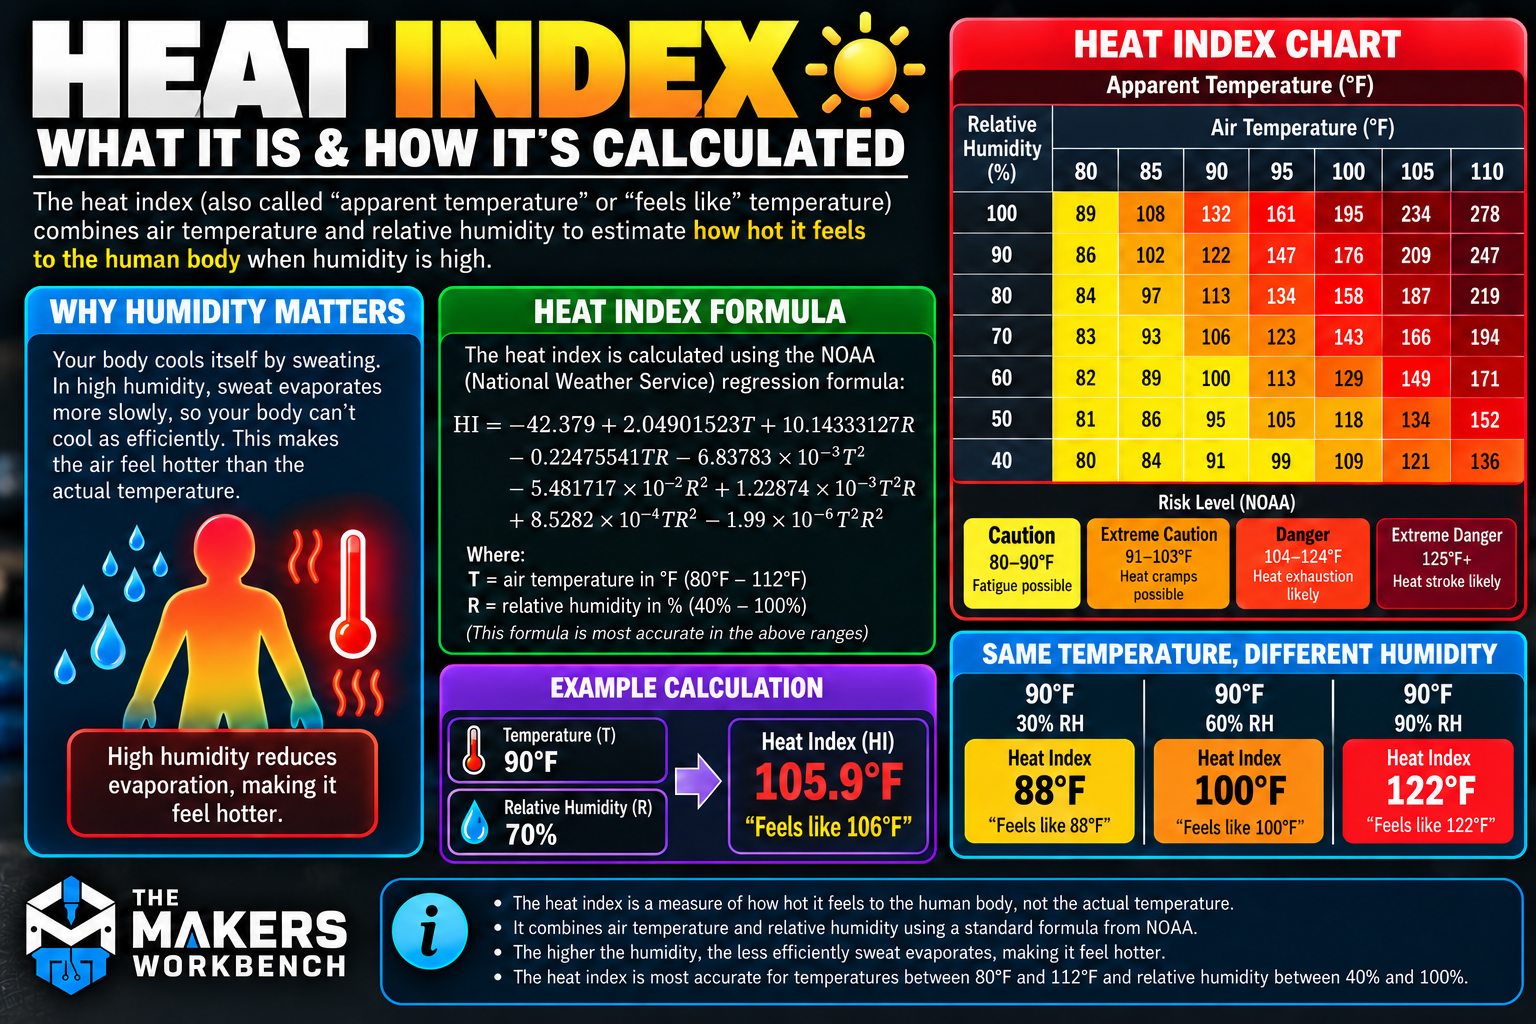
The heat index is a single number that combines air temperature and relative humidity to describe how hot conditions feel. It's often called the "feels like" temperature.
We don't have to implement the calculation ourselves. The Adafruit DHT library provides the computeHeatIndex() function, which takes a temperature, a humidity, and a flag saying whether the temperature is in Fahrenheit.
For Fahrenheit:
float heatIndexF =
    dht.computeHeatIndex(temperatureF, humidity);  // Fahrenheit is the default
For Celsius:
float heatIndexC =
    dht.computeHeatIndex(temperatureC, humidity, false);  // false = the input is Celsius
In the complete sketch at the end of the dew point section, these two calculations sit inside loop() right after the failure check, so they only ever run on valid readings.
Heat index is most meaningful under warm conditions, roughly above 80°F (27°C). At ordinary indoor temperatures, the calculated value will land very close to the measured air temperature. That isn't a bug. There's simply no extra heat stress to report.
This reference shows the formula behind computeHeatIndex(), a worked example, and how much the same air temperature can feel different as humidity changes.
Calculating Dew Point with the ESP32
Grab a cold glass of water on a warm day and watch what happens. Within a minute or two, drops form on the outside of the glass. That water didn't leak through. It came out of the air. The glass cooled the air touching it, and cool air can't hold as much water vapor as warm air, so the extra moisture condensed into liquid.
Dew point is the temperature at which that starts to happen. More precisely, it's the temperature to which air would need to cool, at approximately constant pressure and moisture content, for the air to become saturated with water vapor. Once a surface reaches or falls below the dew point, condensation can begin forming on it.
That makes dew point useful for more than weather reports. In electronics and DIY projects, it can help with:
- Workshop and garage monitoring
- Greenhouses
- Basements and crawl spaces
- Storage areas
- HVAC systems
- Equipment enclosures
- Condensation warnings
- Outdoor electronics
- 3D-printer filament storage
- Dry boxes
Moisture on a circuit board can cause corrosion and short circuits, so seeing condensation coming is valuable.
The DHT22 doesn't measure dew point directly. Instead, we calculate it from the measured temperature and relative humidity.
The Magnus Formula
One commonly used approximation for dew point is the Magnus formula. It takes two steps. First, an intermediate value:
γ = ln(RH / 100) + (a × T) / (b + T)
Then:
Td = (b × γ) / (a - γ)
Where:
Tis temperature in degrees CelsiusRHis relative humidity in percentTdis the dew point in degrees Celsiuslnis the natural logarithm, a math function your code calls aslog()γ(gamma) is just a stand-in name for the intermediate value, to keep the equation readable
For this implementation, we're using:
a = 17.62
b = 243.12
Those two are fixed constants that make the approximation fit real-world data. The ESP32 has more than enough processing capability to do this calculation.
Here is the same formula worked through with real numbers, along with a quick reference chart and a few real-world examples.

Creating a Dew Point Function
Instead of putting the entire equation inside loop(), we'll create a reusable function (a named block of code you can call whenever you need it). That keeps loop() readable:
float calculateDewPoint(float temperatureC, float humidity) {
  const float a = 17.62;   // Magnus constant
  const float b = 243.12;  // Magnus constant, in degrees Celsius

  if (humidity <= 0.0) {   // log(0) isn't a real number, so bail out
    return NAN;
  }

  float gamma =
      log(humidity / 100.0) +                      // ln(RH / 100)
      ((a * temperatureC) / (b + temperatureC));   // (a × T) / (b + T)

  return (b * gamma) / (a - gamma);                // Td, in Celsius
}
We then call it with:
float dewPointC =
    calculateDewPoint(temperatureC, humidity);
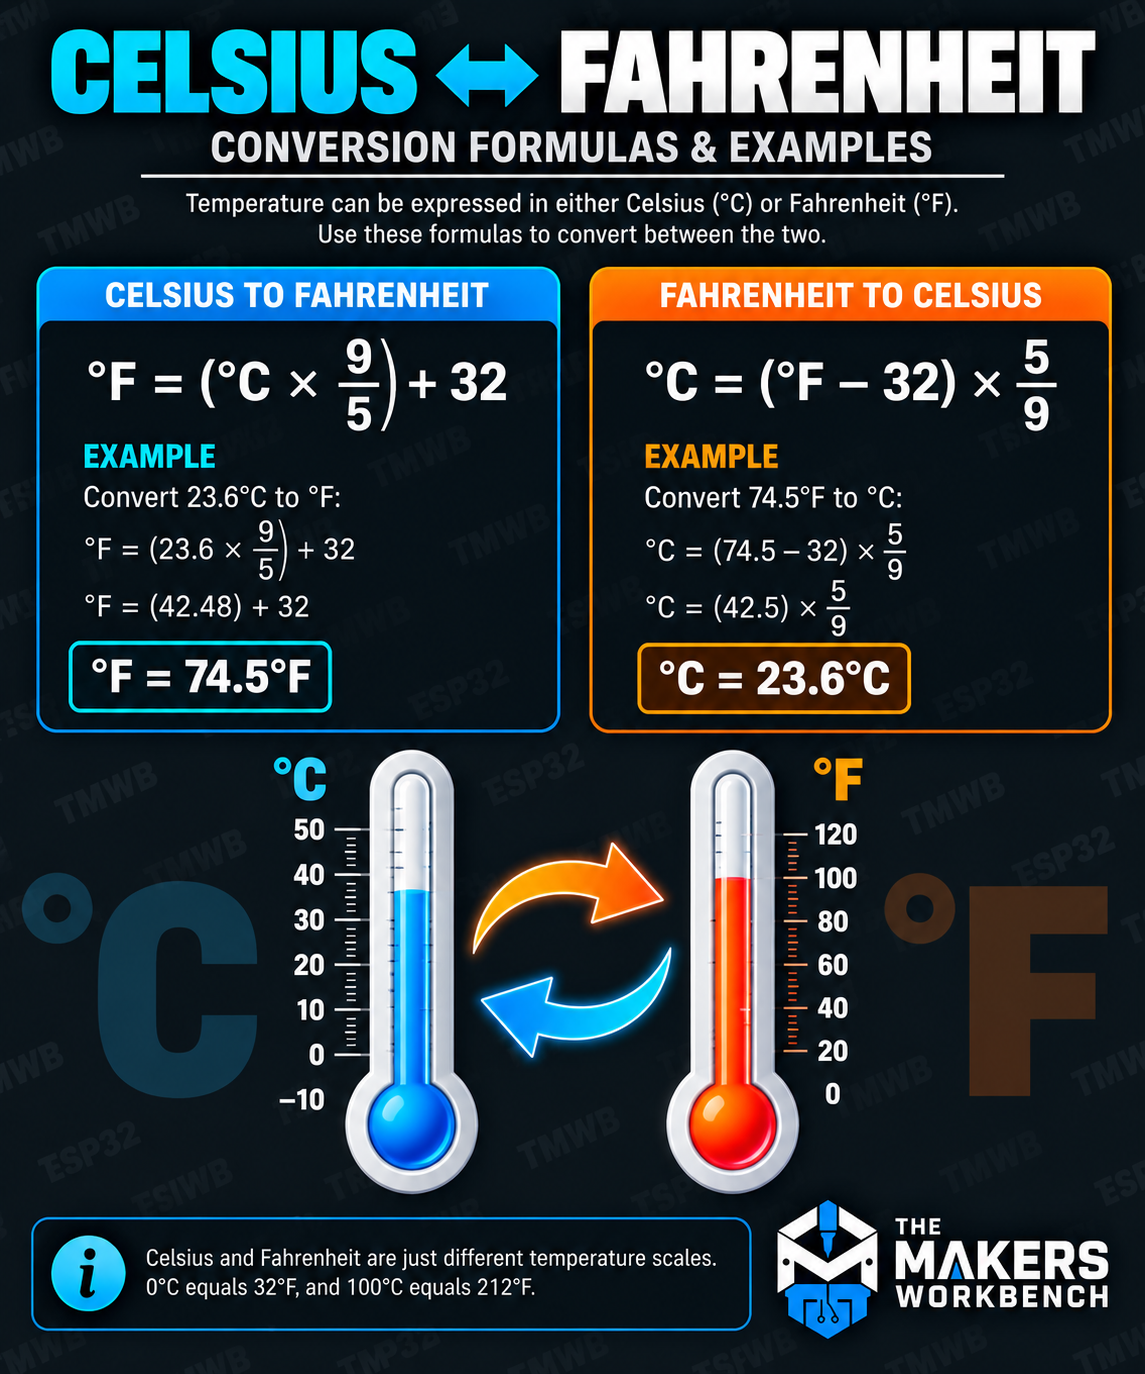
Because the formula returns Celsius, Fahrenheit can be calculated by multiplying by 9/5 and adding 32:
float dewPointF =
    (dewPointC * 9.0 / 5.0) + 32.0;
If the math behind that conversion is new to you, here is a quick reference for converting in both directions, with a worked example.
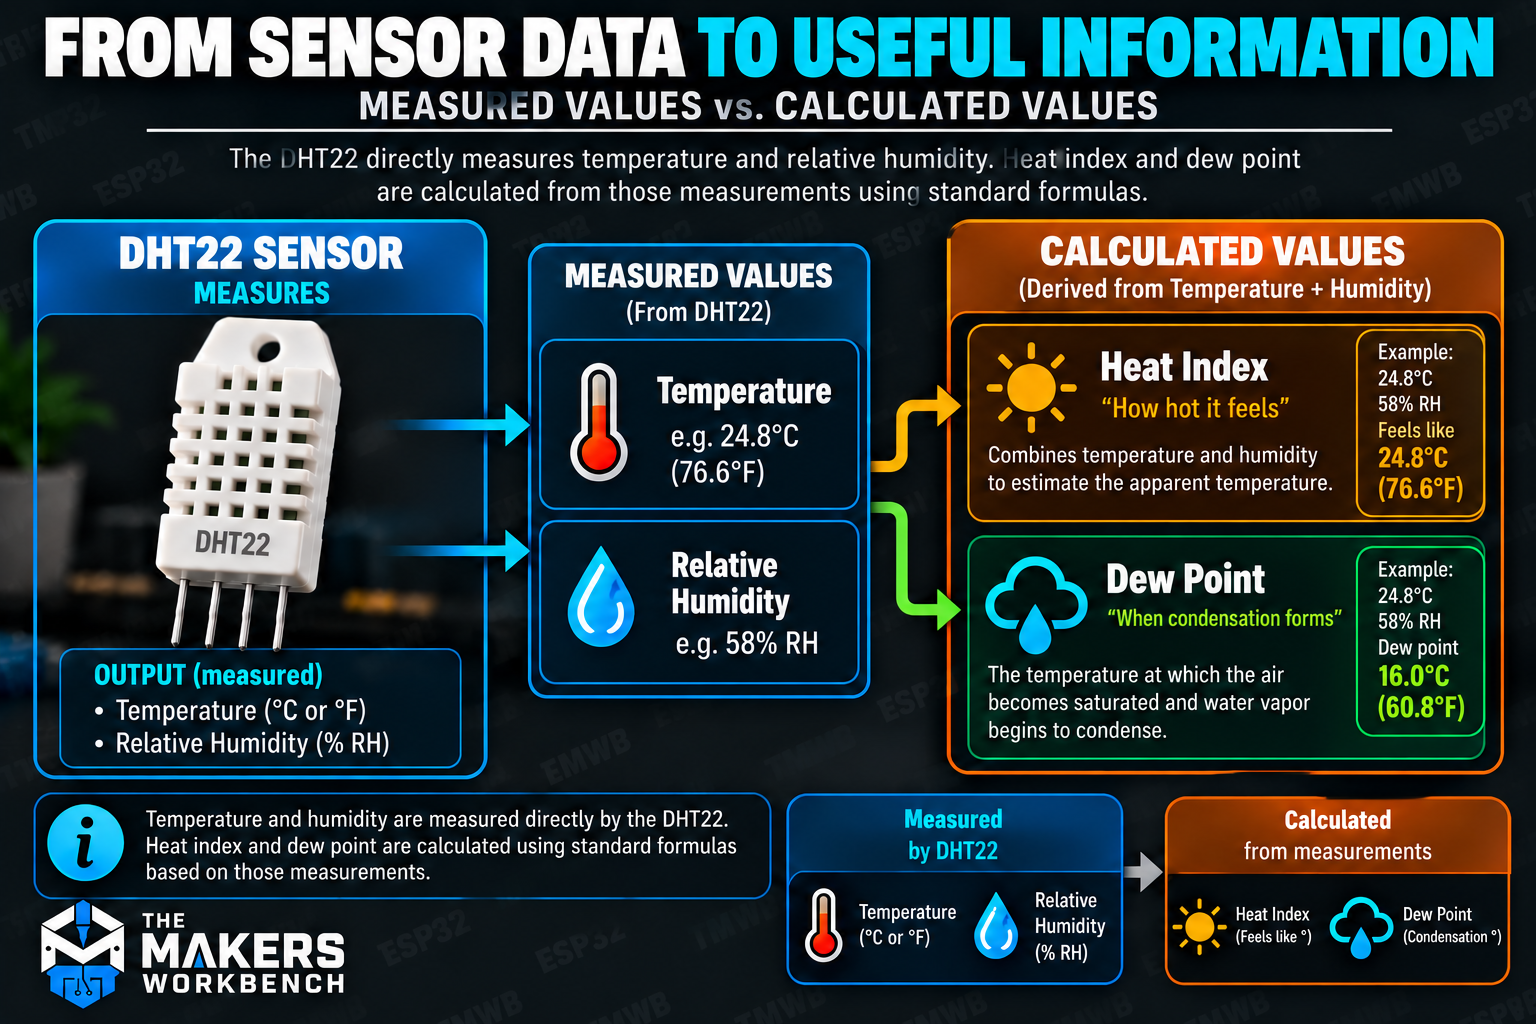
Now we have four useful environmental values available to the ESP32:
- Temperature
- Relative humidity
- Heat index
- Dew point
This diagram sums up which values the DHT22 measures and which ones the ESP32 calculates from them.
Putting It All Together: The Complete Sketch
Now that every piece has been explained, here is the full sketch with temperature, humidity, heat index, and dew point together. It's the basic sketch from earlier with the dew point function added at the top and the two new calculations added inside loop().
#include <DHT.h>   // Adafruit's library that handles the DHT22's single-wire protocol
#include <math.h>  // Gives us log(), which the dew point formula needs

#define DHTPIN 4        // The ESP32 GPIO pin the sensor's DATA line is connected to
#define DHTTYPE DHT22   // Tells the library which sensor we have (the DHT22 and AM2302 are the same here)

DHT dht(DHTPIN, DHTTYPE);  // Create a sensor object named "dht" using the pin and type above

// Calculates the dew point in Celsius from a temperature (Celsius) and relative humidity (percent).
// This is the Magnus formula, explained in the dew point section above.
float calculateDewPoint(float temperatureC, float humidity) {
  const float a = 17.62;   // Magnus constant (unitless)
  const float b = 243.12;  // Magnus constant (in degrees Celsius)

  // A humidity of 0 would break log(), so report "not a number" instead
  if (humidity <= 0.0) {
    return NAN;
  }

  // The intermediate value from the formula: ln(RH/100) + (a*T)/(b+T)
  float gamma =
      log(humidity / 100.0) +
      ((a * temperatureC) / (b + temperatureC));

  // The final step, which turns gamma into a temperature
  return (b * gamma) / (a - gamma);
}

void setup() {
  Serial.begin(115200);  // Start serial communication at 115200 baud (the Serial Monitor must match)
  dht.begin();           // Start the sensor

  Serial.println("ESP32 Environmental Monitor");
  Serial.println("---------------------------");
}

void loop() {
  delay(2000);  // The DHT22 needs about 2 seconds between readings

  float humidity = dht.readHumidity();               // Relative humidity in percent
  float temperatureC = dht.readTemperature();        // Temperature in Celsius (the default)
  float temperatureF = dht.readTemperature(true);    // Passing true asks for Fahrenheit instead

  // isnan() means "is not a number". The library returns NaN when a reading fails,
  // so if any of the three failed, skip this round and try again in 2 seconds.
  if (isnan(humidity) || isnan(temperatureC) || isnan(temperatureF)) {
    Serial.println("Failed to read from DHT22 sensor!");
    return;  // Leave loop() early so we never calculate with bad data
  }

  // Heat index from the library. The last argument says whether the input is Fahrenheit.
  float heatIndexC =
      dht.computeHeatIndex(temperatureC, humidity, false);  // false = the input is Celsius

  float heatIndexF =
      dht.computeHeatIndex(temperatureF, humidity);         // Fahrenheit is the default

  // Dew point from our own function above
  float dewPointC =
      calculateDewPoint(temperatureC, humidity);

  // Convert Celsius to Fahrenheit: multiply by 9/5, then add 32
  float dewPointF =
      (dewPointC * 9.0 / 5.0) + 32.0;

  // Print the results. The second number in each print() is how many decimal places to show.
  Serial.print("Temperature: ");
  Serial.print(temperatureC, 1);
  Serial.print(" °C / ");
  Serial.print(temperatureF, 1);
  Serial.println(" °F");

  Serial.print("Humidity: ");
  Serial.print(humidity, 1);
  Serial.println(" %");

  Serial.print("Heat Index: ");
  Serial.print(heatIndexC, 1);
  Serial.print(" °C / ");
  Serial.print(heatIndexF, 1);
  Serial.println(" °F");

  Serial.print("Dew Point: ");
  Serial.print(dewPointC, 1);
  Serial.print(" °C / ");
  Serial.print(dewPointF, 1);
  Serial.println(" °F");

  Serial.println();  // Blank line to separate each set of readings
}
Typical output might look like this:
Temperature: 23.6 °C / 74.5 °F
Humidity: 47.3 %
Heat Index: 23.4 °C / 74.1 °F
Dew Point: 11.7 °C / 53.1 °F
Try the Complete Sketch in the Lab
Want to watch all four values update without touching hardware? Run the complete sketch in The Makers Workbench Electronics Lab.
The Lab project below has this circuit wired and the complete sketch loaded. Press Run and open the Serial Monitor.
The wiring is the same as the first Lab section:
| From | To | Why |
|---|---|---|
| DHT22 VCC | ESP32 3V3 | Power for the sensor |
| DHT22 DATA | ESP32 GPIO 4 | The readings travel on this single wire |
| DHT22 GND | ESP32 GND | The sensor's return path |
| 10 kΩ resistor | Between DHT22 DATA and 3V3 | Pull-up for the data line (skip it if the Lab's sensor part already includes one) |
You should see all four lines every two seconds: Temperature: 25.0 °C / 77.0 °F, Humidity: 50.0 %, Heat Index: 24.9 °C / 76.7 °F and Dew Point: 13.9 °C / 56.9 °F. Click the DHT22 in the Lab to open its controls and move the Temperature or Humidity slider. The heat index and dew point are worked out from those two readings, so all four values change together.
What Does Dew Point Tell Us?
Dew point provides different information than relative humidity.
Suppose the ESP32 reports:
Temperature: 75 °F
Humidity: 50 %
Dew Point: 55 °F
That doesn't mean the room will suddenly become 55°F. It means that if air at those conditions is cooled enough, saturation occurs around 55°F. A surface colder than roughly that temperature may therefore be susceptible to condensation. A glass of ice water is far below 55°F, so it gets wet. A wall at 68°F stays dry.
This distinction can be extremely useful in electronics projects. Imagine an ESP32 monitoring an outdoor electronics enclosure. Knowing the enclosure is at 70°F and 80% relative humidity is useful, but the calculated dew point (about 64°F in that case) tells you how close the enclosure's coldest surface can get before moisture becomes a problem.
A future system could compare the calculated dew point against a separate surface-temperature sensor and trigger a warning, heater, fan, or other control before condensation occurs.
Dew point also has a rough comfort scale, in Fahrenheit:
| Dew point | What it feels like |
|---|---|
| Below 55°F | Dry and comfortable |
| 55°F to 65°F | Getting humid |
| 65°F to 70°F | Sticky and uncomfortable |
| Above 70°F | Oppressive |
Why Dew Point Can Be More Informative Than Relative Humidity
Relative humidity depends heavily on temperature. Warm air can hold more water vapor than cool air, so warm air and cool air at the same relative humidity don't contain the same amount of water.
Picture a room with a fixed amount of water vapor in it. If the room warms up, the relative humidity drops, even though no moisture left the room. The dew point stays put, because the actual amount of moisture hasn't changed. That makes dew point a steadier way to track moisture as temperatures swing, and it's one reason weather reports and HVAC applications use dew point alongside relative humidity.
Accuracy of the Calculated Dew Point
Our calculated dew point can only be as accurate as the measurements used to calculate it. The ESP32 can do the math with great precision, but that doesn't make an inexpensive DHT22 a precision instrument. If the humidity or temperature reading is off, the dew point will be off too. A 3% error in humidity, for example, can shift the dew point by a degree or so.
For a DIY environmental monitor, workshop sensor, educational project, or general-purpose automation system, the result is still very useful. If condensation prediction is safety-critical or needs high accuracy, a higher-quality calibrated sensor is the better choice.
Sensor placement affects accuracy as much as the sensor itself:
- Keep it away from heat sources. The ESP32, voltage regulators, and power supplies all run warm, and a sensor next to one will read a degree or two high.
- Give it airflow. The case is vented so air can reach the sensing elements. Don't cover the vents with tape, glue, or foam.
- Keep it out of direct sunlight. Sun can heat the case well above the real air temperature.
- Be patient after big changes. Carry the sensor from a cold garage into a warm room and it can take a minute or more for the readings to settle.
Troubleshooting Common AM2302/DHT22 Problems
Almost every DHT22 problem falls into a short list. Work through it from the top.
| What you see | What to check |
|---|---|
| "Failed to read from DHT22 sensor!" every time | Check the wiring first: VCC to 3.3 V, GND to GND, DATA to the GPIO number in your code. Then check the pull-up resistor. A bare sensor without one is the most common cause. |
| It works for a while, then fails | Loose breadboard connections. Press each wire in firmly or try different holes. A very long data wire (a meter or more) can also cause dropouts. |
| Garbled characters in the Serial Monitor | The baud rate is wrong. Set the Serial Monitor to 115200. |
DHT.h: No such file or directory | The library isn't installed, or the IDE hasn't seen it yet. Install DHT sensor library by Adafruit, then restart the IDE. |
Compile error mentioning Adafruit_Sensor.h | Install Adafruit Unified Sensor from the Library Manager. |
| Board not listed under Tools > Port | Try a different USB cable (many are charge-only), then confirm the ESP32 board package is installed. |
| Upload hangs on "Connecting..." | Hold the BOOT button on the ESP32 while it connects, then release it once the upload starts. |
| Temperature reads a few degrees high | The sensor is probably too close to the ESP32 or another heat source. Move it away on longer wires. |
| Humidity reads 0% or exactly 100% | Treat it as a failed or saturated reading and check the wiring. A sensor that's been wet may need time to dry out. |
If none of that helps, try a different GPIO pin and update the pin number in the code. Sometimes a single bad breadboard row is the culprit, and changing pins moves you away from it.
Where Can You Use an ESP32 and DHT22?
Once you can reliably read and process the sensor, the basic circuit can become the foundation for much more interesting projects.
Examples include:
- Room environmental monitors
- Workshop temperature monitors
- Greenhouse monitoring systems
- Electronics enclosure monitoring
- Server or network cabinet monitoring
- Weather stations
- HVAC experiments
- Temperature-controlled fans
- Humidity alarms
- Condensation monitoring
- Data loggers
- MQTT sensor nodes
- Home automation sensors
- Web-based environmental dashboards
This is where the ESP32 becomes particularly useful. Instead of simply displaying measurements over USB, we can use its Wi-Fi connection to make the sensor accessible across the network.
Taking This Project Further
There are several easy ways to expand the circuit.
An OLED or LCD could provide a local display.
A relay (an electrically controlled switch) could run a fan, heater, humidifier, or dehumidifier based on environmental conditions.
An addressable LED strip could provide an at-a-glance environmental indicator.
Measurements could be saved for long-term analysis or sent to another system over Wi-Fi.
And because we now calculate dew point, a more advanced project could compare it against the temperature of a surface or enclosure and provide a condensation-risk warning.
The ESP32 could also host its own web server, so all four measurements (temperature, humidity, heat index, and dew point) can be viewed from a phone, tablet, or computer.
Conclusion
Connecting an AM2302/DHT22 to an ESP32 takes only a few connections, but the resulting circuit is the foundation for a wide range of environmental monitoring and automation projects.
The DHT22 gives us two direct measurements: temperature and relative humidity. From those, the ESP32 can derive two more: heat index and dew point. That means even this simple sensor provides four useful environmental values.
Temperature, humidity, heat index, and dew point.
More important, those values are now available programmatically inside the ESP32. Instead of just displaying numbers in the Serial Monitor, we can use them to control hardware, detect environmental conditions, record data, trigger warnings, or publish measurements over Wi-Fi.
In an upcoming project, we'll take this considerably further by combining the AM2302 with an addressable LED temperature gauge and an ESP32-hosted web dashboard. That dashboard can display live temperature, humidity, heat index, dew point, minimum and maximum measurements, and other environmental information, while the physical LED strip provides an at-a-glance indication of current conditions.