

Part 4 got your sketch juggling several timed jobs at once without ever freezing up. This part is about the data those jobs operate on.
Here's a wall you've probably already felt coming, even if you haven't hit it yet. Every variable you've written in this series so far has held exactly one value. int ledPin = 9; holds one pin number. unsigned long lastBlink = 0; holds one timestamp. That's worked fine because every project so far has used one LED, one button, one potentiometer. The moment a project needs four LEDs instead of one, writing ledPin1, ledPin2, ledPin3, ledPin4 and then four nearly-identical copies of every line that touches them starts to feel less like programming and more like a losing game of whack-a-mole. And there's a second wall waiting right behind that one: type go into the Serial Monitor, compare it against the word "go" with a plain ==, and watch it silently fail, for a reason that has nothing to do with your spelling.
Both of those problems have real, named fixes, and they're this part's whole job. This article assumes an Uno or Nano for pin numbers, the same as every part before it, and points at Part 2 for other boards. By the end, you'll have built an LED Array Light Show with a Serial Command Console: four LEDs chasing back and forth through an array, a potentiometer scaling how fast they move, a button reversing direction, and typed Serial commands controlling all of it, proving you can store, loop over, and safely read back a whole set of values instead of writing a separate variable for every single one.
What's Actually Happening When You Declare a Variable
Think about a row of storage lockers at a gym. Some lockers are small, just big enough for a phone and a set of keys. Some are big enough for a full gym bag. Every locker has a number on the door, and once you've claimed one, that's the only stuff that goes in it. A variable in C++ (the language Arduino sketches are written in) works the same way: when you write int score = 0;, you're claiming a specific-sized locker in the Arduino's memory, labeling it score, and putting a number inside it. Different variable types are different-sized lockers, and picking the right size matters more on an Arduino than it does on a phone or laptop, because an Uno only has 2,048 bytes of SRAM (the fast, working memory your sketch's variables live in while it runs) total, for everything, all at once.
You've already been using several of these types across Parts 1-4, mostly without a plain-language explanation of what each one costs and holds. The table below puts them all in one place:
| Type | Size on Uno/Nano | What it holds | Where you've already used it |
|---|---|---|---|
bool | 1 byte | true or false, nothing else | ledOn, btnLastReading in Part 4 |
uint8_t | 1 byte | A whole number from 0 to 255, never negative | Pin numbers, like const uint8_t LED_PIN = 13; |
int | 2 bytes | A whole number from -32,768 to 32,767 | analogRead()'s return value, loop counters |
unsigned long | 4 bytes | A whole number from 0 to 4,294,967,295, never negative | millis()'s return value, timestamp variables |
char | 1 byte | A single character, or a small number from -128 to 127 | You haven't used this on its own yet, only inside Serial.print() calls |
A couple of things in that table are worth pulling out. uint8_t means "unsigned (never negative) integer, 8 bits wide." That's exactly why pin numbers get declared as uint8_t instead of plain int in this series: a pin number is never negative, it never needs to go above 255 on any board you're using here, and using the smallest type that can honestly hold the value is a habit that starts mattering a lot once you have more than a couple of variables competing for that 2,048-byte budget. unsigned long is the other end of that same idea: millis() needs to count up into the billions before it wraps around (see Part 4 for exactly why), so it needs all 4 bytes and the "never negative" guarantee that makes the wraparound-safe subtraction trick from Part 4 work at all.
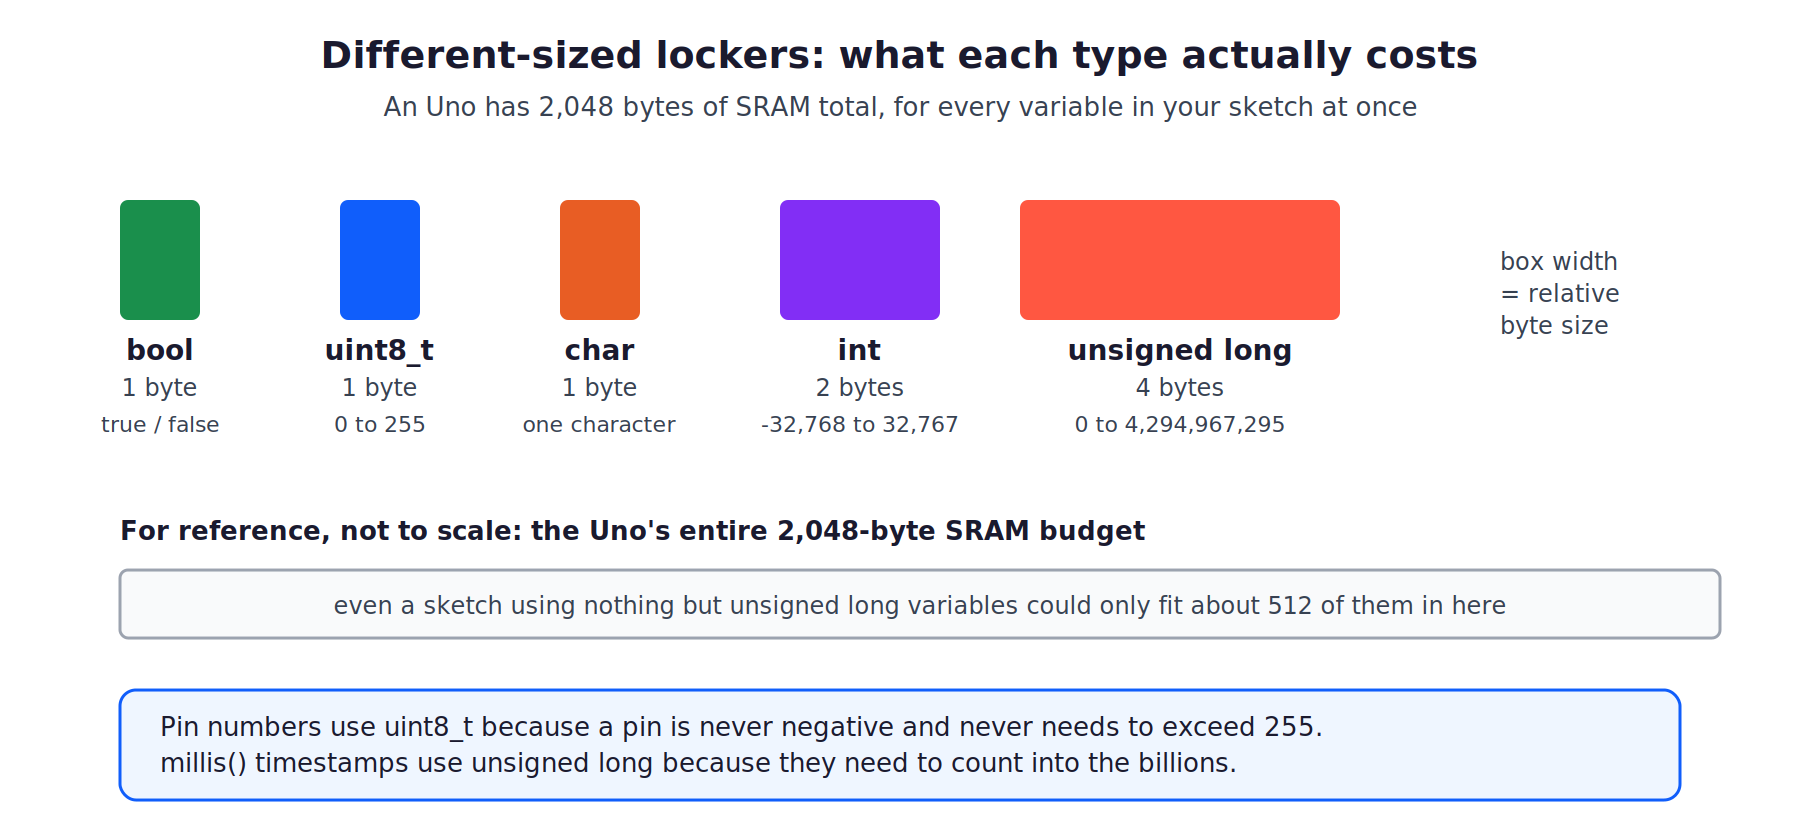
int sits in the middle, and it's the type you'll reach for by default any time you're not sure, the same way you'd grab a medium locker if you didn't know exactly what you were storing yet. Just know that on an Uno's AVR chip (AVR is the family of 8-bit microcontroller chips that Uno and Nano boards are built around), int is only 2 bytes, not 4 like it usually is on a desktop computer. That difference is exactly why Part 4 warned you never to declare a millis() timestamp as plain int: a 2-byte int maxes out at 32,767 and overflows in about 32 seconds of millisecond counting, which is a bug you'd only discover the hard way.
That leaves char, which this article is about to spend a lot of time on, because a single char variable turns out to be the building block for something much bigger: an entire string of text.
What Is an Array?
Picture a carton of eggs. Twelve identical slots, every slot the same size and shape, holding the same kind of thing, and every slot has a fixed position: the first one, the second one, and so on, in a row that doesn't move around. An array in C++ is that egg carton, but for variables. It's a fixed number of same-type "lockers" from the last section, sitting right next to each other in memory, all sharing one name.
The syntax looks like this, side by side with what you'd have written before this article existed:
// The old way, one LED, one variable, from every project through Part 4:
const uint8_t LED_PIN = 9;

// The array way, four LEDs, one variable:
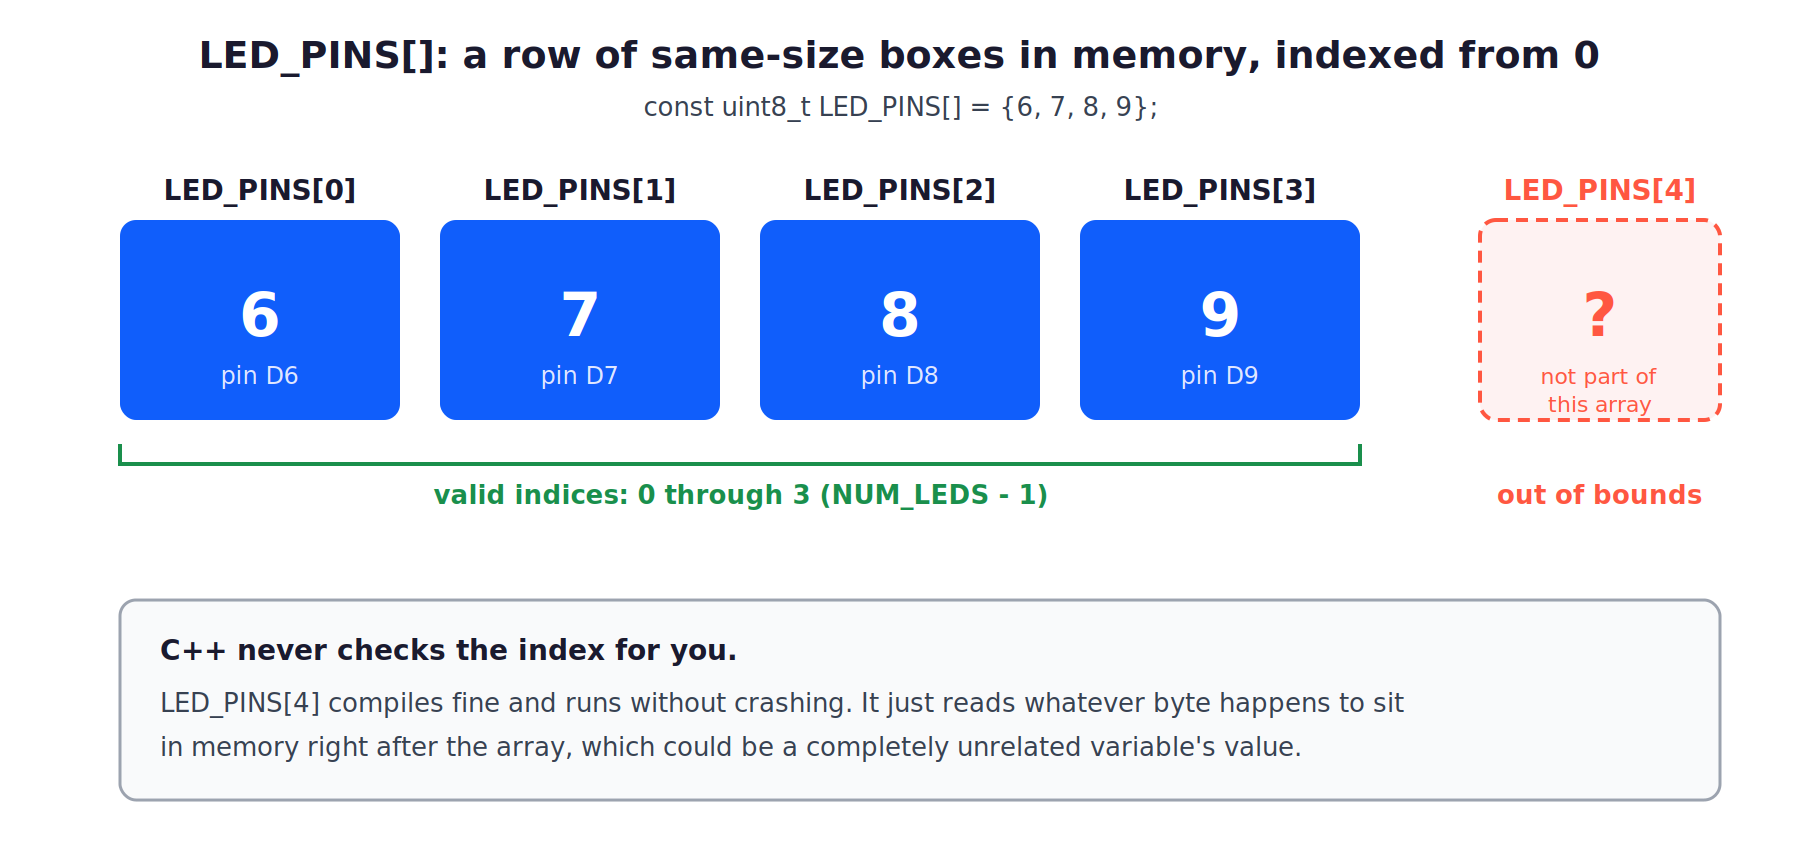
const uint8_t LED_PINS[] = {6, 7, 8, 9};  // four uint8_t "lockers" in a row, named LED_PINS
LED_PINS[] is the whole array's name. The square brackets after the name tell the compiler "this isn't one value, it's a row of them." Inside the curly braces, {6, 7, 8, 9}, are the actual values, one per slot, in order. Leaving the brackets empty like this tells the compiler to count the values you gave it and size the array automatically, four slots for four numbers. You can also state the size explicitly, const uint8_t LED_PINS[4] = {6, 7, 8, 9};, which does the exact same thing but is a little more explicit about your intent. Either form works. This series will use the empty-bracket form, since it means you can never accidentally state a size that doesn't match the list you typed.
Indexing starts at 0, not 1
This is the single most common trip-up with arrays, worth getting right in your head now, before it costs you a debugging session later. To reach into an array and grab one value back out, you use its index, a number in square brackets telling the compiler which slot you want. But the first slot's index is 0, not 1:
LED_PINS[0]  // this is 6, the first value in the array
LED_PINS[1]  // this is 7, the second value
LED_PINS[2]  // this is 8, the third value
LED_PINS[3]  // this is 9, the fourth and last value
Think back to the egg carton, but imagine the slots are numbered the way apartment building floors sometimes are, starting from a ground floor labeled 0 instead of 1. It feels backwards the first few times you write it, and then it stops feeling like anything at all, because it's just how every array in C++ works, no exceptions. A four-element array's valid indices are always 0 through 3, one less than the size, never 1 through 4.
Walking the whole array with a for loop
You've been writing for loops since Part 1 to count iterations. The exact same loop shape is how you visit every slot in an array without typing out each index by hand:
for (uint8_t i = 0; i < 4; i++) {
  digitalWrite(LED_PINS[i], HIGH);  // i counts 0, 1, 2, 3, visiting every slot in order
}
That 4 sitting in the loop condition is doing the same job as writing the array's size out by hand, and it has the same problem hand-typed numbers always have: if you add a fifth LED to the array above and forget to update this 4 to a 5, the loop quietly stops visiting the new one, and nothing about that mistake looks wrong on a skim. C++ gives you a way to compute an array's length instead of guessing at it or writing it down twice:
const uint8_t NUM_LEDS = sizeof(LED_PINS) / sizeof(LED_PINS[0]);sizeof() is a built-in operator (not a function you're calling, more like + or -) that tells you how many bytes something takes up. sizeof(LED_PINS) is the total size of the whole array in bytes, four uint8_t slots at one byte each, so 4. sizeof(LED_PINS[0]) is the size of just one slot, one byte. Divide the whole array's size by one slot's size, and you get the number of slots, no matter how many there are or what type they hold. Add a fifth LED to the {6, 7, 8, 9} list later, and NUM_LEDS recalculates itself the next time you compile, correctly, automatically, without you touching this line again. This is the pattern you'll see in every array-based sketch for the rest of this series: declare the array, then compute its length from the array itself, never type the count by hand a second time.
The gotcha: arrays don't stop you from stepping out of bounds
Here's something C++ will not save you from, and it's worth knowing about before it bites you rather than after: nothing checks whether the index you use is a valid slot in the array. Write LED_PINS[4] against our four-element array above, and the compiler will not complain, because index 4 isn't a valid slot (remember, valid indices for a 4-element array are 0 through 3). At runtime, that line reads whatever byte happens to be sitting in memory right after the array ends, which could be a completely unrelated variable, and hands it back to you as if it were a real, meaningful LED_PINS value. No crash, no warning, often not even an obviously wrong-looking number. That's exactly what makes out-of-bounds array access such a classic, sneaky bug: it can look like it's working, right up until the day it doesn't. You'll see this firsthand in Exercise 2 below. A full deep dive on tracking down bugs like this is planned as its own article; this part only needs you to know the trap exists and to always keep your loop bounds tied to the array's real, computed length.
Two Kinds of Strings: char Arrays vs. the String Class
Every time you've written Serial.println("hello") or Serial.println(F("Part 4 control panel")) in this series, you've already been using an array, whether it looked like one or not. That's the whole secret behind what a "string of text" actually is in C++, and it's worth unpacking properly now, because it explains a failure you will eventually hit if nobody warns you about it first.
The hard way: a C-string is just a char array with one rule
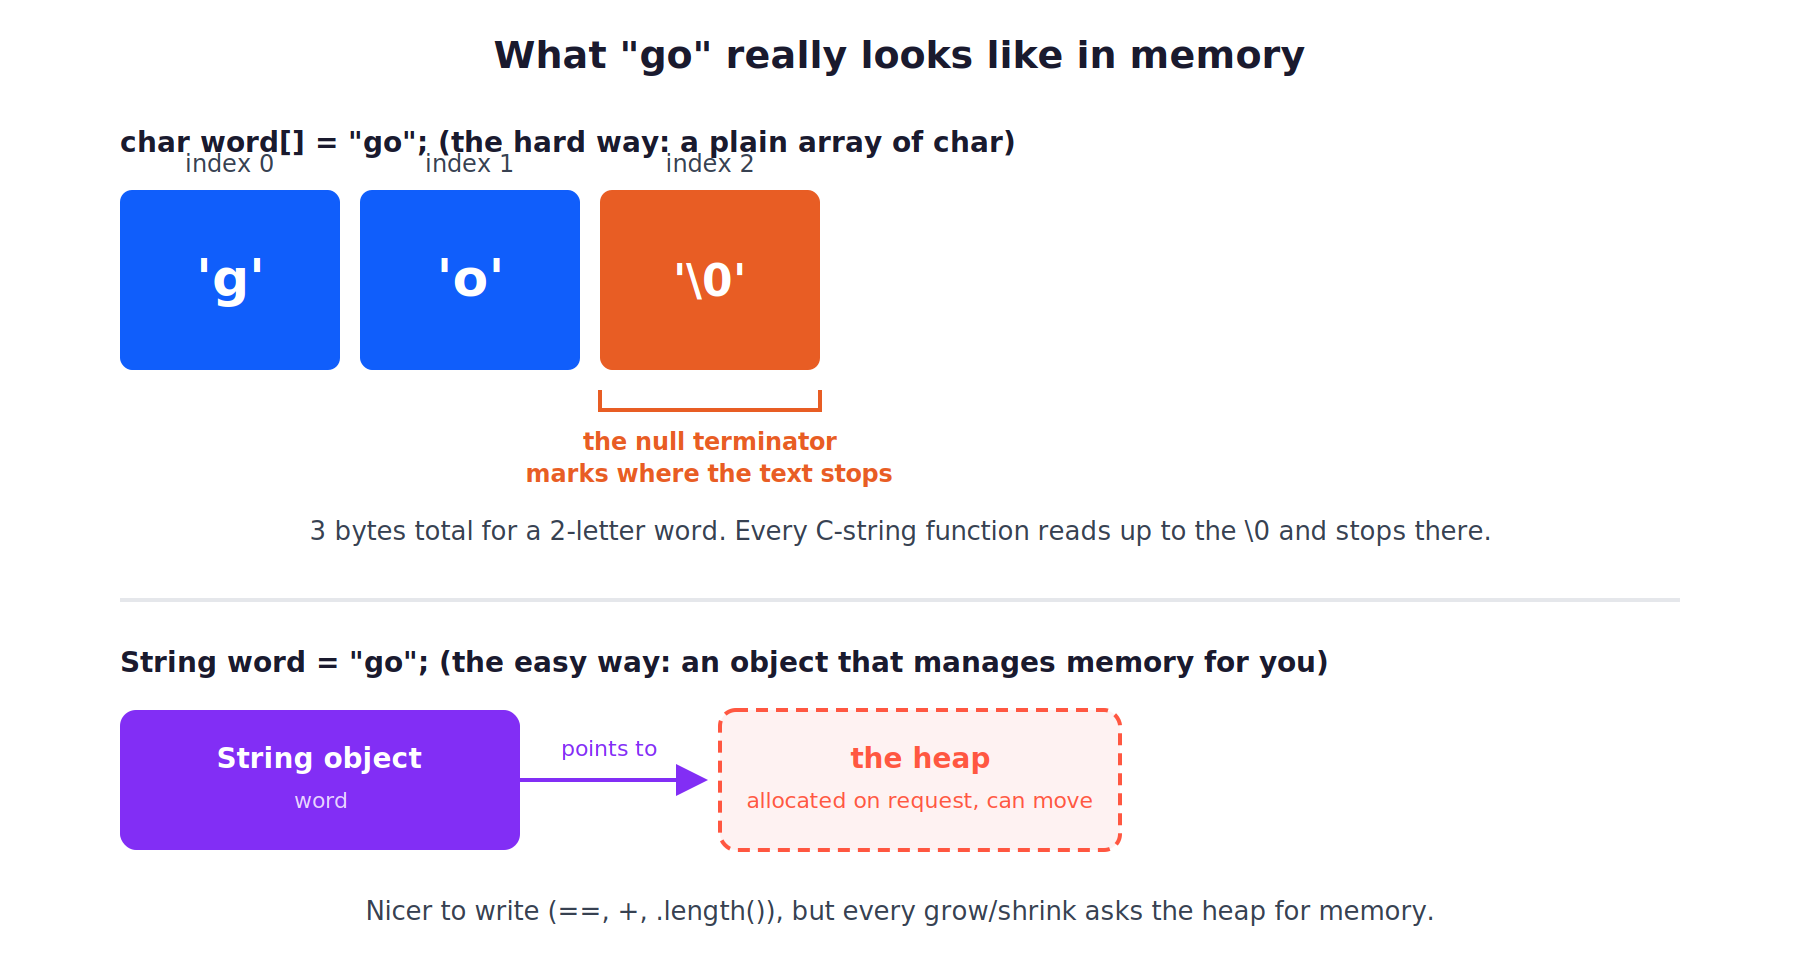
A C-string (short for "C-style string," the original way the C language, which C++ grew out of, represented text) is nothing more than an array of char, with one extra rule: the array must end with a special "null" character, written '\0', that marks where the text stops. Type the word "go" as a string literal anywhere in your code, and the compiler quietly builds this for you:
char word[] = "go";
// What's really sitting in memory: 'g', 'o', '\0'
// That's 3 bytes, not 2, even though "go" is only two letters.
That trailing '\0' isn't optional and it isn't printed or displayed anywhere, it's a silent marker that every C-string function relies on to know where to stop reading. Leave it off, or overwrite it by accident, and functions like Serial.println() will keep reading memory past the end of your intended text until they happen to run into a '\0' somewhere else, printing garbage characters along the way.
You cannot compare two C-strings with a plain ==, and this is the exact silent failure from the Lead. == on a C-string compares the two arrays' addresses in memory (where they're stored), not the actual letters inside them, so if (word == "go") almost always evaluates to false, even when word really does hold the text "go", because they're two completely different arrays sitting at two different memory addresses. The correct tool is a function called strcmp() (string compare), built into a library every Arduino sketch already has access to called <string.h>, no #include needed:
if (strcmp(word, "go") == 0) {  // strcmp returns 0 specifically when the two strings match exactly
  Serial.println(F("matched!"));
}
That == 0 looks backwards the first time you see it. strcmp() doesn't return true or false, it returns a number: 0 when the two strings are identical, and a nonzero number (which string comes first alphabetically) when they're not. Zero for "no difference found" is a convention borrowed straight from the C language, decades before Arduino existed, and every C-string comparison you write will use this same "compare against 0" shape.
The easy way: Arduino's String class
Arduino also gives you a second option, a built-in type just called String (capital S, to tell it apart from the lowercase string word used to describe text in general). String is an object, not a plain array, and it comes with real conveniences a C-string doesn't have on its own: you can compare two Strings directly with == and get the correct answer, glue them together with +, and ask one for its own length with .length(), all without touching strcmp() or counting bytes yourself:
String word = "go";
if (word == "go") {  // this works correctly for String, unlike for a plain char array
  Serial.println(F("matched!"));
}
That's a genuinely nicer piece of code to write and read. It exists for a real reason: managing your own C-string buffers by hand, sizing them correctly, remembering the null terminator, calling strcmp() instead of ==, is exactly the kind of bookkeeping a library exists to take off your hands, the same relationship Part 3 described between a raw sensor protocol and the library that wraps it.
The gotcha: why this series still reaches for char arrays in a running loop()
Here's the trade being made, and it's worth knowing before you default to String everywhere out of habit. A String manages its own memory automatically, growing and shrinking as needed, by asking the Arduino for more memory (allocating on something called the heap, a pool of memory the chip hands out on request while your sketch runs) every time it needs to get bigger. On a desktop computer with gigabytes of RAM, that's invisible and free. On an Uno with only 2,048 bytes total, doing this over and over inside a loop() that runs forever can, over time, leave that memory pool full of small, unusable gaps between allocations, a problem called heap fragmentation. Eventually, a sketch that ran fine for hours can fail to allocate a String it needs and behave strangely or lock up, for no reason that shows up anywhere in your code, days after you last touched it. This is a well-documented, real trap on AVR-based boards like the Uno, and it's exactly why you'll see this article's own practical project reach for a plain char array to parse Serial commands inside loop(), instead of String, even though String would look nicer on the page.
None of that means String is off-limits. It's the right, easy choice for a short-lived value, something built once in setup(), or an occasional interactive read where your sketch has plenty of time between uses to clean up after itself. The rule of thumb this series uses from here on: reach for String for quick, infrequent text handling, and reach for a char array anywhere text needs to be read or rebuilt repeatedly inside a loop() that's meant to run for hours or days unattended.
Exercises
Work through these in order. Each one proves a single rule. By the last one, you're one small step from the practical project.
Bill of Materials
This covers every component used across this article's exercises and its practical project. Nothing new here if you already built Part 4's control panel, just three more of the LED you already have.
| Component | Description | Buy on Amazon | Buy on Temu | Buy on SparkFun | Buy on Seeed Studio |
|---|---|---|---|---|---|
| Arduino Uno | Standard microcontroller board | Amazon Link | Temu Link | SparkFun Link | Seeed Link |
| Breadboard & Jumper Wires | For prototyping connections | Amazon Link | Temu Link | SparkFun Link | Seeed Link |
| 5mm LED (×4) | Four standard through-hole LEDs for the chase array. If you kept Part 4's LED on D9 wired up, you already have one of these four. | Amazon Link | Temu Link | SparkFun Link | Not yet available |
| 220Ω resistor (×4) | One current-limiting resistor per LED in the array | Amazon Link | Temu Link | SparkFun Link | Seeed Link |
| Momentary tactile pushbutton | Normally-open switch that reverses the chase direction | Amazon Link | Temu Link | SparkFun Link | Not yet available |
| 10kΩ potentiometer | Analog input that controls chase speed | Amazon Link | Temu Link | SparkFun Link | Not yet available |
The products linked above may contain affiliate links. The Makers Workbench earns from qualifying purchases when these links are used.
No hardware on hand? You can still build this one. Jump to the Lab embed in the practical project section below and run this whole build right in your browser.
Exercise 1: Turn On a Row of LEDs With One Loop
- You will: Wire up three more LEDs alongside the one from Part 4, declare them as a single array, and turn all four on with one
forloop instead of four separatedigitalWrite()lines. - Parts: Three additional 5mm LEDs and 220Ω resistors (you already have one LED from Part 4, on D9). Reuses the same Uno and breadboard.
- Wiring: LED anodes through a 220Ω resistor each, to D6, D7, D8, and D9. All four cathodes to GND.
- Sketch:
const uint8_t LED_PINS[] = {6, 7, 8, 9};  // one pin per LED, in physical left-to-right order on the breadboard
const uint8_t NUM_LEDS = sizeof(LED_PINS) / sizeof(LED_PINS[0]);  // computed length: 4, without hand-typing it

void setup() {
  Serial.begin(115200);
  for (uint8_t i = 0; i < NUM_LEDS; i++) {
    pinMode(LED_PINS[i], OUTPUT);     // configure every pin in the array as an output
    digitalWrite(LED_PINS[i], HIGH);  // and switch it on immediately
    Serial.print(F("LED on pin "));
    Serial.println(LED_PINS[i]);      // proves the loop visited the array in order: 6, 7, 8, 9
  }
}

void loop() {
  // Nothing to do here, every LED was already switched on once in setup().
}- What to notice: All four LEDs light immediately, and the Serial Monitor prints
6,7,8,9in that exact order, oneforloop instead of four repeated lines. - If it fails: One LED stays dark: check that specific LED's polarity (the flat side of the LED's plastic case is the cathode, which goes to GND) and its resistor, or confirm its pin number in the array matches how you wired it.
Exercise 2: Step Out of Bounds on Purpose
- You will: Deliberately read one slot past the end of the array to see, firsthand, what an out-of-bounds read looks like, so you recognize it if it ever happens by accident.
- Parts: Same as Exercise 1.
- Wiring: Same as Exercise 1.
- Sketch: add one line to the end of Exercise 1's
setup(), after theforloop:
Serial.print(F("LED_PINS[4] (out of bounds!) = "));
Serial.println(LED_PINS[4]); // index 4 doesn't exist on a 4-element array; valid indices are only 0-3- What to notice: The sketch still compiles and still runs, with no error or warning anywhere. The Serial Monitor prints some number for
LED_PINS[4], and that number is not a real LED pin you wired up, it's just whatever byte happened to be sitting in memory right after the array. Remove this line once you've seen it; it's here to prove a point, not to stay in your sketch. - If it fails: If you happen to see
0printed, don't read that as "it worked and returned nothing." It means the byte after the array happened to be zero this one time, on this one upload. Change something else in your sketch (add another variable, for instance) and re-upload, and you'll likely see a different, equally meaningless number. That instability is the actual lesson here.
Exercise 3: Chase Them With millis()
- You will: Turn the static row of lit LEDs into a moving chase light, one LED on at a time, walking through the array using the non-blocking
millis()pattern from Part 4. - Parts: Same as Exercise 1.
- Wiring: Same as Exercise 1.
- Sketch:
const uint8_t LED_PINS[] = {6, 7, 8, 9};
const uint8_t NUM_LEDS = sizeof(LED_PINS) / sizeof(LED_PINS[0]);
const unsigned long STEP_MS = 150;  // how long each LED stays lit before the chase moves to the next one

uint8_t currentIndex = 0;   // which slot in the array is currently lit
unsigned long lastStep = 0;

void setup() {
  for (uint8_t i = 0; i < NUM_LEDS; i++) {
    pinMode(LED_PINS[i], OUTPUT);
  }
  digitalWrite(LED_PINS[currentIndex], HIGH);  // light the first LED before the chase starts moving
}

void loop() {
  unsigned long now = millis();
  if (now - lastStep >= STEP_MS) {              // the same wraparound-safe subtraction pattern from Part 4
    lastStep = now;
    digitalWrite(LED_PINS[currentIndex], LOW);       // turn off the LED we're leaving
    currentIndex = (currentIndex + 1) % NUM_LEDS;    // step forward one slot, wrapping 3 back to 0 automatically
    digitalWrite(LED_PINS[currentIndex], HIGH);      // turn on the new current LED
  }
}- What to notice: The lit LED visibly walks 6 → 7 → 8 → 9 → 6 → 7… forever, and the wrap from index 3 back to index 0 happens with no special-case code anywhere. The
%operator (modulo: it returns the remainder left over after dividing) is doing that work.3 + 1 = 4, and4 % 4 = 0, every time, automatically. - If it fails: The chase runs but never wraps back to the start, or jumps to an unlit or wrong-looking LED: confirm
NUM_LEDSis computed withsizeof, not hand-typed as4, and that the% NUM_LEDSis applied to the already-incremented index, not before it.
Exercise 4: Read a Command the Hard Way (char array)
- You will: Read a typed word from the Serial Monitor into a plain
chararray, the way a C-string really works, and compare it correctly withstrcmp(). - Parts: Arduino Uno only, no new wiring.
- Wiring: None needed beyond Exercise 3's LEDs (they're not used yet in this exercise, just left wired for the project ahead).
- Sketch:
char cmdBuf[16];  // fixed-size buffer for one typed line; 16 bytes is plenty for a short word

void setup() {
  Serial.begin(115200);
  Serial.println(F("Type go or stop and press enter."));
}

void loop() {
  if (Serial.available() == 0) {
    return;  // nothing typed since the last pass; don't wait around for it
  }
  int len = Serial.readBytesUntil('\n', cmdBuf, sizeof(cmdBuf) - 1);  // leaves 1 byte of room for the terminator below
  cmdBuf[len] = '\0';  // readBytesUntil() never adds this for you; skip it and strcmp() reads garbage past your text

  if (strcmp(cmdBuf, "go") == 0) {
    Serial.println(F("recognized: go"));
  } else if (strcmp(cmdBuf, "stop") == 0) {
    Serial.println(F("recognized: stop"));
  } else {
    Serial.print(F("unknown command: "));
    Serial.println(cmdBuf);
  }
}- What to notice: Typing
goorstopgets recognized correctly. Try changingstrcmp(cmdBuf, "go") == 0tocmdBuf == "go"as a quick experiment: it will compile without complaint and never match, even when you type exactlygo, because you're now comparing two memory addresses instead of the actual letters. Put thestrcmp()version back afterward. - A heads-up for later: if the Serial Monitor's line ending setting (bottom-right dropdown of the Serial Monitor window) is set to "Both NL & CR" instead of just "Newline," every line you type arrives with an extra invisible
\rcharacter right before the\n. That\rends up as the last character incmdBuf, right before your manually-added\0, which makesstrcmp()fail to match even a correctly-typed word. The practical project below shows the actual fix.
Exercise 5: Now the Easy Way (String)
- You will: Rewrite Exercise 4 using Arduino's
Stringclass instead, and see exactly what it saves you. - Parts: Same as Exercise 4.
- Wiring: Same as Exercise 4.
- Sketch:
void setup() {
  Serial.begin(115200);
  Serial.println(F("Type go or stop and press enter."));
}

void loop() {
  if (Serial.available() == 0) {
    return;
  }
  String cmd = Serial.readStringUntil('\n');  // builds a String object for you, no fixed-size buffer to manage
  cmd.trim();  // strips leading/trailing whitespace, including a stray \r, regardless of your line-ending setting

  if (cmd == "go") {          // String supports == directly; no strcmp() needed
    Serial.println(F("recognized: go"));
  } else if (cmd == "stop") {
    Serial.println(F("recognized: stop"));
  } else {
    Serial.print(F("unknown command: "));
    Serial.println(cmd);
  }
}- What to notice: This is noticeably shorter than Exercise 4, and
.trim()quietly solves the\rproblem from Exercise 4's heads-up without you needing to know it was ever there. That's the entire case forString: less bookkeeping, at the cost of the heap-fragmentation risk covered above if you lean on it inside aloop()that never stops running. - If it fails: Commands never match even though you're sure you typed them correctly: confirm
.trim()is being called before the comparison, not after.
You're one small step from the full project: an LED array that chases on its own, a potentiometer controlling its speed, a button reversing it, and a Serial console tying it all together, built with a char buffer instead of String, for the reason covered above.
Practical Project: LED Array Light Show with a Serial Command Console
Done looks like: four LEDs chase smoothly back and forth through the array. Turning the potentiometer speeds the chase up or slows it down in real time. Pressing the button reverses which direction it's walking. Typing go, stop, or reverse into the Serial Monitor does the same three things the button and a running chase already do, parsed from a plain char buffer, with no String anywhere inside loop().
What you will build
- An array of 4 LEDs that chase through their positions using the
millis()pattern from Exercise 3, wrapping with%the same way. - A potentiometer on A0 that scales the chase's step interval in real time, using
map()/constrain()from Part 3. - A button on D2 that reverses the chase direction on each press, using the plain edge-detect pattern from Part 4 (this project still doesn't do real debounce; that's still Part 6's job).
- A Serial command console that reads one line into a fixed
charbuffer, strips a stray\rif your line-ending setting adds one, and recognizesgo,stop, andreversewithstrcmp().
Components needed
Everything is already in the Bill of Materials above: Arduino Uno, breadboard and jumper wires, four 5mm LEDs with four 220Ω resistors, one tactile pushbutton, and one 10kΩ potentiometer.
Lab embed
Wiring
| Part | Arduino |
|---|---|
| LED 1 anode, through 220Ω resistor | D6 |
| LED 2 anode, through 220Ω resistor | D7 |
| LED 3 anode, through 220Ω resistor | D8 |
| LED 4 anode, through 220Ω resistor | D9 |
| All four LED cathodes | GND |
| Button, one leg | D2 |
| Button, other leg | GND |
| Potentiometer wiper (center pin) | A0 |
| Potentiometer outer pins | 5V and GND |
No extra libraries here. Every function in this build is core Arduino, the same set Parts 3 and 4 already covered, plus strcmp() from <string.h>, which every sketch already has access to without an #include.
The sketch
const uint8_t LED_PINS[] = {6, 7, 8, 9};                          // one pin per LED, left to right
const uint8_t NUM_LEDS = sizeof(LED_PINS) / sizeof(LED_PINS[0]);  // computed length: 4
const uint8_t BTN_PIN = 2;
const uint8_t POT_PIN = A0;

uint8_t currentIndex = 0;    // which slot in the array is currently lit
int8_t direction = 1;        // +1 walks the array forward, -1 walks it backward
bool running = true;         // "stop" sets this false; "go" sets it back to true
unsigned long lastStep = 0;  // last time the chase moved to a new LED
bool btnLastReading = false;

char cmdBuf[16];  // fixed-size buffer for one typed command line

void setup() {
  for (uint8_t i = 0; i < NUM_LEDS; i++) {
    pinMode(LED_PINS[i], OUTPUT);  // one loop configures every LED pin, however many are in the array
  }
  pinMode(BTN_PIN, INPUT_PULLUP);
  Serial.begin(115200);
  Serial.setTimeout(20);  // readBytesUntil() waits 1000ms by default for a missing newline; 20ms keeps the chase from stalling
  Serial.println(F("Part 5 LED array console. Type go, stop, or reverse."));
  digitalWrite(LED_PINS[currentIndex], HIGH);  // light the first LED before the chase starts moving
}

void loop() {
  unsigned long now = millis();
  serviceChase(now);
  serviceButton();
  serviceSerial();
}

void serviceChase(unsigned long now) {
  if (!running) {
    return;  // "stop" was typed; every LED is already off, so there's nothing to advance
  }
  int raw = analogRead(POT_PIN);              // 0..1023 from the potentiometer wiper
  long stepMs = map(raw, 0, 1023, 40, 400);    // pot scales the chase: fast (40ms) at one end, slow (400ms) at the other
  stepMs = constrain(stepMs, 40, 400);
  if (now - lastStep >= (unsigned long)stepMs) {
    lastStep = now;
    digitalWrite(LED_PINS[currentIndex], LOW);  // turn off the LED we're leaving
    // Adding a signed direction (+1 or -1) to an unsigned index works here because both
    // currentIndex and direction get promoted to a plain (signed) int for the math, so the
    // result can briefly go negative before + NUM_LEDS and % NUM_LEDS pull it back in range.
    currentIndex = (currentIndex + direction + NUM_LEDS) % NUM_LEDS;
    digitalWrite(LED_PINS[currentIndex], HIGH);  // turn on the new current LED
  }
}

void serviceButton() {
  bool reading = digitalRead(BTN_PIN) == LOW;  // INPUT_PULLUP: pressed reads LOW
  if (reading != btnLastReading) {
    btnLastReading = reading;
    if (reading) {  // only act on the press edge, not the release
      direction = -direction;  // flip which way the chase walks the array
      Serial.println(direction > 0 ? F("direction: forward") : F("direction: backward"));
    }
  }
}

void serviceSerial() {
  if (Serial.available() == 0) {
    return;  // nothing typed since the last pass; don't wait around for it
  }
  int len = Serial.readBytesUntil('\n', cmdBuf, sizeof(cmdBuf) - 1);  // leaves 1 byte of room for the terminator
  cmdBuf[len] = '\0';  // readBytesUntil() never null-terminates for you; skip this and strcmp() reads garbage

  if (len > 0 && cmdBuf[len - 1] == '\r') {
    cmdBuf[len - 1] = '\0';  // strips a trailing \r left behind by a "Both NL & CR" line-ending setting
  }

  if (strcmp(cmdBuf, "go") == 0) {
    running = true;
    digitalWrite(LED_PINS[currentIndex], HIGH);  // "stop" turned everything off, so relight the current LED right away
    Serial.println(F("chase: running"));
  } else if (strcmp(cmdBuf, "stop") == 0) {
    running = false;
    allLedsOff();
    Serial.println(F("chase: stopped"));
  } else if (strcmp(cmdBuf, "reverse") == 0) {
    direction = -direction;
    Serial.println(F("chase: reversed"));
  } else if (len > 0) {
    Serial.print(F("unknown command: "));
    Serial.println(cmdBuf);
  }
}

void allLedsOff() {
  for (uint8_t i = 0; i < NUM_LEDS; i++) {
    digitalWrite(LED_PINS[i], LOW);  // one loop over the array turns every LED off, no matter how many are in it
  }
}
Every pin const above matches the Wiring table row for that signal: the four entries in LED_PINS[] are 6, 7, 8, 9, BTN_PIN is 2, POT_PIN is A0. Checked signal by signal, both directions.
What's happening
loop() is a dispatcher, the same shape Part 4 introduced: it calls three functions, in the same order, every single pass, and each one decides for itself whether it has anything to do this time around.
serviceChase() is Exercise 3's chase, with two additions: the step interval now comes from the potentiometer instead of a fixed constant, and the step direction can be +1 or -1 instead of always forward. serviceButton() is the same edge-detect pattern from Part 4's button handling, just flipping direction instead of printing a press duration. serviceSerial() is Exercise 4's hard-way command reader, with the \r-stripping fix from that exercise's heads-up applied for real, plus three recognized words instead of two.
The one line worth slowing down on is the index math inside serviceChase(): (currentIndex + direction + NUM_LEDS) % NUM_LEDS. currentIndex is a uint8_t, which can never legitimately hold a negative number. direction is an int8_t, which can. When you add them together, C++ automatically promotes both to a plain int for the arithmetic (a rule called integer promotion, and the same reason mixing an int and a uint8_t in a calculation doesn't quietly break), so the intermediate result can dip to -1 without wrapping around to some huge unsigned number the way it would if the math stayed in uint8_t. Adding NUM_LEDS before the % guarantees the value going into the modulo is always positive, and % NUM_LEDS brings it back into the valid 0-3 range either way. That's the C++ data-types theme of this whole article showing up directly in working code: picking int8_t here instead of uint8_t is exactly what makes "walk backward through the array" possible at all.
If the project fails the "done" test
The chase runs but only ever goes forward, even after pressing the button: check that serviceButton() is flipping the sign of direction (direction = -direction;) and not accidentally resetting it to a fixed value. Commands typed into Serial never get recognized: open the Serial Monitor's line-ending dropdown and confirm it's set to "Newline" or "Both NL & CR", either is fine now that the \r-stripping line is in place, but "No line ending" will never send the \n this code is waiting for at all.
Troubleshooting
| Symptom | Cause | Fix |
|---|---|---|
| All four LEDs blink together instead of chasing | Every digitalWrite() call is using the same hard-coded pin number instead of LED_PINS[currentIndex] | Confirm every LED write in loop() indexes into the array with the current index variable, not a fixed pin constant |
LED_PINS[4] (or any index at or past the array's length) prints a strange, meaningless number | Reading past the end of the array; valid indices for a 4-element array are only 0-3 | Always bound loops and index math with the array's computed length (sizeof(arr)/sizeof(arr[0])), never a hand-typed number |
| Chase direction never reverses when the button is pressed | Comparing against the wrong lastReading variable, or the press-edge if never flips direction | Confirm btnLastReading is only touched inside serviceButton(), and that direction = -direction; runs on the press edge |
| Serial commands are never recognized, even when typed correctly | Serial Monitor's line ending is set to "Both NL & CR," leaving a trailing \r in the buffer before your added \0 | Add the \r-stripping check shown in the practical project, or switch the Serial Monitor to plain "Newline" |
strcmp() always reports "no match" even for a command you know is right | Comparing with == instead of strcmp() on a plain char array, which compares memory addresses, not text | Use strcmp(buf, "word") == 0, never buf == "word", for C-string comparisons |
| Sketch runs fine for a while, then Serial parsing gets flaky or the board locks up after hours of continuous use | Repeated String allocation inside a loop() that never stops running, fragmenting the Uno's small heap over time | Prefer a fixed-size char buffer for anything read or rebuilt on every pass through loop(), and save String for short, infrequent reads |
NUM_LEDS (or any array-length constant) is wrong after adding or removing an LED from the array | The length was hand-typed as a literal number instead of computed with sizeof | Always compute array length with sizeof(arr) / sizeof(arr[0]) so it can't drift out of sync with the array's actual contents |
| Chase speed doesn't change at all when the potentiometer is turned | POT_PIN wired to the wrong analog pin, or the potentiometer's outer legs swapped so the wiper never reaches 0 or 1023 | Confirm the wiper (center pin) goes to A0, and the outer two legs go to 5V and GND, not both to the same rail |
Where This Fits in the Series
You can now group related values under one name instead of writing a separate variable for each one, walk through them safely with a loop, and tell the difference between a raw char array and Arduino's String class, including which one belongs inside a loop() that has to run for days without a hiccup. That's the last of the data-handling groundwork the rest of this series leans on, from debounced buttons and interrupts to encoders and analog sensors.
- Part 3: Programming Arduino: Sketches, Core Functions, and Libraries
- Part 4: Timing Without delay(), millis(), micros(), and Non-Blocking Loops
- Reading Temperature and Humidity with Arduino and DHT22, a real project already using the
millis()pattern this part builds on
Two more pieces belong to this part's territory but aren't written yet: a closer look at unit conversion and math pitfalls in C++ (temperature scales, integer-versus-float division), and a dedicated deep dive on tracking down buffer-overrun bugs like the one you triggered on purpose in Exercise 2. Both are planned, not yet published.
Wrap-Up and What's Next
An array is a fixed row of same-type variables sharing one name, indexed from 0, and you can walk every slot in it with a for loop instead of writing one line per value. A C-string is just a char array with a hidden '\0' marking where the text ends, compared with strcmp(), never ==. Arduino's String class wraps that same idea in something friendlier to write, at the cost of memory it manages for you behind the scenes, which is exactly why a sketch meant to run for days still reaches for a plain char buffer inside loop(). And the plain types you've been using since Part 1, int, bool, uint8_t, unsigned long, all come down to the same idea: a fixed-size box in memory, sized for exactly what it needs to hold and nothing more.
Next up, Part 6: Digital I/O You Can Trust, where a mechanical button's real chatter finally gets fixed properly with genuine debounce logic, the skill this series has been deliberately holding back until now.
Want to go deeper? Download the full eBook once the series is complete, and subscribe for the rest of the Arduino Mastery Series.
Hack The World and Make Awesome.




