

Twenty years ago, getting a single LED to blink under your own code meant a soldering iron, a chip datasheet thick enough to stop a door, and a separate hardware programmer that alone cost more than most laptops do today. Now it means a \\\\0 board, one USB cable, and about ten minutes. That collapse, from needing an engineering degree to working right out of the box, is the entire reason Arduino exists, and it's why the platform shows up everywhere from grade-school classrooms to museum exhibits to prototypes headed for a Kickstarter campaign.
Whether you're a student blinking your first LED, a DIY hobbyist automating your home, or an engineer roughing out a prototype, Arduino has almost certainly crossed your path. That kind of reach doesn't happen by accident: this part covers what makes Arduino work, why it became the go-to platform for electronics learners worldwide, and why, even after nearly two decades, it's still at the top of the stack.
What is Arduino?
Arduino is an open-source electronics platform built around simple hardware, a user-friendly programming environment (the Arduino IDE), and a vast library of software functions. At its core, an Arduino board reads inputs from the physical world, things like a button press, a temperature reading, or a light level, and responds with outputs like turning on an LED, driving a motor, or sending data over serial. That input-output loop is the foundation of virtually every project you'll ever build on the platform.
What separates Arduino from raw microcontroller development isn't the chip itself. The ATmega, ARM, and RP2040 processors used across the board lineup are available from other vendors too. What Arduino brings to the table is the complete package: standardized hardware with clearly labeled pins, a programming environment that strips away toolchain complexity, and a library ecosystem so comprehensive that you rarely need to write low-level driver code from scratch. When you pick up a sensor or display, there's almost always a working Arduino library waiting for it.
Arduino boards range from classic models like the Uno to advanced options like the Portenta H7. These boards use various microcontrollers (AVR, ARM, RP2040, and more) and come in different form factors for different use cases. They're all programmed through the free Arduino IDE, which supports a simplified version of C++ and thousands of libraries covering sensors, displays, communication modules, motor drivers, and more.
The real value of Arduino is that it was designed to democratize electronics. You don't need an engineering degree to get started. With a $20 board, a USB cable, and a few lines of code, you can build everything from data loggers to robotic arms. The barrier to entry is low, and the ceiling is surprisingly high.
The Origins and History of Arduino
Arduino was born in 2005 at the Interaction Design Institute Ivrea (IDII) in Ivrea, Italy. The founding team, including Massimo Banzi, David Cuartielles, Tom Igoe, Gianluca Martino, and David Mellis, set out to build a low-cost, simple platform that would let students create interactive physical projects without needing expensive tools or a deep background in electrical engineering. At the time, microcontroller development kits cost hundreds of dollars, required proprietary software licenses, and assumed significant technical knowledge before you could get anything working.
Named after a bar in Ivrea where the team used to meet, Arduino was originally built as a more accessible alternative to the BASIC Stamp. It quickly gained traction in academic and maker spaces thanks to its open-source philosophy. The hardware schematics and software were made freely available to use, modify, and distribute, an open approach that invited global contributions and made it possible for anyone to manufacture compatible boards or build businesses on top of the platform.
A few major milestones shaped Arduino's trajectory:
- 2005: The first Arduino board is built using an ATmega8 chip and debuts at IDII.
- 2007-2010: Boards like the Diecimila, Duemilanove, and Uno define the standard form factor and gain serious traction in education and the growing Maker community.
- 2011-2015: The Leonardo, the Due (Arduino's first 32-bit board), and the Mega 2560 expand the platform's reach into more demanding applications, from USB HID devices to high-speed signal processing.
- 2015-2016: A trademark dispute creates a split between Arduino.cc and Genuino, briefly creating two competing organizations. The community navigates the disruption, and the two sides reconcile in 2017.
- 2018-2023: The MKR series targets IoT and low-power applications. The Nano family brings modern connectivity to compact form factors. The Portenta and GIGA R1 WiFi push into industrial and AI territory.
- 2023-present: The Uno R4 series launches with a 32-bit Renesas processor, USB-C, and built-in WiFi on the R4 WiFi variant, modernizing the most iconic board in the lineup without sacrificing backward compatibility.
What's remarkable about this growth is that it was almost entirely organic. Arduino didn't scale through venture capital or aggressive marketing. It spread because students taught each other, makers posted tutorials, retailers stocked kits, and a global community formed around a shared enthusiasm for building things. That kind of momentum is hard to manufacture and even harder to stop.
Why Arduino Became So Popular
Dozens of microcontroller platforms have come and gone since 2005. Many offered better specs, lower prices, or more advanced features at launch. None of them built the kind of global following that Arduino did. Arduino didn't just survive the competition, it set the standard that everyone else is still being compared against. The question worth asking isn't whether Arduino won, it's why, and the answer tells you something important about what actually drives adoption in the maker and education space.
Three core factors explain Arduino's rise: simplicity, accessibility, and community. What made Arduino unusual is that it got all three right simultaneously, and at a time when the Maker Movement and STEM education were both accelerating globally. Each factor reinforced the others. Simplicity drove early adoption. Accessibility kept the barrier low enough for the audience to grow. Community turned that growing audience into a self-sustaining ecosystem that compounds in value with every new user, every new tutorial, and every new project shared online. Together they created something no competitor has fully replicated.
1. Simplicity
Before Arduino, getting a microcontroller to do something useful meant wrestling with datasheets, configuring fuse bits, setting up a compiler toolchain, writing startup code, and understanding hardware register configuration just to toggle a single pin. It wasn't impossible, but it required a significant investment of time and background knowledge before you'd see any results at all. Most beginners gave up before they got there.
Arduino eliminated almost all of that friction. You plug in the board via USB, open the IDE, write a few lines of code using readable function names like digitalWrite() and analogRead(), and click Upload. The board has a bootloader pre-installed that handles everything over the same USB connection you use for power. No external programmer, no driver installation in most cases, no command line required.
That simplicity isn't a crutch. The underlying hardware is fully real, the C++ is fully real, and nothing prevents you from writing directly to hardware registers when you need to. But the default experience removes every unnecessary barrier, which means a complete beginner can have something working on their first evening. That first success is what keeps people going, and Arduino understood that before almost anyone else in the space.
2. Accessibility
Simplicity alone doesn't create a global platform. The barrier to entry also has to be low in terms of cost, availability, and the ability to get help when you're stuck.
On cost, Arduino delivered from day one. Original boards were priced for students, and the open-source hardware model meant compatible third-party boards flooded the market at even lower price points. Today you can get a functional Arduino Uno clone for a few dollars and a full starter kit with sensors, LEDs, resistors, and a breadboard for under $30. For classrooms especially, that price point changes what's possible.
The IDE runs on Windows, macOS, and Linux without any paid licenses or proprietary tools. You don't need a $500 development kit or a specific operating system. Just a computer and a USB cable. Arduino Cloud removed even that requirement by offering a fully browser-based editor that works without installing anything locally.
Physical availability followed adoption. Once Arduino appeared in tutorials, retailers wanted to stock it. Adafruit and SparkFun built entire businesses around Arduino-compatible hardware and education. Microcenter, Fry's Electronics, and even Radio Shack carried starter kits on their shelves. That retail presence meant someone could pick up a board on impulse and be building something that same evening, with no waiting for shipping.
3. Community and Education
Arduino's community is probably its most durable competitive advantage, because it took years to build and it continues to compound in ways a competitor releasing better hardware simply cannot replicate overnight.
Arduino's rise coincided almost perfectly with the Maker Movement, the explosion of STEM education initiatives, and the early days of YouTube as a platform for technical tutorials. Forums, Reddit communities, Stack Overflow threads, and Hackaday project logs became places where beginners could get answers and experienced builders could share what they'd made. That content is still there, still being indexed, and still helping people solve problems every day.
Hardware retailers built deep tutorial libraries around Arduino. Adafruit's learning system, SparkFun's hookup guides, and Element14's community content gave Arduino-specific documentation for sensors, modules, and peripherals that no other platform could match in scope. When you buy an I2C sensor today, there is almost certainly an Arduino library and a step-by-step tutorial for it already written and waiting.
The reach extended into formal education as well. Organizations like the Boy Scouts of America incorporated Arduino into merit badge programs. Universities use it in introductory engineering courses. Middle and high school STEM programs rely on it because the learning curve is manageable for teachers who aren't electrical engineers themselves. Even large brands like SparkFun, Adafruit, Microcenter, Jaycar, and Fry's Electronics embraced Arduino early, offering retail kits with sensors, components, and beginner instructions that packaged the hardware, the software, and the learning materials together as a complete starting point.
The result is a virtuous cycle. More users create more tutorials. More tutorials bring more users. More users create demand for more compatible hardware. More hardware creates more projects. That cycle has been running for nearly two decades, and the accumulated body of community knowledge represents an advantage that newer platforms are still working to catch up with.
Benefits of Arduino
Understanding why Arduino became popular is one thing. Understanding why it actually works well as a development platform is another. Popularity can be manufactured through marketing and timing. Staying power has to be earned. Arduino has held its position as the default platform for electronics education and rapid prototyping for nearly two decades, and that's not an accident. The platform offers a set of practical advantages that compound as your projects grow in complexity, and that remain relevant whether you're a first-time builder or an experienced engineer validating a new hardware concept.
These aren't marketing claims. They're the reasons that professionals who could use any development environment often choose to prototype in Arduino first, and the reasons that beginners who start with Arduino tend to stay within the ecosystem as their skills develop. Let's look at what makes it work.
Hardware and Software Built to Work Together
One of the most underappreciated aspects of Arduino is how much invisible work the platform does to make hardware and software work together without friction. Every official board ships with a bootloader pre-installed that handles the USB upload process without needing an external programmer. The IDE automatically adapts its compilation settings based on which board you select, so the same sketch compiles correctly for an Uno, a Mega, or a Due without manual toolchain configuration.
The Arduino core libraries abstract the hardware details of each microcontroller behind consistent, readable function names. digitalWrite(), analogRead(), Wire.begin(), and Serial.print() work predictably across the entire board lineup, even though the underlying hardware implementation differs significantly between an 8-bit AVR and a 32-bit ARM processor. That consistency is powerful: skills and code patterns developed on a $10 Uno transfer directly to a $40 Nano 33 IoT or a $100 Portenta H7.
For advanced users, none of this gets in the way. You can write directly to hardware registers, use interrupt service routines, configure timers at the register level, and do everything else the microcontroller supports natively. Arduino's abstraction layer is a floor that accelerates development, not a ceiling that limits it.
Cross-Platform Development and Language Support
The Arduino IDE runs on Windows, macOS, and Linux with no licensing costs, which means no platform lock-in and no friction for teams working across different operating systems. The language is a simplified dialect of C++ that gets you writing meaningful application logic immediately, without startup code, linker scripts, or memory map configuration.
As projects grow more complex, the tooling grows with them. PlatformIO offers a professional development environment built into VS Code, with per-project library management, version control integration, advanced debugging support, and multi-board project handling. Arduino Cloud adds a browser-based IDE alongside OTA (Over-the-Air) firmware updates and IoT dashboards, which is especially useful for deployed devices where physical access for updates isn't always practical.
Some boards, including those based on the ESP32 and RP2040, also support MicroPython and CircuitPython alongside the standard C++ workflow. That flexibility means teams with mixed programming backgrounds can contribute to the same project in the language that fits them best.
An Unmatched Library and Documentation Ecosystem
This is where Arduino's years of community investment pay off most concretely. The Arduino Library Manager currently indexes thousands of libraries covering virtually every sensor, display, communication module, motor driver, and peripheral a maker or engineer is likely to encounter. BME280 environmental sensor, DS3231 RTC, WS2812B LED strips, SSD1306 OLED display, GPS modules, fingerprint scanners, e-ink displays: there's almost always a mature, well-documented library available for it before you even open the IDE.
Those libraries include working example sketches you can load and run immediately, along with documentation explaining every function, parameter, and return value. For a beginner, this means getting a new sensor working in under an hour without understanding the I2C or SPI protocol at all. For experienced builders, it means integrating a new component in minutes rather than writing and debugging driver code from scratch. Either way, the library ecosystem dramatically accelerates the path from idea to working hardware.
Beyond libraries, the Arduino Language Reference at arduino.cc documents every core function clearly, with syntax examples and notes on common pitfalls. Nearly two decades of forum posts, Stack Overflow answers, and tutorial articles cover an enormous range of use cases and edge cases. Whatever you're trying to do, the chances are very good that someone has already documented how to do it.
An Educational Platform That Grows With You
Most educational tools have a ceiling. At some point, you grow past them and have to switch to something else, learning a new environment from scratch. Arduino is genuinely unusual in that the same platform that teaches you to blink an LED is also capable of running real-time operating systems, processing audio, driving industrial actuators, and running machine learning inference. The learning curve starts gently and the ceiling is surprisingly high.
For complete beginners, readable function names, abundant examples, and immediate visual feedback create the fastest path from zero to working project. For intermediate builders, the library ecosystem and community knowledge accelerate development significantly. For advanced users, the hardware abstraction layer can be bypassed entirely when raw performance demands it, and professional tools like PlatformIO and the Arduino CLI integrate cleanly with version-controlled, automated build workflows.
This scalability matters especially in educational settings, where students at very different skill levels need to be productive in the same environment. Arduino handles that range better than almost anything else available, which is a big part of why it's remained the default choice in STEM education for as long as it has.
Known Limitations and Pain Points
No platform is right for every job, and Arduino is no exception. Part of learning to use it well is understanding where it struggles and why, so you can make informed decisions before you're halfway through a build and running into walls. The limitations covered below aren't reasons to avoid Arduino. Most of them have straightforward workarounds, and many disappear entirely when you choose the right board for the project at hand. But they are things every Arduino user should know before they start wiring, because the builders who understand their tools make better hardware decisions from the beginning.
Limited Processing Power on Classic Boards
The Arduino Uno's ATmega328P is an 8-bit microcontroller running at 16 MHz with 2 KB of SRAM and 32 KB of flash. That's more than enough for a wide range of projects, but it does hit a ceiling. Parsing complex JSON from a web API, running audio DSP algorithms, animating large numbers of WS2812B LEDs with complex patterns, or handling multiple communication protocols simultaneously can all push the Uno to its limits quickly, and running out of SRAM is one of the most frustrating problems to debug because it doesn't always produce obvious errors.
The solution isn't to avoid Arduino, it's to match the board to the workload. The Mega 2560 offers significantly more memory and I/O. The Due and Nano 33 series step up to 32-bit ARM processors with much larger SRAM. The GIGA R1 WiFi and Portenta H7 handle demanding compute tasks. Arduino is an ecosystem of boards, not a single chip, and scaling up is a straightforward path.
No Native Wireless on Classic Boards
The Uno, classic Nano, and Mega 2560 have no onboard WiFi, Bluetooth, or Ethernet. Adding wireless means attaching an external module like an ESP8266, HC-05, or ENC28J60 Ethernet shield, which adds wiring complexity, increases code overhead, and often introduces its own library quirks to manage.
If connectivity is a core requirement of your project, it's worth starting with a board that has it built in rather than bolting it on later. The Nano 33 IoT, MKR WiFi 1010, and Uno R4 WiFi all include onboard wireless and are programmed almost identically to a classic Uno. Choosing the right starting point costs less time in the long run than retrofitting connectivity after the fact.
Voltage Mismatches Between Boards and Peripherals
Classic Arduino boards like the Uno and Mega run at 5V logic, meaning their I/O pins swing between 0V and 5V. Many modern sensors, displays, and breakout boards, particularly anything designed for battery-powered or mobile applications, operate at 3.3V. Connecting a 5V output directly to a 3.3V input can damage the peripheral immediately or cause intermittent failures that are difficult to diagnose.
This is one of the most common sources of hardware damage for beginners, and it's entirely preventable. Always check the operating voltage of every component before wiring it up. Use a bidirectional logic level shifter when interfacing 5V and 3.3V devices, or choose a 3.3V Arduino board for projects that are predominantly built around modern 3.3V peripherals. The Due, Nano 33 series, and MKR family all operate at 3.3V natively.
The delay() Trap
Almost every introductory Arduino example uses delay() for timing. It's easy to understand and it works perfectly for simple single-task demos. The problem is that while delay() is counting down, the processor is completely blocked. It can't read a button, poll a sensor, update a display, or respond to any external event. For a sketch doing exactly one thing, that's fine. For any project where multiple things need to happen at once, delay() quickly becomes the source of sluggish, unresponsive behavior that's hard to pin down.
The solution is non-blocking timing using millis(), where you record when an event last happened and check whether enough time has elapsed in each loop iteration rather than halting the processor to wait. This pattern takes a little time to internalize, but it makes it possible to handle multiple concurrent tasks cleanly. It's one of the most important patterns to learn before your projects grow beyond simple demos, and we cover it in depth in Part 4 of this series.
Board Descriptions
The five boards below form the foundation of most tutorials, kits, and community projects. They're the boards you'll see referenced most often in this series and across the Arduino ecosystem as a whole. Understanding what each one is genuinely good at, and where it runs out of capability, is the most practical knowledge you can take away from this article before moving on to Part 2, where we go deep on board selection, the rest of the modern lineup (including the Uno R4, GIGA R1 WiFi, Portenta family, and RP2040-based boards), and a full side-by-side spec comparison.
Each description below closes with a short spec list that uses some vocabulary this series hasn't taught yet, terms like flash, SRAM, PWM, and UART. You don't need to know what any of them mean yet: SRAM and flash get a proper plain-language explanation in Part 3, and PWM, UART, I2C, and SPI each get their own explanation as this series reaches them. For now, more of a given spec just means more capability in that category.
Arduino Uno
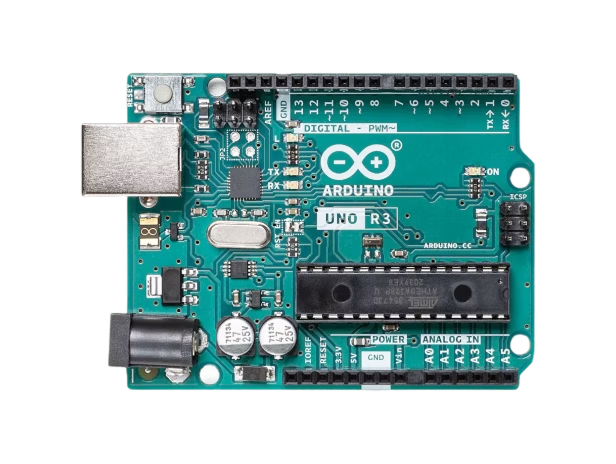
Photo: Arduino, CC BY-SA 4.0
The Uno is the reference board for the entire Arduino ecosystem. Nearly every tutorial targets it by default, nearly every Arduino shield is designed to fit its form factor, and nearly every library lists it as a supported platform. If you're learning Arduino for the first time, this is where to start, not because it's the most powerful board, but because the community resources, tutorials, and example projects available for it are simply unmatched.
The Uno uses the ATmega328P running at 16 MHz with 5V logic, 32 KB of flash, and 2 KB of SRAM. It provides 14 digital I/O pins (6 with PWM capability), 6 analog inputs, and one hardware UART. It connects via USB-B and accepts 7-12V through a barrel jack for standalone power.
Where it struggles: the 2 KB of SRAM fills up quickly on complex projects, there's no wireless connectivity, and 16 MHz isn't enough for anything computationally intensive. When you hit those limits, the path forward is clear: move to the Mega for more I/O and memory, or to the Nano 33 IoT or Uno R4 WiFi for wireless capability.
Best for: Learning, prototyping, any project that fits within its I/O and memory limits, and situations where community support and tutorial availability matter most.
Key Specs:
- ATmega328P, 16 MHz, 8-bit AVR
- 32 KB flash / 2 KB SRAM / 1 KB EEPROM
- 14 digital I/O (6 PWM), 6 analog inputs
- 5V logic, USB-B connector
Arduino Nano
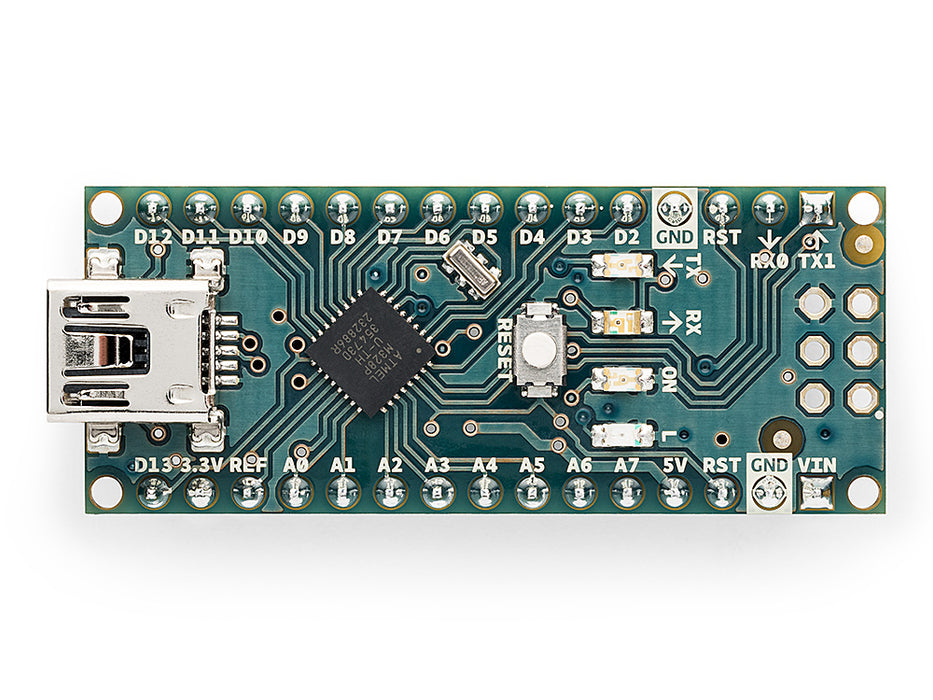
Photo: Arduino, CC BY-SA 4.0
The Nano is essentially an Uno that fits directly on a breadboard. It runs the same ATmega328P chip at the same 16 MHz, with the same 32 KB flash and 2 KB SRAM, and is programmed with identical sketches. The difference is physical: the Nano is small enough to embed permanently in a finished project rather than just serving as a prototyping tool.
A common workflow is to prototype on a full-sized Uno, where the larger form factor makes wiring easier, then swap in a Nano for the final build to save space and cost. The Nano provides 22 I/O pins total (including analog-only A6 and A7 not present on the Uno), connects via USB Mini or USB-C depending on the variant, and sits neatly across the center of a standard breadboard.
Be aware that the Nano family has expanded considerably. The original Nano uses the same 5V AVR architecture as the Uno. The Nano Every steps up to the more capable ATmega4809. The Nano 33 IoT, 33 BLE, and RP2040 Connect are 3.3V boards with onboard wireless, significantly more memory, and entirely different processor architectures. Check the specific variant carefully before buying, especially if purchasing clones online.
Best for: Compact and permanent installs, wearables, breadboard-integrated builds, and any project where the Uno form factor is simply too large.
Key Specs:
- ATmega328P, 16 MHz, 8-bit AVR (classic Nano)
- 32 KB flash / 2 KB SRAM
- 22 I/O pins (6 PWM, 8 analog including A6 and A7)
- 5V logic, USB Mini or USB-C depending on variant
Arduino Mega 2560
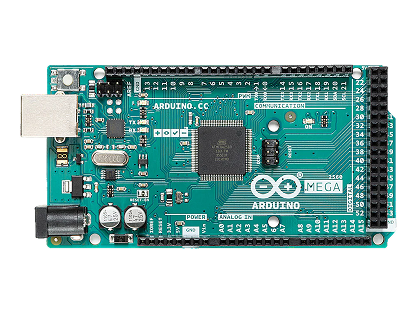
Photo: Arduino, CC BY-SA 4.0
When an Uno or Nano doesn't have enough pins or memory, the Mega 2560 is the logical next step within the classic AVR family. It uses the ATmega2560 running at 16 MHz with the same 5V logic as the Uno, but expands the I/O dramatically: 54 digital pins (15 with PWM), 16 analog inputs, four hardware UARTs, and 256 KB of flash with 8 KB of SRAM.
The Mega earns its place as the workhorse board for projects that need to control a lot of things simultaneously. 3D printers running Marlin firmware, CNC controllers, large LED matrix systems, and robotics platforms with many servos and sensors regularly use the Mega specifically because they need more pins than any other classic Arduino board provides. The four hardware serial ports are particularly valuable for projects that communicate with multiple serial devices simultaneously, like a GPS module, a GSM modem, and a Bluetooth adapter all running at once, without having to share a single UART.
The tradeoff is size: the Mega is physically large, which matters for compact builds. And while 256 KB of flash is a major step up, the 8 KB of SRAM is still a real constraint for projects that work with large data structures, string manipulation, or complex state machines.
Best for: High pin count projects (3D printers, CNC, large-scale robotics), multi-serial-device communication, and builds that need more code space than the Uno provides.
Key Specs:
- ATmega2560, 16 MHz, 8-bit AVR
- 256 KB flash / 8 KB SRAM / 4 KB EEPROM
- 54 digital I/O (15 PWM), 16 analog inputs
- 4 hardware UARTs, 5V logic, USB-B connector
Arduino Due
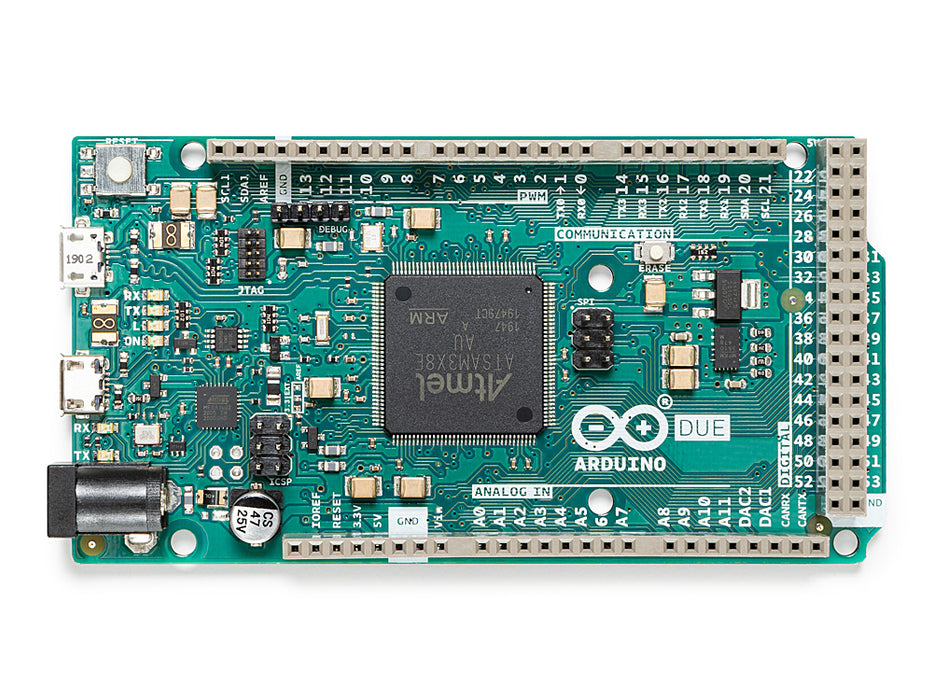
Photo: Arduino, CC BY-SA 4.0
The Due was Arduino's first 32-bit board, and it still represents a meaningful capability jump from the classic AVR lineup. It uses an ARM Cortex-M3 running at 84 MHz with 512 KB of flash and 96 KB of SRAM, making it substantially more capable for computationally demanding tasks. It also includes two 12-bit DAC outputs, which means it can generate true analog voltages rather than just simulating them with PWM. This makes it useful for audio output, precision waveform generation, and analog control applications that the Uno simply can't handle.
The critical thing to know about the Due is that it runs at 3.3V logic, not 5V. This is easy to overlook if you're accustomed to the Uno, and connecting a 5V signal to a Due I/O pin can permanently damage the microcontroller. Every sensor, display, and module you connect to a Due needs to be verified for voltage compatibility first. It also has two Micro USB ports: one for programming (connected to the USB-to-serial chip) and one native USB port that connects directly to the ARM processor for USB HID functionality.
Best for: Signal processing, audio generation, projects requiring true analog output through the DAC, and any application where 8-bit AVR performance isn't sufficient but you want to stay within the standard Arduino IDE workflow.
Key Specs:
- SAM3X8E ARM Cortex-M3 @ 84 MHz, 32-bit
- 512 KB flash / 96 KB SRAM
- 54 digital I/O, 12 analog inputs, 2 DAC outputs
- 3.3V logic (not 5V tolerant), two Micro USB ports
Arduino Leonardo
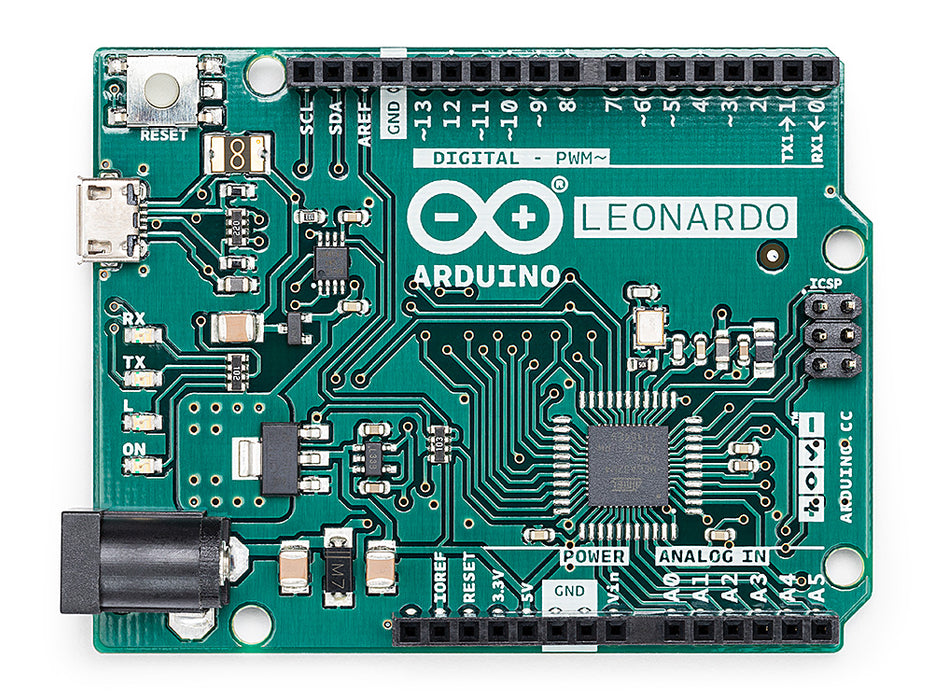
Photo: Arduino, CC BY-SA 4.0
The Leonardo is built around the ATmega32u4, a chip with native USB hardware built directly into the microcontroller itself. This is architecturally different from the Uno and Mega, which use a separate USB-to-serial chip for computer communication. The result is that the Leonardo can appear to a connected computer as a USB keyboard, mouse, gamepad, or MIDI controller rather than just a serial port, and it requires no special drivers on Windows, macOS, or Linux to do it.
This native USB HID capability opens up a category of projects that isn't possible with a standard Uno. Custom macro keyboards, accessibility input devices, DIY game controllers, automated UI testing rigs that simulate keyboard and mouse input, and MIDI controllers for music production all become straightforward builds. The Leonardo handles the USB protocol in hardware, so you can focus on the application logic rather than the communication layer.
One thing to know: because the Leonardo handles USB through the main microcontroller rather than a separate chip, sketch upload behavior is slightly different from the Uno. The IDE needs to reset the board via a specific sequence to start an upload, and while(!Serial) in setup code behaves differently than on the Uno since the USB connection is handled by the same processor running your code. These are minor issues once you know about them, but they can be confusing the first time you encounter them.
Best for: Any project requiring USB HID emulation: custom keyboards, mouse controllers, MIDI instruments, accessibility tools, and automated UI testing.
Key Specs:
- ATmega32u4, 16 MHz, native USB HID
- 32 KB flash / 2.5 KB SRAM
- 20 digital I/O (7 PWM), 12 analog inputs
- 5V logic, Micro USB connector
Why Arduino Still Matters Today
In 2025, the honest question is whether Arduino still deserves its dominant position or whether it's running on inertia. The competition is real. The ESP32 is faster, cheaper, has onboard wireless, and its own thriving ecosystem. The Raspberry Pi runs a full Linux OS. STM32 offers professional-grade performance at competitive prices. So why does Arduino still dominate beginner and prototyping workflows across all experience levels?
The answer isn't hardware specs. On raw specs alone, there are better options for almost every use case. The answer is everything built around the hardware: the documentation depth, the library ecosystem, the community knowledge base, the standardized tooling, and two decades of accumulated tutorials that make almost every problem a solved problem. That infrastructure doesn't get replicated quickly, and it's worth more in practice than most spec comparisons suggest.
The Fastest Path from Idea to Working Hardware
No other platform gets you from a blank editor to a running circuit as quickly as Arduino. The IDE is approachable, the upload process is reliable, error messages are readable, and the built-in examples are immediately runnable without modification. When you're at the early stage of a project where you need to validate whether an idea is physically feasible before investing serious development time, that speed is valuable.
This prototyping speed matters even for experienced engineers. Many professional embedded developers use Arduino for initial concept validation before moving to a custom PCB with a bare microcontroller, precisely because Arduino's library ecosystem and community knowledge compress the validation phase dramatically. Getting to a working proof of concept in an afternoon rather than a week is a real advantage, regardless of what the final production platform ends up being.
A Standardized Ecosystem Where Skills Transfer
Arduino's standardized hardware form factors, shield system, and library interfaces mean that knowledge compounds across every project you build. The pattern you learn for reading a DHT22 temperature sensor on an Uno applies identically on a Nano, a Mega, and an R4. The I2C workflow you internalize for one sensor works the same way for every I2C device you'll ever use. The skills don't reset when you move to a different board within the ecosystem.
This standardization also makes community collaboration easier. Projects shared on GitHub can be replicated by other Arduino users without needing exact hardware matches. Tutorials found online have a very high probability of working with your specific board without modification. That interoperability is a practical advantage that platforms with more fragmented ecosystems struggle to match, and it's one of the reasons Arduino projects tend to be so well-documented and easy to share.
Nearly Two Decades of Accumulated Community Knowledge
Forum posts, tutorials, project writeups, YouTube walkthroughs, and Stack Overflow threads have been accumulating around Arduino since 2005. When you hit a problem, the probability that someone else has encountered the exact same issue and documented the solution is remarkably high. That collective knowledge base is one of the platform's most practical advantages, and it's not something a newer platform can replicate quickly regardless of how good its hardware is.
For beginners, this means common stumbling blocks already have clear, findable solutions. For advanced users, it means obscure edge cases and unusual hardware combinations have often been explored and written up somewhere. The depth of available knowledge reduces the time spent stuck on problems and increases the time spent building.
An Educational Design Philosophy That Doesn't Have a Ceiling
Unlike most educational tools, Arduino doesn't have a point where you outgrow it and have to start over on a new platform. The same environment that teaches you to blink an LED is also capable of running real-time operating systems, processing sensor fusion algorithms, driving industrial actuators, and running machine learning models. The beginner experience is beginner-friendly, and the advanced experience is genuinely advanced.
That continuity keeps people within the ecosystem as their skills develop. A student who learns Arduino in a STEM class might still be using it for professional prototyping years later, just on more capable boards with more sophisticated code. Arduino benefits from that loyalty, and users benefit from never having to throw away accumulated knowledge when their projects become more ambitious.
With powerful platforms like the ESP32 or Raspberry Pi offering strong alternatives for specific use cases, Arduino's edge isn't raw capability. It's the combination of accessibility, community depth, and ecosystem maturity that makes it the easiest platform to learn on, the fastest platform to prototype with, and a platform you never have to leave.
Additional Resources and Helpful Links
The resources below are worth bookmarking before you write your first sketch. Arduino's documentation has improved substantially over the years, and the official channels are good now in a way that wasn't always true in the early days. The community resources listed here represent the highest-signal sources in the ecosystem, the ones that experienced Arduino builders actually use rather than just recommend to beginners.
Official Documentation and Platforms
- Arduino Docs Hub - Complete board documentation, tutorials, and reference materials for every official board
- Arduino Language Reference - The authoritative reference for every core function, with syntax examples and usage notes
- Arduino IDE Download - The desktop IDE for Windows, macOS, and Linux
- Arduino Cloud - Browser-based IDE with OTA updates, IoT dashboards, and remote device management
- Arduino Forum - The official community forum with millions of answered questions spanning nearly two decades
GitHub Repositories
- Arduino GitHub Organization - Source code for the IDE, board cores, libraries, and CLI tools
- ArduinoCore-avr - The official AVR core for Uno, Nano, Mega, and other ATmega-based boards
- Arduino Library Index - Search and install thousands of community and official libraries directly from the IDE
Learning and Community Resources
- Adafruit Arduino Learning Hub - Project-based tutorials for all skill levels, with strong sensor and display coverage
- SparkFun Tutorials - Hardware-focused guides covering a wide range of Arduino-compatible components
- Hackaday Arduino Projects - Creative and experimental builds from the broader maker community
The Arduino Forum alone contains nearly two decades of answered questions. Before posting a new thread anywhere, run your problem through it first. The answer is almost certainly already there.
Wrap-Up and What's Next
Arduino succeeded where dozens of other platforms didn't because it made the on-ramp short enough that people finished the first project instead of getting stuck in toolchain setup. That first working circuit tends to be the thing that convinces someone to keep going, and Arduino was deliberately designed to produce that result as quickly as possible.
Whether you're a teacher building a STEM curriculum, a hobbyist in a garage with a pile of sensors and an idea, or an engineer who needs a fast path from concept to prototype, Arduino offers the tools, the ecosystem, and the community to get there. Its influence spans generations and industries, from art installations and smart gardens to factory automation and scientific research.
Arduino's open-source foundation and steadily expanding board lineup mean it has kept pace with what builders need, from simple classroom projects to industrial deployments, without breaking compatibility with older code or requiring users to migrate to a new environment. The boards have changed considerably since 2005. The workflow has stayed familiar by design.
In Part 2 of this series:
We'll go deep on Arduino board selection, covering the full lineup from the Uno to the Portenta in detail. You'll come away with a clear framework for matching a board to a project: how to evaluate I/O requirements, memory needs, connectivity options, voltage compatibility, and form factor constraints before you buy anything. If you've ever ended up with the wrong board for a build, Part 2 is what prevents that from happening again.
Want to go deeper? Download the full eBook once the series is complete, and don't forget to subscribe for the rest of the Arduino Mastery Series!
\\\\n\\\\n\\n\\n\n\n




