

If you have spent years with an Uno, App Lab is the first Arduino "IDE" that can look like a mistake. You download it, plug in a UNO Q, and the project is not a single .ino file. There is a Python file. There is a sketch. There are things called Bricks. There is Linux. There is talk of AI models. It is reasonable to close the window and open Arduino IDE 2, because IDE 2 still talks to that board.
IDE 2 is talking to half of it.
A UNO Q (and its bigger sibling, the VENTUNO Q) is a hybrid board. One chip is a microcontroller, an MCU: a small processor that is excellent at pins, sensors, and hitting timing deadlines. The other is a microprocessor, an MPU: a Linux computer, closer to a Raspberry Pi than to a classic Uno. Arduino App Lab is the development environment Arduino built for that combination. One App can include a Python program running under Linux, an Arduino sketch running on the MCU, and prepackaged services called Bricks, including AI models.
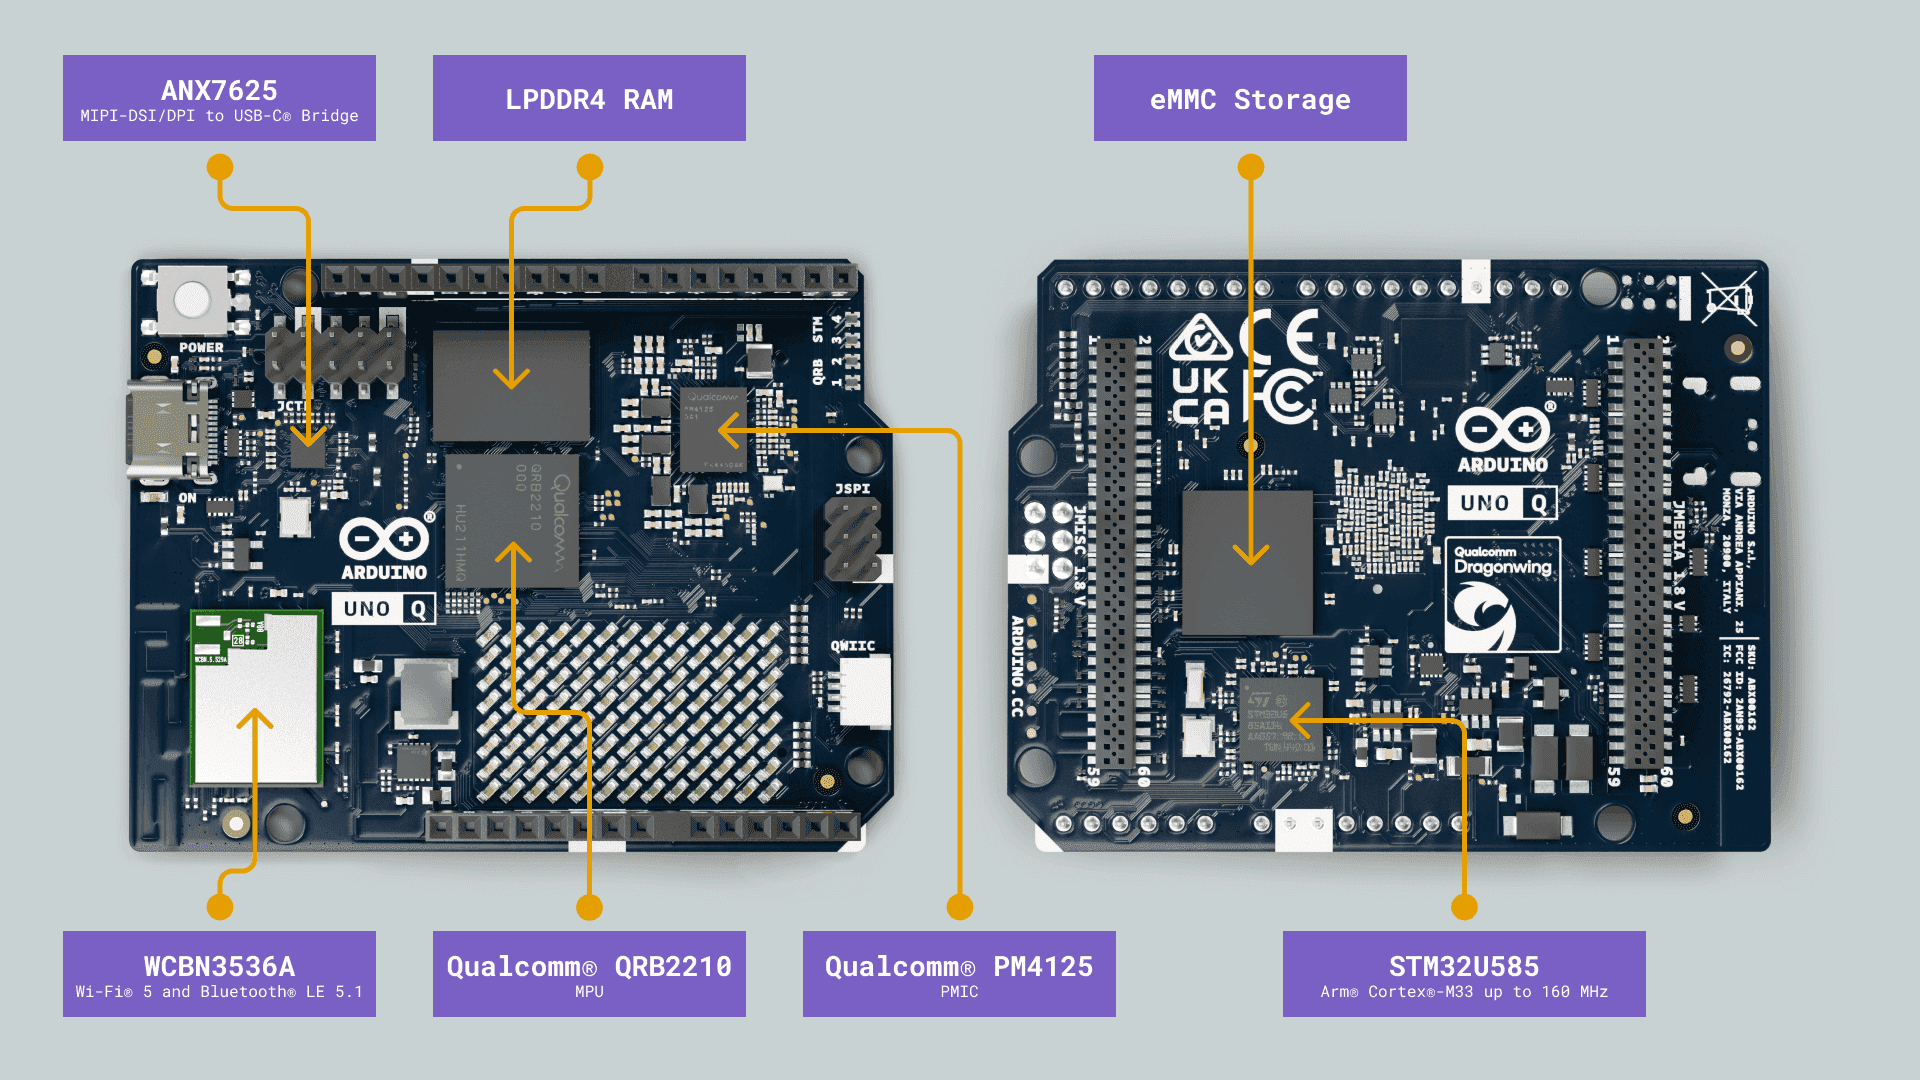
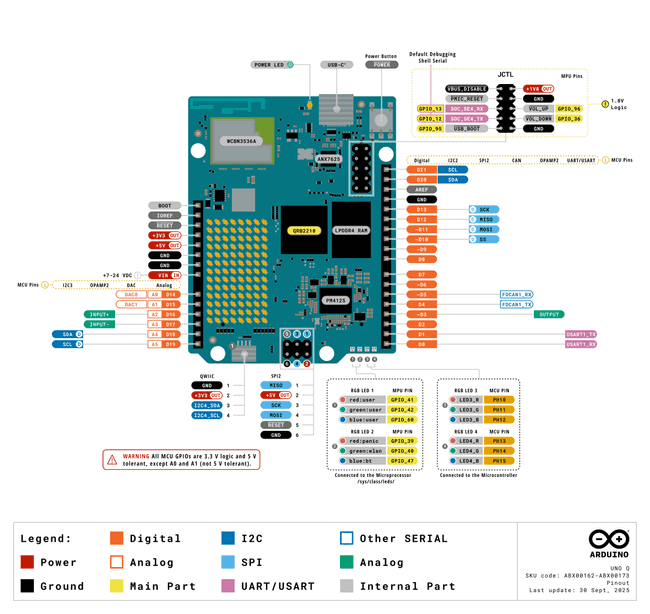
Image: Arduino
Image: Arduino
This article explains the architecture. It is not a click-by-click install. It answers what App Lab is, what an App is, what a Brick is, how Python and C++ talk through the Bridge, where AI fits, how this differs from IDE 2, and who should bother. If you are still deciding whether a UNO Q is even the right board, Part 2 of the Mastering Arduino series is the family conversation. Do not buy a UNO Q because you wanted a slightly nicer Uno.
Current App Lab on Arduino's software page: 0.10.0, open source under GPL 3.0.
What is Arduino App Lab?
Arduino App Lab is a unified editor for the new dual-processor Arduino boards. Unified here means one window that can see both chips. You write (or generate) an App, you press Run, and App Lab deploys the Linux side and the MCU side together.
It can run in two places:
-
On your PC. Windows 10 64-bit or later, macOS 11 or later, Ubuntu 22.04 or later, Debian Trixie 64-bit. The PC talks to the board over USB-C, or over the local network once the board is on Wi-Fi or Ethernet.
-
On the board itself. Plug a UNO Q into a monitor, keyboard, and mouse through a USB-C dongle that supports power delivery (PD: the dongle can both show video and power the board). App Lab is already on the Debian image. Arduino recommends the 4 GB RAM variant for that single-board-computer setup. A dongle that does not do PD is a common "it will not boot" trap. Apple's USB-C dongle is documented as incompatible. Pick one that says PD.
App Lab is not a cloud IDE. The heavy lifting happens on the board's Linux system, or on your PC talking to that system. It can register a UNO Q with Arduino Cloud from Settings so an App can join dashboards. App Lab itself still runs locally; Cloud only hosts the dashboard side.
And it is not IDE 3. The sketch you write for the MCU is still Arduino C++. The new part is everything around that sketch.
Which boards is this for?
UNO Q. Classic Uno footprint, two processors on one board. Linux-capable Qualcomm Dragonwing QRB2210 plus an STM32U585 microcontroller. In plain terms, the Qualcomm chip has four Cortex-A53 processor cores (the same class of core found in older smartphones), a GPU (graphics processor), and camera-processing hardware, and it runs Debian Linux. The STM32 uses a single Cortex-M33 core, a microcontroller-class design built for fast, predictable pin control. Onboard eMMC storage (soldered flash, not an SD card). Wi-Fi 5 and Bluetooth 5.1. 2 GB and 4 GB RAM versions. Arduino App Lab is the tool Arduino points at when they say "from sketch to Linux to AI."
VENTUNO Q. Same idea, more headroom. A Qualcomm application processor running Linux next to an STM32 MCU. App Lab is still the orchestrator. Flashing a Linux image is not the same procedure as UNO Q. Arduino's UNO Q flash tutorial says so and sends VENTUNO Q readers down a separate Ubuntu image path. If you have a VENTUNO Q, do not follow a UNO Q Emergency Download Mode walkthrough blindly.
Not this. A classic Uno, Nano, Mega, most R4 boards, a generic ESP32 DevKit. Those have one brain. App Lab will not magically add Linux to them. Use IDE 2 or the CLI.
You can still open IDE 2 and program the MCU subsystem of a UNO Q. Arduino says that outright. The sketch lands on the STM32. Linux, Python, Bricks, and AI models do not. If you only need the MCU, IDE 2 is simpler. If you bought the board because you wanted the other processor, App Lab is the environment that can see both.
What is an App?
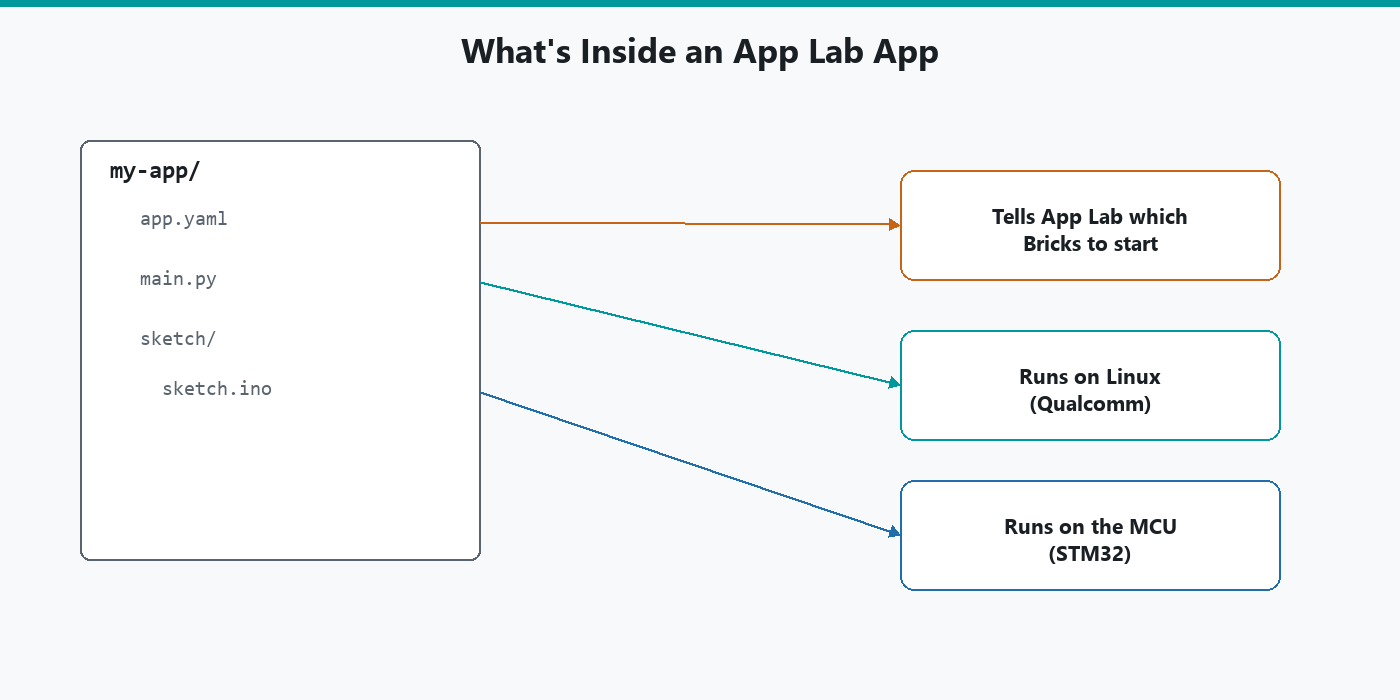
In App Lab, an App is not a phone app and not a single sketch. It is a folder that Arduino treats as one project, with three possible layers.
- Python on Linux (required). Arduino calls this the logic layer.
main.pyis where networking, web UI glue, AI calls, and high-level decisions live. An App is fundamentally a Python application running on the board's Linux system. - Bricks (optional). Pre-packaged modules that run beside your Python. AI models, web interfaces, REST APIs, databases, Cloud connectors. Arduino currently runs those as separate processes in isolated Docker containers. Docker, here, means "a boxed-in program with its own files and dependencies, so it does not fight the rest of Linux."
- An Arduino sketch (optional, on dual-processor boards). The real-time layer. Standard Arduino C++ on the microcontroller:
setup(),loop(),pinMode, sensors, motors. This is the same sketch idea Part 3 taught. It is optional because you can write a Linux-only App. The moment you care about a GPIO deadline (GPIO means general-purpose input/output, the ordinary pins you read and write), you want this layer.
Every App also has metadata (an app.yaml or equivalent) so App Lab knows the name, which Bricks to start, and how to launch it.
Arduino documents a strict folder layout so App Lab can find everything:
-
main.py: the Linux Python entry point. -
sketch/sketch.ino: the microcontroller sketch, when you have one. It lives in that subfolder on purpose. A loose.inoin the App root is easy for App Lab to miss. -
app.yaml: name, Bricks to start, launch metadata. -
Brick config and assets as the catalog adds them. You usually do not hand-author those on day one.
When Python and a sketch are both present, they do not share variables by magic. They talk through the Bridge.
If you catch yourself asking where to put a piece of code, use this test. Does it need a pin in real time, or does it need Linux? Pins go in the sketch. Linux goes in Python. If someone already packaged the feature as a Brick, use the Brick.
Python on Linux
The Python in App Lab is not MicroPython. MicroPython is a small Python interpreter that replaces Arduino C++ on a microcontroller. App Lab Python is CPython (ordinary Python) on a real Debian-style Linux. You get files, processes, packages, networking, and enough RAM to load a model. It is the same family of Python you would write on a Raspberry Pi, with Arduino's App helpers on top.
A typical main.py imports Arduino's App utilities, maybe a Brick, maybe the Bridge, then hands a loop to App.run(). The Linux side stays up as long as the App is running. If you kill the App, that Python process goes away. Linux itself is still there.
Because it is Linux, you can also SSH in (SSH is a secure way to open a terminal on another computer over the network), use arduino-app-cli on the board, install packages, and treat the UNO Q as a small computer. App Lab is the supported front door. It is not a lock. Arduino is explicit that you can use VS Code and native Linux tools on the MPU if you want. App Lab is the path they built so you do not have to wire that together on day one.
Gotcha: this Python can do things a sketch never should, like block for half a second while a model runs. That is fine on Linux. It is not fine if you expected the MCU's loop() to keep servicing a motor during that pause. Put the slow work in Python. Put the motor in the sketch. Talk across the Bridge.
Arduino sketches on the MCU
The MCU sketch is still a sketch. setup() runs once. loop() runs forever. You still own the pins.
Two differences from a classic Uno sketch, in App Lab:
The sketch is a part of an App, not the whole project. App Lab deploys it when you press Run, alongside Python. You are not clicking Upload in IDE 2 unless you have chosen the MCU-only workflow.
Serial to your PC is not the main conversation. The interesting link is MCU to Linux. Official examples use Monitor.print to send text back to the App Lab console, and the Bridge to send values to Python. Serial.println to USB still exists on many cores, and it is easy to mix those up while debugging. If you print to the wrong serial, the console you are staring at stays blank.
The UNO Q's MCU core is built on Zephyr, a small real-time operating system that runs underneath your sketch. On current versions of that core (Arduino documents this around Zephyr core 0.55.0), the Router Bridge library is included by default. Older tutorials say to add Arduino_RouterBridge in a sketch library manager. If a fresh App already compiles Bridge.begin() without that step, you are on the newer core. If it does not compile, add the library the old way. Do not fight both instructions at once.
IDE 2 can still open and upload that MCU sketch by itself. When you do that, you are bypassing App Lab's "run the whole App" button. Useful for a pin test. Easy to forget that Python is no longer driving anything.
What is a Brick?
A Brick is a prebuilt chunk of functionality you drop into an App instead of writing that chunk from scratch. Arduino's examples include AI models, web interfaces, REST APIs (HTTP interfaces other programs can call), sensor integrations, Cloud connectors, and similar services.
A Brick is closer to a ready-made accessory than to a library you #include. You add it to the App. It has an interface you did not design. It does one job. You still write the App that uses it. Arduino picked the name Brick. I am not going to rename it.
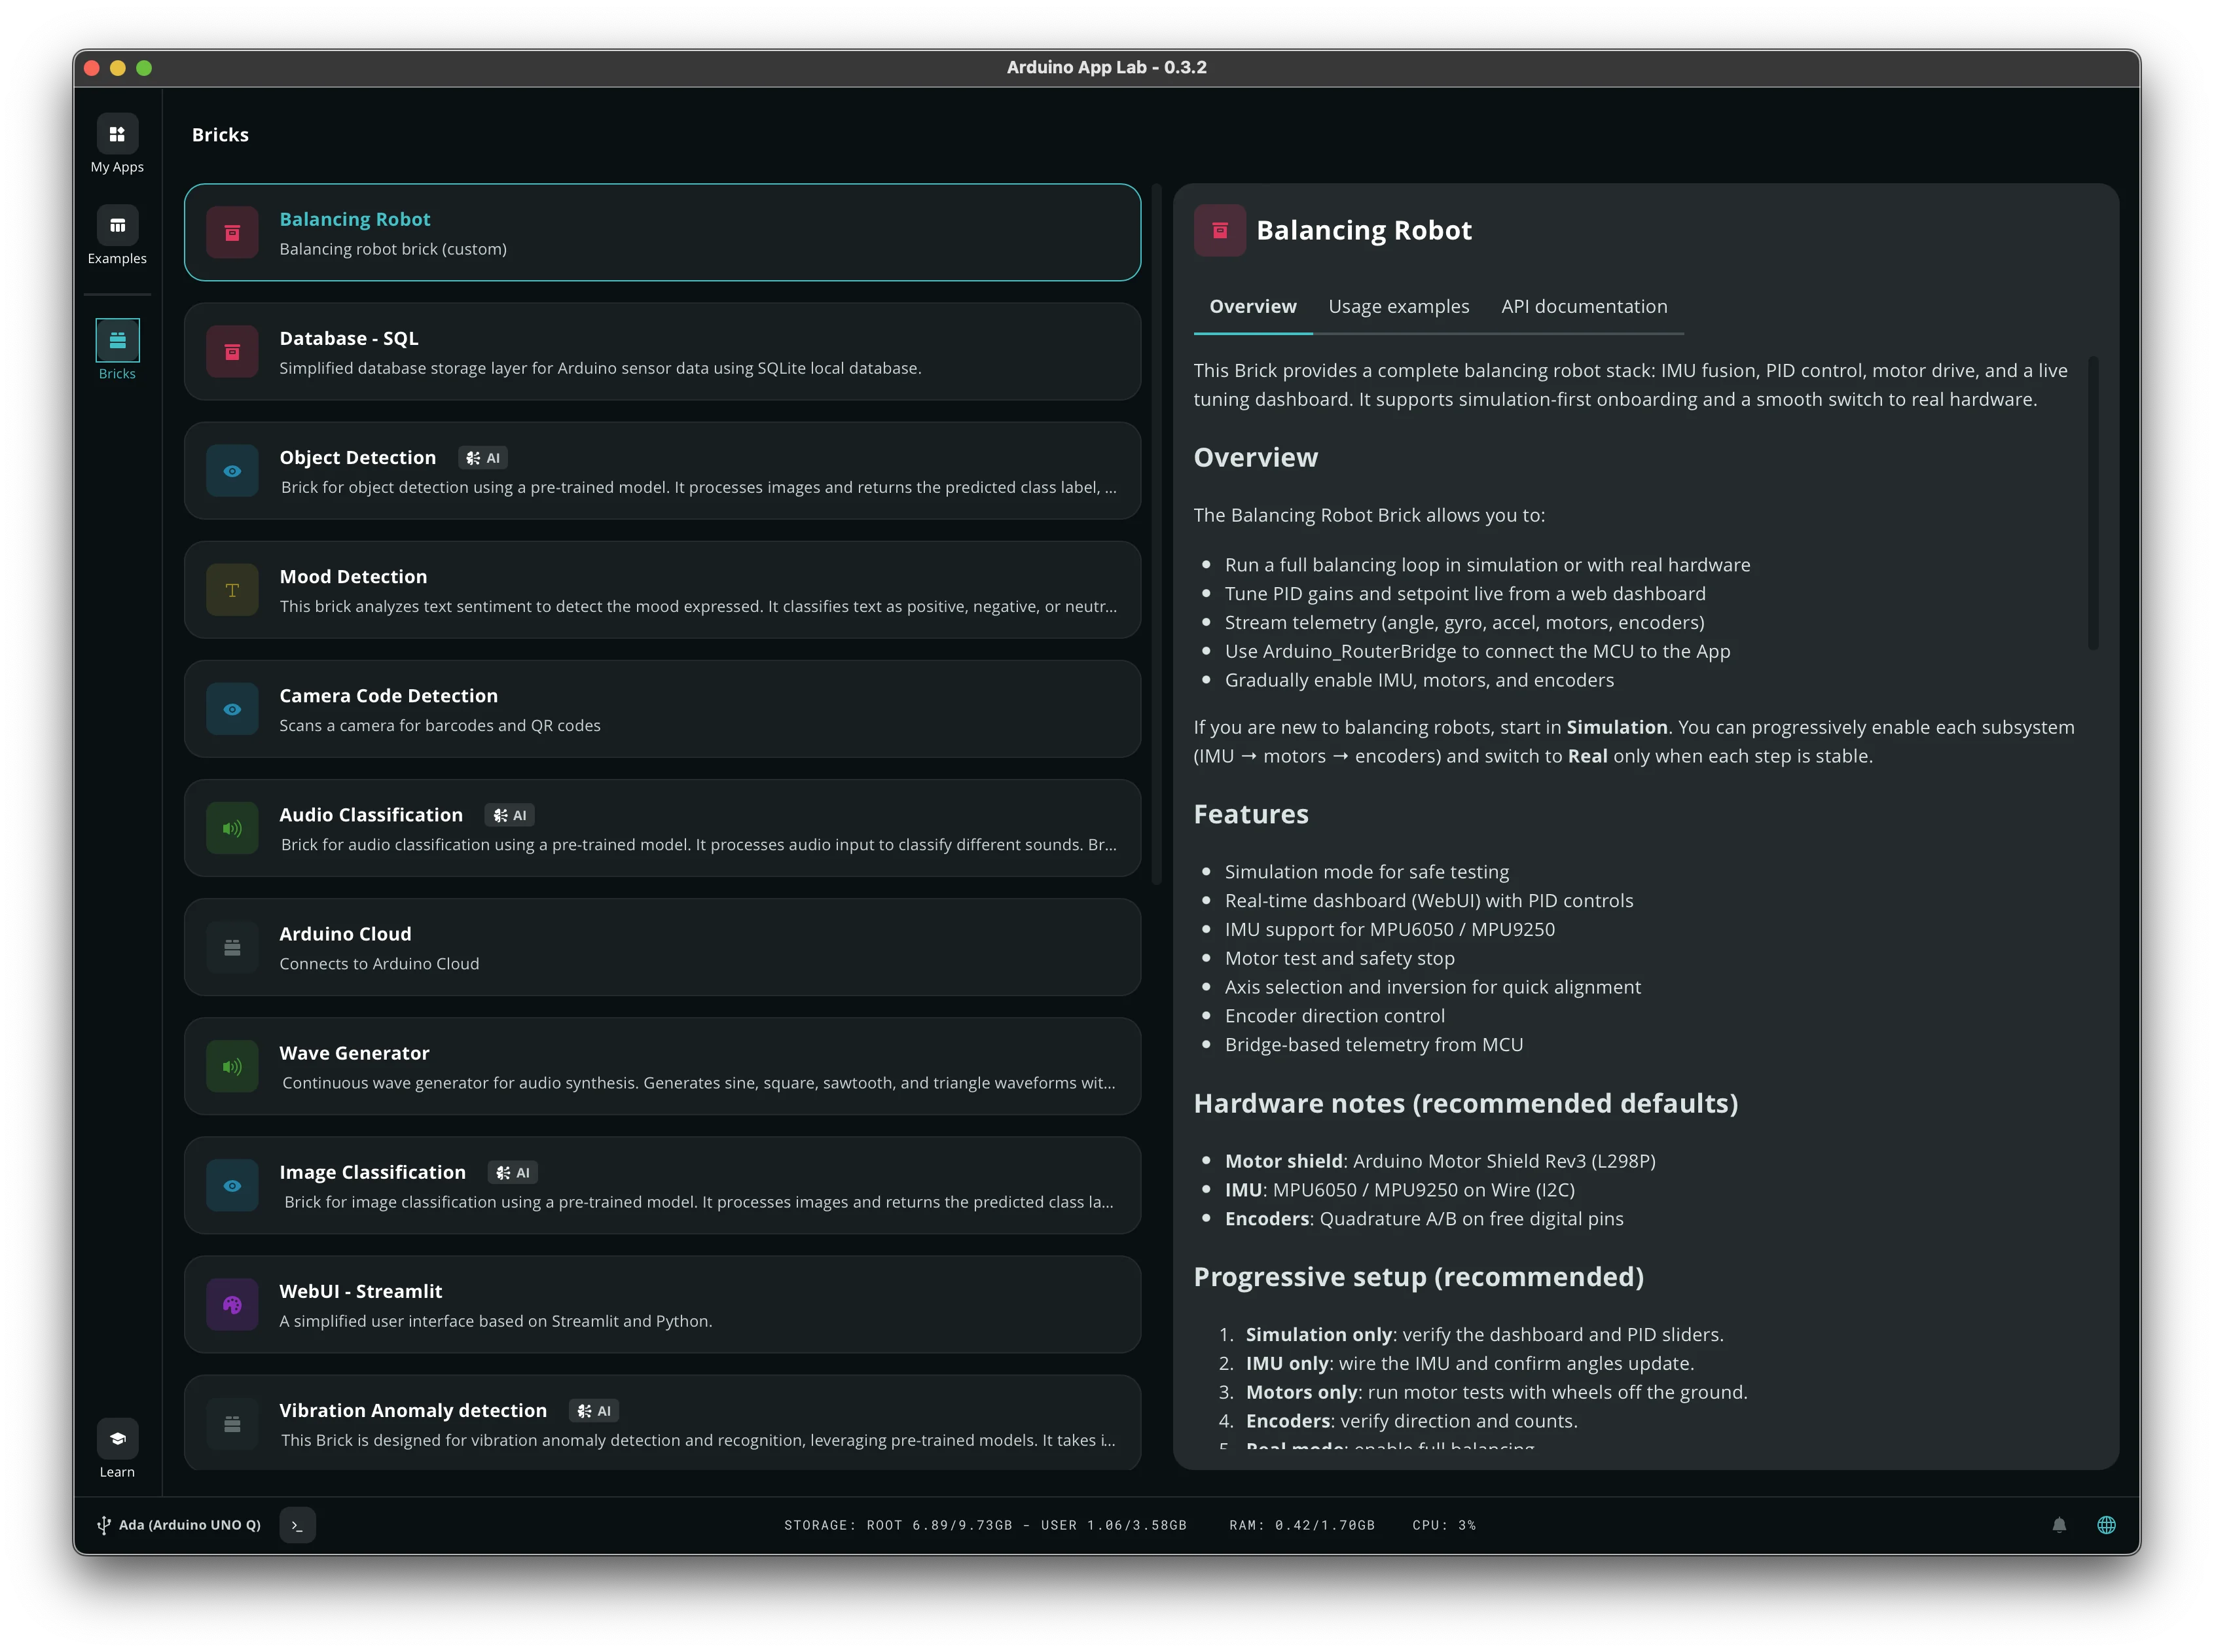
In the editor you add a Brick from a catalog, configure whatever it asks for, and import it in main.py. Arduino's develop-apps guide is blunt: Bricks run as separate processes. Your Python talks to them through their API. You do not paste the model's internals into main.py.
You can also write custom Bricks once you outgrow the catalog. Custom Bricks get their own later article. For a first App, start with an official example that already has the Brick attached, then duplicate it ("Copy and edit app" in the examples UI) so you are not wiring Docker and a model from a blank folder.
Gotcha: adding a Brick is not the same as understanding it. An "object detection" Brick will want a camera. An "Arduino Cloud" Brick will want the board registered in Cloud. If Run fails after you added a Brick, read that Brick's required hardware and login, not the Python syntax.
How Bridge and RPC work
Two processors on one board still need a wire between them. On UNO Q, the Bridge is Arduino's library for that wire. Underneath, a Linux service called Arduino Router (arduino-router) shuttles messages. The protocol is RPC, remote procedure call: code on Linux asks the MCU to run a function by name, and can get a value back, as if the function were local. The MCU can do the same toward Python.
Arduino documents the physical path as Linux /dev/ttyHS1 talking to the MCU's Serial1 at 115200 baud, with a 256-byte maximum message. That size limit is a gotcha. You cannot shove a JPEG across the Bridge in one call. You send small values: a bool for an LED, an int for a sensor, a short string. Big payloads stay on Linux (camera frames, or the large arrays of numbers an AI model works on) or get handled by a Brick.
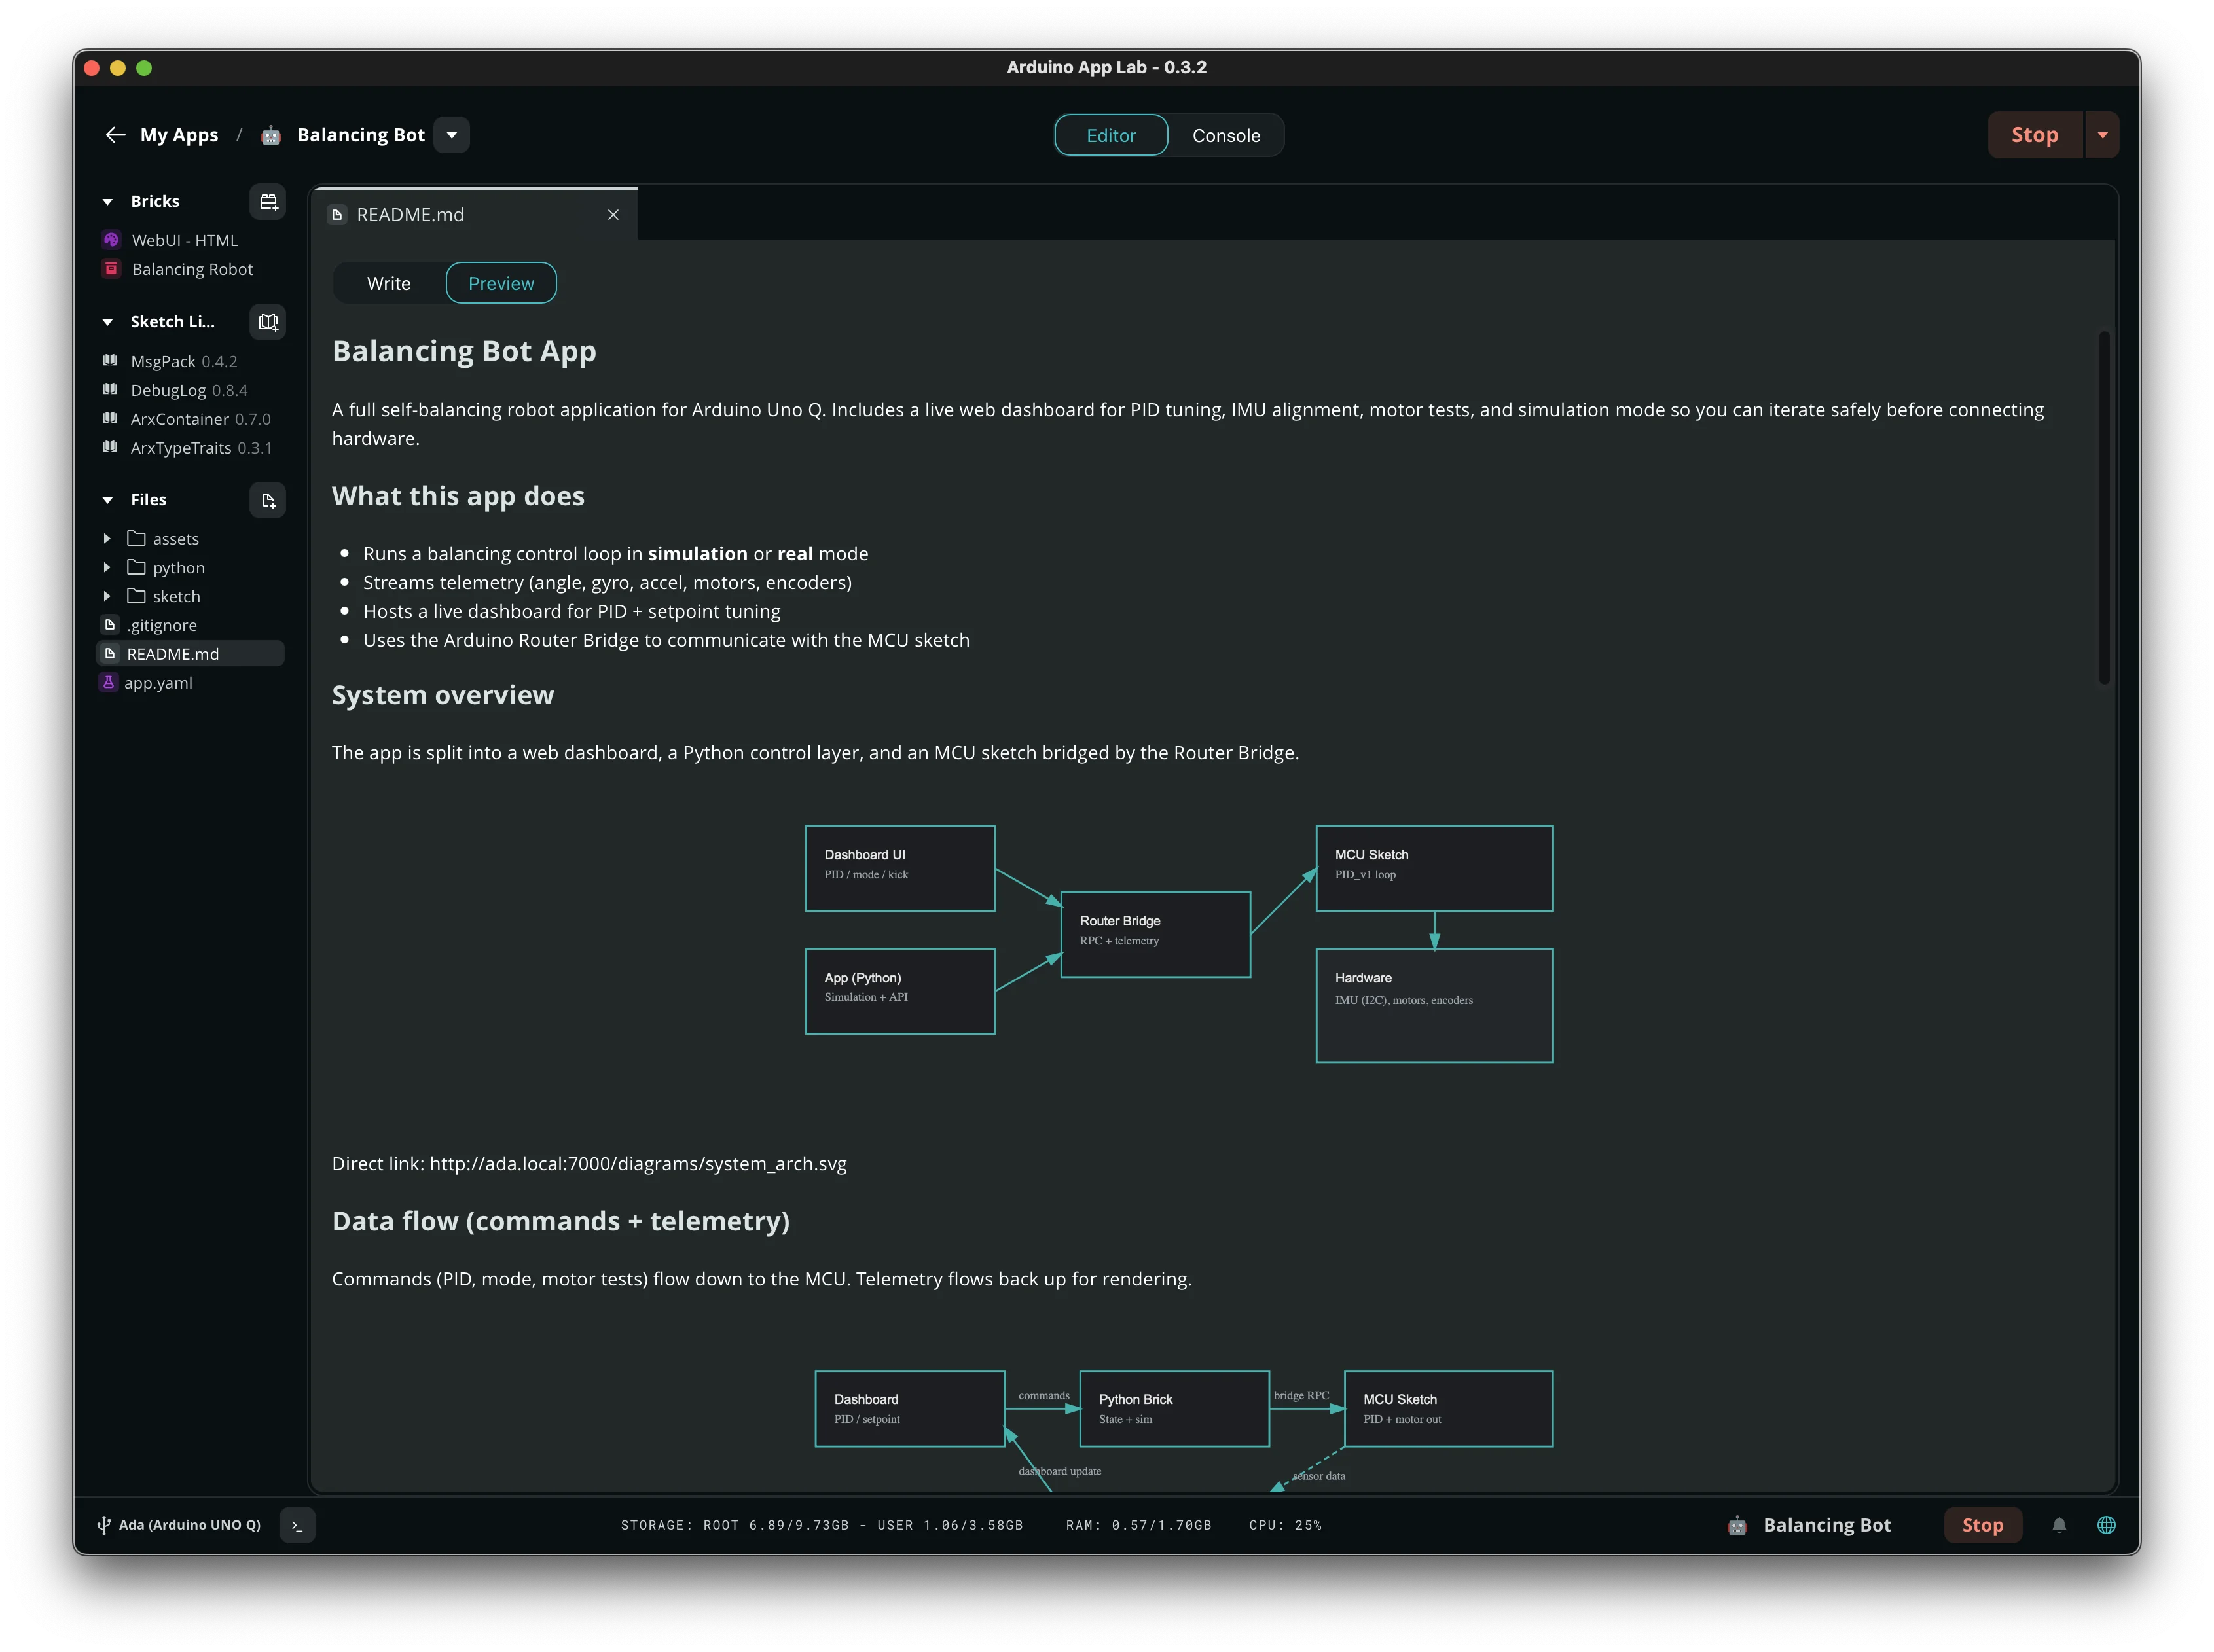
The pattern in official examples looks like this.
On the MCU, you provide a function (register it under a name). On Python, you call that name.
#include "Arduino_RouterBridge.h"  // The Bridge library (included by default on newer cores)

// The function Linux will be allowed to call. "state" arrives from Python.
void set_led_state(bool state) {
  // Many onboard LEDs on these boards are active-low: LOW is on.
  // "state ? LOW : HIGH" means: if state is true use LOW, otherwise HIGH.
  digitalWrite(LED_BUILTIN, state ? LOW : HIGH);
}

void setup() {
  pinMode(LED_BUILTIN, OUTPUT);  // Let the onboard LED pin drive current
  Bridge.begin();                // Open the link to the Linux side
  // Publish this function so Linux can call "set_led_state"
  Bridge.provide("set_led_state", set_led_state);
}

void loop() {
  // Real-time work belongs here. This example is only serving RPC.
}
from arduino.app_utils import *  # Arduino's App helpers, including App and Bridge
import time                       # Standard Python module, used here for sleep()

led_state = False                 # Remember whether the LED should be on

def loop():
    global led_state              # Let this function change the variable above
    time.sleep(1)                 # Pause one second. Fine on Linux, the MCU keeps running.
    led_state = not led_state     # Flip True to False, or False to True
    # Ask the MCU to run the function it provided under this name
    Bridge.call("set_led_state", led_state)

# Start the App and keep calling loop()
App.run(user_loop=loop)
Python toggles a boolean once a second. The MCU drives the LED. If you put delay(1000) in the MCU loop() instead, you would freeze pin handling the way a classic Uno freezes inside delay(). The whole point of the split is that Linux is allowed to be slow, and the MCU is not.
RPC goes the other way too: Python can provide a function, and the sketch can Bridge.call("my_function"). Use that when the MCU needs a decision Linux is better at (a model result, a Cloud value) and should not compute it on the STM32.
This is the hard way, written out, so the easy way makes sense. The easy way is an example App titled along the lines of "Blink LED with UI" or "Blink LED from Python." Duplicate it, press Run, then read the two files. App Lab's value is that Run deploys both sides and starts the router. You are not compiling the sketch in IDE 2 and then separately starting a Python script over SSH, unless you choose that life later.
Where AI fits
"AI" in App Lab marketing is not a chatbot bolted onto Blink. It is a Brick (or a custom model) running on the Linux processor, usually looking at camera or audio, then sending a small result across the Bridge: "person / no person," a label, a confidence number.
UNO Q's Qualcomm chip includes acceleration for on-device vision and similar work. Arduino's example list is the honest catalog of what they think this is for: object detection on a USB camera, face detection, a concrete-crack detector, an edge AI assistant (a small language model, a scaled-down relative of chatbot models like ChatGPT, running locally on the board), Cloud LLM examples (LLM means large language model, the full-size version, reached over the internet), dictation on VENTUNO Q. Those are Linux jobs. The MCU might strobe a light or trip a relay when the label changes.
Custom AI models have their own App Lab docs. The short version: the model lives on Linux, packed as a Brick or loaded by one. The sketch never runs the model. If a tutorial shows you pasting a neural network into loop(), that tutorial is not about App Lab.
Cloud AI and local AI are different Bricks. Local means the board can work with the network unplugged, within the model's limits. Cloud means you are calling a service. Choose the one that matches the project. A greenhouse that should still close a vent when Wi-Fi dies wants local.
App Lab vs Arduino IDE 2
| Feature | Arduino IDE 2 | Arduino App Lab |
|---|---|---|
| Main job | MCU firmware | An App across Linux + MCU + Bricks |
| Language | Arduino C++ | Python + optional Arduino C++ |
| Boards | Almost everything Arduino C++ supports | UNO Q, VENTUNO Q (the dual-processor line) |
| Linux, Docker, AI models | No | Yes |
| Serial Plotter, Board Manager as you know them | Yes | Different UI. MCU still gets a sketch editor |
| Works offline on a classic Uno | Yes | Wrong tool |
| Who starts it | You, on a PC | You on a PC, or the board as a single-board computer |
If the project is "read a sensor, blink an LED, print to Serial," IDE 2 is the shorter path, even on a UNO Q's MCU. If the project is "run a camera model and then move a pin," App Lab is the path that matches the hardware you paid for.
You can use both. MCU-only experiments in IDE 2. Full Apps in App Lab. Do not expect a .ino from IDE 2 to drag-and-drop into an App without wrapping it in the App folder layout (sketch/sketch.ino plus main.py).
A dedicated "App Lab vs IDE" article later in this cluster will go comparison-deep. The table above is the decision you need in order to download the right thing today.
Who needs App Lab?
You need it if:
-
You have, or are about to buy, a UNO Q or VENTUNO Q because you want Linux next to real-time pins.
-
You want Python and Arduino C++ in one Run button, not an SSH session plus IDE 2.
-
You want an official path to on-board AI, a web UI Brick, or Cloud from that hybrid board.
You do not need it if:
-
Your board is an Uno, Nano, Mega, R4, or ESP32 and you were only curious.
-
You want MicroPython on a single microcontroller. That is Arduino Lab for MicroPython, a different editor, a different firmware.
-
You want ladder logic on Opta. You want PLC IDE for that.
-
You want a Cloud dashboard on a Wi-Fi Uno R4 and you are happy in the Cloud Editor.
App Lab is interesting. It is also hardware-gated. The marketing can make it sound like the new default for everyone. It is the new default for this new class of board.
What a first session looks like
I would not start from a blank App. I would:
- Install App Lab 0.10.0 from Arduino's software page.
- Power the UNO Q correctly (USB-C, or a power-delivery dongle if you are using the board as a computer with a monitor).
- Let App Lab discover the board on USB. If it does not, network discovery needs the board and PC on the same Wi-Fi. Linux hosts also need USB permission rules, called udev rules (small settings files that decide which users may talk to a newly plugged-in device). Arduino's UNO Q user manual is explicit that a Linux PC without those udev rules fails silently.
- Open Examples, pick Blink LED from Python or Blink LED with UI, Run.
- When the LED blinks, duplicate the example and read
main.pyplussketch.inoside by side.
That is the easy way, after the hard way (the Bridge listing above) so you know what Run is launching. A later getting-started article in this cluster walks the install step by step.
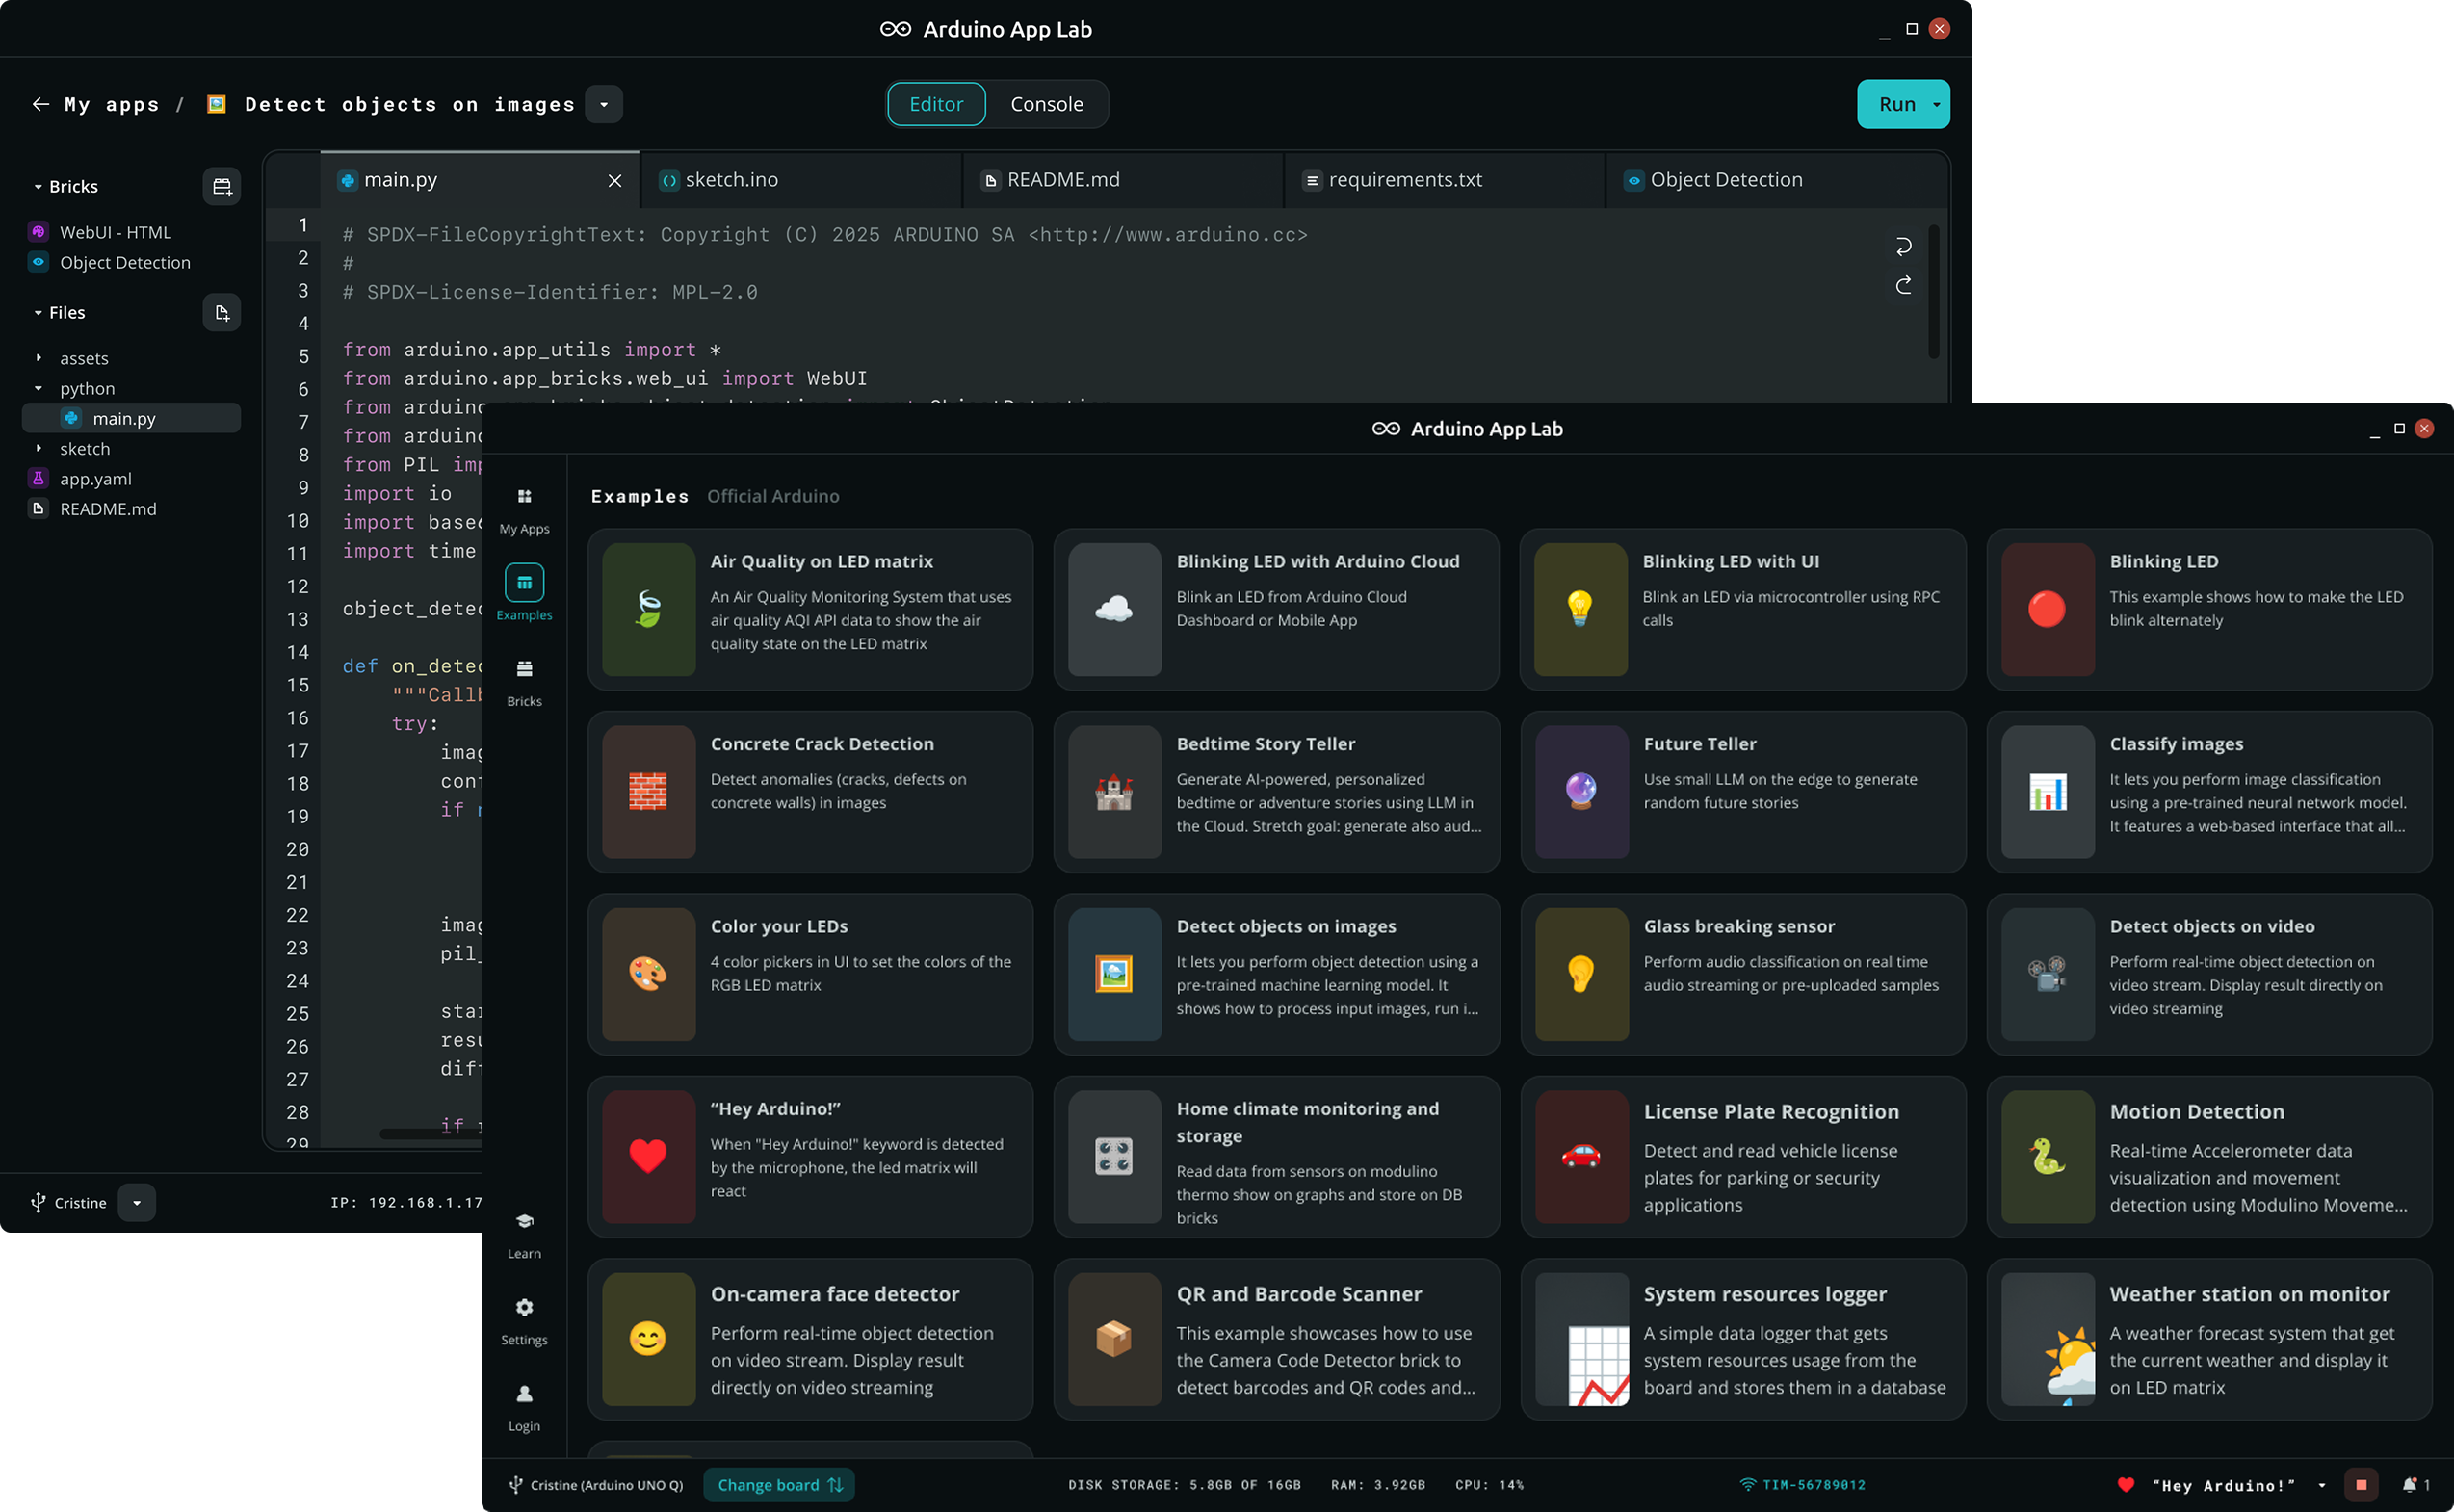
If Run fails because Linux is unhappy, that is an image/flash problem, not an App Lab editor problem. Flasher CLI and the Linux images are a different pair of articles. Do not "fix" a board that will not boot by reinstalling App Lab on the PC.
Gotchas to know before you download
-
App Lab will not replace IDE 2 for an Uno. Wrong hardware class.
-
Flashing a Linux image is not uploading a sketch. Image = operating system. Sketch = MCU firmware. Mixing those up is how people wipe
/home/arduinoby accident. -
Bridge messages are small. 256 bytes. Keep RPC payloads tiny.
-
Using the board as a single-board computer needs power delivery and enough RAM. 4 GB variant, a USB-C dongle that supports power delivery, not a random hub.
-
VENTUNO Q is not flashed the same way as UNO Q. Follow the guide for the board you actually have.
-
Python slowness must not live in
loop()on the MCU. That is the split. -
3.3 V pins on the MCU side still apply. Linux does not make the STM32 5 V-tolerant.
-
Close the mental Serial Monitor habit. Look at App Lab's console and at
Monitor.print, not only at USB serial. -
The last tool to write to a chip is what is actually running there. If you Run an App from App Lab and then Upload a sketch from IDE 2 in the same sitting, the MCU now runs whatever IDE 2 just wrote, not the sketch App Lab deployed as part of that App. Neither tool warns you the other one exists or that it just overwrote something. This is the single most common "my App stopped working and I didn't touch anything" report, and the fix is always the same: Run the App again from App Lab so both halves match.
That last one is worth dwelling on because it is easy to trip into without meaning to. Someone building a UNO Q project naturally wants to poke at the sketch half in IDE 2, since that is the familiar tool, click Upload to test one small change, confirm the pin does what they expect, and move on. The MCU firmware IDE 2 just wrote is not connected to the Python half of the App anymore, even though App Lab's own copy of that sketch on disk is unchanged and still looks correct in the editor. The App as a whole is now split: Python on Linux expecting one set of Bridge names, an MCU running a different, unrelated sketch. Running the App again from App Lab redeploys both halves together and closes that gap.
Troubleshooting
| Symptom | Likely cause | Fix |
|---|---|---|
| App Lab never sees the board | Cable, power, Linux USB permissions, board not booted | Data-capable USB-C, power first. On a Linux PC, install the documented udev rules |
| Board boots, App Lab missing when used as a computer | No power delivery on the dongle, not enough RAM, no display | Power-delivery dongle, 4 GB variant, confirmed video path |
| Run succeeds, LED never blinks | Wrong example, active-low LED, MCU sketch not deployed | Use a Blink example. Read the sketch. Check App Lab's MCU log |
| Python runs, pins do nothing | No sketch in the App, or Bridge name mismatch | provide and call strings must match. Confirm sketch.ino exists |
| RPC fails or truncates | Payload too big, router not running | Keep messages tiny. Restart the App so arduino-router comes up |
| IDE 2 upload "broke" the App | You replaced MCU firmware outside App Lab | Run the App again from App Lab so both sides match |
| You installed App Lab to program an Uno | Wrong tool | Arduino IDE 2 |
Wrap-up
Arduino App Lab is one environment for a new kind of Arduino: Linux Python, microcontroller sketches, Bricks, and AI models, deployed together on UNO Q and VENTUNO Q. An App is a folder with Python on Linux, an optional sketch on the microcontroller, and optional Bricks. The Bridge is how Python and the sketch call each other without you inventing a serial protocol. IDE 2 still owns classic microcontrollers, and it still owns the microcontroller half of a UNO Q if that is all you need.
If your bench has an Uno, you can skip App Lab without falling behind. If your bench has a UNO Q because you wanted a camera model next to a relay, this is the tool that matches the hardware.
Next in this cluster: a getting-started install, then Bricks in depth, then the IDE vs App Lab comparison as its own piece. Official App Lab docs live under docs.arduino.cc/software/app-lab. When UI labels move, trust that tree.
Hack The World and Make Awesome.




