

Arduino IDE 2 is a program on your computer. Arduino Cloud is a platform in a browser. You log into app.arduino.cc, you attach a board that can reach the internet, and you keep a live copy of selected values both on the chip and on Arduino's servers. Those values can drive a dashboard, a phone app, another board, or a notification.
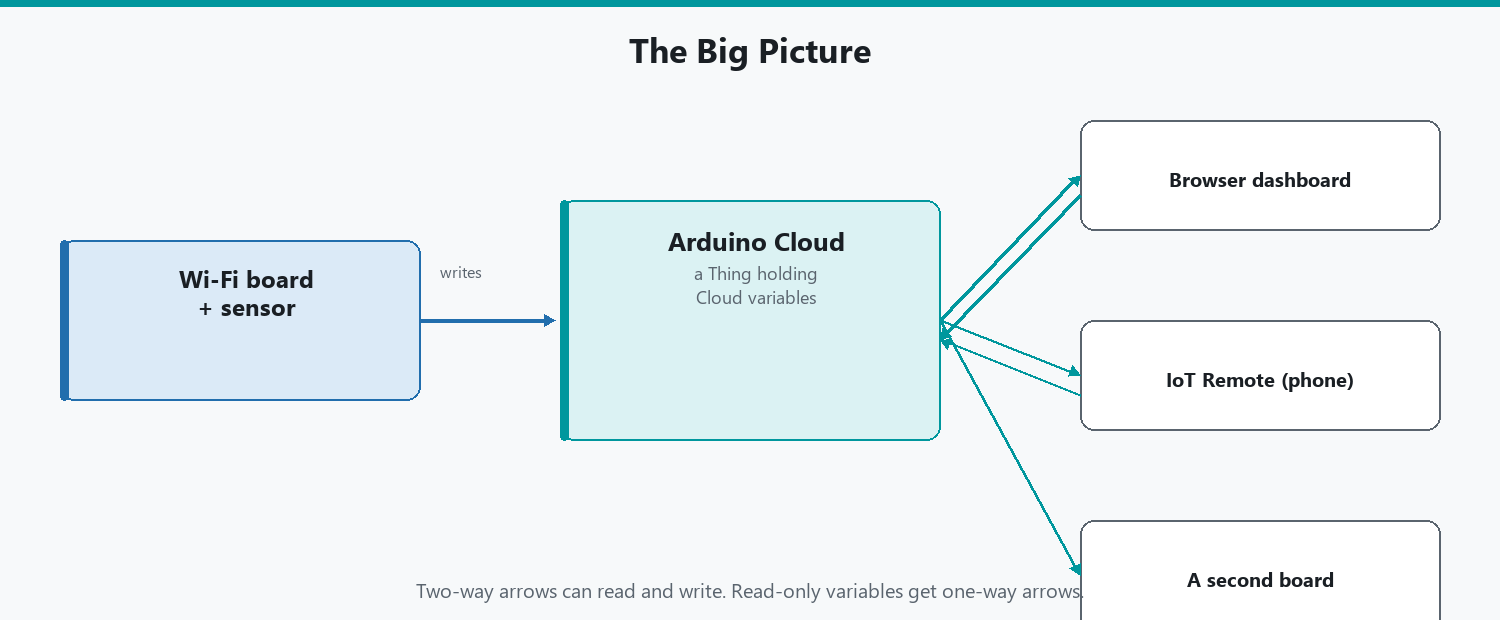
If you have only used USB and Serial Monitor, Cloud feels like a lot of new nouns at once: Thing, variable, dashboard, widget, OTA, Create Agent. Each of those is a normal idea with a Cloud name. This article walks them in the order you meet them, then compares Cloud to IDE 2, then builds a small temperature project so the nouns have somewhere to sit.
You need a board Cloud supports for the connection you want. Wi-Fi boards (Uno R4 WiFi, Nano ESP32, many ESP32 modules) are the usual starting point. Ethernet and some cellular options exist too. A USB-only classic Uno cannot join Cloud by itself. Part 2 of the Mastery Series is the place to pick hardware. Part 3 is still how sketches work. Cloud wraps a sketch. It does not replace learning setup() and loop().
Arduino offers several plans, from a free tier up through school and business plans. The limits on each one change often enough that I am not going to quote a device count here and have it be wrong in six months. When a button is greyed out, check Arduino's plans page.
What is Arduino Cloud?
Arduino Cloud is Arduino's web platform for:
-
Writing and storing sketches online (the Cloud Editor).
-
Connecting boards over Wi-Fi, Ethernet, or cellular.
-
Keeping Cloud variables in sync between a board and the internet.
-
Building dashboards of widgets around those variables.
-
Triggers that fire when a variable meets a condition.
-
OTA uploads (over-the-air: a new sketch without a USB cable, once the board is on the network and your plan allows it).
-
Device-to-device sync, so two Things can share a value.
-
APIs so Python, JavaScript, or Go on a computer can manage Things or talk to devices.
-
Integrations Arduino documents toward Alexa, Google Home, Node-RED, and similar.
The Chromebook app on Arduino's software page is this editor in a school-friendly wrapper, not a third IDE. IoT Remote is the phone screen for dashboards you already built. Neither one is Cloud by itself. They are doors into Cloud.
Arduino CLI is the compile engine under IDE 2. Cloud's compile path is in the same family. There is also a separate Arduino Cloud CLI for duplicating Things and doing mass OTA. That is a fleet tool, not the first-week download.
Devices, Things, and variables
Start with the hardware, then the virtual twin, then the values.
A device in Cloud is the physical board (or a phone, if you use IoT Remote's Phone as Device). You add it once, name it, and store network credentials on it.
A Thing is Cloud's virtual twin of a setup. Inside a Thing you:
-
Attach a device.
-
Create Cloud variables.
-
Edit the sketch Cloud generated.
-
Set timezone and, if you use them, webhooks (a web address Cloud calls automatically whenever your data changes, so another service can react).
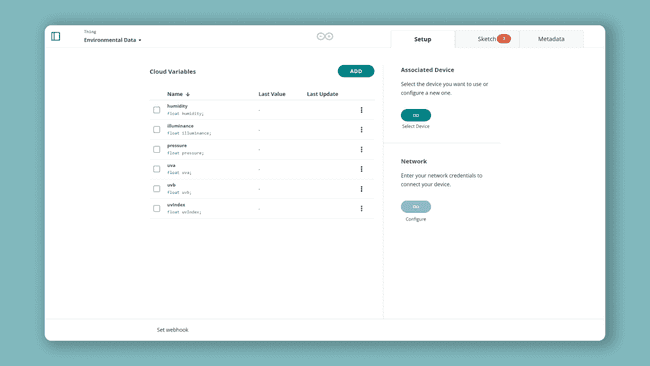
Image: Arduino
A Cloud variable exists in two places at once: on the board, and in Cloud. While the board is connected, they stay in sync. If you change a switch on a dashboard, the boolean on the board changes. If the board writes a temperature, the dashboard gauge moves.
When you add a variable, Cloud adds it to thingProperties.h, a generated header your sketch includes. You do not hand-edit that file as a hobby. You add variables in the Thing UI so Cloud and the sketch stay aligned.
Permissions:
-
Read only: the board writes, the dashboard displays. Use this for sensors.
-
Read and write: the dashboard can change the value too. Use this for a switch or a setpoint.
Update policy:
-
On change: sync when the value changes (there is a threshold).
-
Periodically: sync every N seconds.
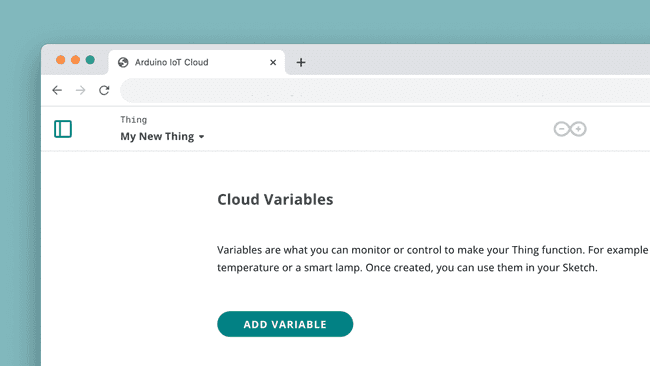
Image: Arduino
The function that pushes and pulls data is ArduinoCloud.update(). It belongs in loop(), and it needs to run regularly. If you block loop() with a long delay(), Cloud looks dead while the sketch is "fine." Use millis() timing for slow sensors. Part 4 of the Mastery Series teaches that pattern from scratch.
For a read/write variable named buttonSwitch, Cloud also generates an empty function called onButtonSwitchChange(). That function runs when the value changes from the Cloud (a dashboard switch). Put digitalWrite there, or in loop() after update. Do not assume the pin magically follows the widget.
You can synchronize a variable on one Thing with a variable on another. That is device-to-device. A garage sensor Thing can share a boolean with a house relay Thing without you writing a server. Both boards still need Cloud connectivity.
Dashboards and widgets
A dashboard is a page of widgets. A widget is a control or a display tied to a Cloud variable: gauge, switch, chart, map, LED, scheduler, and others. Arduino's docs are explicit: a dashboard is not glued to one Thing. One dashboard can show variables from several devices. Ten temperature nodes can share one chart.
Edit mode is where you add widgets, link variables, and drag layout. View mode is using it. Cloud also has a mobile layout preview so you can see how it will look in IoT Remote before you stand in the driveway.
You create dashboards in the browser. The phone app does not create them. Share a dashboard with another Arduino Cloud user if you want someone to watch without handing over your whole account.
A first dashboard should be boring: one gauge, one switch, two variables. Fancy layouts come after the board stays online.
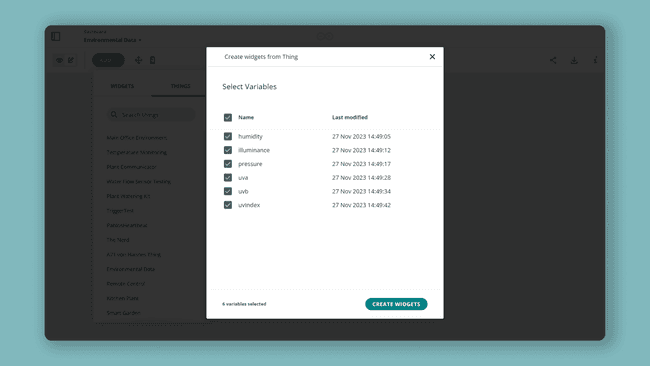
Image: Arduino
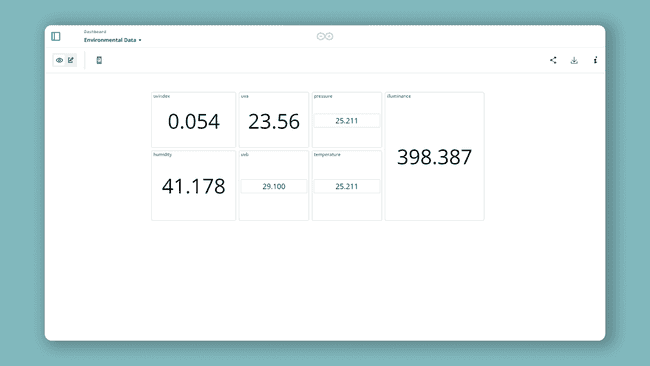
Image: Arduino
The sketch Cloud generates
A Thing sketch is still a sketch, with extra files.
-
The
.inoyou edit:setup(),loop(), your sensor code. -
thingProperties.h: generated. Variable names, Cloud connection setup. Recreated when you add variables in the UI. If you rename a variable only in the.ino, Cloud and the board disagree. -
Secret / device connection pieces Cloud injects so the board can authenticate. Do not paste those into a public GitHub repo.
initProperties() and ArduinoCloud.begin(...) show up in setup(). Leave them. Your work is: include libraries, set pin modes, then in loop() call ArduinoCloud.update() and assign variables.
If you copy this sketch into IDE 2, install the ArduinoIoTCloud / Arduino_ConnectionHandler libraries Cloud tells you to use, and keep those generated files next to the .ino. Missing libraries look like a Cloud outage. They are a Library Manager install.
Create Agent, on a normal computer
Create Agent is a small program Arduino publishes so a browser can use USB. Cloud Editor needs it for cable uploads. IDE 2 does not, because IDE 2 already speaks USB.
Install it from Arduino's Cloud / Create Agent download when the editor asks. Once it is running, it lives as a small icon in the Windows system tray (or the macOS menu bar). Keep it running while you upload. Close Serial Monitor in IDE 2 first if both are installed. Two programs cannot own the port.
On a Chromebook you do not install that Windows/macOS Agent the same way. You use the Chromebook Cloud app. That is a separate short article in this cluster.
What happens when Wi-Fi drops
Cloud variables stop updating. Dashboards show the last value or an offline device. The sketch on the board keeps running loop(). Pins do not freeze just because Cloud is gone, unless your sketch only writes pins inside on...Change() callbacks that never fire.
Write local fail-safes in the sketch: if Cloud is disconnected, set a safe output. Do not assume a dashboard switch is a physical interlock.
When Wi-Fi returns, ArduinoCloud.update() resumes. You do not re-add the device unless credentials changed.
Device-to-device, a concrete picture
Thing A: a sensor node, tooDry as a boolean, read only from the board's point of view, set true in the sketch when soil is dry.
Thing B: a relay node, pumpOn as read/write.
In Cloud, synchronize tooDry with pumpOn (or copy the boolean in a way the UI offers: link variables across Things). When A sets tooDry, B sees pumpOn and the relay sketch turns a pin on.
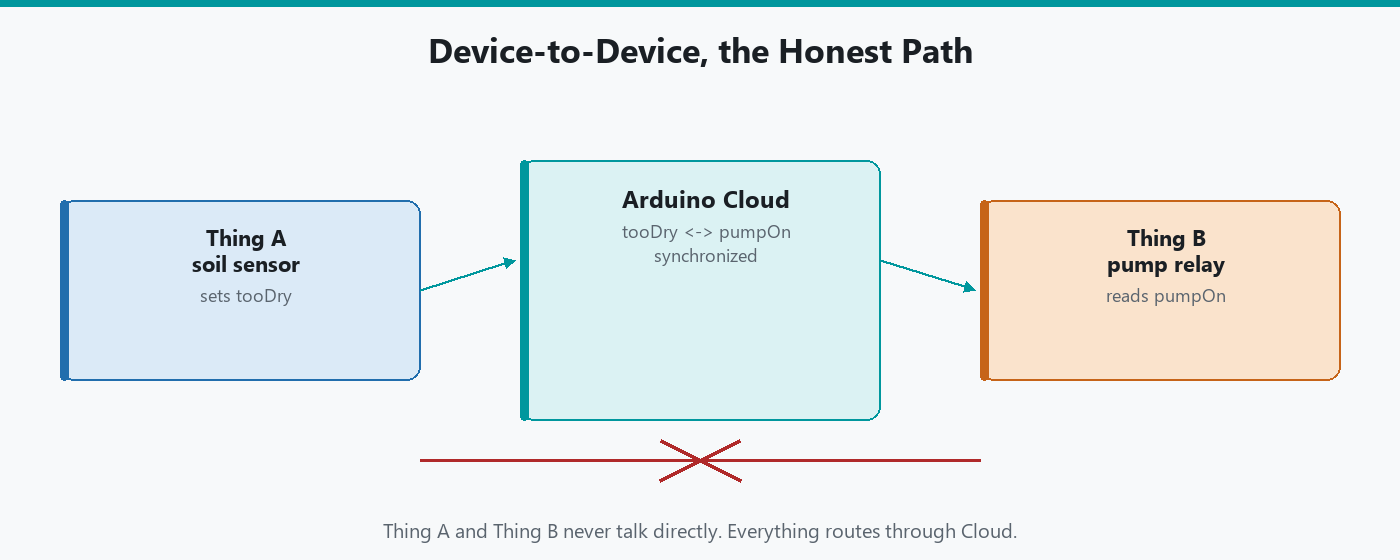
Both boards need network. This is not a direct radio link. If Cloud is down, the sync is down. For a greenhouse that must water during an outage, put a local threshold in B's sketch too, or keep a float switch. Cloud sync is convenience, not a safety-rated control loop.
Cloud Editor vs Arduino IDE 2
The Cloud Editor is the IDE-in-a-browser: sketches saved on Arduino's servers, boards talking through the Create Agent from the previous section when you use USB. Chromebooks and locked school PCs are why this path exists.
| Feature | Arduino IDE 2 | Cloud Editor |
|---|---|---|
| Where it runs | Your PC | Browser (and Chromebook app) |
| Where sketches live | Disk / Git | Arduino's servers (you can still copy out) |
| USB upload | Native | Create Agent |
| Serial Plotter | Yes | Not the same desktop Plotter |
| Board Manager / Library Manager | Local | Cloud's library set and board support |
| Offline | Yes | No |
| Dashboards, OTA, Things | No | Yes (that is Cloud) |
I still write a lot of firmware in IDE 2 and only use Cloud when the point of the project is a dashboard, OTA, or a machine that cannot install IDE 2. Plenty of people compile in Cloud end to end. Both are valid. Mixing is fine: develop in IDE 2, paste into the Thing sketch when you are ready to attach variables. Keep ArduinoCloud.update() and thingProperties.h intact when you do that.
Cloud also supports more than Arduino C++ on the device side and in integrations: MicroPython on supported boards, Python and JavaScript talking to APIs, Node-RED, Alexa, Google Home. Those are extra doors. The first project should still be C++ on a Wi-Fi board so you are not debugging language, network, and Cloud in the same hour.
OTA updates
OTA means you upload a new sketch over the network. The board must already have been set up with Cloud, be powered, and be online. Arduino's environmental-data tutorial notes that OTA requires a Cloud subscription plan. USB still works on the free path for many people.
Use OTA when the board is in a ceiling or a greenhouse. Do not use OTA as your first-ever upload. Get USB working first so you know the Thing, the Wi-Fi credentials, and the sketch. Then enable OTA when crawling under the deck is the pain.
A failed OTA can leave you wanting a USB cable anyway. Keep one in the kit.
Triggers and notifications
A trigger watches a Cloud condition and fires an action, such as email. Arduino's trigger documentation (as of the last revision I checked) focuses on boolean and string variables. A boolean going true, or a string taking a value, can send mail. Do not assume every float temperature has a built-in "email me above 30°C" trigger until you confirm that variable type is supported in the Triggers UI on your account.
For a temperature alarm, a common pattern is: the sketch sets a boolean tooHot when the reading crosses a threshold, and the trigger watches tooHot. That keeps the comparison on the board, where you already have the float.
Webhooks (Cloud calling a URL when data changes) live on the Thing as well. That is how you hook Node-RED or a custom script without polling.
APIs, in brief
Arduino Cloud has two API families:
-
Application API: a REST API (a set of web addresses a program can send requests to, the same way a browser requests a page), for creating and managing Things, dashboards, devices, and historical data. Clients exist for JavaScript, Python, and Go. You create an API key in Cloud.
-
Device API: how devices exchange values with Cloud. Under the hood it uses MQTT, a lightweight messaging protocol designed for small devices on unreliable networks. You do not usually hand-roll this. The Arduino Cloud library on the board is doing it.
Use the Application API when you want a script to clone ten Things or pull history into a spreadsheet. Do not start there. Start with one Thing and a gauge.
A first Cloud project
Use a DHT22 and a Wi-Fi board. Wiring and the library are in the DHT22 article. This section is only the Cloud wrapping.
- Log into Arduino Cloud. Add your Wi-Fi board as a device. Enter your Wi-Fi network name (the SSID) and password when asked.
- Create a Thing. Add
temperature(float, read only) andhumidity(float, read only). AddledOn(boolean, read and write) so you have a switch to play with. - Open the generated sketch. Include your DHT library. In
loop(), callArduinoCloud.update(), then every few seconds read the DHT withmillis()timing and assign the Cloud variables. The finished sketch is below. - Upload over USB with Create Agent, or from IDE 2 if you copied the Thing sketch carefully.
- Confirm the device shows online in Cloud.
- Build a dashboard. Add two gauges. Link them to
temperatureandhumidity. Add a switch and link it toledOn. - Open the same dashboard later in IoT Remote if you want the phone. The app is a companion. It is not required to prove Cloud works.
Here is what the .ino looks like once you fill in the generated template. The lines marked "Generated" were already there when I opened it. Cloud writes thingProperties.h for you, and it already declares temperature, humidity, and ledOn, which is why they are not declared again here. If your generated names differ slightly, keep Cloud's version and adapt my lines to it.
#include "thingProperties.h"  // Generated: your Cloud variables + connection setup
#include <DHT.h>              // Adafruit "DHT sensor library" (install it first)

const uint8_t DHT_PIN = 2;    // DHT22 data wire goes to digital pin 2
DHT dht(DHT_PIN, DHT22);      // Tell the library which pin and which sensor model

unsigned long lastReadMs = 0;              // When we last read the sensor
const unsigned long READ_EVERY_MS = 5000;  // DHT22 needs at least ~2 s between reads

void setup() {
  Serial.begin(9600);         // Generated: debug output to Serial Monitor
  delay(1500);                // Generated: give Serial Monitor time to connect
  pinMode(LED_BUILTIN, OUTPUT);  // The dashboard switch will drive this LED
  dht.begin();                // Start talking to the DHT22

  initProperties();           // Generated: register the Cloud variables
  ArduinoCloud.begin(ArduinoIoTPreferredConnection);  // Generated: connect with your stored Wi-Fi details
  setDebugMessageLevel(2);    // Generated: how chatty the connection messages are
  ArduinoCloud.printDebugInfo();
}

void loop() {
  ArduinoCloud.update();      // Sync with Cloud. This must run often, so no long delay() here.

  // Non-blocking timer: only read the sensor every READ_EVERY_MS
  if (millis() - lastReadMs >= READ_EVERY_MS) {
    lastReadMs = millis();                 // Remember when this read happened
    float t = dht.readTemperature();       // Celsius
    float h = dht.readHumidity();          // Percent relative humidity
    // isnan() catches a failed read, so a loose wire does not push junk to the dashboard
    if (!isnan(t) && !isnan(h)) {
      temperature = t;                     // Assigning a Cloud variable is all it takes to sync it
      humidity = h;
    }
  }
}

// Generated (empty) callback. Cloud runs this when the dashboard switch changes ledOn.
void onLedOnChange() {
  digitalWrite(LED_BUILTIN, ledOn ? HIGH : LOW);  // Follow the switch: true = LED on
}
Your Wi-Fi name and password do not appear in this file. Cloud keeps them in a separate Secret tab (arduino_secrets.h), which is exactly what you want if you ever share the sketch.
If Serial Monitor in IDE 2 shows good DHT numbers and Cloud stays at zero, you are running the Serial-only sketch, not the Thing sketch. The Cloud variables have to be assigned in the sketch Cloud generated.
When Cloud is the wrong tool
Stay in IDE 2 when you are offline, when you want Serial Plotter, when the board has no network, or when the project is a local gadget with no dashboard. Reach for Cloud when the whole value of the project is "I can see this from somewhere else," or when the computer in front of you is a Chromebook.
A UNO Q can register with Cloud from App Lab's settings so a Linux-side App can join dashboards. The dashboards and variables still work the way this article describes. App Lab is just another way of getting a device into Cloud. Classic Unos still want IDE 2.
Troubleshooting
| Symptom | Likely cause | Fix |
|---|---|---|
| Device never online | Wrong Wi-Fi, sketch has no ArduinoCloud.update(), board not Cloud-capable |
Recheck credentials. Use the Thing sketch. Confirm the board is on Cloud's list |
| Create Agent will not upload | Agent not running, or another program has the port | Start Create Agent. Close IDE 2 Serial Monitor |
| Gauges stuck at 0 | Variables never written, or read/write mix-up | Assign Cloud variables in loop(). Match names to thingProperties.h |
| Dashboard switch does nothing | Empty on...Change() body, or pin not written |
Fill the generated callback or write the pin after update |
| OTA missing | Plan, or board never completed first USB Cloud upload | USB first. Check the plan. Keep the board powered and online |
| Trigger never fires | Variable type not supported, or condition never met | Check Triggers docs for types. Use a boolean the sketch sets |
Wrap-up
Arduino Cloud is the online half of Arduino's software family: editor, Things, variables, dashboards, triggers, OTA, and APIs. IDE 2 remains the desktop workshop for sketches. Cloud is what you add when those sketches should show up on a page, a phone, or another board.
Start with one Wi-Fi device, two variables, and a boring dashboard. Then add a switch, then a phone, then OTA. Official docs live under docs.arduino.cc Cloud. When plan limits or widget names move, trust that tree.
Hack The World and Make Awesome.




