

If you have only used Arduino IDE 2, Python on an Arduino sounds like a trick. You write a sketch, you click Upload, the chip runs C++ until you overwrite it. That is still the default path, and Part 3 of the Mastery Series is where that path gets taught.
MicroPython is a different deal. It is a version of Python built to run on the microcontroller itself. An interpreter reads your program as text and executes it on the board. You are not compiling a .ino into firmware and replacing it every time you change a print statement. You put MicroPython firmware on the board once, then you send it Python files and talk to it live.
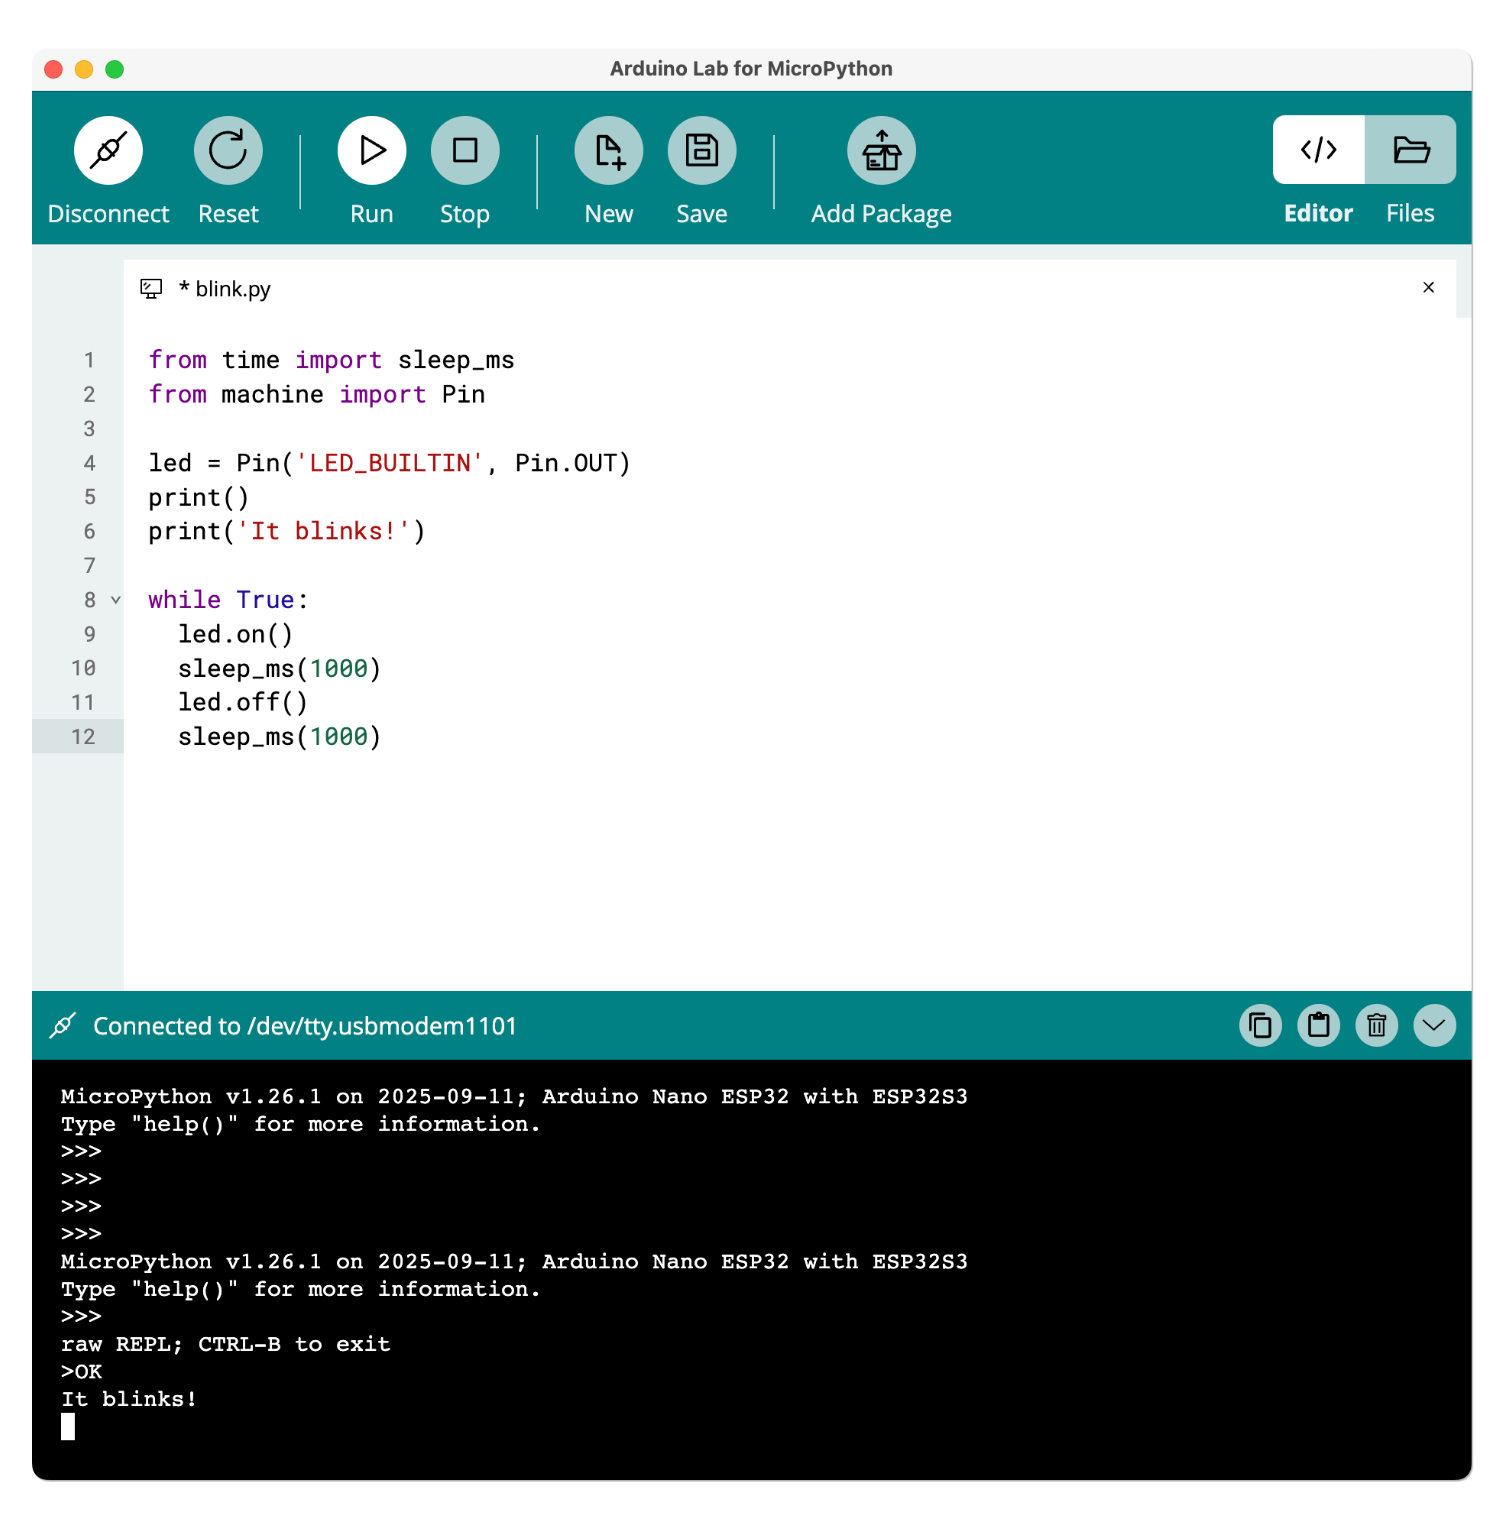
Arduino Lab for MicroPython is Arduino's lightweight editor for that workflow. It can connect over serial, run code, move files on and off the board, and open a REPL. REPL stands for Read-Eval-Print Loop: you type a line, the board runs it, you see the result immediately. Arduino also hosts an online version of the same editor at lab-micropython.arduino.cc, inside Arduino Cloud.
This article is the Lab itself: what it is, which boards it is for, how firmware gets onto the chip, how the editor works, a first blink, and how to put Arduino C++ back when you are done. It is not a full Python course, and it is not Arduino App Lab. App Lab's Python runs on Linux next to a microcontroller, on UNO Q and VENTUNO Q. MicroPython replaces Arduino C++ on a supported microcontroller. Mixing those two up is how people download the wrong editor.
Arduino is clear that the desktop Lab is experimental pre-release software. Questions go to GitHub issues. Treat it as a real tool that can still change under you.
What is MicroPython?
Python on a laptop has an operating system, a disk, and as much RAM as you bought. A microcontroller has kilobytes to megabytes of RAM and no desktop OS. MicroPython is a Python implementation designed for that smaller world. It includes a subset of the Python standard library, plus modules for pins, time, and the board's hardware.
You install MicroPython as firmware, the same way you would upload a sketch, except the firmware is the Python runtime. After that, the board is a MicroPython machine until you overwrite it with an Arduino sketch again. Arduino's help center is blunt: uploading a sketch from Arduino IDE or the Cloud Editor replaces MicroPython and restores normal Arduino C++ behavior. You do not "uninstall" MicroPython as a separate step. You upload a sketch.
Gotcha, before anything else: a classic Arduino Uno (ATmega328P) is not on Arduino's current MicroPython installer list. If your only board is an Uno, Nano classic, or Mega, this editor will not magically add Python to it. You need a board Arduino supports for MicroPython. Part 2 is the place to think about that purchase. Arduino's MicroPython 101 course is built around the Nano ESP32.
What is Arduino Lab for MicroPython?
The Lab is an editor, not a compiler in the Arduino IDE 2 sense. Arduino's GitHub description: a lightweight editor supporting connection with a board, code upload, file transfer, and an interactive REPL shell. It is an Electron app (a desktop app built from the same web technologies a browser uses) talking to MicroPython over serial. The project is sponsored by Arduino, based on original work by Murilo Polese.
What you get in the window, based on Arduino's own feature list and docs:
-
A Python text editor, with syntax highlighting and autocomplete.
-
Multiple tabs.
-
Connect / disconnect to a board on a serial port.
-
Run / stop the script in the editor.
-
A REPL terminal (
>>>prompt) for live lines. -
A file manager for the computer and for the board's MicroPython file system: create, rename, delete, upload, download.
-
Soft reset, stop (a "keyboard interrupt," the same Ctrl+C that stops a program on a PC), paste mode, and tab completion in the REPL.
There are two ways to use it:
- Desktop Lab. Download from Arduino's software / MicroPython pages. On Windows you unzip and run the
.exe. On macOS you unzip and put the app in Applications. - Online Lab. lab-micropython.arduino.cc, also listed in Arduino Cloud under Resources. You need a Cloud account and a board that already has MicroPython installed. Arduino's online-editor tutorial walks Connect, then a one-line
print("Hello World!")in the REPL.
The online editor is convenient on a machine that should not install desktop software. The desktop Lab is what I use when I want files on disk and no Cloud login in the way. Both still need MicroPython firmware on the board first. The editor does not install that firmware by itself.
Arduino also points at OpenMV as another MicroPython-based editor, aimed at machine vision. If you came here for a first Python blink, stay with Arduino Lab. OpenMV is a different firmware fork (a separate project that started from MicroPython's code and went its own way) and a different IDE.
Which Arduino boards can run MicroPython?
Arduino's help article for the MicroPython installer (and the matching "upload a sketch to a board running MicroPython" article) currently lists boards including:
-
Arduino Nano 33 BLE, BLE Rev2, BLE Sense, BLE Sense Rev2
-
Arduino Nano ESP32
-
Arduino Nano RP2040 Connect
-
Arduino Opta (Lite, RS485, WiFi, depending on the article)
-
Arduino Portenta C33
-
Arduino Portenta H7, H7 Lite, H7 Lite Connected
That list moves. Check Arduino's MicroPython page and the installer before you buy. The important negative is still true: Uno R3 is not on it.
Third-party boards (generic ESP32, Raspberry Pi Pico, and many others) run MicroPython from micropython.org with other editors, such as Thonny (a beginner-friendly Python editor with MicroPython support built in) or mpremote (MicroPython's official command-line tool). This article is Arduino's Lab and Arduino's installer. If you have a generic ESP32 DevKit, you can put MicroPython on it, but you will be following Espressif / MicroPython docs, not Arduino's one-click installer.
Install MicroPython firmware first
The editor will connect to a board that is already running MicroPython. If the board still has Arduino C++ firmware, Connect will fail or you will get garbage, and you will think the Lab is broken.
Arduino's recommended path is the MicroPython Firmware Installer (Arduino also calls it the MicroPython Installer):
- Download the installer for your OS from Arduino's MicroPython / Help Center pages. Windows is an
.exe. macOS is a zip you move to Applications. Linux is a.debyou install with the package manager. - Plug the supported board in with a data-capable USB cable.
- Let the installer detect it. You should see the board name (for example Nano ESP32).
- Click Install MicroPython. Wait. "Installation successful" means the Python runtime is on the chip.
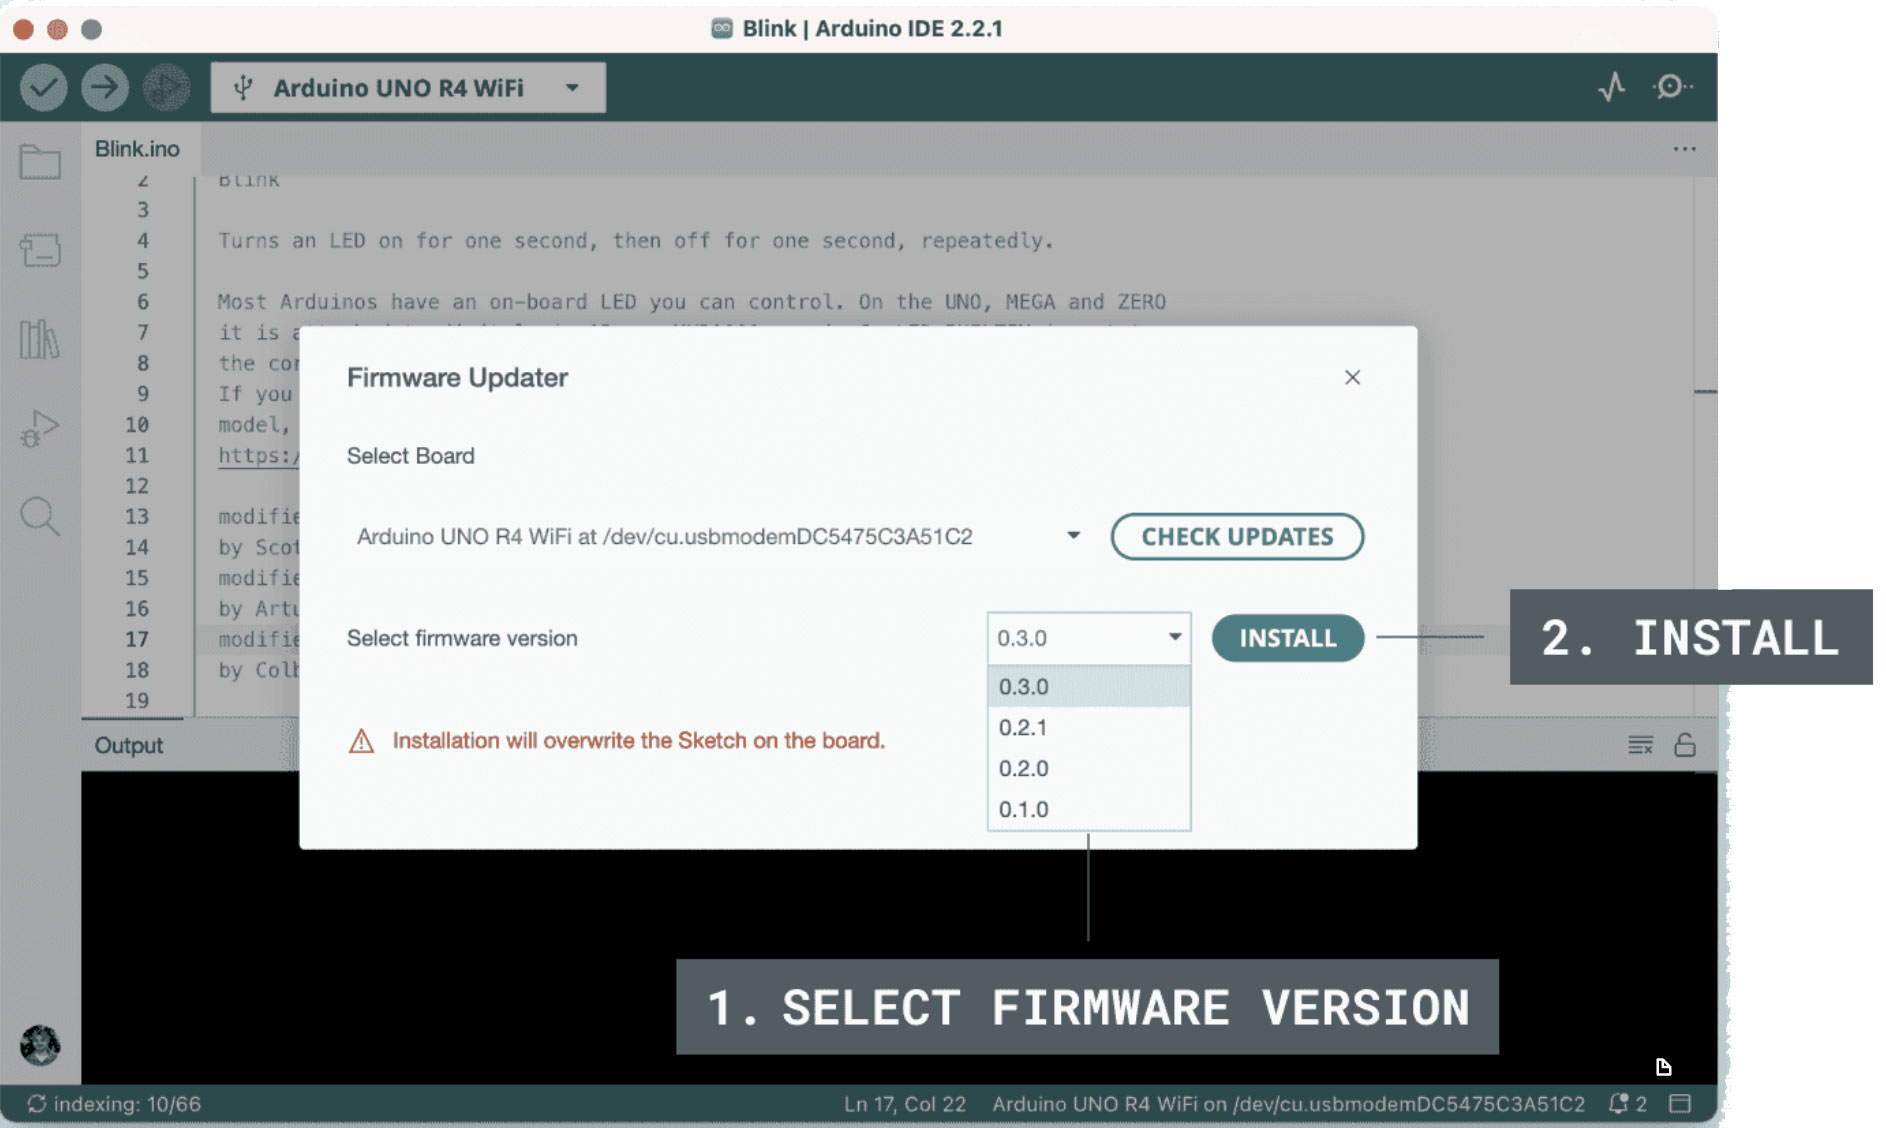
- Close the installer. You can disconnect and reconnect the USB cable, or tap reset once, if the Lab does not see the board immediately.
You can also download a specific firmware file from Arduino's MicroPython page (GIGA, Nano ESP32, Portenta H7, and so on) and flash it yourself. For a first board, use the installer.
Gotcha: the Lab and the installer both want the serial port. If the Lab is already connected, the installer can fail. Disconnect in the Lab, or close it, before you run the installer. The same rule applies in reverse when you later upload an Arduino sketch from IDE 2.
Open the Lab and connect
Desktop:
- Unzip / install Arduino Lab for MicroPython.
- Launch it.
- Click Connect and pick the board's serial port.
- You should get a REPL prompt:
>>>.
Online:
- Log into Arduino Cloud.
- Open lab-micropython.arduino.cc.
- Connect, pick the board.
If Connect fails:
-
MicroPython is not installed yet.
-
The serial port is held by Arduino IDE 2's Serial Monitor, another Lab window, or a Python script.
-
Charge-only USB cable (power LED on, no data).
-
You need a reset after a fresh firmware install.
Arduino's online tutorial says: if you recently installed MicroPython, press reset once, or unplug and replug USB.
How the REPL works
The REPL is the reason people reach for MicroPython when they are poking at a sensor.
Four steps, which is where the name comes from:
- Read your line.
- Eval (evaluate) it on the board.
- Print the result.
- Loop back for the next line.
In the Lab, expand the terminal. Type after >>>. Press Enter.
>>> 2 + 2                   # Type a bit of math...
4                           # ...and the board answers immediately
>>> from machine import Pin # Load MicroPython's pin-control class
>>> led = Pin(48, Pin.OUT)  # Nano ESP32's onboard LED (use 2 on many generic ESP32 DevKits)
>>> led.value(1)            # Drive the pin high: the LED turns on right now
Everything after a # is my note for you. You only type the part before it.
You just turned a pin on without compiling anything. That is the felt difference from IDE 2. In Arduino C++ you would change loop(), click Verify, click Upload, wait, maybe open Serial Monitor. Here the board is already running an interpreter, and you are talking to it.
Tab completes names. You can stop a running script (keyboard interrupt). Soft reset restarts the interpreter without power-cycling the USB port, which is useful when a script is stuck.
Gotcha: a script that sits in a tight loop can make the REPL feel dead until you Stop it. Use Stop before you assume the serial connection died.
A later article in this cluster will go deeper on the REPL as its own tutorial. For this page, you need enough to test that the board is alive.
Files on the board: main.py and boot.py
MicroPython boards have a small file system. The Lab's file panel shows that file system next to your computer's files. You upload a .py file the way you would copy a file onto a USB stick, except the stick is the microcontroller.
Two filenames matter:
-
boot.pyruns once when the board resets, beforemain.py. Keep it short. Network setup sometimes lives here. Do not put your whole blink loop inboot.py. -
main.pyruns afterboot.py. This is the program you think of as "the sketch equivalent." Ifmain.pyexists, it starts on boot.
If you only click Run in the Lab, you are sending the editor buffer to the interpreter now. That does not always save it as main.py. If you unplug the board and the blink is gone, you ran the buffer and never uploaded main.py. Upload the file, name it main.py, reset. That is the "this should survive unplug" path.
You can also download files from the board to the PC, rename, and delete. Treat the board like a tiny disk. Do not delete boot.py unless you know why it is there.
A first-time upload of a blink that should survive unplugging looks like this:
- Write the script in the Lab editor and Run it once, so you know the pin and the sleep times are right.
- Open the file manager. You should see two sides: files on the computer, files on the board.
- Save the script on the computer, then upload it to the board with the name
main.py. If amain.pyalready exists, you are replacing it. - Soft reset, or unplug and plug the board back in.
- The LED should start without you clicking Run. If it only blinks when Run is pressed, the file never landed as
main.py.
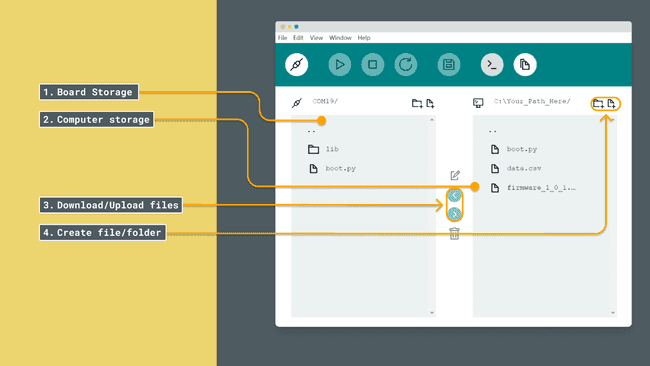
Image: Arduino
Paste mode in the REPL is for dropping several lines at once so the interpreter does not try to run a half-indented block. The Lab exposes it as a REPL feature. For a first blink, Run from the editor is simpler than paste mode.
Your first MicroPython blink
Pin numbers depend on the board. MicroPython uses the chip's own GPIO numbers (GPIO means general-purpose input/output pin), which are not always the numbers printed on the board. On the Nano ESP32, the onboard LED that Arduino C++ calls LED_BUILTIN (pin D13) is GPIO 48. On many generic ESP32 DevKits it is GPIO 2. Arduino's MicroPython examples for your board are the place to confirm the pin. The pattern is the same everywhere.
# Blink the onboard LED. Change the pin number to match your board.
from machine import Pin   # Pin controls a single GPIO
import time               # time.sleep() for pauses

# Pin.OUT means this pin is a digital output, like pinMode(pin, OUTPUT) in Arduino C++
led = Pin(48, Pin.OUT)    # 48 = Nano ESP32 onboard LED. Try 2 on a generic ESP32 DevKit.

while True:           # Loop forever. This is your loop() now.
    led.value(1)      # on (some boards are inverted: try 0 if this looks backwards)
    time.sleep(0.4)   # 0.4 seconds. time.sleep is seconds, not milliseconds
    led.value(0)      # off
    time.sleep(0.4)   # Same pause, then back to the top of the while loop
Two differences from Arduino C++ to flag before you hit them:
-
time.sleep(0.4)is seconds.delay(400)in Arduino is milliseconds. Sleepingtime.sleep(400)will pause for 400 seconds. I have done that. It looks like a freeze. -
There is no
setup()/loop(). You write awhile True:yourself, or you put setup lines above the loop. The interpreter does not callloop()for you.
In the Lab: paste into the editor, Connect, Run. You should see the LED blink. Then upload the file as main.py if you want it to start on power-up.
To print, use print(), and watch the REPL, not Arduino IDE's Serial Monitor. The Lab owns that serial port.
# Put this at the top of the script. It shows up in the Lab's REPL panel.
print("boot: micropython blink")
If Run does nothing and the REPL is silent, you are probably not connected, or another program has the port.
How to get Arduino C++ back
When you are done with MicroPython, open Arduino IDE 2 (or the Cloud Editor). Disconnect the Lab first. Select the board, upload Blink or any sketch. Arduino's help center: you do not manually uninstall MicroPython. The sketch upload replaces that firmware.
Some boards need bootloader mode if the port looks wrong: double-press reset until the LED pulses (Nano ESP32 timing can be picky, 0.3 to 1 second between presses). Then upload.
To go back to MicroPython later, run the Firmware Installer again. You can bounce between the two firmwares. You cannot run both at once. One runtime owns the chip.
Lab vs Arduino IDE 2, in this workflow
| Feature | Arduino IDE 2 | Arduino Lab for MicroPython |
|---|---|---|
| Language on the chip | Arduino C++ | MicroPython |
| What you install first | Nothing extra for an Uno. A core for ESP32 | MicroPython firmware, via the installer |
| How you send code | Compile, then Upload (firmware image) | Run the buffer, and/or upload .py files |
| Live line-by-line | Serial Monitor prints. You still compile to change code | REPL |
| File on the board | One firmware image | A file system (main.py, boot.py, lib/) |
| Classic Uno | Yes | No (not on Arduino's installer list) |
| Maturity | Current stable desktop IDE (2.3.10 as of this writing) | Experimental editor |
A dedicated C++ vs MicroPython article sits next in this cluster. It goes through compiled vs interpreted, speed, memory, libraries, debugging, and hardware access. This page is the Lab and the firmware step so you can try the language at all.
Troubleshooting
| Symptom | Likely cause | Fix |
|---|---|---|
| Connect finds nothing | Firmware still Arduino C++, or bad cable / driver | Run the MicroPython installer. Data cable. Close IDE 2 Monitor |
| Installer cannot see the board | Lab or IDE holding the port | Disconnect / close Lab and IDE 2, then run the installer |
| Run does nothing | Not connected, or you never saved/uploaded main.py |
Connect until >>> appears. Upload as main.py for boot |
| LED does not blink | Wrong GPIO, inverted LED, time.sleep in seconds |
Check the board's MicroPython pinout. Try value(0) vs 1. Do not sleep(400) |
| REPL frozen | Script in a tight loop | Stop in the Lab, then soft reset |
| Want Arduino sketches again | MicroPython still on the chip | Disconnect Lab, upload any sketch from IDE 2 |
| You expected this to work on an Uno R3 | Uno is not on the installer list | Use a supported board, or stay on Arduino C++ |
Wrap-up
Arduino Lab for MicroPython is a small editor for boards that are already running MicroPython. You install firmware with Arduino's MicroPython Installer, connect in the Lab (desktop or online), talk to the REPL, and put lasting code in main.py. It is Python on the microcontroller, not Python on Linux, and not a replacement for IDE 2 on an Uno.
If your board is on Arduino's list and you want to poke at hardware line by line, this is the official Arduino-shaped door. If you want twenty years of C++ libraries and a classic Uno, stay in IDE 2.
The next article in this cluster compares Arduino C++ and MicroPython as languages and runtimes, not as download buttons.
Hack The World and Make Awesome.




