

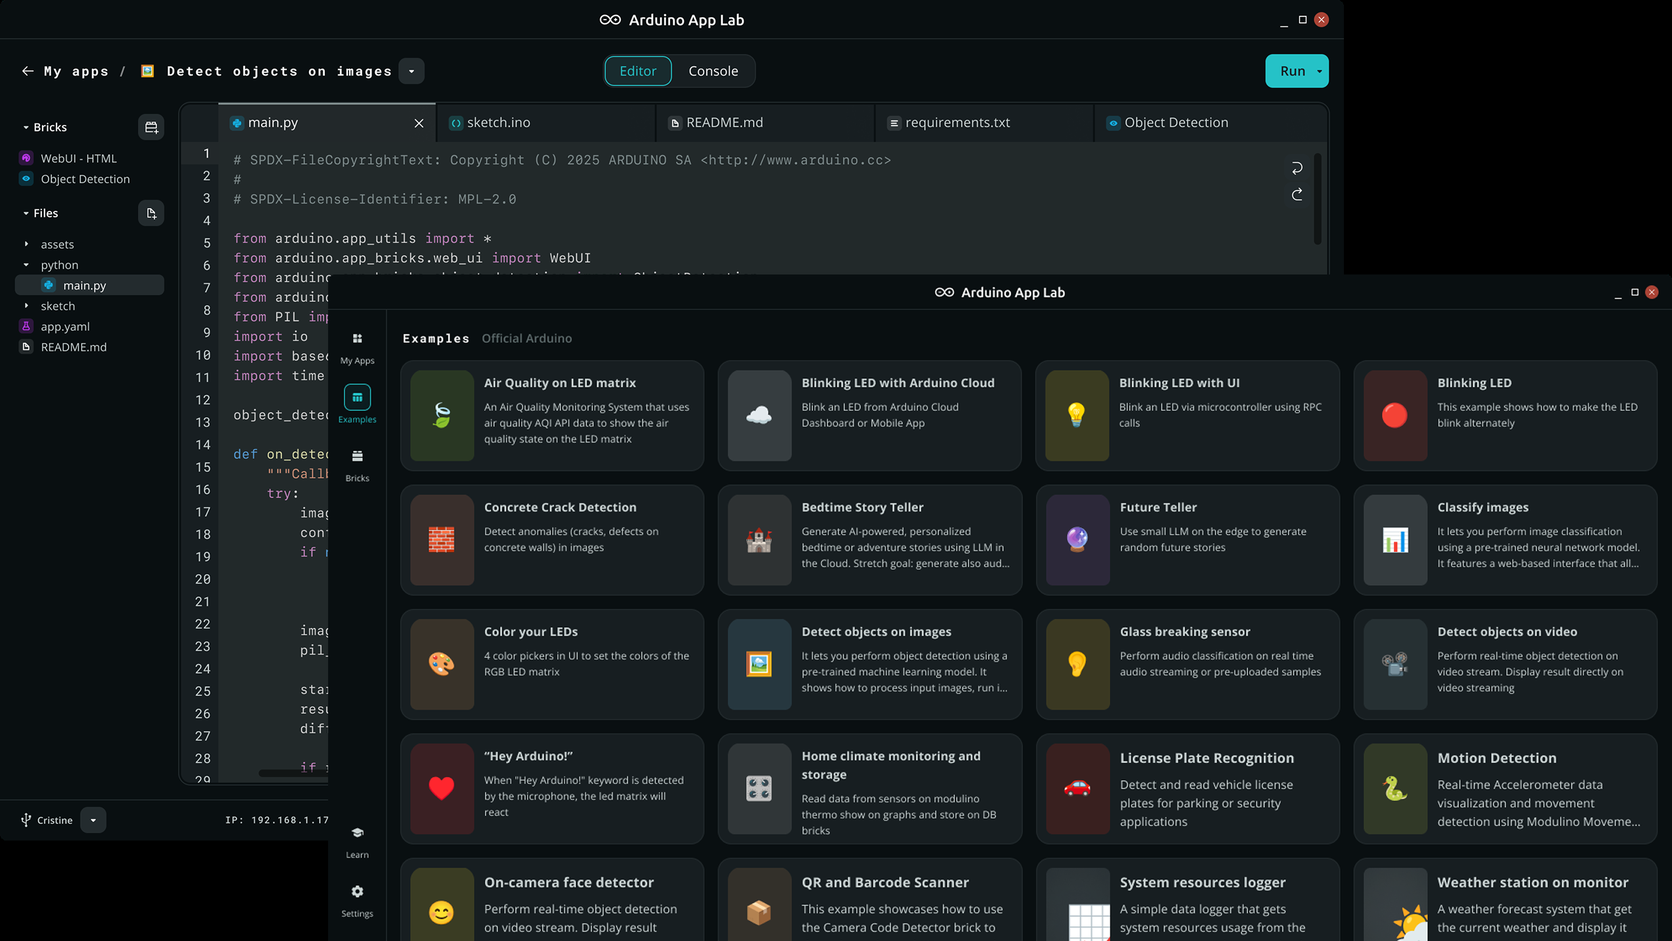
Do not start from a blank App. Arduino ships Examples. Duplicate Blink, change one thing, Run. That is a first App. Blank folders are how app.yaml and sketch/sketch.ino get forgotten.
A blank App puts you in front of an empty editor with three files to create from scratch and no proof that any of them are wired together correctly, which is a bad place to debug your first Bridge call from. An example that already runs gives you the opposite: a known-good starting point where main.py and sketch.ino are already talking to each other, so the only thing that can be wrong after your first edit is the thing you just changed. That is the whole reason to duplicate instead of create.
Set aside 30 minutes. Most of that is waiting on Run, not typing. If Blink from Examples has never worked on this board, stop and go back to getting started. You cannot debug a copy of an App that never ran as an example.
Keep IDE 2 closed for this session so you do not Upload by habit and replace the MCU sketch.
You need App Lab installed and a UNO Q or VENTUNO Q that already ran an official Blink (getting-started article in this folder). Part 3 of the Mastery Series is the C++ file you are about to edit.
Duplicate Blink
- Open App Lab. Connect the board.
- Examples → Blink LED from Python (or Blink with UI). Run once so you know the hardware works.
- Copy and edit app (Arduino's examples UI wording). Give it a name such as
FirstLedToggle. - Open
main.pyandsketch/sketch.ino.
Image: Arduino
You should see Python calling a Bridge name and the sketch provideing that name. If you do not, you copied a different example. Switch to Blink.
Change one thing
On the MCU, keep provide("set_led_state", ...). On Python, change the sleep from 1 second to 0.25 seconds, or invert the bool so the duty cycle feels different. Do not add a Brick yet. Do not add a camera.
If the example's Python looks like this, the only edit is the sleep number:
from arduino.app_utils import *   # Arduino's App + Bridge helpers
import time

led_state = False                 # Current LED state

def loop():
    global led_state
    time.sleep(0.25)              # THE ONE EDIT: was 1.0 in many Blink examples
    led_state = not led_state     # Flip on/off
    Bridge.call("set_led_state", led_state)  # Ask the MCU to set the pin

App.run(user_loop=loop)           # Start the App
Do not "clean up" App.run or the imports while you are changing timing. One edit.
Run. If the blink rate changes, you own the App. If nothing changes, you edited a file that is not in the App that Run deployed, or you never saved.
Add a boot print
In the sketch setup(), after Bridge.begin(), use Monitor.print (App Lab examples) so the App Lab console shows a banner:
// In setup(), right after Bridge.begin():
Monitor.print("boot: first-app");  // Appears in App Lab's console, proving THIS sketch is on the MCU
If your core uses Serial instead, use that and watch the matching console. The banner tells you this sketch, not last week's IDE 2 upload, is on the STM32.
This step exists because "did my change actually take" is the single most common confusion on a UNO Q, and a print statement is the cheapest possible proof. The board has two chips that can both hold old code: an earlier IDE 2 upload can still be sitting on the STM32 even after you Run a new App from Python, and an earlier App can still be marked to start at boot on the Linux side even after you save a new one. A boot line costs one line of code and answers "which sketch is actually running" without guessing.
Save the mental model
| File | You changed |
|---|---|
main.py |
How often Linux asks for a toggle |
sketch/sketch.ino |
How the pin is driven, and a boot line |
app.yaml |
Leave it for App 1 |
Next App: provide read_button from the MCU and print it in Python. Still no Brick. That direction matters because a Brick is a much bigger commitment than a Bridge call: it is a whole packaged program with its own dependencies, running in its own container on the Linux side, and debugging a Brick you have never touched at the same time as debugging your first Bridge call stacks two unknowns on top of each other. Get one provide/call pair working cleanly first, in both directions, before a Brick's extra moving parts enter the picture.
When you are done, write one sentence in a comment at the top of main.py saying what you changed, and date it. Future you will not remember whether 0.25 was the point of the exercise.
Use a name you will recognize in My Apps next week. App2 is how you open the wrong project and think Run is broken. first-led-toggle is enough.
Your second App: reading a button
Once the LED toggle App is solid, the natural next step is a Bridge call going the other direction: the MCU providing a value, Python reading it instead of setting it. Duplicate the LED App this time instead of Blink, since it already has a working provide/Bridge.begin() pair to build from.
On the sketch side, add a second provide alongside the LED one, returning whatever a button pin currently reads:
// Add this next to your existing set_led_state provide()
int read_button() {
  return digitalRead(2);   // HIGH or LOW, whatever pin 2 is wired to
}

// In setup(), after the existing Bridge.provide for the LED:
Bridge.provide("read_button", read_button);
On the Python side, call it on the same loop that is already toggling the LED:
button = Bridge.call("read_button")   # Ask the MCU what the pin currently reads
print("button:", button)              # Confirm it in App Lab's console
Run it and watch the console value change as you press the button. That one small addition is the entire shape of "the MCU tells Linux something": a provide() that returns a value, a call() that reads it, printed somewhere you can actually see it change. Every more complex sensor-reporting App in this cluster, moisture, distance, motion, is this same pattern with a different pin and a different number attached.
Rename nothing on the first pass
Do not rename main.py. Do not move sketch.ino out of sketch/. Do not tidy app.yaml "to make it cleaner." App Lab is matching paths. After Blink-rate works, then rename functions if you must, both sides at once.
Save as you go. Run after each save. Two changes at once (timing and pin polarity) makes a dark LED impossible to explain.
If it fails
- LED never moved after your edit: Run log. Names on
provide/call. Active-low LED (try inverting HIGH/LOW). - Python exception: read the traceback.
App.runmissing, import path, syntax. - Worked, then IDE 2 Upload, then dead RPC: Run the App again from App Lab.
- Cannot find the App: My Apps, not Examples.
- Run reports success but the LED keeps the old rate: you may be watching a cached App, or an older App set to start at boot. Check which App is marked as the default at startup in App Lab, and turn that off on the original Blink example if it keeps taking over the board.
- Two apps both claim the same Bridge name: the MCU only has one
provide("set_led_state", ...)active at a time, whichever sketch is currently flashed. If you duplicated Blink twice and Ran both at different points, the boot print tells you which sketch actually answered the last upload, since the Run log alone will not.
Troubleshooting
| Symptom | Likely cause | Fix |
|---|---|---|
| Rate never changes | Edited the example, Ran the copy | Run your App under My Apps |
| No boot line | Wrong console or sketch not deployed | App Lab log. Run, do not only save |
| Blank App missing sketch | Started empty | Duplicate Blink instead |
Wrap-up
First App = duplicate Blink, change the Python timing or the pin polarity, Run, confirm with a boot print. Architecture articles in this folder explain why. This page is the clicks.
Hack The World and Make Awesome.




