

A Chromebook is a laptop that lives in ChromeOS and, in a lot of schools, is not allowed to install Arduino IDE 2. Arduino still has a path. Arduino's software page lists Arduino Cloud on Chromebook: a Play Store app that wraps the Cloud Editor so you can write sketches in a browser-shaped environment, save them online, and upload to a board.
This is not a different programming language. You still write a sketch, the same setup() and loop() Part 3 of the Mastery Series teaches. The editor runs in Cloud. The files live on Arduino's servers. USB still needs a path from the Chromebook to the board.
If you can install IDE 2 on a Windows, Mac, or Linux machine, that is still the more complete desktop workshop (Serial Plotter, local files, offline). Use the Chromebook path when the Chromebook is the computer you have, especially in a classroom.
What you are using
Three pieces, with Cloud names:
-
Arduino Cloud (app.arduino.cc): account, sketches, optional Things and dashboards.
-
Cloud Editor: the online IDE. Sketches, verify, upload, serial monitor in the web UI.
-
Chromebook app: Play Store listing Arduino documents as the Chromebook door into that editor. Arduino's software page treats it as Cloud on Chromebook, not as a native port of IDE 2.
Arduino Create Agent is the helper that lets a browser talk to USB. On a Windows PC you install it as a small program. On a Chromebook, the Play Store Cloud app is how Arduino expects that USB bridge to exist. If upload cannot see a port, the app or the USB permission on ChromeOS is the first place to look, not Board Manager.
You will need an Arduino account. Cloud has a free tier. Classrooms often use Arduino Cloud for Education or a managed plan. I will not quote seat counts. Your school's admin may have to allow the Play Store app.
What you need
-
A Chromebook that can install the Arduino Cloud / editor app from Play Store, or a browser allowed to use Cloud plus whatever USB access ChromeOS gives you.
-
An Arduino account.
-
A data-capable USB cable. Charge-only cables light the board and never enumerate (enumeration is the quick "hello, here is what I am" conversation a USB device has with the computer when you plug it in). This trap is the same as on Windows.
-
A board Cloud can upload to over USB from that environment. Official Arduino boards with a proper USB stack are the safe classroom default. Some clones need drivers ChromeOS will not install. Part 2 is the board-family guide. For a Chromebook cart, I would stock official Unos, Leonardo/Micro-style native USB boards, or official Nano ESP32 / R4 WiFi, not a drawer of unmarked CH340 Nanos, until you have proven ChromeOS sees them.
-
Internet. Cloud Editor is not an offline IDE. If the school's filter blocks Arduino's domains, nothing in this article will save you. Test on the actual student Wi-Fi, not only on a teacher hotspot.
First session
- Install the Chromebook app Arduino lists on the software page, or open Cloud in Chrome and use the documented Chromebook path.
- Sign in.
- Plug the board in. Grant USB access if ChromeOS asks. If it never asks and the editor shows no port, try another cable, another USB-C jack, and a board you know works on a normal PC.
- New sketch. The empty
setup()/loop()is the same as IDE 2. - Select the board type in the Cloud Editor's board list. This is Cloud's board support, not your laptop's Board Manager extras. Third-party ESP32 cores you added on a Windows PC are not automatically here. Official boards and Cloud's supported list are what you get.
- Verify (compile in the cloud / in the editor). Errors still appear in an output pane. Read the first error.
- Upload. The board's RX/TX LEDs should flicker on a classic Uno.
- Open the Cloud serial monitor if you printed something. Baud rate must match
Serial.begin.
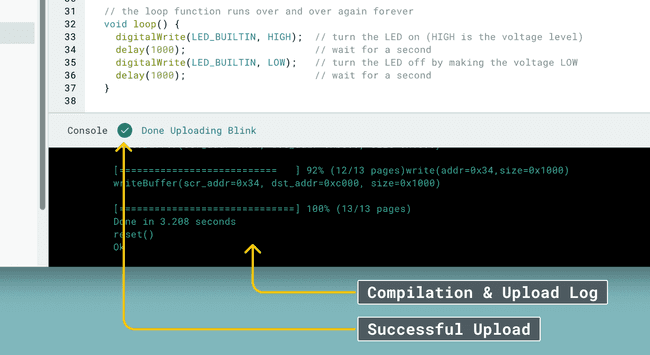
Image: Arduino
This is the tiny test sketch I use on a new Chromebook, because it proves upload and the serial monitor in one go:
void setup() {
  pinMode(LED_BUILTIN, OUTPUT);  // Onboard LED becomes an output
  Serial.begin(9600);            // Set the Cloud serial monitor to 9600 too
}

void loop() {
  digitalWrite(LED_BUILTIN, HIGH);          // LED on
  Serial.println("Hello from a Chromebook"); // Shows up in the serial monitor
  delay(500);                               // Half a second
  digitalWrite(LED_BUILTIN, LOW);           // LED off
  delay(500);                               // Half a second, then repeat
}
If the LED blinks and the message scrolls by once a second, the whole path works: editor, compile, USB, board, and serial.
Save is to Cloud. There is no Documents\Arduino folder on the Chromebook unless you copy sketches out yourself. Teach students that "saved" means saved to the account, so a shared Chromebook cart does not keep their work locally.
USB on ChromeOS
ChromeOS USB is stricter than Windows. The OS must allow the app to see the device. Symptoms look like "no port" in the editor.
Work through:
-
Data cable, not a charger cord.
-
USB-C hub: try the Chromebook's own jack.
-
Another student unplugged the board and ChromeOS still thinks the app owns it: unplug, close the app, replug, reopen.
-
CH340 / CP2102 clones: Windows would need a driver. ChromeOS may show nothing useful. Prefer official Arduino USB.
-
The board is in a failed upload state: press reset, or double-tap reset for native-USB boards (Leonardo, some Nanos) so the bootloader enumerates.
If a Windows laptop on the same cable sees COM7 and the Chromebook sees nothing, the board is fine. The Chromebook USB permission or clone chip is the problem.
What you give up compared with Windows, macOS, or Linux
| Feature | Chromebook + Cloud | Desktop IDE 2 |
|---|---|---|
| Install IDE 2 | Usually no | Yes |
| Offline editing / compile | No | Yes |
| Serial Plotter | Not the desktop Plotter | Yes |
| Local Git repo as the main copy | Awkward | Natural |
| Extra Board Manager URLs (ESP32 community cores, etc.) | Cloud's supported boards | You add URLs |
| Library Manager as on the desktop | Cloud's libraries | Full Library Manager + zips on disk |
| Things, dashboards, OTA | Yes, you are already in Cloud | Separate, if you set Cloud up |
| Shared classroom cart | Strong (account holds sketches) | Weak (each PC has a sketchbook) |
ESP32 work that needs a Board Manager URL you pasted in Preferences on Windows may not be a Chromebook-first project. Official Nano ESP32, if Cloud lists it, is a better classroom ESP than a generic DevKit you have to add by JSON URL.
App Lab, PLC IDE, and Arduino CLI are not the Chromebook story. PLC IDE is Windows-only. App Lab wants a real desktop or the UNO Q itself. CLI wants a normal shell and PATH.
Cloud features you get "for free" by being on Chromebook
Because you are already in Cloud, Things and dashboards are next door. A student can go from Blink to a Wi-Fi dashboard without installing a second IDE. That is the pedagogical reason this path exists, not only "the school blocked .exe files."
Do not force dashboards on day one. Get USB upload and Serial working. Then attach a Cloud-capable board and a Thing. The Cloud complete guide in this cluster is the Thing / variable / dashboard map. This page is only how the Chromebook reaches that map.
The Linux container option, for Chromebooks that support it
Cloud Editor is the path this article recommends because it works on essentially any Chromebook with no setup beyond enabling USB access. It is not the only path. Many current Chromebooks support Linux (Beta), sometimes called Crostini, a genuine Debian Linux environment that runs alongside ChromeOS in its own sandboxed container, with its own filesystem, package manager, and the ability to install ordinary Linux desktop applications, including the real Arduino IDE 2 Linux build.
That gets you the full offline IDE experience, autocomplete, Board Manager, a docked Serial Monitor, exactly as this cluster's other Arduino IDE 2 articles describe it, running locally rather than in a browser tab. The tradeoff is real setup: enabling Linux support in ChromeOS Settings, installing IDE 2's Linux package inside that container, and configuring USB device passthrough so the container can actually see the board plugged into the Chromebook, a permission step distinct from the browser's own USB access prompt covered earlier in this article. Not every Chromebook model supports Linux at all, particularly older or lower-end education models a school district is likely to have bought in bulk, so check that support exists before promising a classroom this path.
For a single Chromebook you own and want to set up once, carefully, Linux plus a real IDE 2 install is worth doing if you want the desktop experience badly enough to spend the setup time. For a cart of thirty school-managed Chromebooks on a tight class period, Cloud Editor's zero-install path is almost always the more practical choice, which is why it is the one this article leads with.
Classroom notes
-
One Arduino account per student, or a managed Cloud for Education setup your admin chose. Shared logins make "who overwrote Blink" unanswerable.
-
Allow-list Arduino Cloud and the Play Store app before the period starts.
-
Cables: buy a class set of known-data USB cables. Label them.
-
Boards: official USB-serial or native USB. Test one clone on ChromeOS before you buy thirty.
-
Time: first-period USB permission popups will eat ten minutes. Demonstrate Grant once on a projector.
-
Performance: lower-end education Chromebooks with limited RAM can feel sluggish running Cloud Editor alongside several other browser tabs. Close unused tabs before a compile, the same advice that applies to a low-RAM Windows laptop running IDE 2. Cloud Editor itself is lightweight; a dozen background tabs fighting it for memory is usually the actual slowdown.
Troubleshooting
| Symptom | Likely cause | Fix |
|---|---|---|
| No port in the editor | Charge-only cable, ChromeOS USB permission, clone chip | Data cable, grant USB, try an official Arduino |
| Verify works, upload fails | Port lost, board in wrong mode, Agent/app USB | Reset board, reconnect USB, close other serial tools |
| Sketch vanished overnight | Saved only in a local tab, or shared account | Confirm Cloud save. Individual accounts |
| ESP32 DevKit missing | Not on Cloud's board list the way your Windows IDE was | Use a Cloud-listed board, or a desktop for that core |
| School filter blocks compile | Cloud domains blocked | IT allow-list. Hotspot is a test, not a policy |
Wrap-up
On a Chromebook you program Arduino through Arduino Cloud: the Play Store app and the Cloud Editor, sketches stored online, USB through ChromeOS permissions. The language is still Arduino C++. You give up offline IDE 2, Serial Plotter, and easy third-party cores. You gain a cart-friendly save location and a straight path into dashboards.
If a student can use a Windows lab PC, IDE 2 is still the fuller tool. If the Chromebook is what they have, this is the official Arduino answer.
Arduino's current Chromebook / Cloud links sit on arduino.cc/en/software and in Cloud itself. When the Play Store name shifts, trust that page.
Hack The World and Make Awesome.




