

Firmware is on the board (install article in this folder). The Lab connects and shows >>>. That prompt is the REPL: Read-Eval-Print Loop, an interpreter that reads one line you type, evaluates it immediately, prints whatever it returns, and waits for the next line. It is the same idea as typing commands into a calculator one at a time, except the calculator understands Python and is sitting on a microcontroller. Type 1 + 1 at that prompt and press Enter, and you get 2 back instantly, no compile step, no upload. That instant feedback is the entire point of MicroPython, and it is also the thing that will surprise you the first time a program does not behave like a compiled sketch would.
Now you write a program.
A MicroPython program is a .py file, not a .ino sketch. There is no setup() / loop() that the runtime calls for you. You write a while True: if you want a loop. Part 3 of the Mastery Series is the C++ shape. This page is the Python shape, a blink, and how to make it survive unplug.
What running code the hard way would look like
Under the hood, blinking an LED means writing directly to a hardware register, a small piece of memory built into the chip that controls a pin's electrical state. On bare-metal firmware, that could mean poking a specific memory address with a specific bit pattern, something like GPIO.OUT_SET = (1 << 48) to turn pin 48 high, with the exact address and bit position different for every chip family. You would need a datasheet open in another tab just to blink an LED. MicroPython's machine.Pin class exists to save you from that: it is a wrapper that knows which register belongs to which pin number on the board you selected, so led.value(1) does the same electrical thing as that raw register write, without you ever needing to know the address. That is worth knowing once, so machine.Pin reads as a shortcut you understand rather than a magic incantation you memorized.
Pin numbers are board-specific
Arduino's MicroPython examples for your board are the pinout source. Nano ESP32, GIGA, and Nano 33 BLE Sense do not share one LED pin. Some ports accept Pin("LED"). Others want a GPIO number (GPIO means general-purpose input/output, and the number is the chip's own name for the pin, which is not always the label printed on the board). On the Nano ESP32, the onboard LED is GPIO 48. If the LED does not blink, the program ran and the pin is wrong. Try the documented LED pin before you reinstall firmware.
Many generic ESP32 DevKits use GPIO 2 for an onboard LED, and some LEDs are active-low (LOW turns the LED on). Invert value(1) / value(0) if it looks backwards.
This trips up more people than the syntax does, because a C++ Arduino sketch hides the problem behind LED_BUILTIN, a constant the core defines for you so digitalWrite(LED_BUILTIN, HIGH) just works across boards. MicroPython does not ship that same convenience layer for every port, so you are looking up the real GPIO number yourself, the first time you touch a new board. Bookmark the pinout diagram for whatever you are holding. You will open it again the next time you add a sensor.
The blink
In Arduino Lab for MicroPython, Connect, then paste into the editor:
# First blink. Change the pin to match your board's MicroPython pinout.
from machine import Pin   # Pin controls one GPIO
import time               # For time.sleep()

led = Pin(48, Pin.OUT)    # 48 = Nano ESP32 onboard LED (try 2 on a generic ESP32 DevKit)
                          # Pin.OUT is an output, like pinMode(pin, OUTPUT)

print("boot: first-blink")  # Shows in the Lab's REPL pane, so you know the script started

while True:               # Loop forever (this is your loop())
    led.value(1)          # LED on
    time.sleep(0.4)       # 0.4 SECONDS, not milliseconds
    led.value(0)          # LED off
    time.sleep(0.4)       # Then back to the top
Click Run. You should see boot: first-blink in the REPL pane and a blinking LED.
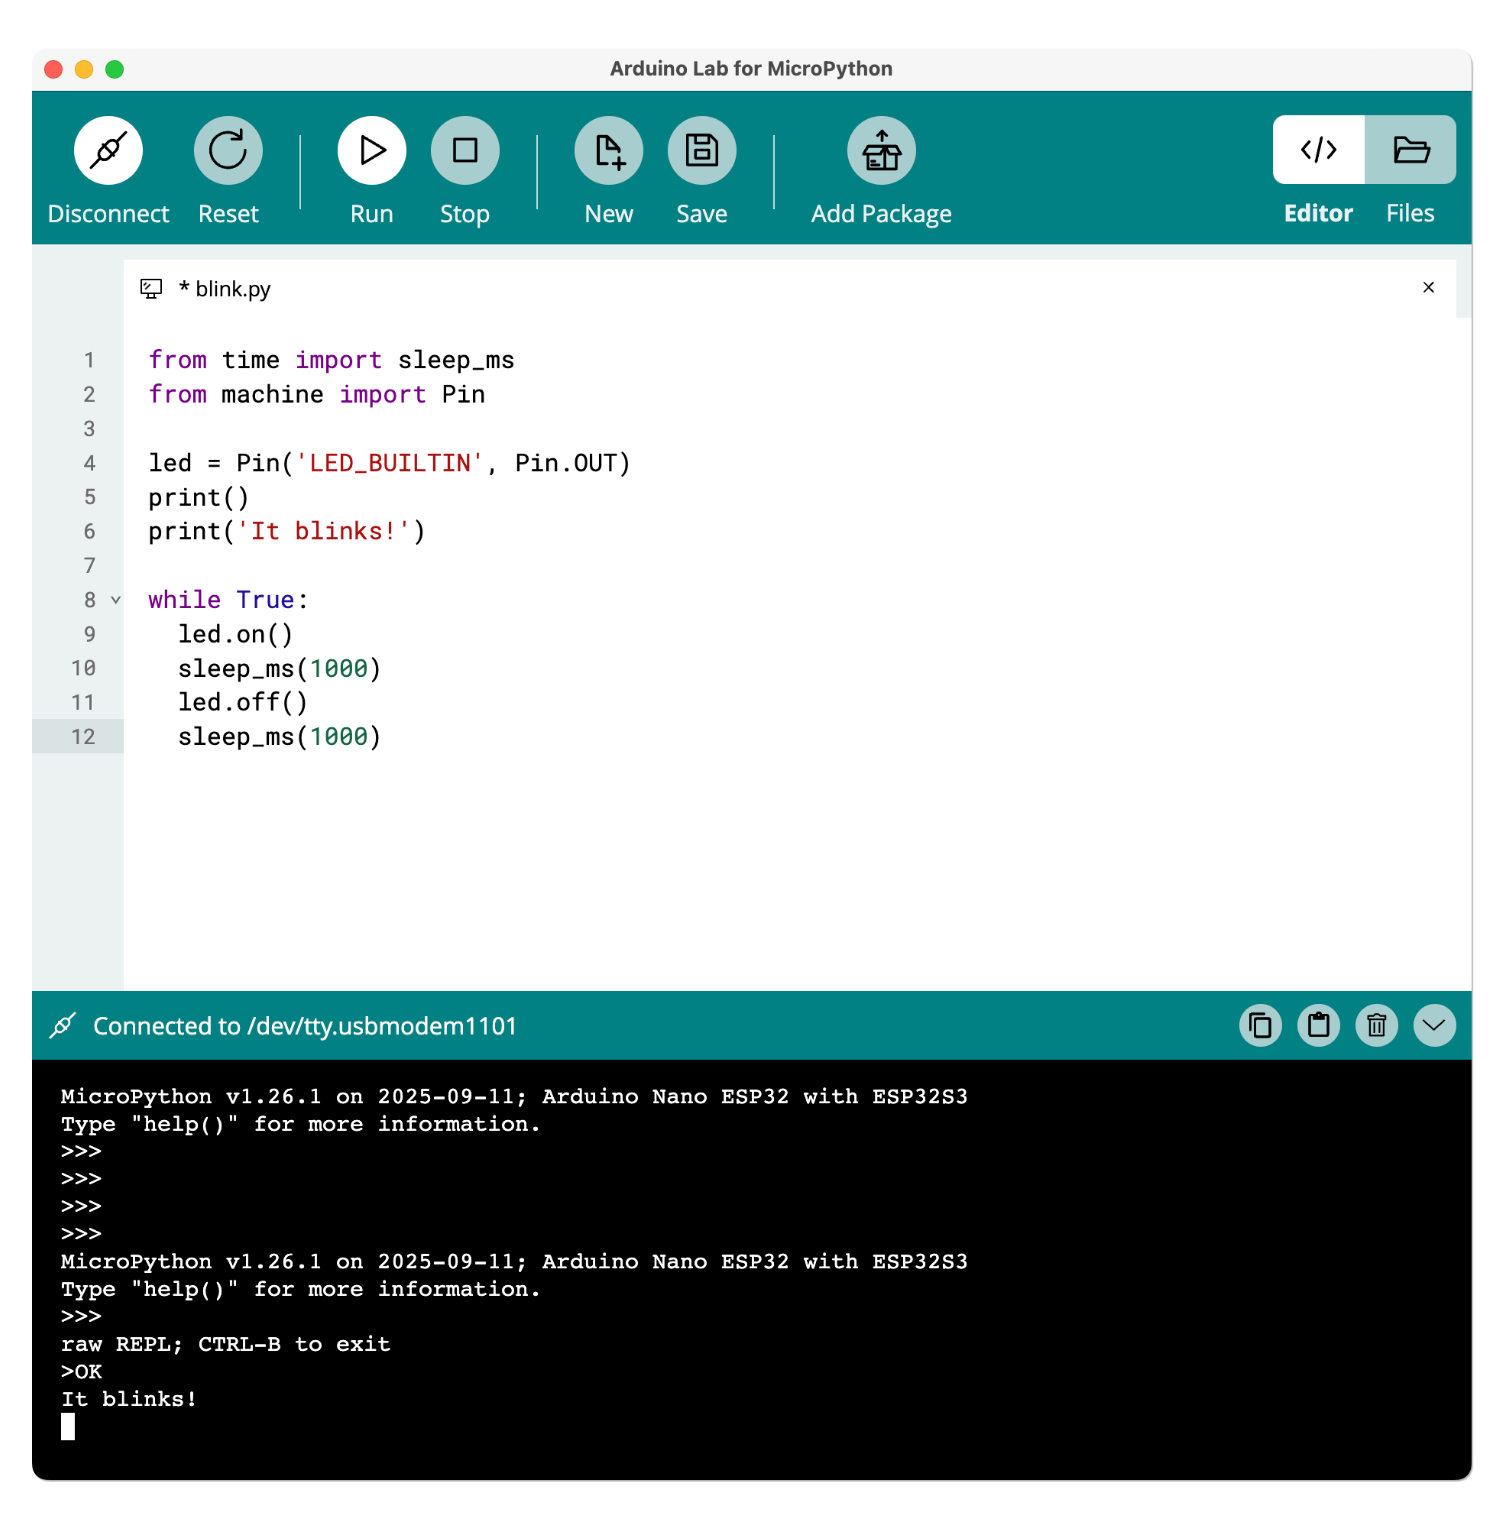
Gotcha: time.sleep(0.4) is 0.4 seconds. Arduino delay(400) is 400 milliseconds, which is the same duration. time.sleep(400) is 400 seconds. The board is not frozen. It is sleeping.
Run vs main.py
Run sends the editor buffer to the interpreter now. Unplug the board and that program is gone unless you saved it on the chip.
main.py on the board's file system runs after reset (after boot.py). That is the "sketch equivalent" for boot.
To persist:
- Prove Run works.
- Open the Lab's file manager (computer files vs board files).
- Upload this script to the board as
main.py. Replacing an existingmain.pyis expected. - Soft reset (restart the Python interpreter without cutting power, from the Lab's button or Ctrl+D in the REPL), or unplug and plug in.
- The LED should start without clicking Run.
If it only blinks when you press Run, the file never landed as main.py.
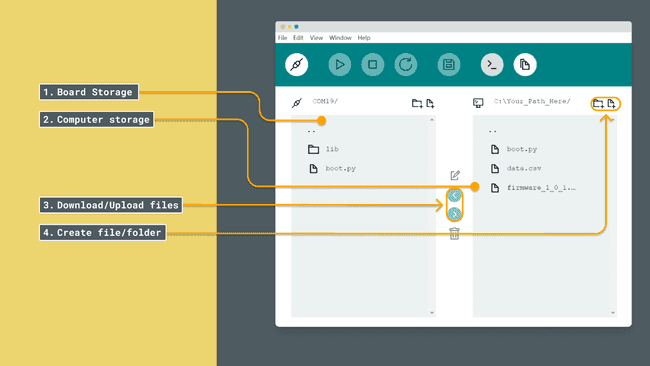
Image: Arduino
Keep boot.py short. It runs first. Do not put your blink loop there. Network setup sometimes lives in boot.py. If you delete it without knowing why it existed, put a minimal empty boot.py back only if the port's docs want one.
Download a copy of main.py to the PC from the Lab file manager after it works. The board is not a backup. A later C++ upload will wipe MicroPython, including that file, until you install firmware again and copy main.py back.
If Run shows the print and no LED, do not change sleep yet. Fix the pin first. If the LED blinks and there is no print, you are not looking at the Lab REPL (wrong window, or Monitor in IDE 2).
Stop a runaway loop
A tight while True without sleep can make the REPL feel dead. This is a real gotcha worth expecting before it happens to you: the interpreter is busy running your loop as fast as it can, so it never gets a spare moment to listen for new input from the Lab, and the >>> prompt simply will not come back on its own. It looks like the board has frozen or crashed, but it has not; it is doing exactly what you told it to do, forever. The fix is Stop in the Lab, which sends a keyboard interrupt (the same signal a Ctrl+C sends on a desktop terminal) that breaks out of whatever loop is running and hands control back to the REPL. If Stop does not respond, a soft reset restarts the interpreter from scratch, which always works because it does not wait for your code to cooperate.
Back to C++
Disconnect the Lab. IDE 2 → Upload Blink. MicroPython is gone until you run the installer again.
That is not a figure of speech. Uploading a C++ sketch through IDE 2 writes a compiled firmware image into the same flash memory region the MicroPython interpreter was living in, and the installer's .py files went with it, including any main.py you saved. The earlier step telling you to download a copy to your PC once the blink worked was not caution for its own sake: the board's flash is where MicroPython runs from, not a separate, protected storage area, so an Arduino C++ upload and a MicroPython install take turns owning the same physical space. Going back to MicroPython later means running the installer again, which writes the interpreter back before any of your .py files can run again.
Troubleshooting
| Symptom | Likely cause | Fix |
|---|---|---|
| Print works, no LED | Wrong GPIO or active-low | Board pinout. Swap 0/1 |
| Sleep feels like a hang | time.sleep(400) |
Use 0.4 for 400 ms |
| Lost after unplug | Only Ran, never uploaded main.py |
File manager → main.py → reset |
| REPL dead | Tight loop | Stop, then reset |
Wrap-up
First program: machine.Pin, a while True, time.sleep in seconds, a boot print, then upload as main.py. Run is a test. main.py is what boots. Next: the REPL, then buses and sensors.
Hack The World and Make Awesome.




