

In part 3, we learned: how a sketch runs under the hood, the core functions you'll use on nearly every build, Serial as your debugging tool, and how libraries get into your project. This part is about something every one of those tools eventually runs into: time.
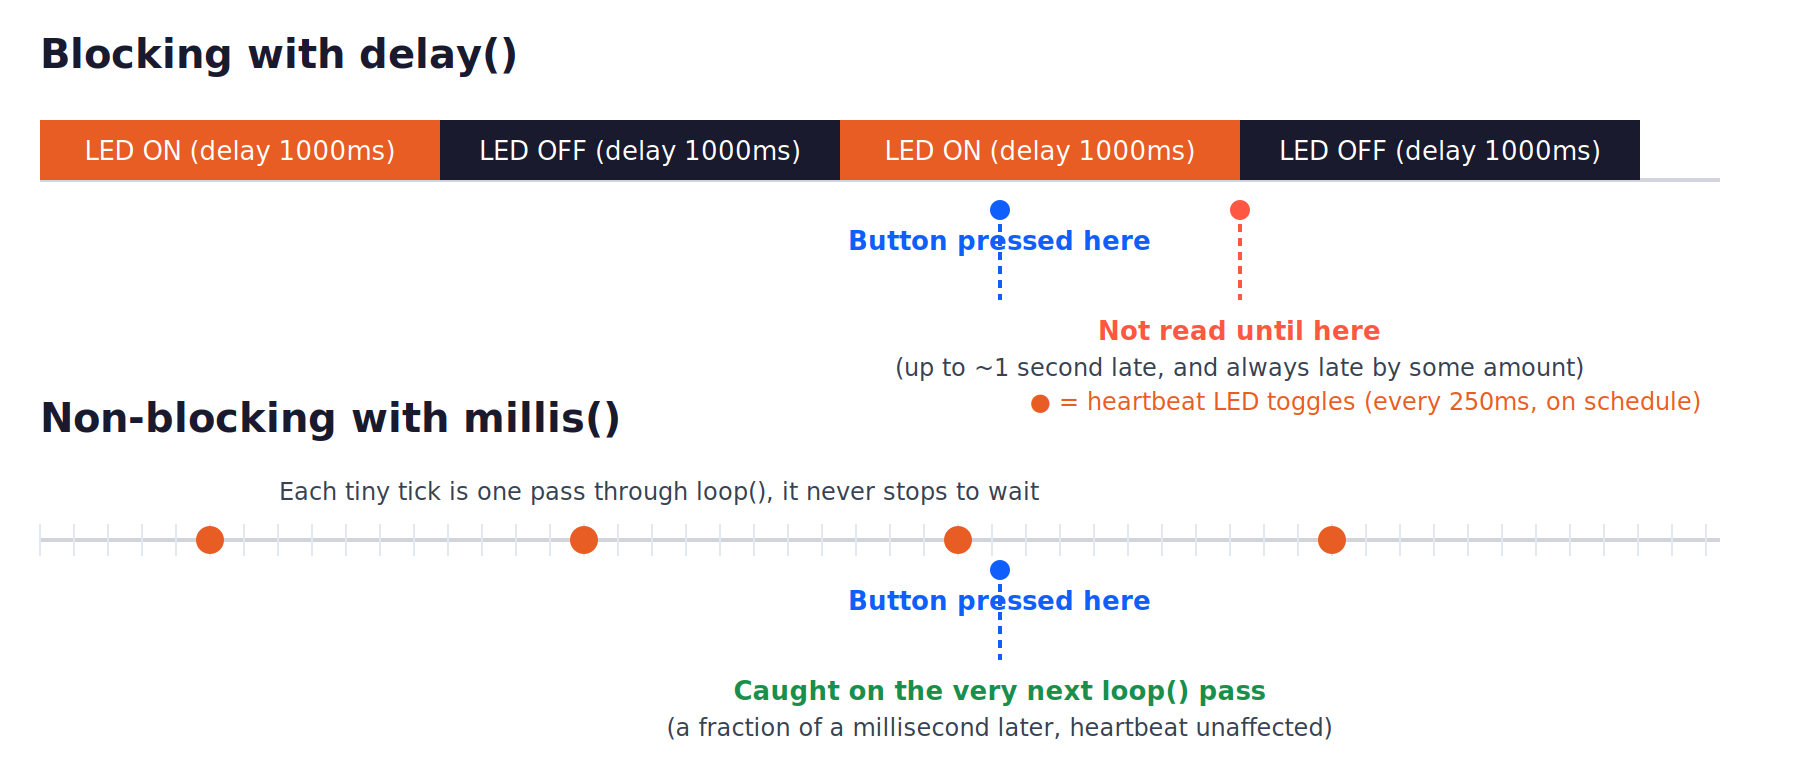
Here's the failure you've probably already hit, even if you didn't have a name for it. You wire up a button next to a blinking LED. The blink works fine by itself. The button works fine by itself. Put them in the same sketch with delay() doing the timing, and the button starts feeling broken: you press it, and nothing happens for up to a full second, because your sketch is frozen mid-blink and can't hear you. The button isn't broken. Your sketch is deaf while it's inside delay(), and that's true no matter what you're waiting on it for.
This article fixes that, for good. It assumes an Uno or Nano for pin numbers, but everything here applies across the board families in Part 2. By the end, you'll have built a Non-Blocking Control Panel: a heartbeat LED timed with millis(), a dimmable LED, and a button that times its own press length with micros(), all running at once, none of them ever waiting on the others. One thing I want to flag before you get there: the button in this project uses a plain, no-frills read. A real mechanical switch will "chatter" (rapidly flicker between on and off for a few milliseconds as the metal contacts physically bounce), and this project doesn't fix that. Real debounce is Part 6's job, once you've got Digital I/O under your belt. Here, we're solving a different, bigger problem first: how to keep your whole sketch responsive while it's timing anything at all.
Why Does delay() Freeze Everything?
Picture a single cashier at a small shop who can only help one customer at a time, and while helping that customer, physically locks the front door so nobody else can even walk in. That's delay(). It's not that it's slow or badly written, it's that for however many milliseconds you told it to wait, your Arduino does nothing else. Not reading a button. Not checking a sensor. Not updating a display. It just spins in place, counting.
That pattern looks like this in code, the same shape you probably wrote back in Part 1:
void loop() {
  digitalWrite(LED_PIN, HIGH);
  delay(1000);                  // freeze right here for a full second, nothing else can run
  digitalWrite(LED_PIN, LOW);
  delay(1000);
  // A button read down here cannot run until both delays finish.
}
Each delay(1000) blocks (a blocking call is one that refuses to return control to the rest of your program until it's done) for a full second. During that second, if you tried to add a line reading a button below it, that line would only ever get checked once every two seconds, no matter how fast you pressed the button. Press it at the wrong moment and your sketch simply never notices. That's the "drunk button" symptom: it works, technically, but only if you get lucky with timing.
This gets worse fast. Say you also want a sensor that needs a two-second gap between readings, plus a display that should refresh every 100 milliseconds. Stack enough of these delays on top of each other and your sketch stops behaving like a program and starts behaving like a slow line at the DMV: everyone's waiting for everyone else, whether they need to or not.
To be clear, delay() itself isn't a bug. It's a real function that does exactly what it says. It's genuinely the right tool in a couple of places: a one-time splash message in setup() before your real program starts, or a five-minute throwaway sketch where you just want to see an LED blink and nothing else in the sketch needs your attention. The problem is using it as the timing backbone of anything that also needs to listen while it waits. That's nearly everything you'll build from here on, which is why this whole article exists.
What Does millis() Actually Measure?
millis() is a built-in Arduino function that returns the number of milliseconds that have passed since your board was last reset or powered on, as a whole number. Call it anywhere in your sketch and it hands you back that count instantly. It doesn't wait. It doesn't block. It just tells you what time it is on the Arduino's own internal clock, the same way glancing at a wall clock doesn't stop whatever else you're doing.
That single property, that it returns immediately instead of pausing, is the whole fix. Instead of telling the Arduino "stop everything and wait one second," you tell it "remember what time it is right now, and every time through loop(), check whether a second has gone by yet." If it hasn't, you move on to check everything else. If it has, you do the timed thing and remember the new "right now" for next time. Nothing ever stops moving.
Here's that idea as a real, working pattern:
const uint8_t LED_PIN = 13;  // D13 is the Uno's onboard LED
const unsigned long BLINK_MS = 500;

unsigned long lastBlink = 0;
bool ledOn = false;

void setup() {
  pinMode(LED_PIN, OUTPUT);
}

void loop() {
  unsigned long now = millis();
  if (now - lastBlink >= BLINK_MS) {  // subtracting keeps this correct when millis() wraps around
    lastBlink = now;
    ledOn = !ledOn;
    digitalWrite(LED_PIN, ledOn ? HIGH : LOW);
  }
  // Anything else you add here still runs every single pass through loop(),
  // whether or not the LED happens to be toggling this time around.
}
Notice loop() never pauses. It runs through, checks "has 500ms gone by," and either flips the LED or doesn't, then immediately loops back around and checks again. It might run through this loop hundreds of thousands of times a second when the LED isn't due to change. That's fine. Checking a number is fast. Waiting on a timer is not.
Why unsigned long, and why 49.7 days matters
millis() returns its answer as an unsigned long, a 32-bit whole number that can only ever be zero or positive (there's no - sign to store). On an Uno or Nano, that gives it a maximum value of 4,294,967,295. Once the clock ticks past that number, it doesn't crash or go negative. It wraps back around to zero, the same way a car's odometer that maxes out at 999999 miles rolls back over to 000000 instead of showing a seventh digit. At one tick per millisecond, that wraparound happens roughly every 49.7 days.
This is the part that trips people up, where an instinctive shortcut breaks quietly instead of loudly. Say you write the comparison like this instead of the way shown above:
if (millis() >= lastBlink + BLINK_MS) {   // Don't do this: breaks across the wraparound
  lastBlink = millis();
}
That looks equivalent to the subtraction version. It isn't, and the difference only shows up once every 49.7 days, which is exactly the kind of bug that survives testing and then breaks in the field. Let's walk through why, with small numbers so the wraparound is easy to see. Imagine a toy version of millis() that's only 8 bits wide, so it wraps at 256 instead of 4.29 billion. Say BLINK_MS is 250, and lastBlink was set to 250 right before the counter wrapped. A few ticks later, the real clock reads 5 (it wrapped past 256 back to 0, then ticked up to 5).
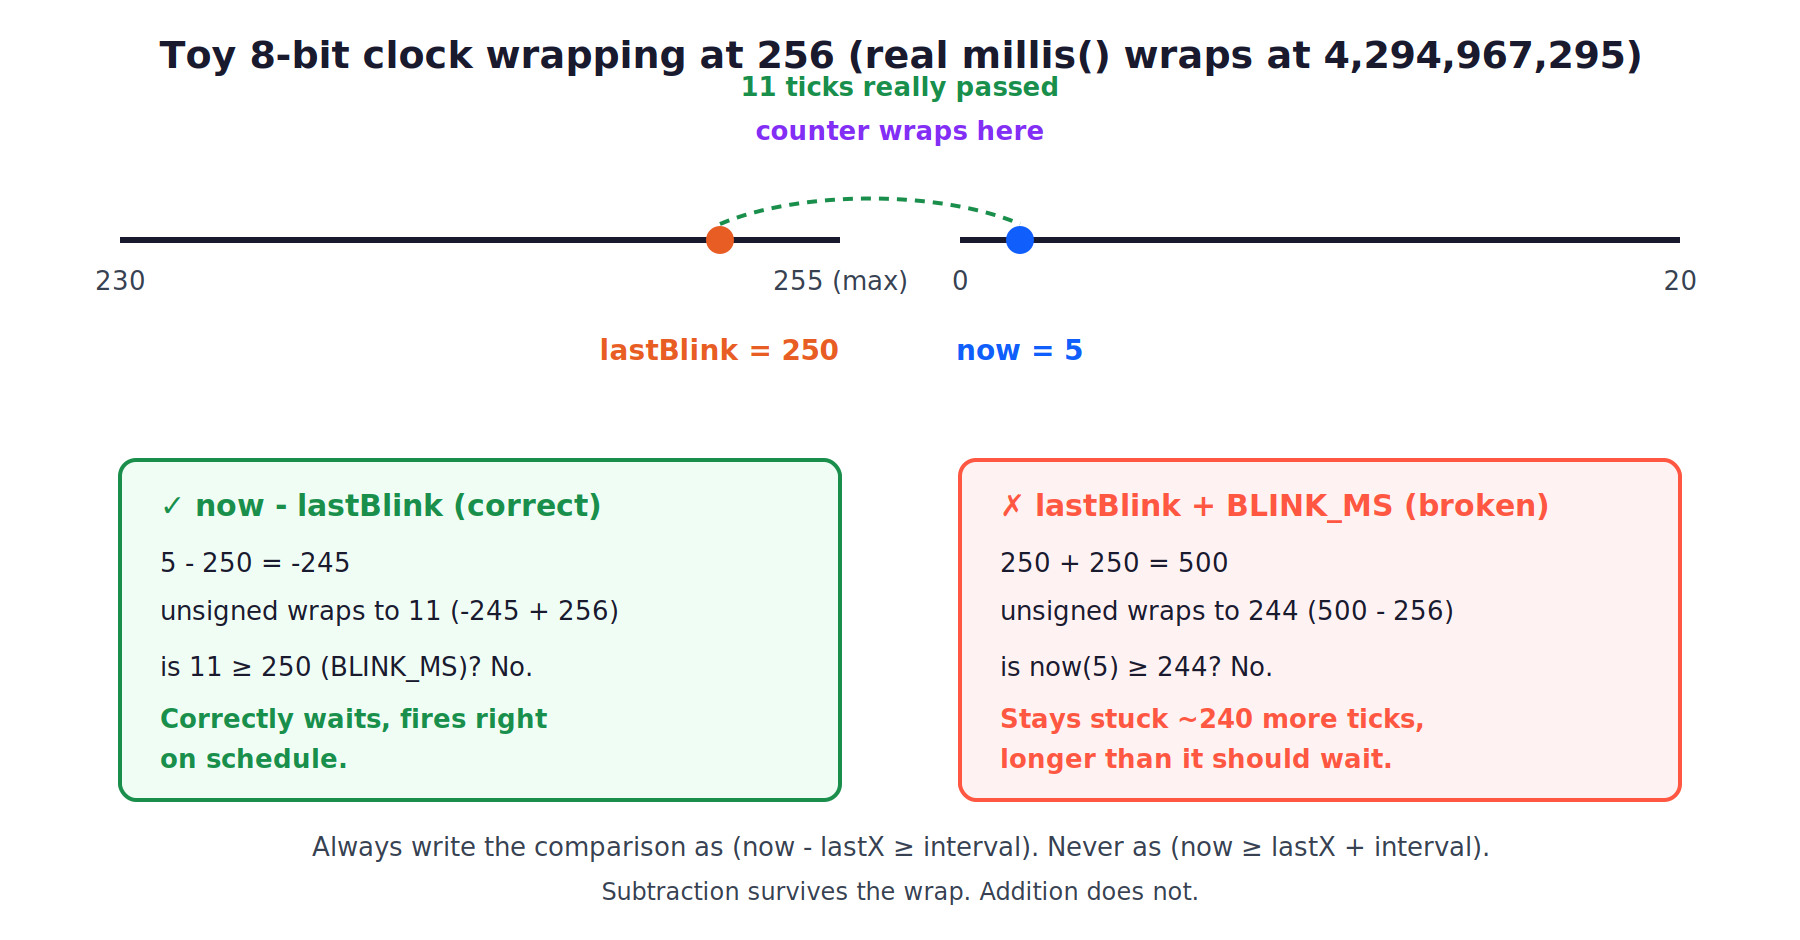
Using subtraction, the correct approach: now - lastBlink is 5 - 250. In unsigned arithmetic, that doesn't go negative, it wraps the other way and lands on 11 (think of it as 5 - 250 + 256 = 11). Eleven ticks have passed since the wrap, and 11 >= 250 is false, so nothing fires yet, which is correct, not enough time has passed. Keep ticking forward and eventually that subtraction climbs past 250 and the blink fires right on schedule. The wraparound never breaks anything.
Now try the addition version on the same numbers: lastBlink + BLINK_MS is 250 + 250 = 500, which also wraps in 8-bit math down to 244. The check becomes now >= 244, or 5 >= 244, which is false, and stays false until now climbs all the way up to 244. Instead of firing after roughly 11 more ticks like it should, this version won't fire for nearly 240 more ticks, almost the entire wrap cycle late. On the real 32-bit millis(), that's the difference between your LED blinking on schedule and it silently freezing for weeks after every wraparound, for no reason you'll be able to spot by staring at the code that one time you happen to test it.
The fix costs you nothing: always write the comparison as now - lastBlink >= interval, never now >= lastBlink + interval. Subtraction survives the wrap. Addition doesn't.
Giving Each Job Its Own Clock
Once you trust the subtraction pattern, scaling it up is almost too easy. Give every timed task its own variable to remember "when did I last run," and check each one independently, every time through loop():
unsigned long lastLed = 0;
unsigned long lastSample = 0;

void loop() {
  unsigned long now = millis();  // one shared timestamp for this pass

  if (now - lastLed >= 250) {
    lastLed = now;
    toggleLed();
  }

  if (now - lastSample >= 10000) {
    lastSample = now;
    readSensor();
  }

  serviceSerial();  // no timer needed, this one runs every single pass
}
This is called cooperative multitasking: multiple jobs taking turns using the same processor, each one checking in briefly and then getting out of the way, rather than one job locking everyone else out while it works. "Cooperative" is the key word. Nothing here is forcibly interrupting anything else the way a real operating system's scheduler would. Each function agrees, by how it's written, to check its own timer, do a small amount of work if it's due, and return immediately either way. If any one of those functions misbehaves and blocks (say, someone sneaks a delay() back in, or calls a library function that takes 200ms to return), the whole cooperative system breaks down, because the other tasks never get a turn until that one finishes.
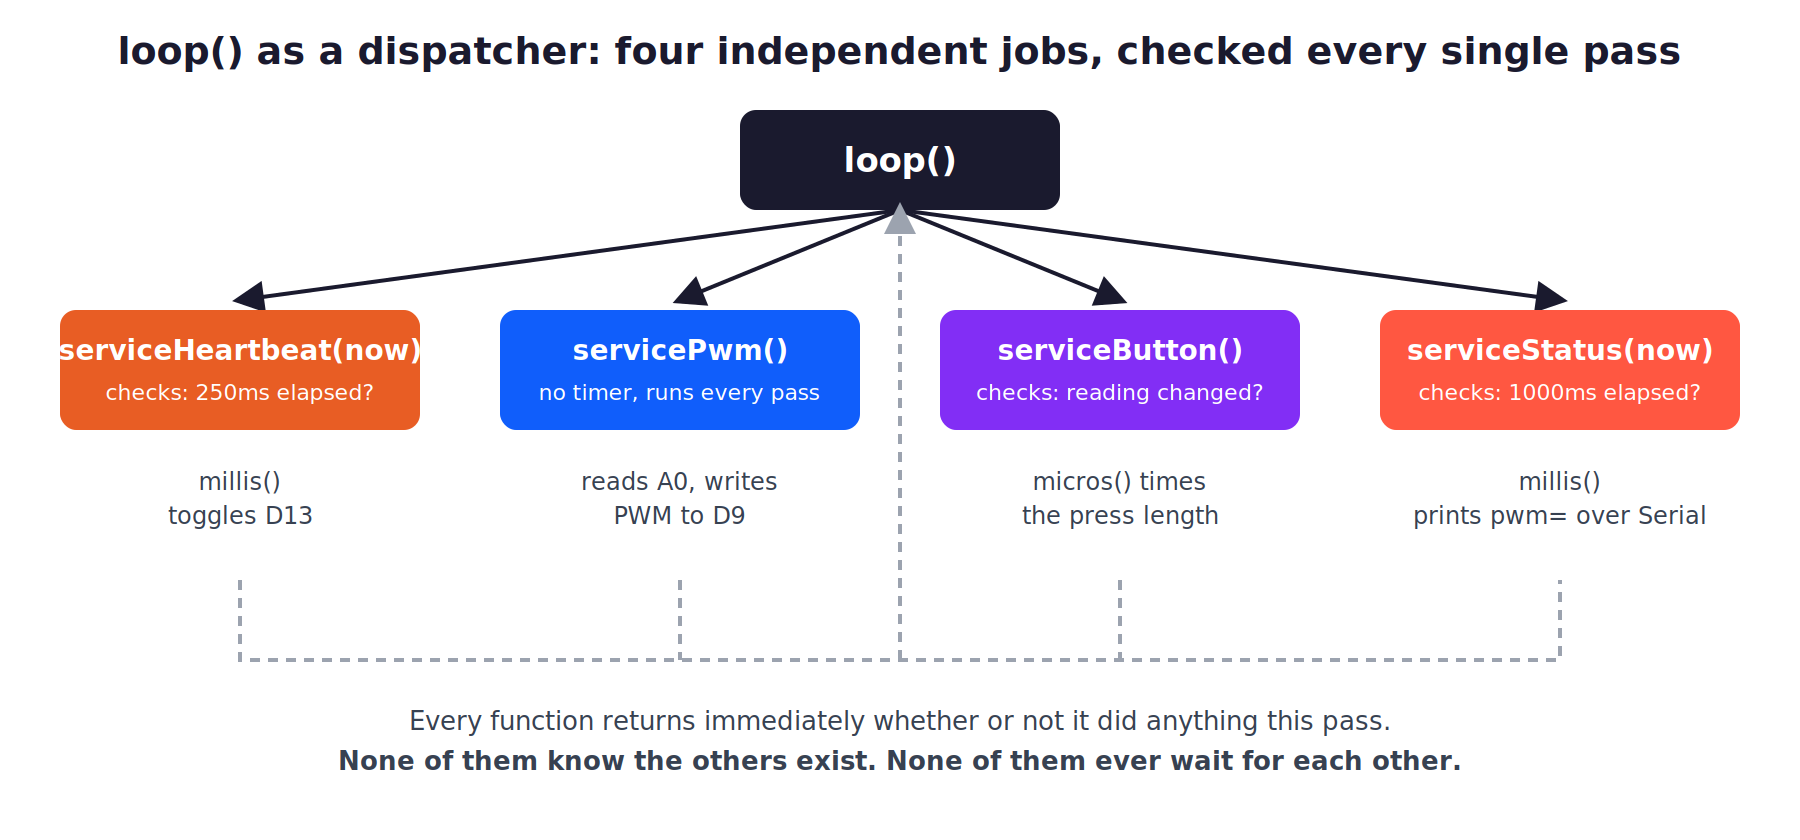
That's also why loop() in a sketch like this reads less like a script and more like a dispatcher: a piece of code whose job is to check a list of things and hand off work to whichever ones are ready, in a fixed order, over and over. Naming your pins with const at the top and giving each task a one-line call in loop() (toggleLed(), readSensor(), serviceSerial()) keeps that dispatcher readable even as you add a fourth job, a fifth, a tenth.
millis() or micros(): Which One Do You Need?
millis() measures in whole milliseconds (thousandths of a second), which is plenty of resolution for blinking LEDs, polling buttons, or spacing out sensor reads. Arduino also gives you micros(), which works exactly the same way (an unsigned long count, subtraction-safe, use it identically to millis()), except it counts in microseconds (millionths of a second) instead. That's a thousand times finer resolution, but it pays for that precision by wrapping around roughly every 70 minutes instead of every 49.7 days, so a micros()-based timer needs to tolerate a much more frequent wraparound if it's meant to run for hours unattended.
You'll reach for micros() when milliseconds are too coarse to measure what you care about: timing a pulse from an ultrasonic distance sensor, generating precise waveforms, or anything where "close enough to a millisecond" just isn't close enough. For the control panel you're about to build, and for the large majority of Arduino projects, millis() is the right default. Keep micros() in your back pocket for when a project specifically calls for it.
When millis() Isn't Enough: The Timer Interrupt Off-Ramp
millis()-based timing has a real limit, and it's worth knowing where it is even though you won't hit it in this article. Every task sharing loop() has to wait its turn behind every other task's check, and behind any blocking library call you haven't yet found a non-blocking replacement for. If a task genuinely needs to fire at a precise moment, down to a jitter of only a few microseconds, or if loop() is regularly stuck for tens of milliseconds inside a library call you can't break apart, checking a variable in loop() isn't fast or reliable enough anymore.
That's the point where you graduate from millis() to a hardware timer interrupt: a way of telling a chip on the board itself to physically pause whatever the processor is doing, at a precise, guaranteed interval, and run a small piece of your code immediately, no matter what loop() was busy with. We already have a full guide on wiring that up: How to Use Arduino Timer Interrupts for Non-Blocking Multitasking. You don't need any of that yet. millis() is the right default for the vast majority of what you'll build, including everything in this article. Timers are the upgrade you reach for later, once you've felt the limit yourself. We'll also cover the closely related idea of pin-triggered interrupts, using attachInterrupt() to react to a button press or sensor pulse the instant it happens instead of polling for it, in Part 8.
Exercises
Work through these in order. Each one proves a single rule. By the last one, you're one small step from the practical project.
Bill of Materials
This covers every component used across this article's exercises and its practical project.
| Component | Description | Buy on Amazon | Buy on Temu | Buy on SparkFun | Buy on Seeed Studio |
|---|---|---|---|---|---|
| Arduino Uno | Standard microcontroller board | Amazon Link | Temu Link | SparkFun Link | Seeed Link |
| Breadboard & Jumper Wires | For prototyping connections | Amazon Link | Temu Link | SparkFun Link | Seeed Link |
| 5mm LED | Standard through-hole LED for the dimmable channel (the heartbeat channel uses the Uno's built-in LED on D13, no extra part needed) | Amazon Link | Temu Link | SparkFun Link | Not yet available |
| 220Ω resistor | Current-limiting resistor for the LED | Amazon Link | Temu Link | SparkFun Link | Seeed Link |
| Momentary tactile pushbutton | Normally-open switch for the button input | Amazon Link | Temu Link | SparkFun Link | Not yet available |
| 10kΩ potentiometer | Analog input for the dimming control | Amazon Link | Temu Link | SparkFun Link | Not yet available |
The products linked above may contain affiliate links. The Makers Workbench earns from qualifying purchases when these links are used.
No hardware on hand? You can still build this one. Jump to the Lab embed in the practical project section below and run this whole build right in your browser.
Exercise 1: Blink Without delay()
- You will: Blink the Uno's built-in LED (D13) using
millis()instead ofdelay(), and prove it never blocks by adding a second, unrelatedSerial.print()that still runs every single pass throughloop(). - Parts: Arduino Uno only. D13 has an LED built onto the board.
- Wiring: None needed.
- Sketch:
const uint8_t LED_PIN = 13;          // built-in LED pin on most Uno/Nano boards
const unsigned long BLINK_MS = 500;

unsigned long lastBlink = 0;
bool ledOn = false;

void setup() {
  pinMode(LED_PIN, OUTPUT);
  Serial.begin(115200);
}

void loop() {
  unsigned long now = millis();

  if (now - lastBlink >= BLINK_MS) {
    lastBlink = now;
    ledOn = !ledOn;
    digitalWrite(LED_PIN, ledOn ? HIGH : LOW);
  }

  Serial.println(now);  // proves loop() is still running constantly, not just every 500ms
}- What to notice: The LED blinks every half second, but the Serial Monitor scrolls numbers continuously and fast, not in half-second chunks.
loop()is running far more often than the LED is changing. - If it fails: LED doesn't blink at all: check
BLINK_MSandlastBlinkare both declaredunsigned long, notint. Aninton an Uno is only 16 bits and will misbehave with millisecond-scale math.
Exercise 2: Two Clocks at Once
- You will: Add a second LED blinking at a different interval, proving that two independently-timed tasks can share one
loop()without interfering with each other. - Parts: Add one 5mm LED and one 220Ω resistor to the Exercise 1 circuit.
- Wiring: New LED anode through the 220Ω resistor to D9 (a
~PWM-capable pin, though we're only using plain HIGH/LOW here), cathode to GND. D13's onboard LED stays as-is. - Sketch: add a second timestamp variable and a second
ifblock, using a different interval (try 173ms, an odd number, so it's obvious the two blinks aren't secretly the same timer):
const uint8_t LED_PIN = 13;           // heartbeat LED from Exercise 1
const uint8_t LED2_PIN = 9;
const unsigned long BLINK_MS = 500;
const unsigned long BLINK2_MS = 173;  // deliberately uneven, so the two LEDs drift in and out of step

unsigned long lastBlink = 0;
unsigned long lastBlink2 = 0;  // each task keeps its own clock, so neither disturbs the other
bool ledOn = false;
bool led2On = false;

void setup() {
  pinMode(LED_PIN, OUTPUT);
  pinMode(LED2_PIN, OUTPUT);
}

void loop() {
  unsigned long now = millis();  // both checks below read this same snapshot

  if (now - lastBlink >= BLINK_MS) {
    lastBlink = now;
    ledOn = !ledOn;
    digitalWrite(LED_PIN, ledOn ? HIGH : LOW);
  }

  if (now - lastBlink2 >= BLINK2_MS) {
    lastBlink2 = now;
    led2On = !led2On;
    digitalWrite(LED2_PIN, led2On ? HIGH : LOW);
  }
}- What to notice: The two LEDs drift in and out of sync with each other, since 173 doesn't divide evenly into 500. Neither one ever waits for the other.
- If it fails: Both LEDs blink at the exact same rate: you likely copy-pasted the first
ifblock without changing which timestamp variable it reads and writes. Each task needs its own variable, checked and updated only by that task.
Exercise 3: A Button That Doesn't Block
- You will: Read a pushbutton with a plain edge-detect (report only the moment it changes, not its state on every single loop pass), while the blink from Exercise 1 keeps going untouched.
- Parts: Add the tactile pushbutton.
- Wiring: Button between D2 and GND. Use
INPUT_PULLUPin software, no external resistor needed. - Sketch: keep the Exercise 1 blink code, and add:
const uint8_t BTN_PIN = 2;
bool lastReading = false;

void setup() {
  // ...existing setup from Exercise 1...
  pinMode(BTN_PIN, INPUT_PULLUP);
  Serial.begin(115200);
}

void loop() {
  // ...existing blink code from Exercise 1...

  bool reading = digitalRead(BTN_PIN) == LOW;  // INPUT_PULLUP: pressed reads LOW
  if (reading != lastReading) {  // act on changes only, so a held button counts once
    lastReading = reading;
    Serial.println(reading ? F("pressed") : F("released"));
  }
}- What to notice: You get exactly one
pressedand onereleasedper press, not a flood of repeated messages, and the LED never hitches while you're mashing the button. - If it fails: You see
pressedrepeated many times while holding the button down: you're printing on every loop pass where the button reads LOW, instead of only when the reading changes. Compare againstlastReading, not against a fixed value. - A heads-up for later: if you build this with a real mechanical button instead of a simulator, you may occasionally see an extra
pressed/releasedpair right at the moment you press or release, from the switch physically bouncing for a few milliseconds. That's real, it's not a mistake in this code, and fixing it properly is Part 6's job.
Exercise 4: How Long Was That Press? (micros())
- You will: Measure exactly how long the button stays pressed, using
micros()instead ofmillis(), and print the result in both microseconds and milliseconds. - Parts: Same button as Exercise 3.
- Wiring: Same as Exercise 3.
- Sketch: extend the Exercise 3 button code to record a start time on the press edge and compute the elapsed time on the release edge:
const uint8_t BTN_PIN = 2;
bool lastReading = false;
unsigned long pressStartUs = 0;

void setup() {
  pinMode(BTN_PIN, INPUT_PULLUP);
  Serial.begin(115200);
}

void loop() {
  bool reading = digitalRead(BTN_PIN) == LOW;
  if (reading != lastReading) {
    lastReading = reading;
    if (reading) {
      pressStartUs = micros();
      Serial.println(F("pressed"));
    } else {
      unsigned long heldUs = micros() - pressStartUs;
      Serial.print(F("released after "));
      Serial.print(heldUs);
      Serial.print(F(" us ("));
      Serial.print(heldUs / 1000.0, 1);  // same duration, converted to milliseconds
      Serial.println(F(" ms)"));
    }
  }
}- What to notice: That's the exact same subtraction pattern you already trust from
millis()(micros() - pressStartUs), just reading a faster clock. The microsecond number is huge, six digits or more for an ordinary press, becausemicros()counts a thousand times faster thanmillis(). Dividing by 1000 gets you back to a millisecond figure you can sanity-check against a stopwatch. - If it fails: Printed duration is 0 or an enormous, nonsensical number: check that
pressStartUsis declaredunsigned long, notint, and that it's only being set inside the "just pressed" branch, not reset anywhere else inloop().
Exercise 5: A One-Second Status Line
- You will: Add a third independent timer that prints a status line over Serial exactly once a second, combining everything so far into one sketch.
- Parts: Same as Exercise 3.
- Wiring: Same as Exercise 3.
- Sketch: add a third timestamp variable and interval, following the same pattern as the blink and the button:
const unsigned long STATUS_MS = 1000;
unsigned long lastStatus = 0;

// inside loop(), alongside the blink and button code:
if (now - lastStatus >= STATUS_MS) {
  lastStatus = now;                   // reset the clock before doing the work
  Serial.println(F("status: alive"));
}- What to notice: Three independent jobs (blink, button, status line) now run out of the same
loop(), on three different schedules, and none of them make the others late. - If it fails: The status line prints way more or less often than once a second: double check
STATUS_MSis1000, not100or10000, and that you're comparingnow - lastStatus, notnow - lastBlinkby copy-paste accident.
You're one component away from the full project: a potentiometer feeding a dimmable LED, using functions you already know from Part 3. The button in the project below keeps the micros() timing you just built.
Practical Project: Non-Blocking Control Panel
Done looks like: the heartbeat LED keeps a rock-steady beat while you twist the potentiometer and mash the button. Twisting the pot smoothly brightens and dims the second LED. Pressing the button prints pressed, then, on release, exactly how long you held it, timed with micros(). None of it ever makes the heartbeat stutter.
What you will build
- A heartbeat LED on D13 that blinks every 250ms, no matter what else is happening, timed with
millis(). - A second LED on D9 that fades up and down as you turn a potentiometer on A0, using the PWM and
map()/constrain()functions from Part 3. - A button on D2 that prints
pressed, then reports the exact press duration in both microseconds and milliseconds on release, timed withmicros(), without ever slowing the blink. - A one-second Serial status line showing the current PWM value, using
F()strings to keep debug text out of SRAM.
Components needed
Everything is already in the Bill of Materials above: Arduino Uno, breadboard and jumper wires, one 5mm LED, one 220Ω resistor, one tactile pushbutton, and one 10kΩ potentiometer.
Lab embed
No hardware? Run this project live in The Lab.
Wiring
| Part | Arduino |
|---|---|
| Heartbeat LED | D13 (onboard, no wiring needed) |
| Dimmable LED anode, through 220Ω resistor | D9 (~ PWM pin required) |
| Dimmable LED cathode | GND |
| Button, one leg | D2 |
| Button, other leg | GND |
| Potentiometer wiper (center pin) | A0 |
| Potentiometer outer pins | 5V and GND |
No extra libraries here. Every function in this build is core Arduino, the same set Part 3 already covered.
The sketch
const uint8_t HEARTBEAT_PIN = 13;  // onboard LED, blinks on a steady beat
const uint8_t PWM_PIN = 9;         // dimmable LED, must be a ~ PWM pin
const uint8_t BTN_PIN = 2;
const uint8_t POT_PIN = A0;

const unsigned long BLINK_MS = 250;
const unsigned long STATUS_MS = 1000;

unsigned long lastBlink = 0;  // each task keeps its own clock, so none can block another
unsigned long lastStatus = 0;
unsigned long pressStartUs = 0;
bool heartOn = false;
bool btnLastReading = false;

void setup() {
  pinMode(HEARTBEAT_PIN, OUTPUT);
  pinMode(PWM_PIN, OUTPUT);
  pinMode(BTN_PIN, INPUT_PULLUP);
  Serial.begin(115200);
  Serial.println(F("Part 4 control panel"));
}

void loop() {
  unsigned long now = millis();  // one shared timestamp, handed to whichever tasks need it
  serviceHeartbeat(now);
  servicePwm();
  serviceButton();
  serviceStatus(now);
}

void serviceHeartbeat(unsigned long now) {
  if (now - lastBlink >= BLINK_MS) {
    lastBlink = now;
    heartOn = !heartOn;
    digitalWrite(HEARTBEAT_PIN, heartOn ? HIGH : LOW);
  }
}

void servicePwm() {
  int raw = analogRead(POT_PIN);
  int duty = map(raw, 0, 1023, 0, 255);     // scale to PWM range
  duty = constrain(duty, 0, 255);           // guard against any out-of-range result
  analogWrite(PWM_PIN, duty);
}

void serviceButton() {
  bool reading = digitalRead(BTN_PIN) == LOW;  // INPUT_PULLUP: pressed = LOW
  if (reading != btnLastReading) {             // only act on a real change, not every pass
    btnLastReading = reading;
    if (reading) {
      pressStartUs = micros();
      Serial.println(F("pressed"));
    } else {
      unsigned long heldUs = micros() - pressStartUs;
      Serial.print(F("released after "));
      Serial.print(heldUs);
      Serial.print(F(" us ("));
      Serial.print(heldUs / 1000.0, 1);  // same duration, shown in milliseconds too
      Serial.println(F(" ms)"));
    }
  }
}

void serviceStatus(unsigned long now) {
  if (now - lastStatus < STATUS_MS) {  // not due yet, leave everything else alone
    return;
  }
  lastStatus = now;
  int duty = map(analogRead(POT_PIN), 0, 1023, 0, 255);
  Serial.print(F("pwm="));
  Serial.println(constrain(duty, 0, 255));
}
Every pin const above matches the Wiring table row for that signal: HEARTBEAT_PIN is 13, PWM_PIN is 9, BTN_PIN is 2, POT_PIN is A0. Checked signal by signal, both directions.
What's happening
loop() is a dispatcher, exactly like the pattern from earlier in this article: it calls four functions, in the same order, every single pass, and each function decides for itself whether it's due to do anything this time around.
serviceHeartbeat() is the same 250ms blink you built in Exercise 1, just renamed into its own function, timed with millis(). servicePwm() has no timer at all, it doesn't need one: reading a potentiometer and setting a PWM value is fast enough to just do every single loop pass, so there's nothing to wait on. serviceButton() is the edge-detect from Exercise 3, plus the press-duration timer from Exercise 4, now living in its own function. serviceStatus() is the one-second print from Exercise 5, with the PWM value swapped in for the plain "alive" message.
Notice that serviceHeartbeat() and serviceStatus() both use millis(), while serviceButton() uses micros() for the one thing in this sketch that actually benefits from finer resolution: how long a single button press lasted. They're the same function in every way that matters, same unsigned type, same subtraction pattern, same wraparound-safe math, just reading two different clocks on the same chip. That's the whole relationship between millis() and micros() in one working sketch.
None of these four functions know or care that the others exist. That's the entire point of writing them this way: you can add a fifth job to this control panel next month, and as long as it follows the same shape (check a timer or a condition, do a small amount of work, return), it won't make anything already running any less responsive.
If the project fails the "done" test
The usual culprit is a stray delay() that snuck back in somewhere. Search the whole sketch for delay( and delete anything you find. The next most common cause: the LED on D9 doesn't fade smoothly, it just snaps between fully on and fully off. That means D9 isn't a PWM-capable pin on your board at all, or you've mistakenly wired the dimmable LED to a pin without a ~ next to it in the pinout diagram.
Troubleshooting
| Symptom | Cause | Fix |
|---|---|---|
| Heartbeat stutters whenever the button is pressed or the pot is turned | A delay() snuck back into loop() somewhere | Search the sketch for delay( and remove it. Nothing after Part 4 should ever call delay() inside loop(). |
| A timed task stops firing entirely after it's worked fine for weeks | Comparison written as millis() >= lastX + interval instead of now - lastX >= interval | Rewrite using subtraction. Addition-based comparisons break silently across the ~49.7 day millis() wraparound. |
| An LED never blinks, or blinks once and then never again | lastBlink or the interval variable declared as int instead of unsigned long | Every timestamp and interval used with millis() needs to be unsigned long. A 16-bit int overflows in about 32 seconds of millisecond counting. |
| Two supposedly-independent timed tasks always change at the exact same moment | Both if blocks are reading and writing the same timestamp variable (usually a copy-paste mistake) | Give every task its own lastX variable, and double check each if block only touches its own. |
| Serial prints a flood of messages instead of one | The if block checks the interval but never updates the last-run timestamp | Add lastX = now; as the first line inside the if block, before doing the actual work. |
Button prints pressed repeatedly while held down | Comparing digitalRead() directly instead of against the last stored reading | Store the previous reading in a variable and only print when the new reading differs from it (edge detection), not on every loop pass where the pin happens to read LOW. |
Button reports released after 0 us or an absurdly large number | pressStartUs never captured, declared as int instead of unsigned long, or overwritten somewhere else in loop() | Confirm pressStartUs is unsigned long and is only ever set inside the "just pressed" branch of serviceButton(). |
| The PWM LED flickers slightly even when the pot isn't moving | Normal ADC (analog-to-digital converter) noise; the pot's wiper voltage jitters by a tiny amount even sitting still | Usually not worth fixing at this stage. If it bothers you, average a handful of analogRead() values before mapping them. |
| D9's LED just snaps on/off instead of fading | Wired to a non-PWM pin, or analogWrite() called on the wrong pin number | Confirm the pin has a ~ next to it in your board's pinout diagram before wiring. Only ~ pins support analogWrite(). |
Where This Fits in the Series
You can now keep an Arduino sketch responsive no matter how many things it's timing at once, which is the single biggest jump in capability this series makes before it moves on to hardware like encoders and analog sensors. Every project from here forward assumes you'll reach for millis() by default and delay() only on purpose.
- Part 1: What is Arduino
- Part 2: Choosing the right board
- Part 3: Programming Arduino: Sketches, Core Functions, and Libraries
- Reading Temperature and Humidity with Arduino and DHT22, a real project that's already using this exact
millis()pattern to space out sensor reads - How to Use Arduino Timer Interrupts for Non-Blocking Multitasking, the upgrade path once
millis()isn't precise enough anymore - Mastering Arduino Interrupts, a preview of Part 8's territory, reacting to an event the instant it happens instead of polling for it
Wrap-Up and What's Next
delay() isn't wrong, it's just a full stop, and a full stop is the wrong tool for anything that needs to keep listening while it waits. millis() gives you the current time instantly, without blocking, and subtracting an earlier reading from a later one survives the wraparound that happens every 49.7 days, as long as you always subtract instead of add. Give every timed task its own timestamp variable, check them all every pass through loop(), and you get several jobs running "at once" on a single processor with no threads, no operating system, and no magic, just a dispatcher and some careful bookkeeping.
Next up, Part 5: arrays, strings, and how C++ actually stores data, the foundation you'll need before sketches start juggling more than a handful of variables.
Want to go deeper? Download the full eBook once the series is complete, and subscribe for the rest of the Arduino Mastery Series.
Hack The World and Make Awesome.




