

Arduino put two different desktop environments on the same software page, both with "Arduino" in the name, both able to talk to a UNO Q. That is enough to download the wrong one. You wanted to blink an LED on a classic Uno and you downloaded App Lab. Or you bought a UNO Q because the page said Linux and AI, then spent an evening in Arduino IDE 2 wondering where Python went.
They are not two versions of the same editor. They are two tools for two jobs.
Arduino IDE 2 is the current desktop environment for writing Arduino C++ and putting that program onto a microcontroller. A microcontroller, an MCU, is the small chip that reads pins and hits timing deadlines. A sketch is Arduino's word for that program. IDE 2 is Verify, Upload, Serial Monitor, Board Manager, Library Manager. If you have an Uno, a Nano, a Mega, or most R4 boards, this is the default.
Arduino App Lab is the environment for Arduino's hybrid boards, currently UNO Q and VENTUNO Q. Those boards put a Linux computer (an MPU, a microprocessor) next to a real-time MCU. An App in App Lab can include Python running under Linux, a sketch running on the MCU, and prepackaged services called Bricks (AI models, web UIs, APIs). Press Run, and App Lab deploys the whole stack, not just the STM32 firmware.
This article is the comparison. Both tools get a real pass, then the overlap on a UNO Q, then a "which one do I download" rule. It is not an install tutorial for either one. Current versions on Arduino's software page: IDE 2.3.10, App Lab 0.10.0.
If you are still choosing the board, that is Part 2 of the Mastering Arduino series. Tool choice follows the board more than the other way around.
What does Arduino IDE 2 do?
IDE 2 is a workshop for firmware. Firmware is the program that lives on the MCU until you overwrite it. You open a .ino file, you pick a board and a COM port (the operating system's name for the USB-serial connection), you compile, you upload. The chip resets and runs your setup() once and your loop() forever. That loop is the whole application. There is no Linux sitting next to it on a classic Uno. There is no Python process. There is no Docker container. There is your sketch, and the libraries you pulled in.
Under the hood, IDE 2 is a graphical shell around Arduino CLI, the command-line engine Arduino also ships standalone. Clicking Verify asks that engine to compile. That is why a sketch that builds in IDE 2 will build from a terminal later, with the same core (board-support package) and the same libraries.
What you spend your time on in IDE 2:
-
Writing Arduino C++ in a modern editor, with autocomplete and jump-to-definition.
-
Board Manager, for cores you do not have yet (ESP32 and ESP8266 need an extra URL).
-
Library Manager, for reusable code.
-
Serial Monitor and Serial Plotter, for watching
Serial.println()and graphing numbers. -
A debugger, on boards that support a debug probe. A classic Uno generally does not, without extra hardware.
The teaching surface of this site, including Part 3, assumes this workflow. Sketches, core functions, libraries, Serial as a debug tool: that is IDE 2's world even when we do not name the window.
IDE 2 runs on Windows 10 64-bit and newer, macOS, and Linux. It talks to a long list of official and third-party boards. It does not orchestrate a Linux App. It does not start an AI Brick. Pointing it at a UNO Q and looking for main.py is how you conclude the product is missing features it never claimed.
What does Arduino App Lab do?
App Lab is a workshop for an App. Arduino's docs describe an App as a folder with a required Python program on Linux, optional Bricks, and an optional C++ sketch on the MCU. The Python is ordinary CPython on Debian-style Linux, not MicroPython (the small Python that replaces C++ on a single microcontroller). The sketch, when you include one, is still setup() and loop() on the STM32. Bricks are prebuilt modules that run beside your Python, currently as isolated Docker processes. Docker, here, means a boxed-in program with its own files and dependencies.
You press Run. App Lab deploys Linux-side code, MCU firmware, and whatever Bricks you clipped on. The two processors talk through the Bridge, Arduino's RPC layer. RPC, remote procedure call, means Python can ask the MCU to run a named function (and the other way around) without you inventing a serial protocol. Official docs put that link on Linux /dev/ttyHS1 to the MCU's Serial1, at 115200 baud, with a maximum message size of 256 bytes. Send small values (a boolean, an integer, a short string), not a camera frame.
App Lab runs on your PC (Windows 10 64-bit+, macOS 11+, Ubuntu 22.04+, Debian Trixie 64-bit) and talks to the board over USB-C or the local network. It can also run on the board as a single-board computer if you attach a display and a USB-C dongle that supports power delivery. Arduino recommends the 4 GB UNO Q for that.
What you spend your time on in App Lab:
-
main.pyfor application logic on Linux: networking, UI glue, model results, high-level decisions. -
sketch/sketch.inofor the microcontroller: pins, sensors, motors, anything with a timing deadline. -
A Brick catalog: object detection, Cloud, web UI, and similar.
-
Examples you duplicate ("Copy and edit app") instead of starting from a blank
.ino. -
An App Lab console, including
Monitor.printfrom the MCU, which is easy to confuse with USB Serial Monitor from IDE 2.
App Lab will not make an Uno grow a Linux chip. If the hardware is a single MCU, App Lab is the wrong download.
A concrete example, before the table
You have a temperature sensor and an LED. In IDE 2 you write one sketch. loop() reads the sensor, digitalWrite hits the LED, Serial.println prints the number. The sketch is the whole product, and it is the right product for an Uno.
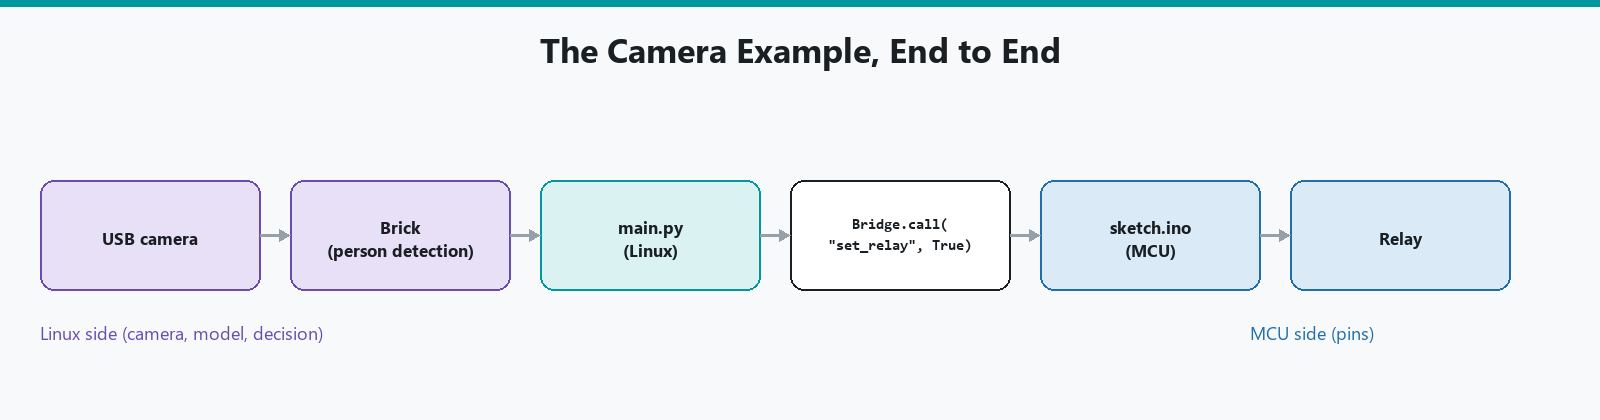
You have a USB camera, a "person / no person" model, and a relay. In App Lab, Python (and a Brick) own the camera and the model on Linux. The sketch owns the relay on the MCU. Python calls Bridge.call("set_relay", True) when the label flips. The MCU does not run the model. Linux does not wiggle the relay pin in real time. Each side does the job it is good at. A UNO Q exists for exactly this kind of project.
Arduino makes both tools. On a UNO Q they can even share a USB-C cable. They are still doing different jobs.
Side-by-side
| Feature | Arduino IDE 2 | Arduino App Lab |
|---|---|---|
| Job | Compile and upload MCU firmware | Deploy an App: Linux Python + optional MCU sketch + Bricks |
| What you open | A sketch (.ino folder) |
An App folder (main.py, optional sketch/sketch.ino, app.yaml) |
| Languages | Arduino C++ | Python on Linux, plus optional Arduino C++ |
| Typical boards | Uno, Nano, Mega, R4, ESP32, and the rest of the C++ ecosystem | UNO Q, VENTUNO Q |
| Linux / AI / Docker Bricks | No | Yes |
| How you "send it to the board" | Upload (and Verify before that) | Run (both sides, plus Bricks) |
| Serial Plotter, Board Manager, Library Manager as in the last decade of tutorials | Yes | Different UI. MCU libraries still exist inside the App |
| Engine underneath | Arduino CLI | App Lab + Linux (arduino-app-cli on the board, arduino-router for Bridge) |
| Chromebook / Cloud Editor | Related but separate (Cloud) | Not this. App Lab is local / on-board |
| Classic Uno | Yes. This is the tool | No |
If you are arguing about which editor to install, look at that "Typical boards" row first. The board in front of you usually answers the question.
Same board, two tools: UNO Q and VENTUNO Q
This is the overlap that creates the confusion. Arduino is explicit: UNO Q works with App Lab and with Arduino IDE 2 and Arduino CLI.
IDE 2 on a UNO Q programs the microcontroller only. You get a sketch on the STM32: pins, delay(), libraries that talk to hardware. Linux is still running on the Qualcomm chip, doing whatever the image does at idle. Your IDE 2 session is not driving Python, Bricks, or a camera model. If all you needed was that microcontroller sketch, a classic Uno or an R4 would have been enough. If you already own a UNO Q and you only want to test a pin tonight, IDE 2 is still the quicker way to do that one job.
App Lab on a UNO Q is the full board: Python, sketch, Bricks, Bridge, Run. Arduino built the board around this workflow.
CLI on a UNO Q is the MCU path again, from a terminal, same family as IDE 2.
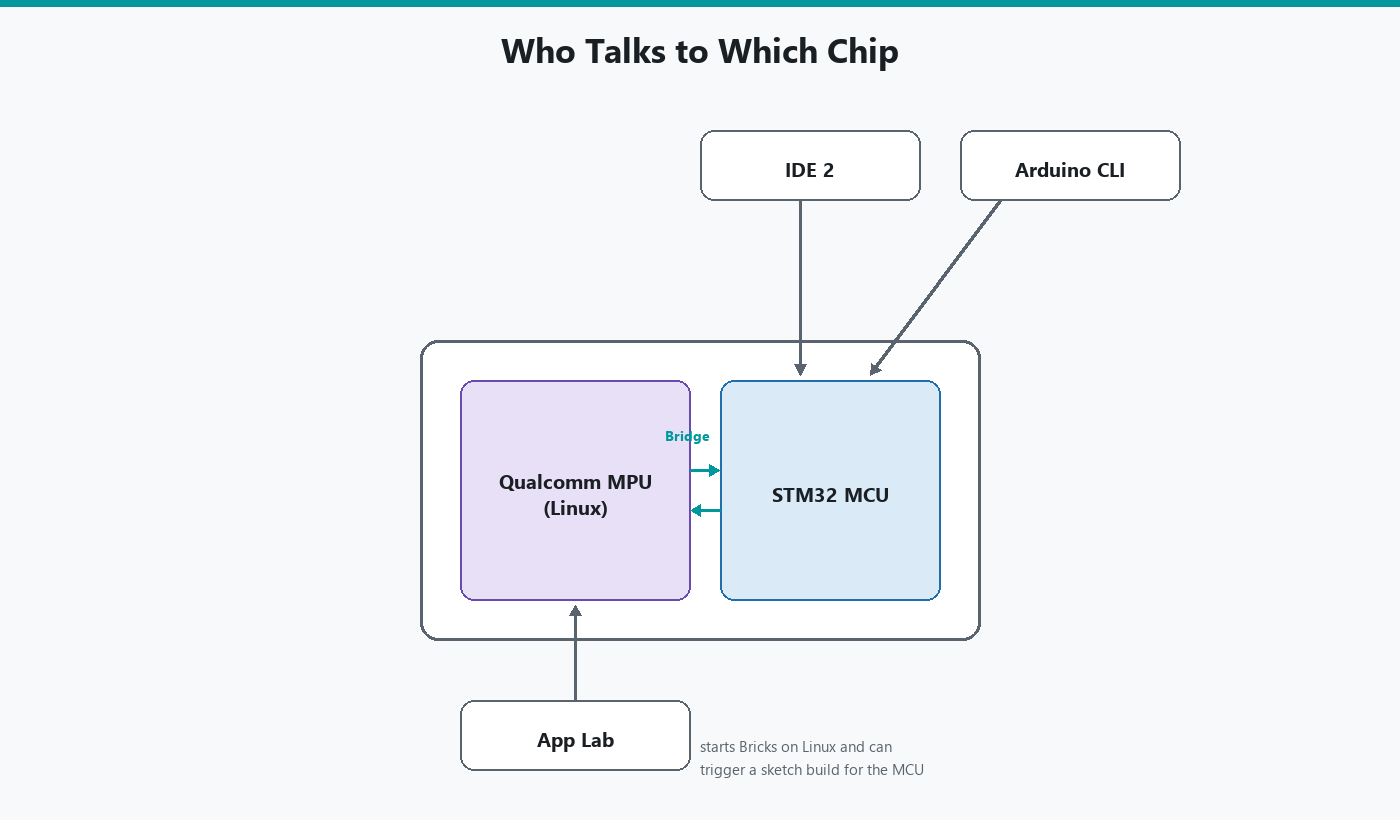
You can use IDE 2 in the afternoon and App Lab in the evening. The gotcha is leftover firmware. If you Upload a sketch from IDE 2, you have replaced whatever MCU image App Lab last deployed. Python may still run and call set_led_state on a sketch that no longer provides that function. Run the App again from App Lab when you want both sides to match. The reverse is also true: an App Lab Run overwrites the MCU sketch you were poking at in IDE 2.
VENTUNO Q follows the same split. Extra caution: reimaging Linux on VENTUNO Q is not the UNO Q Flasher CLI procedure. That does not change the IDE vs App Lab decision. It changes how you recover the OS.
Which languages does each tool use?
IDE 2 uses Arduino C++, which is C++ with Arduino's helper functions (pinMode, digitalWrite, and friends). The code is compiled ahead of time and uploaded as firmware.
App Lab uses Python on Linux for the application logic. You can add Arduino C++ on the microcontroller. Bricks can include other pieces, such as a model runtime or a web stack. Do not open App Lab because you wanted MicroPython on a Nano. That is Arduino Lab for MicroPython, a different editor and a different firmware.
If someone says "Arduino now does Python," ask which Python. App Lab Python has an operating system under it. MicroPython does not. Mixing those two sentences is how people install App Lab to program a board it cannot see.
What a beginner should download
You have, or will buy, a classic Arduino (Uno, Nano, Mega, most R4s) and you want to learn electronics. Arduino IDE 2. Not App Lab. The tutorials, the Library Manager, Serial Plotter, and this site's Mastery Series all assume that window.
You have a UNO Q or VENTUNO Q because you wanted Linux, Python, a camera, or on-board AI next to pins. App Lab. Keep IDE 2 installed if you like it for MCU-only tests.
You have a UNO Q because it was in stock and you thought it was the new Uno. You can still learn sketches in IDE 2 on the MCU. You will be using a fraction of the board. Read Part 2 before the next purchase.
You are on a Chromebook. Neither of these desktop apps is the path. Arduino Cloud in the browser (and the Chromebook app) is. App Lab is not a Chromebook product. IDE 2 is not a Play Store app.
You want command line, VS Code, CI. That is Arduino CLI, which is the engine under IDE 2, not under App Lab's Linux Apps. App Lab has arduino-app-cli on the board for starting Apps from a shell. Different binary, different job.
What you see on screen
IDE 2 looks like a code editor that grew up around Arduino. Big sketch. Left sidebar for boards and libraries. Check mark for Verify. Arrow for Upload. Serial Monitor and Plotter along the bottom. Twenty years of tutorials screenshot this shape, even when they were still on 1.8.x. The buttons have the same jobs.
App Lab looks like a project environment. Examples and My Apps in a sidebar. An App opens as more than one file. Python is not tucked in a tab you ignore. Bricks are a catalog you add, not a #include. The important control is Run, not Upload. If you sit down expecting Tools → Port, you will hunt for a menu App Lab does not use the same way. The board still has to be connected. App Lab finds it over USB or on the local network. You are not picking COM7 from a list you memorized.
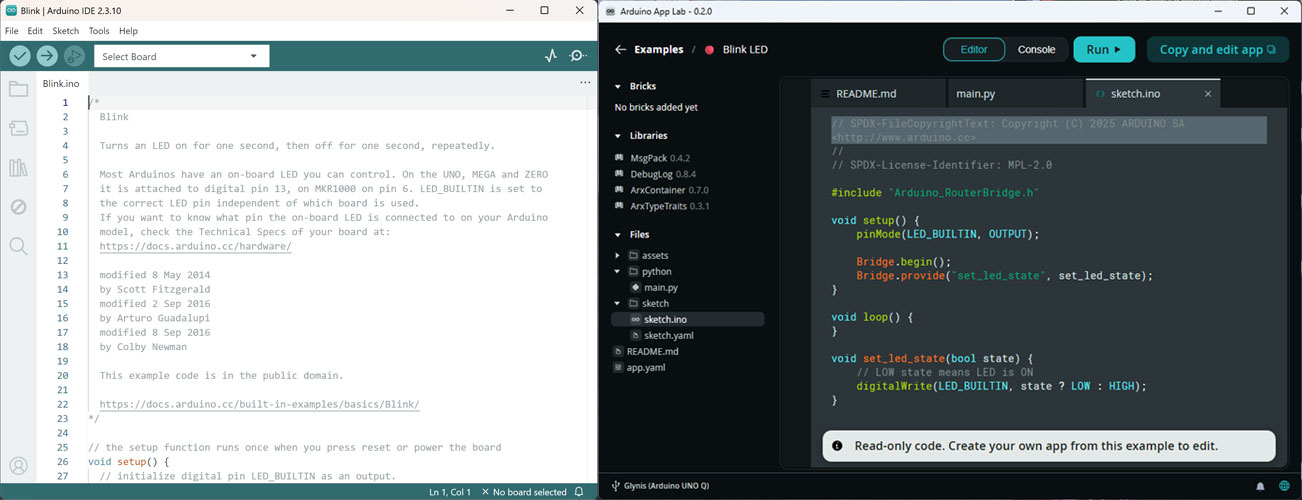
Neither window is universally easier. IDE 2 is easier if the project is a sketch. App Lab is easier if the project is an example App on a UNO Q or VENTUNO Q. Match the tool to the job.
The same LED, two workflows
The demo is just the onboard LED. Even for something that small, the two tools take noticeably different paths to get there.
IDE 2 (MCU only, including a UNO Q's STM32): File → New Sketch. pinMode(LED_BUILTIN, OUTPUT) in setup(). Toggle the pin in loop(). Select the board, select the port, Upload. Serial Monitor optional. One language. One chip. One button that means "put this firmware on the MCU."
App Lab (full UNO Q App): Duplicate "Blink LED from Python" (or Blink with UI). Read main.py: it calls the Bridge on a timer. Read sketch.ino: it provides set_led_state and writes the pin. Run. Linux stays in the loop. The MCU only services the RPC and the pin. Two languages. Two chips. One button that means "start the App."
If you take the IDE 2 blink sketch and paste it into App Lab as the entire project, you skipped Python and Bricks. App Lab can still put that sketch on the microcontroller. You are not using the Linux side of the board. If you take an App Lab main.py and paste it into IDE 2, it will not compile. IDE 2 does not run Python on Linux.
Can you use both?
Yes. You can install Arduino IDE 2 and Arduino App Lab on the same computer. On a UNO Q or VENTUNO Q that is useful, because the two programs talk to different parts of the board.
I keep both installed when I am working on a UNO Q. I open IDE 2 when I only want to test the microcontroller: a pin, a sketch, Serial output. I open App Lab when I want the full project: Python on Linux, the microcontroller sketch, and any Bricks, started together with Run.
The one habit to build is the leftover-firmware check I described in the UNO Q section above. Whichever tool programmed the microcontroller last is the one whose sketch is running. If an App suddenly looks broken after an IDE 2 session, press Run in App Lab before you debug anything else.
On a classic Uno, Nano, Mega, or most R4 boards, you do not need App Lab. Install IDE 2 and stop there. App Lab will not list those boards, and installing it will not add Linux to them.
What does not change
USB cables still have to carry data. Charge-only cables still light a power LED and never create a serial port. The microcontroller pins on a UNO Q or VENTUNO Q are still 3.3 V. loop() on the microcontroller still should not sit in a long delay() if you care about responsiveness. App Lab did not change those rules. It moved slow work onto Linux so the microcontroller does not have to do it.
Board Manager URLs, ESP32 cores, and CH340 drivers are IDE 2 and CLI problems. App Lab does not replace that toolchain for an ESP32 DevKit. If your parts drawer is ESP32 boards and Unos, stay in IDE 2 (and Arduino Cloud if you need dashboards). App Lab is not the next step in that drawer.
Troubleshooting: you downloaded the wrong tool
| What you see | What is going on | What to do |
|---|---|---|
| App Lab will not list your Uno | App Lab is for UNO Q and VENTUNO Q | Install Arduino IDE 2 |
IDE 2 has no Python, no Bricks, no main.py |
IDE 2 is a sketch editor | Use App Lab if the board is a UNO Q / VENTUNO Q and you want the Linux half |
| IDE 2 uploads to a UNO Q, Linux "does nothing new" | You programmed the MCU only | Expected. Use App Lab Run for an App |
| App Lab Run, then IDE 2 Upload, then RPC dies | Two tools overwrote the MCU sketch | Run the App again from App Lab |
| You installed both and feel lost | Two programs for two jobs | Use IDE 2 for Unos and for microcontroller-only tests. Use App Lab for UNO Q / VENTUNO Q Apps |
| Want AI on an Uno | The Uno has no Linux MPU for those Bricks | Different board, or a PC/Cloud model talking to the Uno. Not App Lab on that Uno |
Wrap-up
Arduino IDE 2 writes firmware for a microcontroller. Arduino App Lab writes and deploys an App across Linux and a microcontroller on UNO Q and VENTUNO Q. The two names sit next to each other on Arduino's software page. They are still two different jobs.
If you have an Uno and a USB cable, download IDE 2. If you have a UNO Q because you wanted Python, Bricks, and a camera next to a relay, download App Lab, and keep IDE 2 around for microcontroller-only tests. When both programs are installed, remember which one last programmed the microcontroller.
Official downloads: arduino.cc/en/software. IDE 2.3.10 and App Lab 0.10.0 as of this writing.
Hack The World and Make Awesome.




