

The first time I sat down with an Arduino, the hard part was not the LED. The hard part was the program on the computer. Which download? Which button compiles, and which one talks to the board? Why does Tools → Port show nothing? You can know exactly what you want the hardware to do and still spend an evening fighting the editor.
Arduino IDE 2 is the current desktop environment for that job. An IDE, an integrated development environment, is a single app that holds a code editor, a compiler (the program that turns your text into machine code), and an uploader (the program that copies that machine code onto the board). IDE 2 is the tool most TMWB tutorials assume, including Part 3 of the Arduino Mastery Series, where sketches, core functions, and libraries get taught in depth.
This guide walks the whole desktop workflow: install, a tour of the window, boards and ports, Board Manager, Library Manager, compile, upload, Serial Monitor, Serial Plotter, autocomplete, code navigation, debugging, preferences, third-party boards (ESP32 and ESP8266 included), and the traps that look like software bugs and are usually a cable. It is a beginner-to-advanced map of this program. It is not a C++ course, and it is not a Cloud or App Lab tutorial.
The current stable release, as of this writing, is Arduino IDE 2.3.10 (9 June 2026). Download it from arduino.cc/en/software, not from a random "free IDE" site.
What Arduino IDE 2 is
Think of IDE 2 as a workshop bench with labeled drawers. The big open space is the editor, where your sketch lives. A sketch is Arduino's word for a program, saved as a .ino file inside a folder of the same name. The drawers are Board Manager, Library Manager, Serial Monitor, and Serial Plotter. The two buttons you will hit constantly are Verify (compile, do not touch the board) and Upload (compile if needed, then send the result over USB).
Under the hood, IDE 2 is a graphical shell around Arduino CLI, the command-line engine Arduino also ships as a standalone tool. When you click Verify, you are asking that engine to compile. That is why a sketch that builds in IDE 2 will build from the command line later, as long as both tools see the same cores and libraries. You do not need the CLI on day one. Knowing it is there means the work you do in this editor still counts later, when you compile from a terminal or from VS Code.
IDE 2 is not App Lab, not the Cloud Editor, and not the Legacy IDE 1.8.19. If you have a classic Uno, Nano, Mega, or most R4 boards and you want to write Arduino C++ on a Windows, macOS, or Linux machine, this is the default.
How to install Arduino IDE 2
I am going to be specific about Windows, because that is where most of the "which file do I click" confusion lives. macOS and Linux are shorter at the end of this section.
Go to the official software page and find Arduino IDE 2. For Windows 10 64-bit and newer you will usually see three flavors:
-
Windows Win 10 and newer, 64 bits (MSI). An installer. This is the one I use on a machine I own. It puts the app in a normal location, creates a Start Menu entry, and is easy to update.
-
Windows Win 10 and newer, 64 bits (EXE). Also an installer. Functionally you end up with IDE 2 either way. If the MSI is offered, take it.
-
ZIP file for Windows. A portable copy. You unzip it wherever you want (a USB stick, a folder you control without admin rights) and run the
.exeinside. Use this on a locked-down work PC, or if you want two versions side by side.
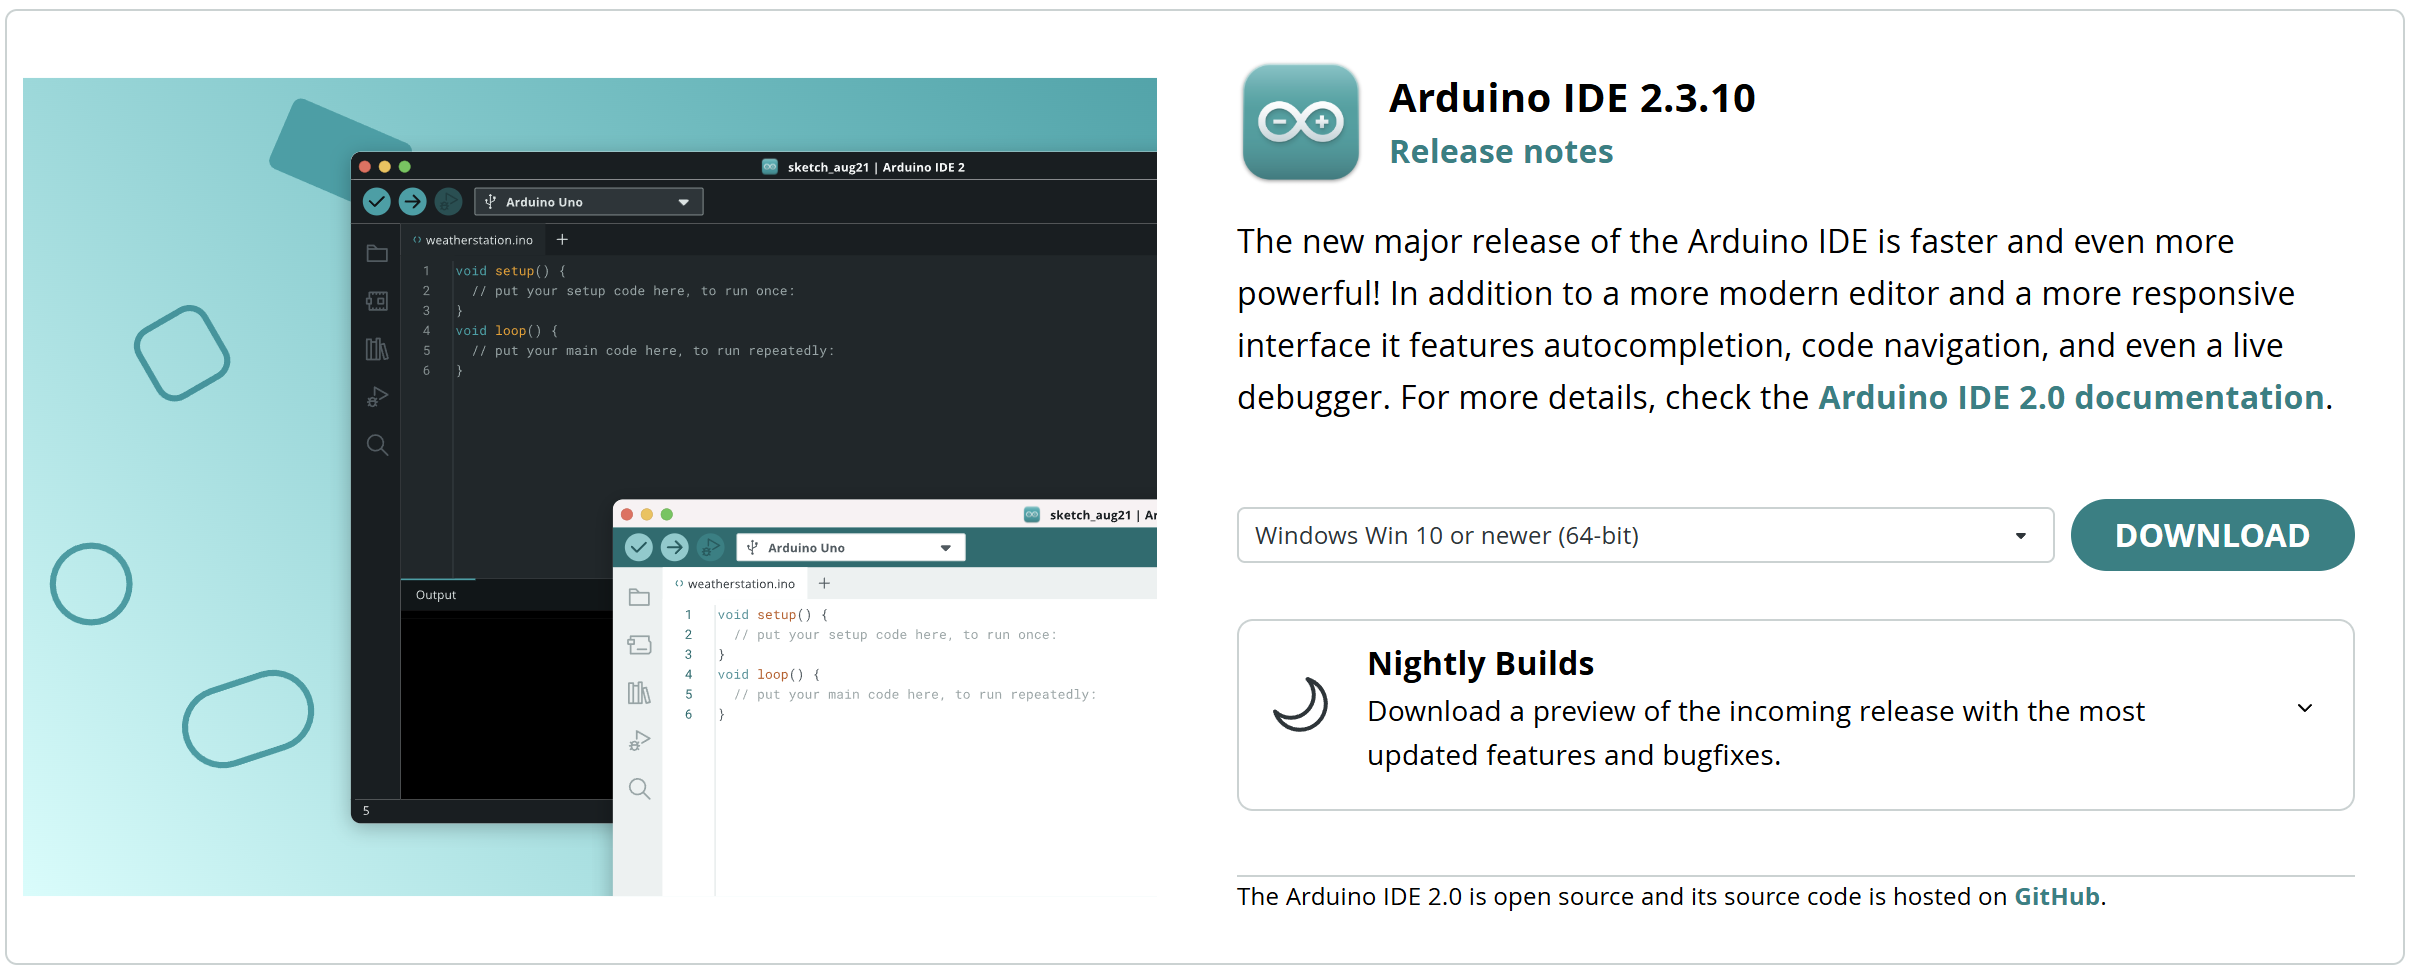
A gotcha before you click anything: some browsers and some "download helper" sites will offer you IDE 1.8.19, or a third-party packager. Check the version string. You want 2.3.x, currently 2.3.10.
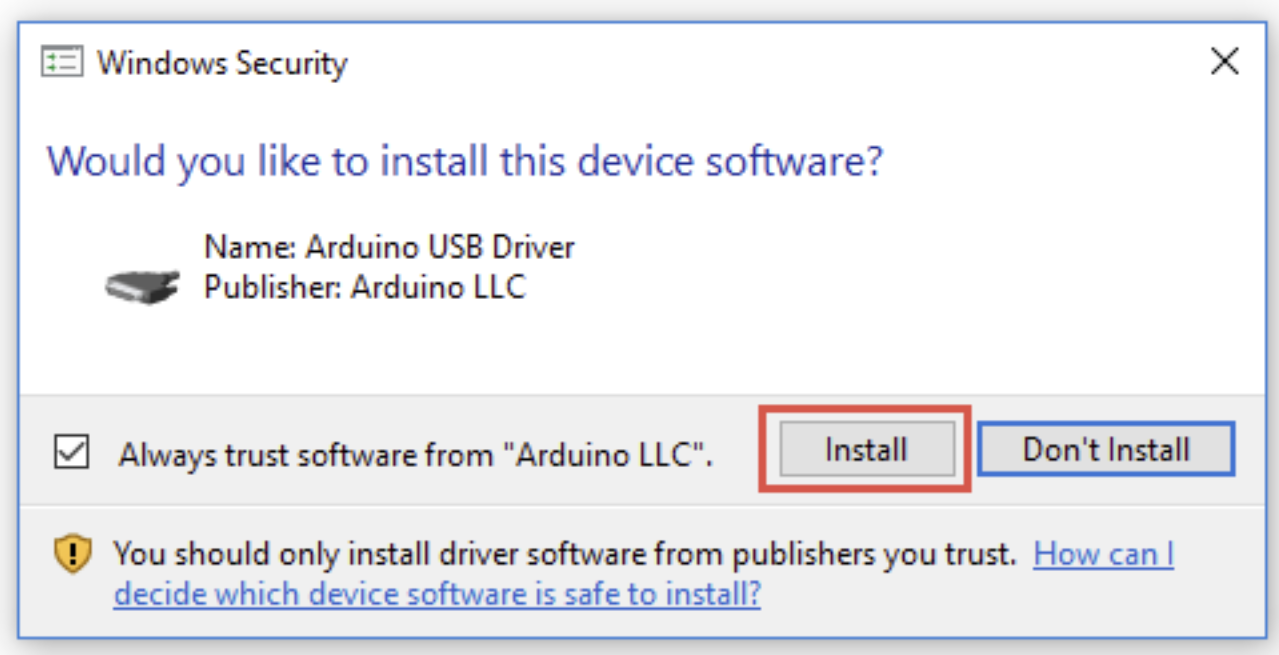
Run the installer. Accept the USB driver prompt if Windows asks. Those drivers are how the computer talks to official Arduino boards over USB. Skipping them is a reliable way to get a board that powers up and never appears under Tools → Port.
On first launch, IDE 2 may spend a minute fetching updates and installing the built-in AVR core. A core is the board-support package: compiler, upload recipe, and pin names for a family of boards. The AVR core covers Uno, classic Nano, Mega, and friends. Let that finish. If you quit halfway, the next launch can look "broken" until the core finishes installing.
Your sketches live in a sketchbook folder. On Windows that is usually Documents\Arduino. IDE 2 will create it. Cores and libraries you install later live in a different folder, typically C:\Users\<you>\AppData\Local\Arduino15. That Arduino15 folder is the one to back up if you ever reinstall and you do not want to download every board package again.
macOS: download the .dmg that matches your Mac (Intel vs Apple Silicon). Drag the app to Applications. The first time you open it, macOS may ask you to allow an app from the internet. Serial ports show up as /dev/cu.usbmodem... or /dev/cu.usbserial....
Linux: Arduino publishes an AppImage and a ZIP. The AppImage is the least painful on Ubuntu-style machines. You will likely need to add your user to the dialout group (and sometimes plugdev) so the IDE is allowed to open the serial port. Log out and back in after that group change. If you skip it, Upload fails with a permission error that looks like a bad board.
You can install a nightly build next to stable if you need a bug fix that has not shipped. Do not make the nightly your only copy.
A tour of the window
Open IDE 2 and, if it did not already, create a new sketch from File → New Sketch. You should see setup() and loop() already stubbed in. That is the whole Arduino program structure: setup() runs once at boot, loop() runs forever after that.
Look around, top to bottom.
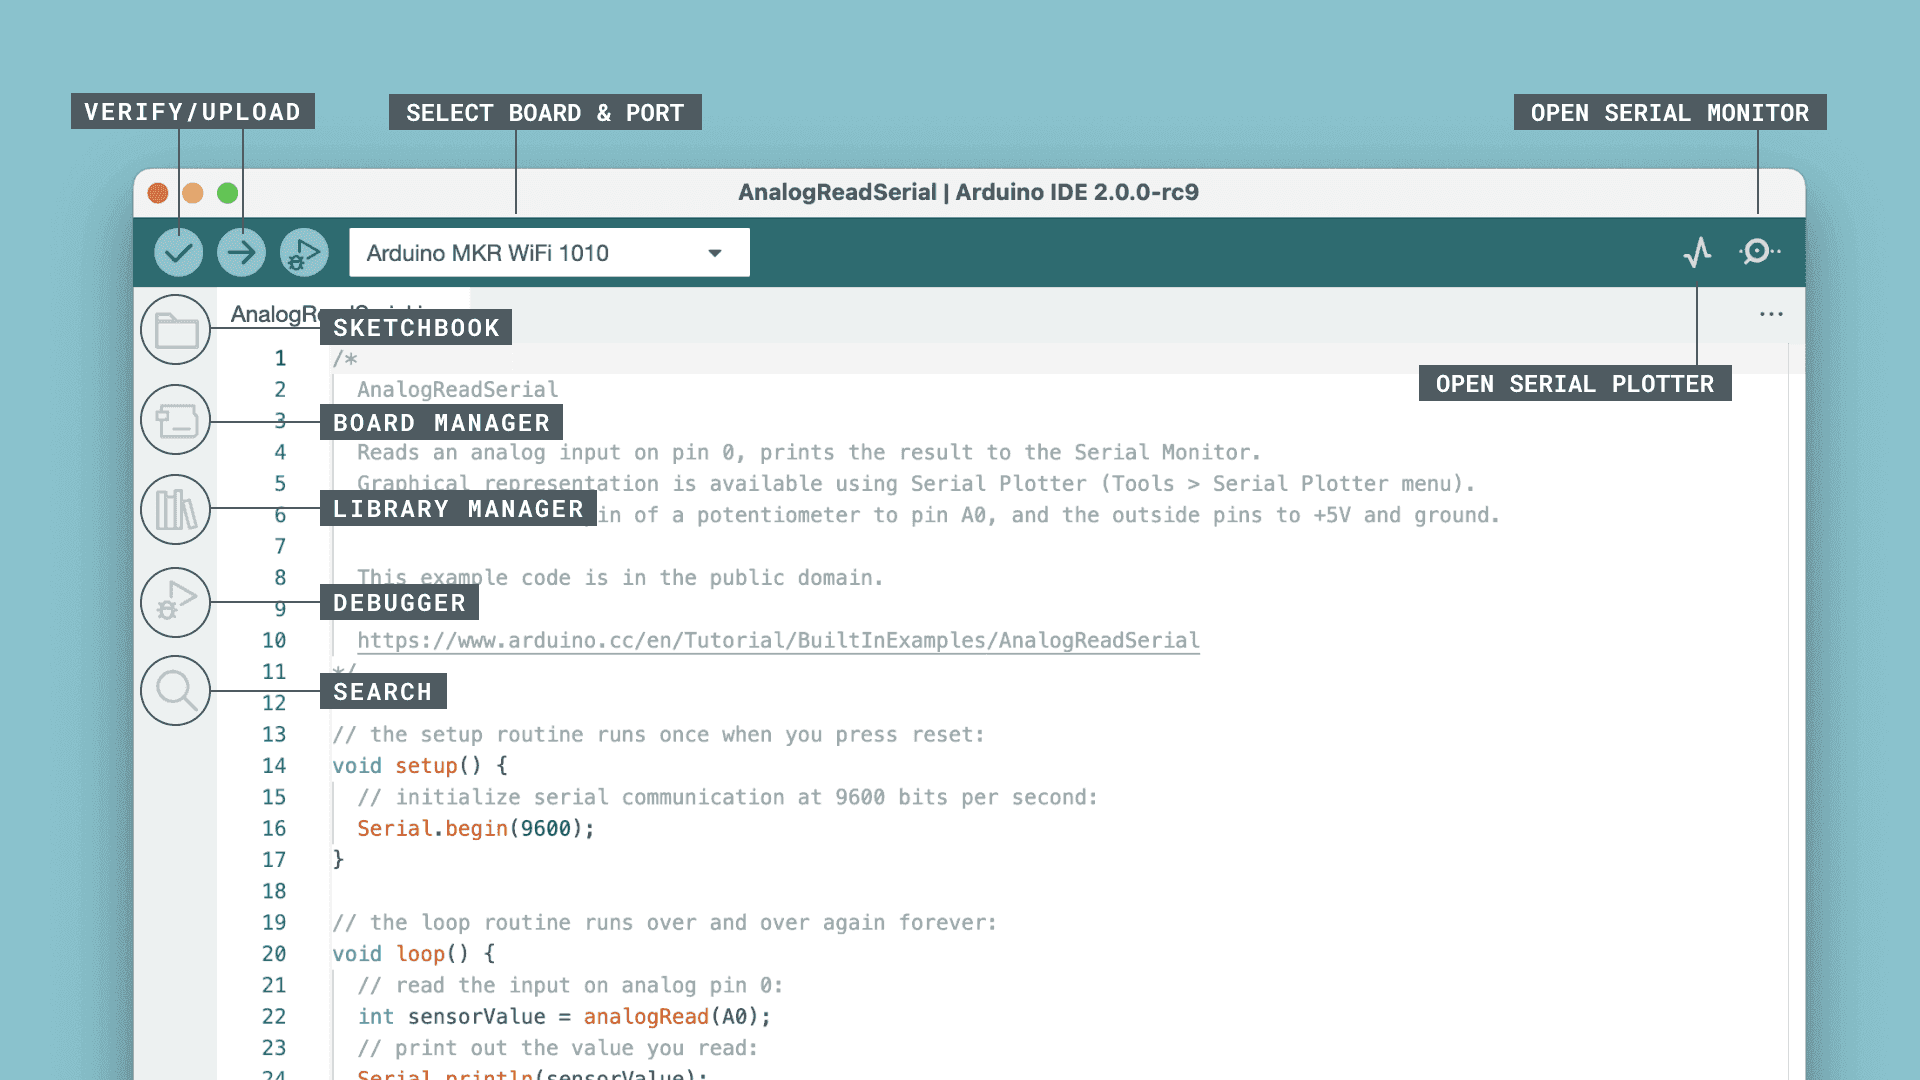
Left sidebar. Icons for the board manager, library manager, debug, and (depending on version) your sketchbook or cloud sketches. Hover if you are not sure. Clicking an icon opens a pane; clicking it again closes it. I keep those panes closed until I need them, so the editor stays wide.
Top toolbar. The check mark is Verify (compile). The right arrow is Upload. Next to those you will see a board-and-port picker: a drop-down that should name your board and, once the board is plugged in, a COM port. Serial Monitor and Serial Plotter have their own buttons as well. On a small laptop the toolbar can wrap. The buttons are still there.
Editor. The big text area. Tabs appear if your sketch has extra .ino, .h, or .cpp files. Line numbers live on the left. Autocomplete will start offering suggestions as you type, once a board is selected so the editor knows which core's API to suggest.
Bottom pane. This is where compile output, upload progress, and errors go. When something fails, read this pane before you change code. The useful line is often a few lines above the red one, the first error, not the last.
Serial Monitor / Plotter. In IDE 2 these can dock at the bottom of the same window, which is a real change from 1.8.x. You can keep an eye on Serial.println() output without a second floating window disappearing behind the editor.
If the window looks empty or the sidebar icons do nothing, wait out that first-launch core download, then restart once. IDE 2 is Electron-based (Electron is a framework for building desktop apps out of the same web technologies a browser uses, so in a sense IDE 2 carries a small browser around with it). It is heavier than 1.8.19. On a very old machine that can feel sluggish. It is still the right tool.
How to select a board and a port
Plug the board in with a data-capable USB cable. That sentence earns its own warning: a cable that only supplies power (the kind that came with a cheap gadget and was meant for charging) will light the board and never create a COM port. If the OS does not see a serial device, the IDE cannot either. Try a cable you know has transferred files.
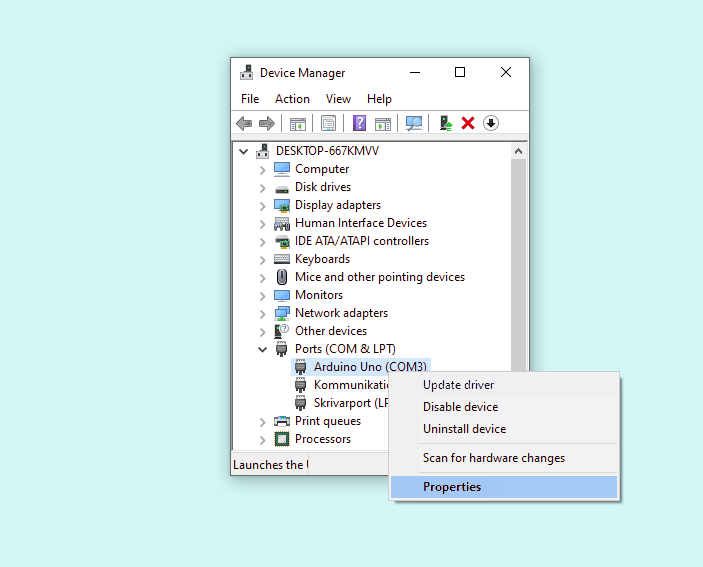
On Windows, open Device Manager and look under Ports (COM & LPT). You want a COM number, like COM3 or COM7. Official Unos usually appear as "Arduino Uno" or a similar name. Many clones and many ESP32 boards appear as USB-SERIAL CH340, CP210x, or FTDI. If you see the device with a yellow warning triangle, Windows does not have a driver. Fix that before you touch IDE 2. A later article in this cluster is a full COM-port troubleshooting guide. The short version: bad cable, missing driver, or the board is in a bootloader/download mode you did not expect. (A bootloader is a tiny program that lives on the chip and listens for new firmware right after reset. Some boards show up as a different device, or on a different COM number, while it is running.)
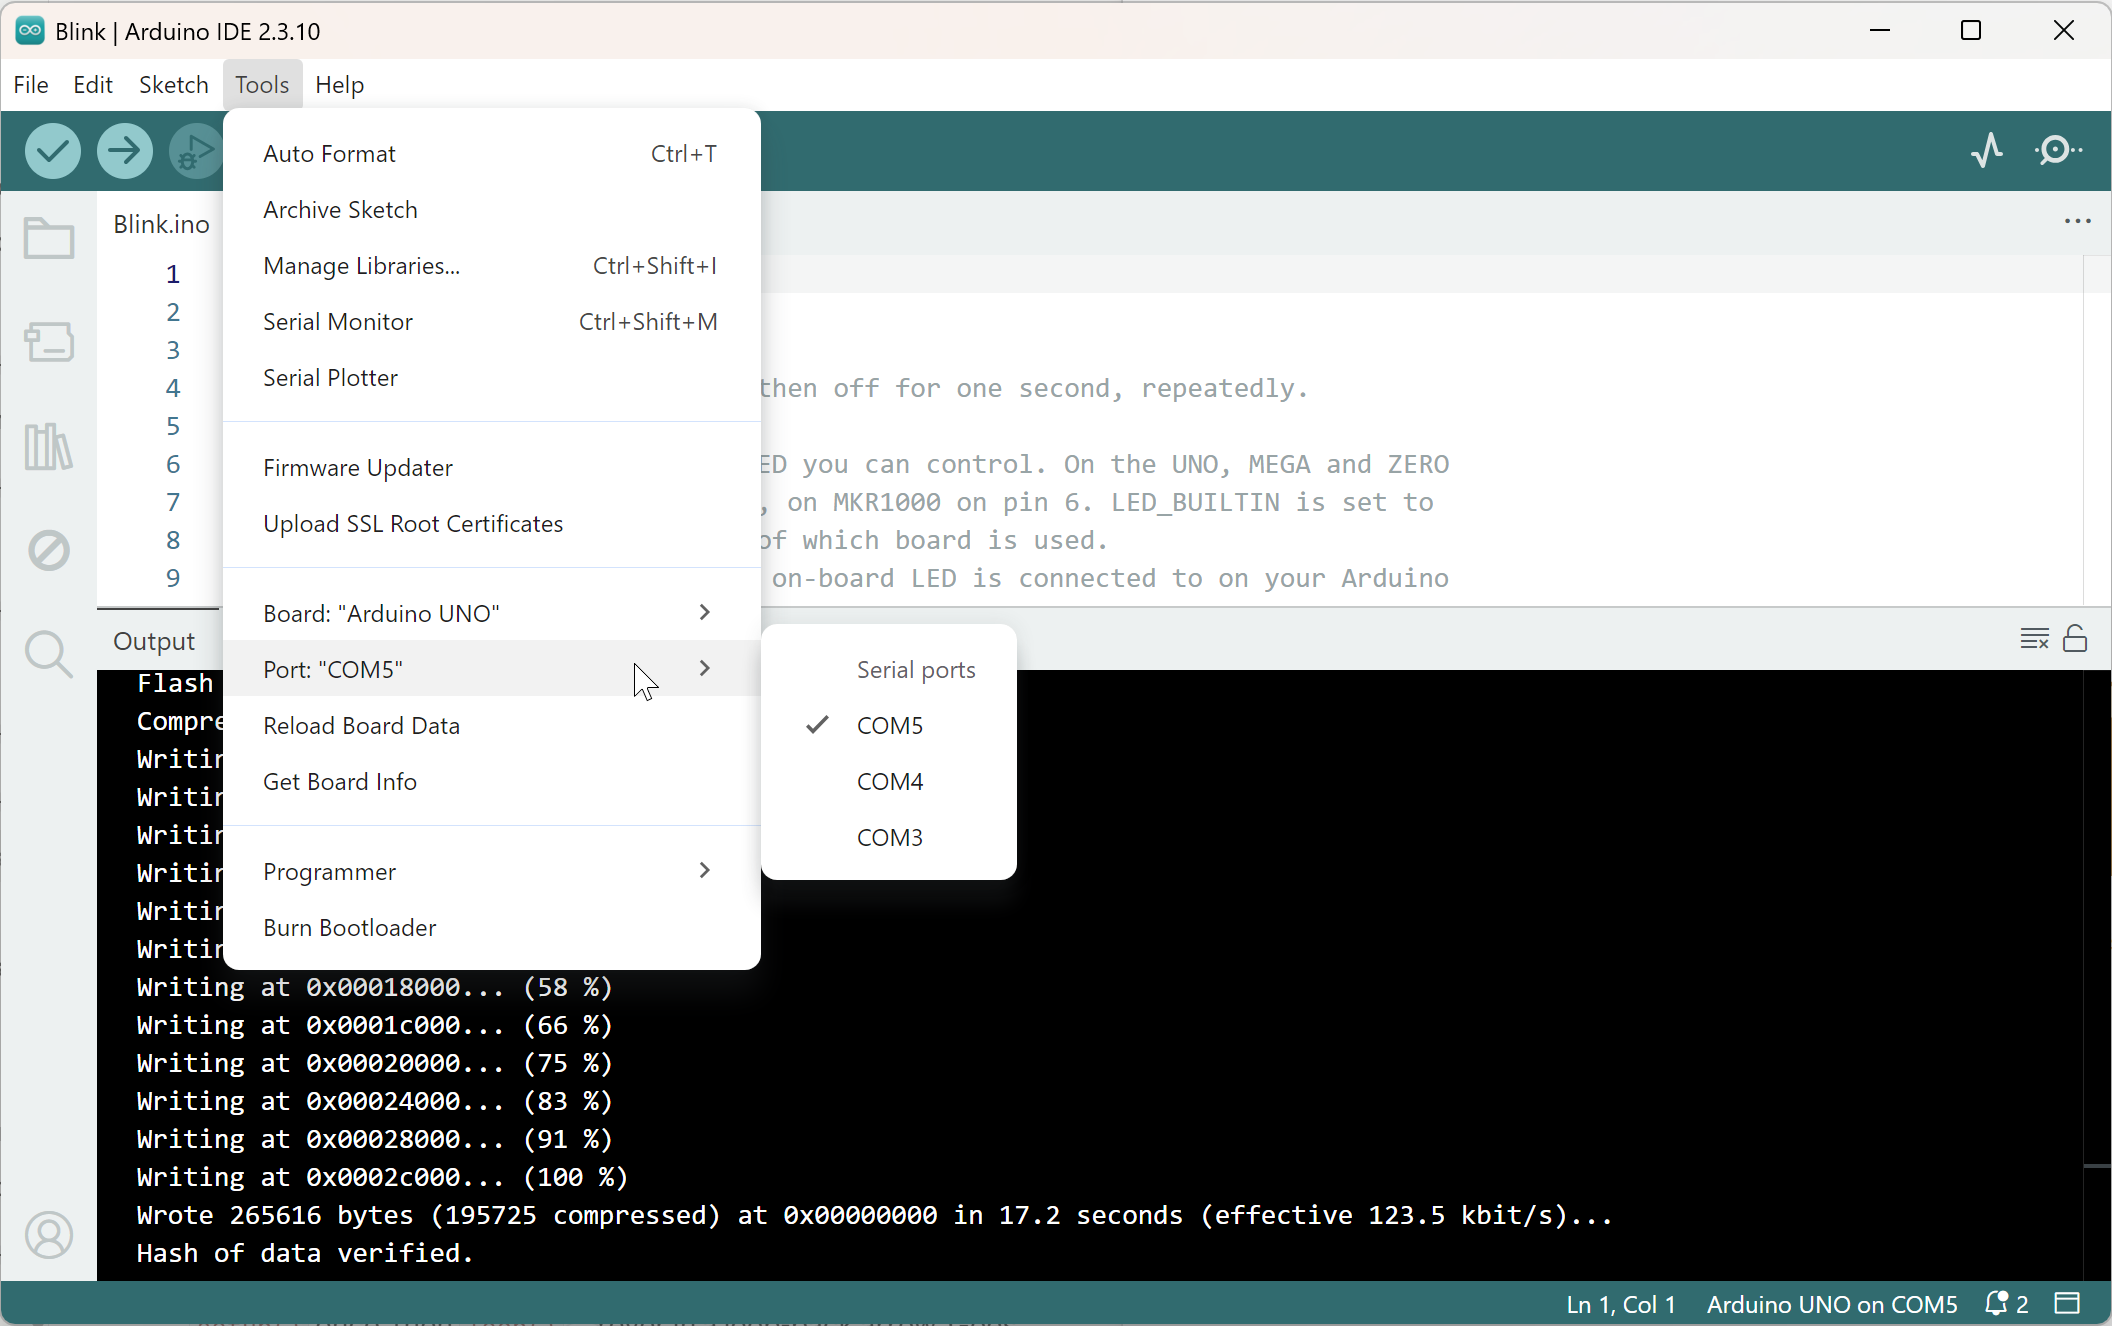
In IDE 2, open the board picker on the toolbar (or Tools → Board). Pick the matching board. For a classic Uno that is Arduino Uno. For a Nano, pay attention to "Nano" vs "Nano Every" vs "Nano 33 IoT" vs "Nano ESP32". Those are different chips. The wrong one will compile and then fail to upload, or upload and then run nonsense.
Then pick the port: Tools → Port, or the same toolbar drop-down. The port name has to match Device Manager. If the list is empty, the IDE cannot see a serial device. Unplug, wait five seconds, plug into a different USB jack, preferably one on the PC itself rather than a hub.
Select the board before you lean on autocomplete. The editor's suggestions come from the core you selected. If no board is selected, suggestions are thin or wrong.
What Board Manager is
Board Manager is how you install cores you do not already have.
The AVR core is already there after a normal IDE 2 install, which is why an Uno works on day one. ESP32, ESP8266, SAMD boards, RP2040 boards, and a lot of third-party hardware are not. They are not missing because Arduino is hiding them. They live in other vendors' packages, and Board Manager has to be told to fetch them.
Open the boards pane from the left sidebar, or Tools → Board → Boards Manager. Search for a family name (for example Arduino AVR, Arduino SAMD, esp32). Click Install on the package you want. Let it finish. Then the board name appears under Tools → Board.
A core is more than a friendly name in a menu. It is:
-
A compiler toolchain for that chip. Different chips are built on different processor families (AVR on the Uno, Xtensa or RISC-V on ESP32s, ARM on most newer boards), and each family needs its own compiler that speaks its machine language.
-
boards.txtand related files that describe how to compile and upload for each product in the family. -
Pin-number mappings so
digitalWrite(13, HIGH)hits the right pad. -
Sometimes extra tools (uploaders, debug probes, partition schemes).
So picking "ESP32 Dev Module" without installing the ESP32 core does nothing useful. There is no compiler to run yet.
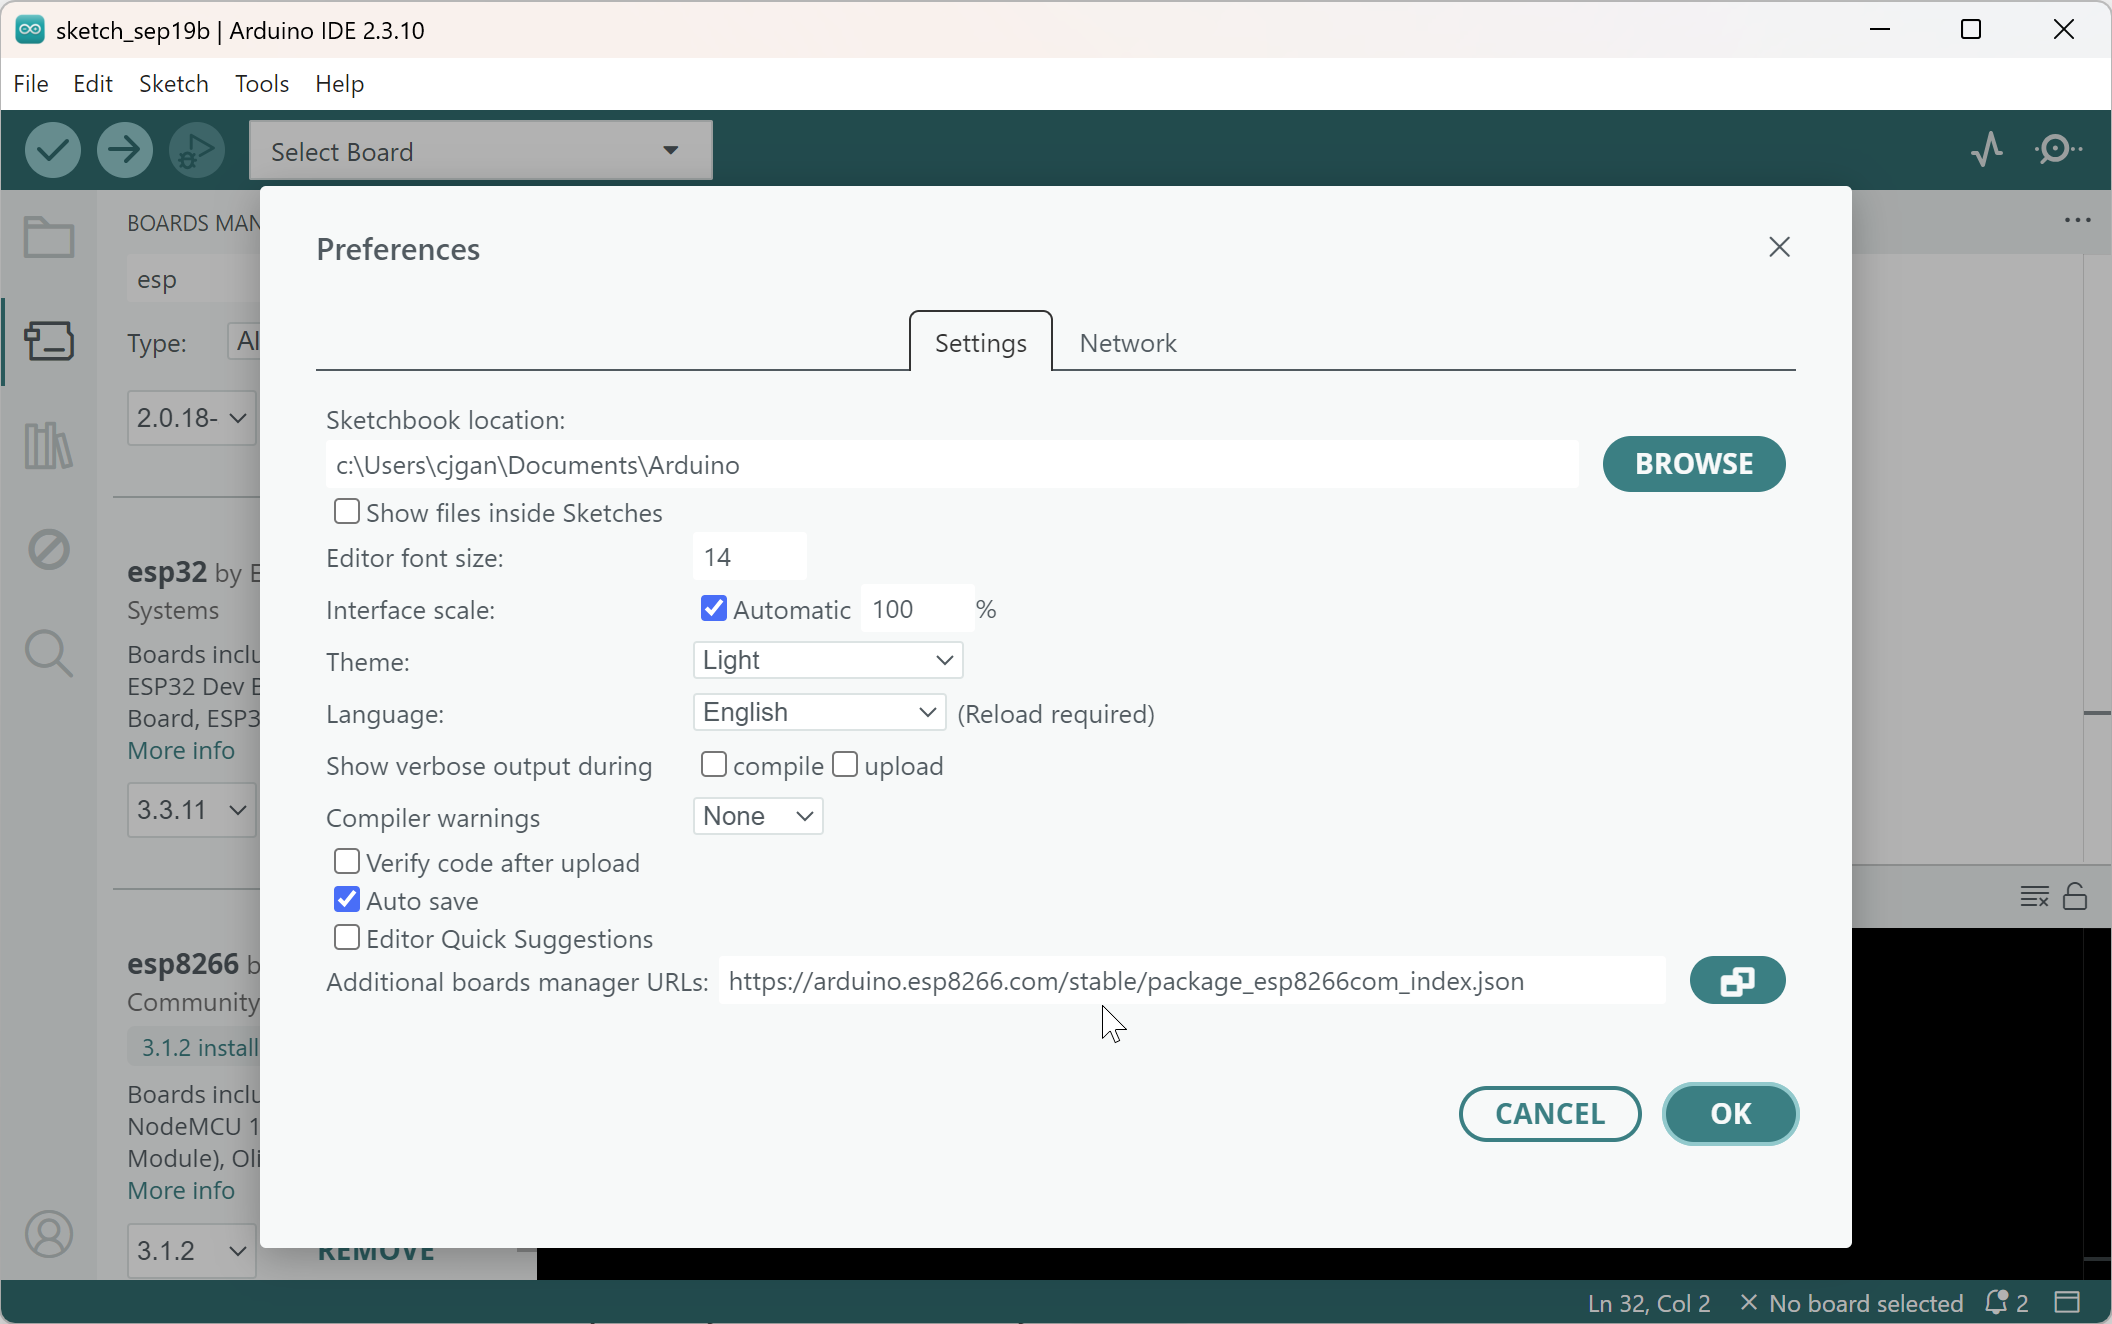
The ESP32 / ESP8266 gotcha, up front. Those families often do not show up in Board Manager until you add a Board Manager URL. That is a web address pointing at a JSON index of packages (JSON is a plain-text data format; this particular file is basically a catalog listing which versions exist and where to download them). You paste it in File → Preferences, in the "Additional boards manager URLs" field, then go back to Board Manager and search again. I will give the current official-style URLs in the third-party boards section below. If you search Board Manager for esp32 and get zero results, you skipped the URL. Nine times out of ten, a missing URL is the cause, not a broken install.
Where the files land: under Arduino15\packages\<vendor>\.... You rarely need to open that folder. You need to know it exists so you do not delete AppData\Local\Arduino15 and then wonder why every board vanished.
What Library Manager is
A library is a package of reusable code. Instead of writing the protocol for a DHT22 temperature sensor from the datasheet, you install a library, #include its header, and call functions it provides. Part 3 of the series is the place that idea gets taught properly. This section is the IDE 2 mechanics.
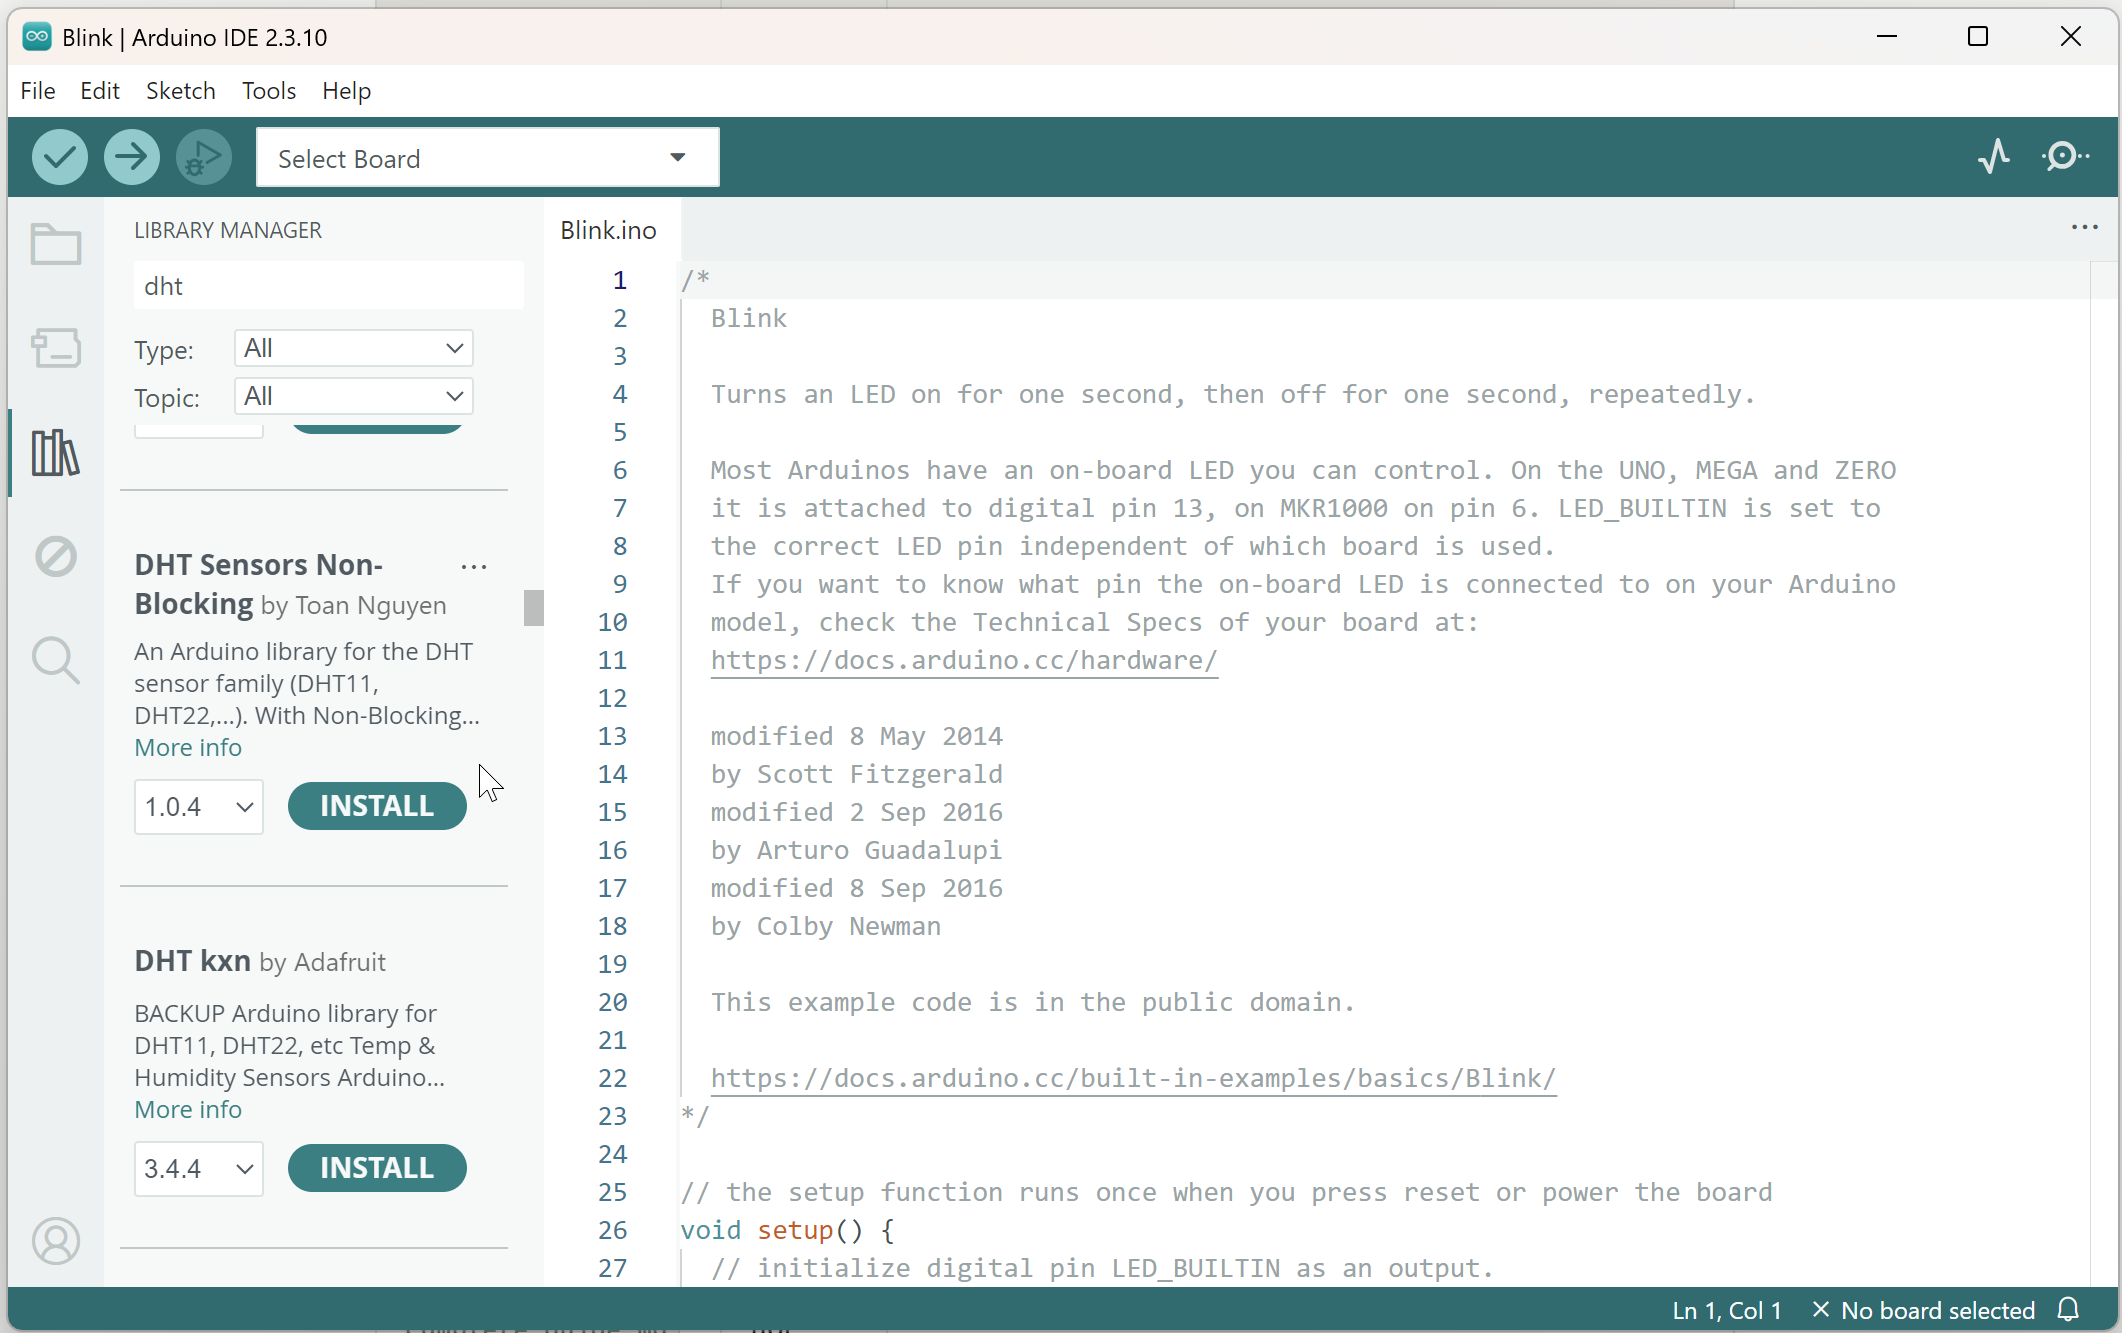
Open the library pane from the left sidebar, or Sketch → Include Library → Manage Libraries. Search by library name or sensor name. Check the author if several results share a title. Click Install. If the library needs dependencies (other libraries it relies on), IDE 2 will usually offer to install those too. Say yes, unless you know you already have them.
Three install paths, because the Manager is not the whole story:
- Library Manager. Best default. Stays updateable from the same pane.
- Sketch → Include Library → Add .ZIP Library. Use this when a vendor gives you a
.zipfrom GitHub or their site, and that library is not in the Manager (or the Manager copy is old). Do not unzip it yourself first. Point the dialog at the zip. Restart the IDE if the new library does not appear under Sketch → Include Library immediately. Arduino still indexes that folder at startup for some views. - Drop a folder into
Documents\Arduino\libraries. Same idea as the zip path, manual. The folder name should match the library, and it should contain the.hfile at the expected depth, not a nested "library-master/library-master" mess from a sloppy GitHub unzip.
Gotcha: two libraries that both define the same class name will collide. The error looks like a broken sketch. It is two packages fighting. If you just installed a second DHT or a second OLED library, that is the first thing to suspect.
Removing a library: in Library Manager, find it and choose Remove, or delete its folder from Documents\Arduino\libraries. Close and reopen the IDE if the include still resolves.
How Verify (compile) works
Verify asks the CLI to compile the sketch for the currently selected board. It does not need the board plugged in. You can compile on the train, which is exactly why Verify exists as its own button.
Click the check mark, or use Sketch → Verify/Compile. Watch the bottom pane. A first compile of a core is slow because the toolchain is building a lot of Arduino internals. Later compiles are faster. IDE 2.3.10 added a clean compile: Shift-click Verify if you suspect a stale cache. To save time, the compiler keeps pieces of previous builds (object files) and reuses the ones it thinks have not changed. Once in a while it guesses wrong, and your latest edit never makes it into the hex file (the finished firmware that actually gets uploaded). If a change you just made seems to have no effect after upload, clean-compile once before you rewrite the sketch.
A compile error is a gift, even when it does not feel like one. The first error is the one to fix. Later errors are often fallout. Double-clicking the error line should jump the editor to the spot.
Common first-week compile errors:
-
'foo' was not declared in this scope: typo, missing#include, or you used a function the selected core does not have. -
No such file or directoryon a header: library not installed, or installed under a nested folder name. -
Wrong board selected, so a pin or library call that exists on ESP32 is being compiled for an Uno.
Success looks like a summary of program-storage and dynamic-memory use. On an Uno, dynamic memory is SRAM, the working RAM. If that percentage is high, you will have mysterious crashes later. That is a programming problem, not an IDE problem, but the IDE is where you see the number.
How Upload works
Upload compiles if needed, then sends the firmware to the board over the selected port.
The board has to be on the correct port, the cable has to be a data cable, and nothing else should be holding that serial port open. Serial Monitor in IDE 2 usually gets out of the way. Other programs (a second IDE, a Python serial script, a phone-tethering tool that grabbed COM3) will not. Close them.
Click the right-arrow button. You should see the bottom pane run through compile, then a sequence of upload-tool messages. On a classic Uno the board's RX/TX LEDs flicker. When it says "Done uploading," the new sketch is on the chip and already running.
Some boards need a manual reset or a boot-button hold at the start of upload. Many ESP32 and ESP8266 boards do this automatically through the serial chip. Some cheap ones do not. If upload sits on "Connecting..." until it times out, hold the BOOT (or FLASH) button, start Upload, and release when the terminal starts spitting lines. Blame the board's auto-reset circuit for this one, not your choice of IDE.
A successful upload to the wrong board is worse than a failed upload. If Tools → Board says Uno and the hardware is a Mega, you can "succeed" and then stare at a brick that is running the wrong image. Match the menu to the silkscreen.
How to use the Serial Monitor
Serial Monitor is a text window attached to the same USB-serial port you uploaded over. Your sketch writes to it with Serial.println(). You type back into the send box if the sketch is reading input.
Open it from the toolbar or Tools → Serial Monitor. Set the baud rate (the bits-per-second speed) to match Serial.begin(...) in the sketch. If the sketch says Serial.begin(115200); and the Monitor is at 9600, you get garbage characters. That is the most common "Serial is broken" report, and it is just a speed mismatch. The UART (the serial hardware inside the chip) is fine.
Line ending (No line ending, Newline, Carriage return, Both) matters when the sketch reads incoming text. If you are sending 1 and the sketch never sees it, try Newline.
Timestamps are a checkbox. Turn them on when you are correlating events. They are extra noise when you are watching a clean sensor printout.
A tiny sketch to prove the Monitor, with comments for a first-time reader:
void setup() {
  // Start the USB-serial link at 115200 bits per second
  Serial.begin(115200);
  // On native-USB boards this waits until the Monitor is open. On a classic Uno it does nothing useful; skip it there.
  // while (!Serial) { ; }
  // Print a one-time "boot banner" so you know THIS sketch is the one running.
  // F() keeps the text in flash memory instead of copying it into the Uno's small RAM.
  Serial.println(F("boot: serial monitor test"));
}

void loop() {
  // millis() is milliseconds since reset. Printing it proves the board is running, not frozen.
  Serial.print(F("uptime_ms="));  // print() stays on the same line
  // println() prints the number, then moves to a new line
  Serial.println(millis());
  delay(1000);  // Fine for this demo. Do not copy delay() into a real loop() after Part 4.
}
If you see the boot line once and then a number every second, USB, port, baud, and the sketch are all fine. If you see nothing, the usual suspects are wrong port, wrong baud, or you uploaded a different sketch than the one you are looking at. Print a unique boot banner from setup() so you can tell.
Serial Monitor is also the front door of a debugging method, not just a log. Part 7 of the Mastery Series is the place that method gets taught. In this article, the rule is smaller: make the board talk, then believe what it says over what you hoped the LEDs meant.
How to use the Serial Plotter
Serial Plotter graphs numbers arriving over the same serial link. It is the Monitor's cousin for anything that is easier to see as a line than as a column of text: a pot, a temperature, a filter settling.
The format it wants is simple. Print one or more numbers, separated by commas or tabs, then a newline.
void setup() {
  Serial.begin(115200);  // Plotter must be set to this same speed
}

void loop() {
  // Read the voltage on pin A0. The Uno's ADC (analog-to-digital converter)
  // turns 0 to 5 V into a whole number from 0 to 1023.
  int raw = analogRead(A0);
  // One number per line = one trace on the Plotter
  Serial.println(raw);
  delay(50);  // About 20 readings per second, slow enough to watch the line move
}
Open Tools → Serial Plotter, match the baud rate, twist a potentiometer on A0, and you should get a live trace. (A potentiometer is a knob with three legs: wire the outer two to 5V and GND, and the middle one to A0.) Multiple values on one line become multiple traces.
Gotcha: Plotter and Monitor are both using the serial port. In IDE 2 you generally use one at a time for that port. If Plotter is open and you cannot upload, close it.
A dedicated Plotter article later in this cluster will build a fake temperature-and-humidity stream so you can practice without a sensor. The mechanic above is enough to see a pot move.
Autocomplete and code navigation
Autocomplete is the editor suggesting names as you type: digitalW becomes digitalWrite, and a parameter hint follows. It is powered by a language server, a helper program running in the background that reads the selected core and your includes so it knows which functions exist. If suggestions are missing, select a board, wait a few seconds, and type again. Right after a core install, the first open of a sketch can be slow while that index builds.
Accept a suggestion with Tab or Enter, depending on your keybindings. If autocomplete is in the way while you type a comment, keep going; it will back off. You can turn it down in preferences if you hate it. I leave it on. It is the fastest way to discover that analogWrite is not available on the pin you thought, because the suggestion list is coming from this core, not from a tutorial written for a different board.
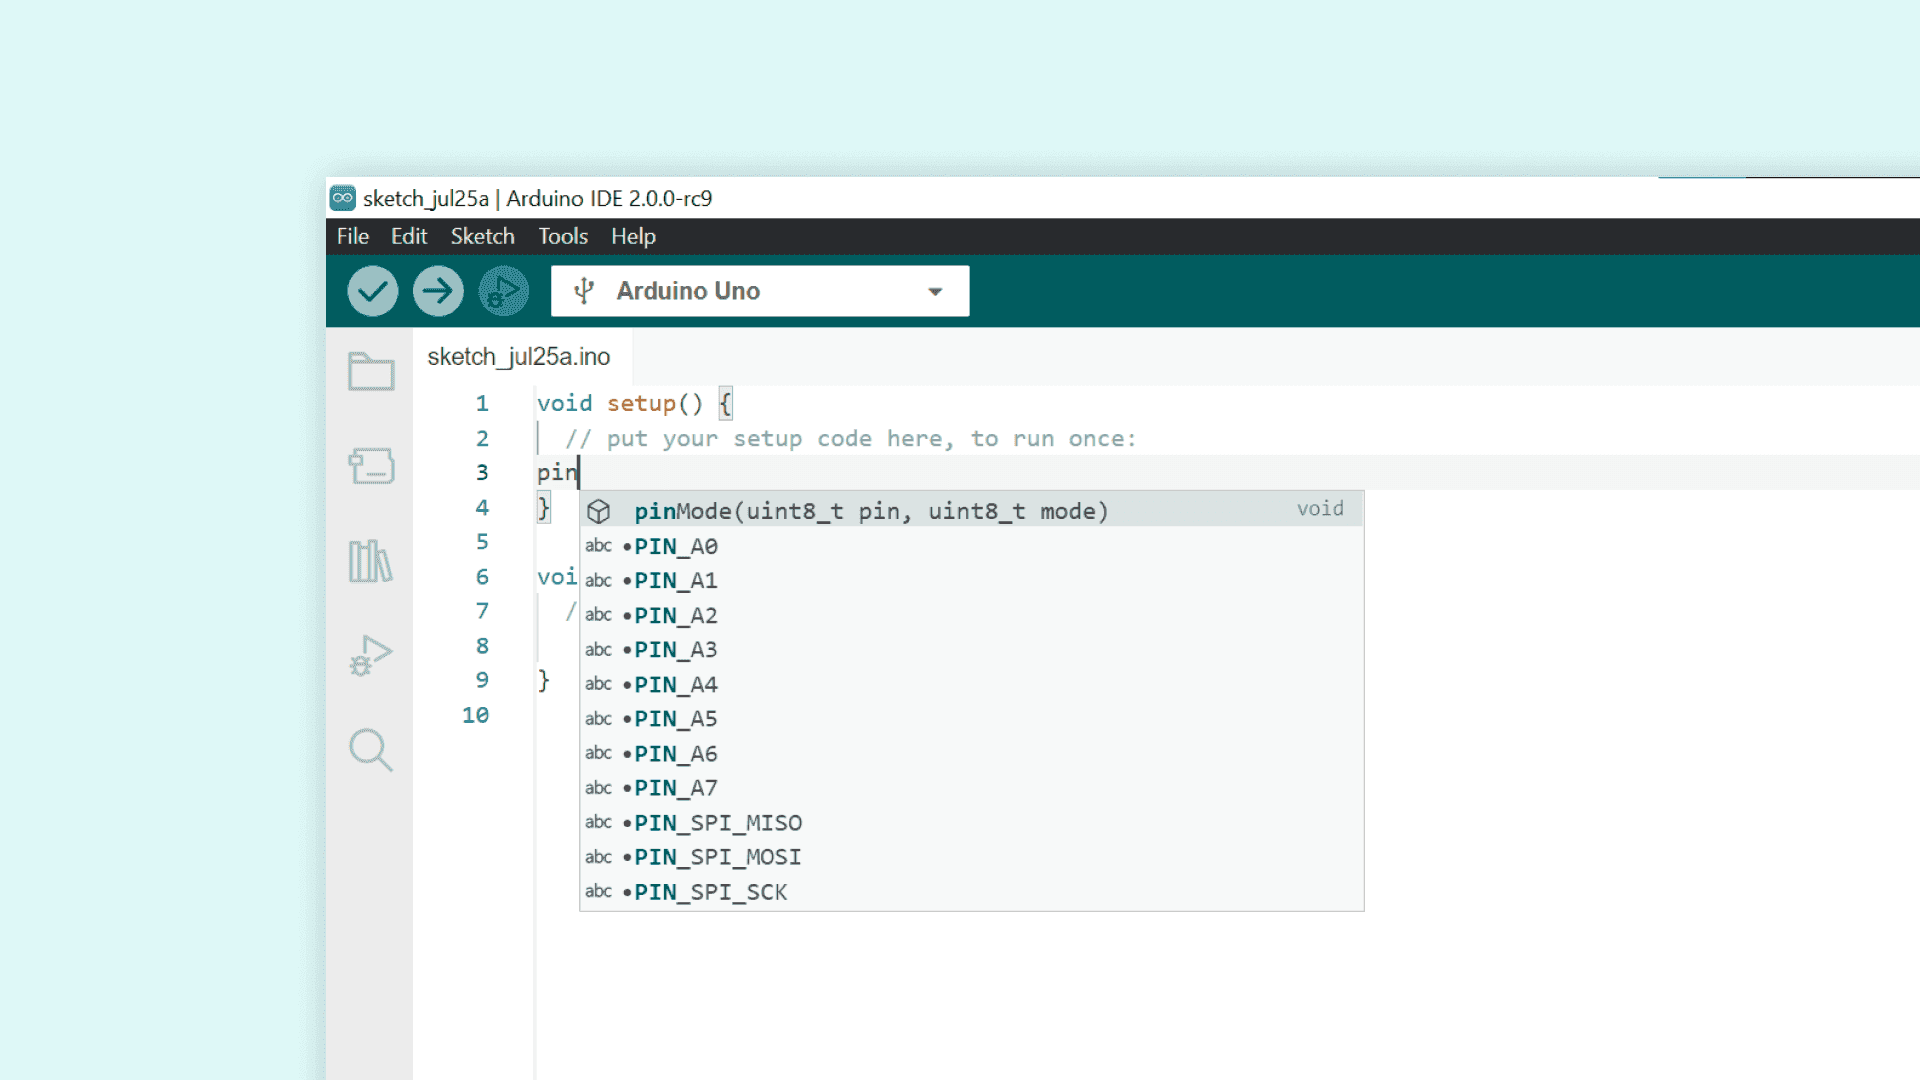
Code navigation means jump-to-definition and find-references. Right-click a function name, or use the keybinding shown in that menu, and IDE 2 should take you to the header or the source that defines it. This is how you stop guessing what a library function does: you go read it. On large cores the first jump can take a moment.
If navigation does nothing, the language server is not ready, the board is not selected, or you clicked a macro that has no clean definition. Restarting the IDE is the unglamorous fix that works more often than it should.
How debugging works in Arduino IDE 2
Debugging here means live debugging: pause the program on the chip, inspect variables, step line by line. It is not Serial Monitor (which is print-debugging) and it is not the bottom-pane compiler errors.
IDE 2's debugger talks to hardware that supports a debug probe: Arduino Zero, some SAMD and STM32 boards, on-board debug on some modern official boards, or an external probe such as a J-Link or Atmel-ICE. A classic Uno (ATmega328P) does not do this over the USB-serial chip you already have. You can still debug an Uno with Serial prints. You cannot attach this debugger to it without extra hardware and a different workflow.
If your board supports it, you pick the debug probe in the IDE, set a breakpoint (a marker that says "pause here") by clicking the gutter next to a line, and start a debug session from the sidebar. When the chip hits that line, the editor shows you variable values.
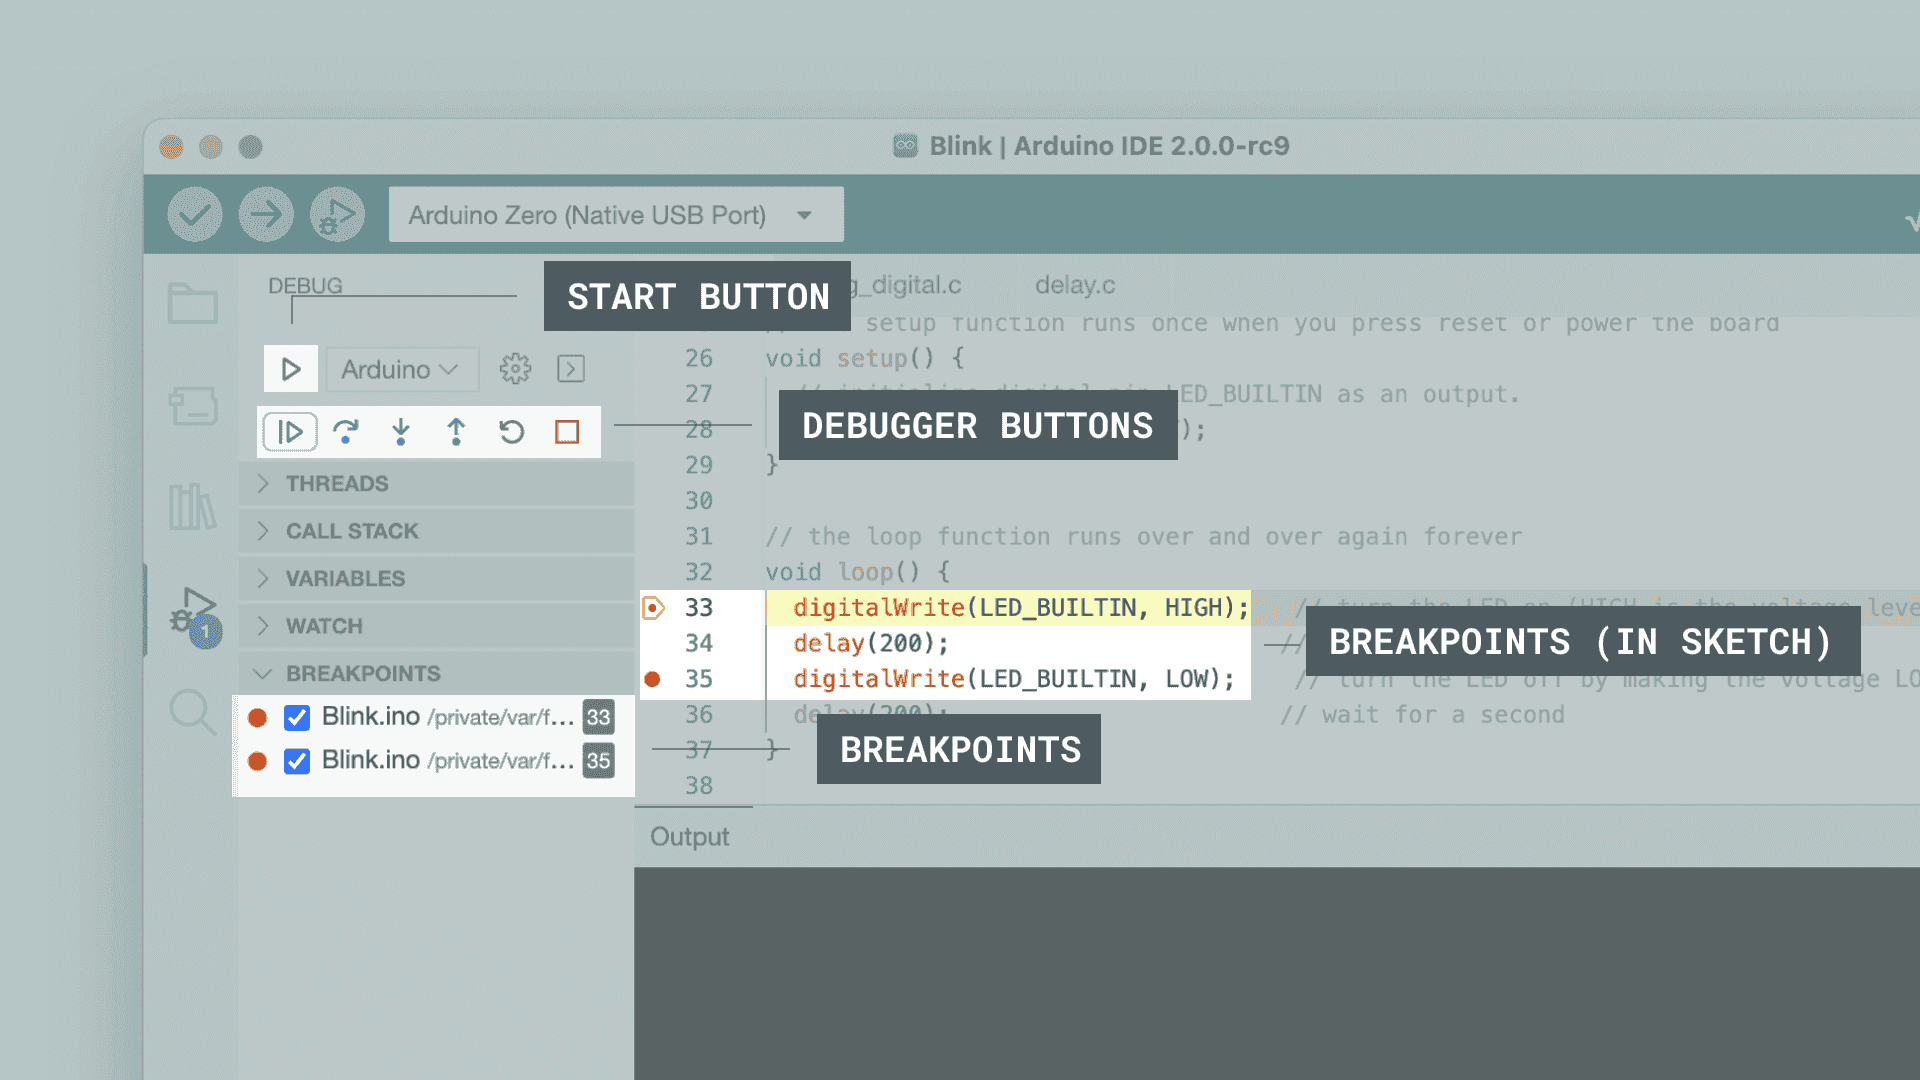
Gotcha: debugging changes timing. A sketch that works because of luck in loop() can fail when you pause it. Use the debugger to inspect state, not to prove real-time behavior.
If your board is an Uno and you came here for "debugging," use Serial Monitor plus the method in Part 7. The debugger UI will only frustrate you.
Preferences worth setting on day one
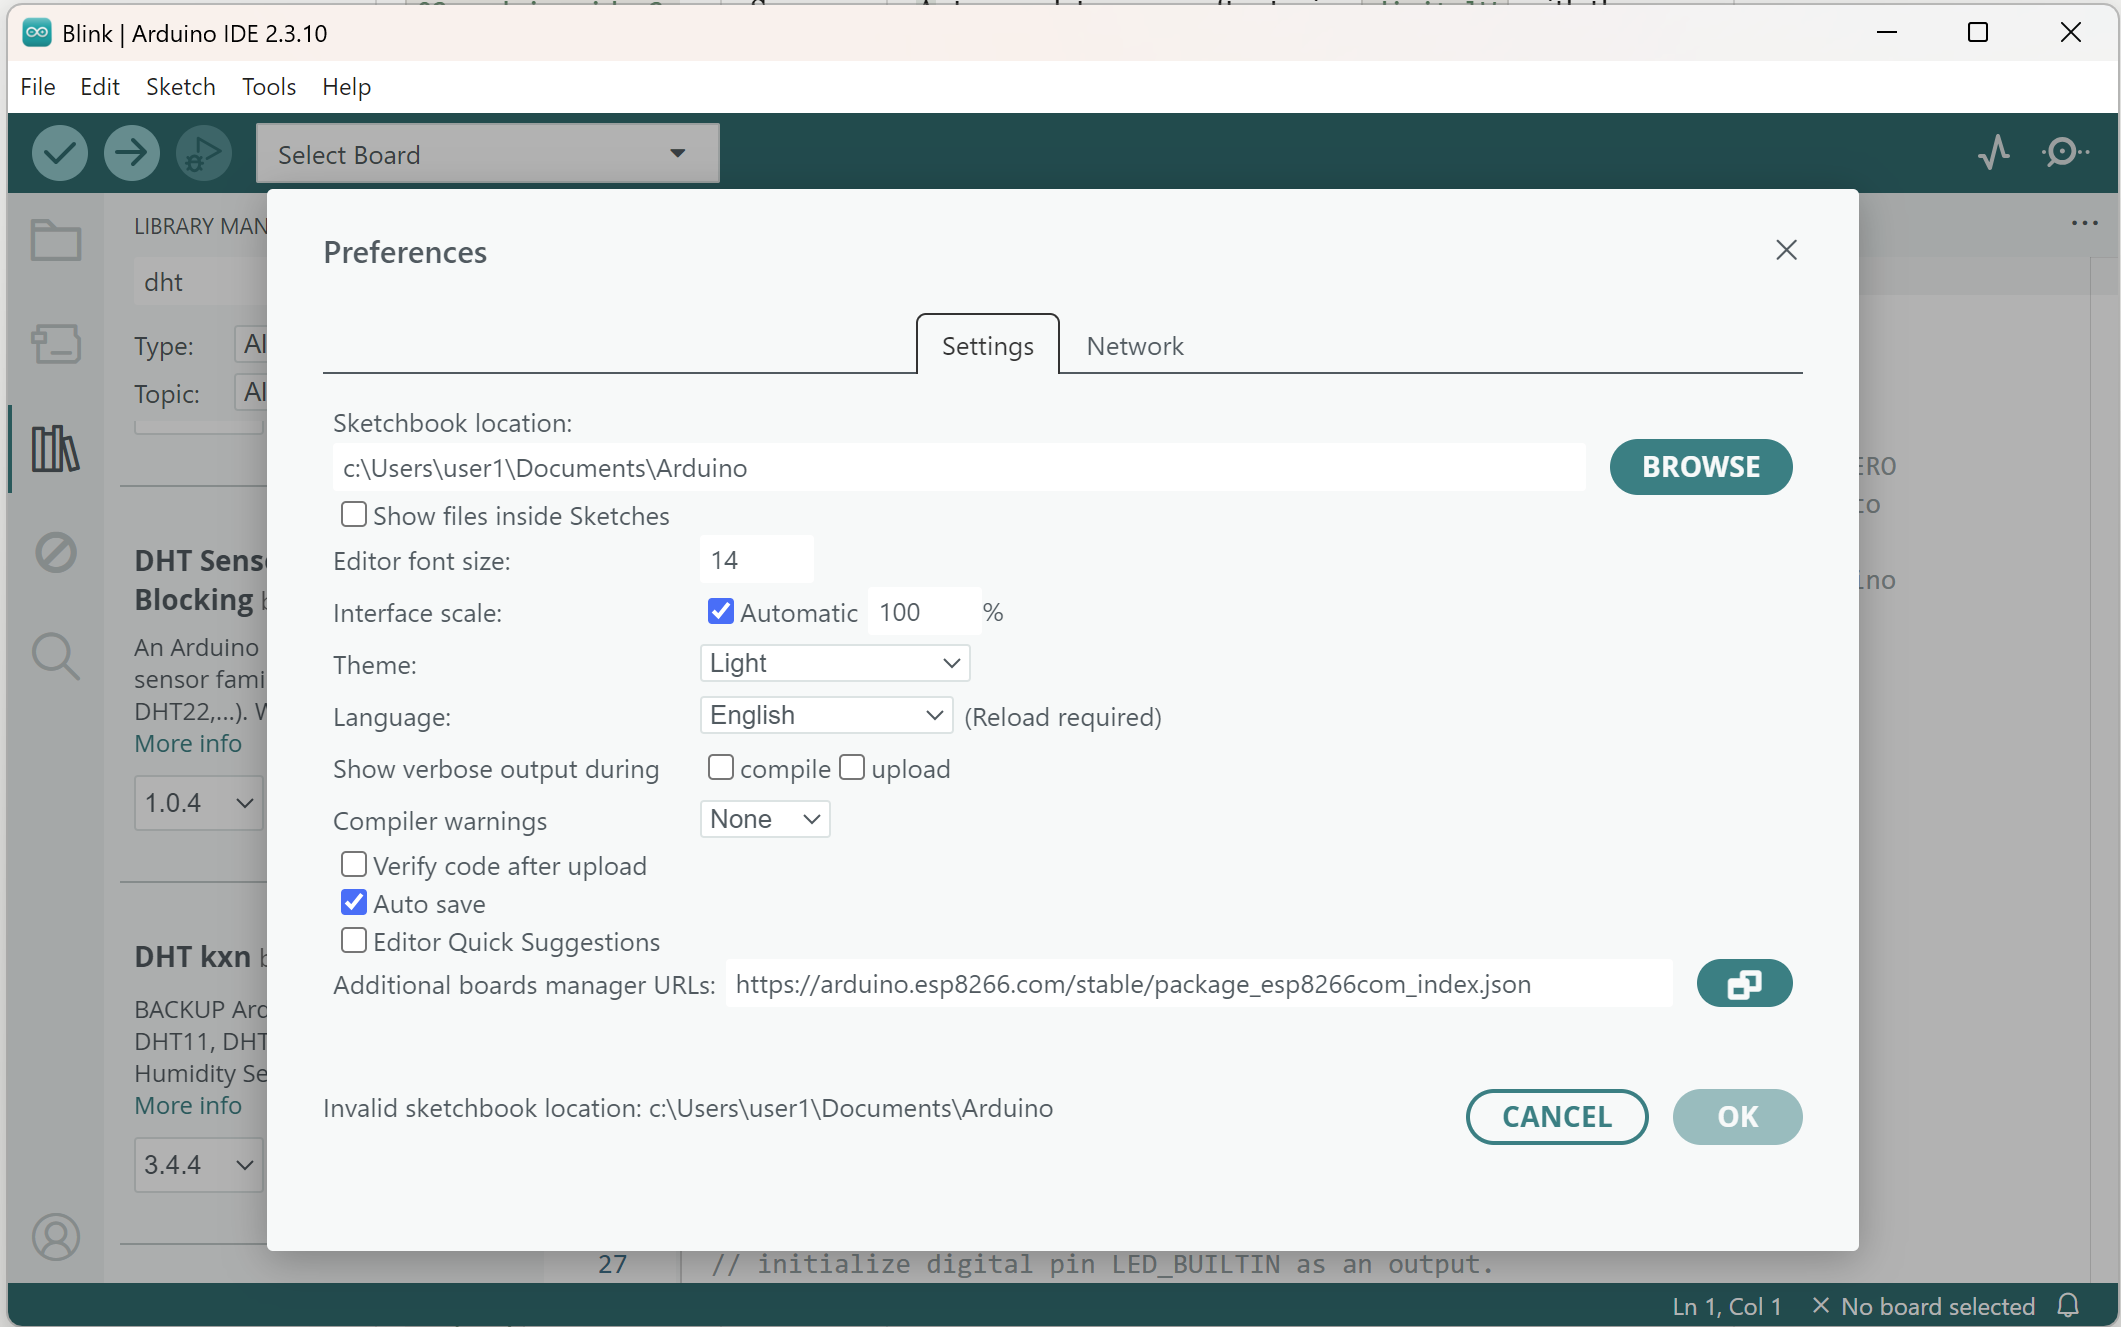
File → Preferences (Arduino IDE → Settings on macOS).
-
Sketchbook location. Point this at a folder you back up. If you let it sit in a cloud-synced Documents folder that fights over file locks, you will get mysterious save errors.
-
Editor font size. Use it. Squinting is not a virtue.
-
Show verbose output during compile / upload. Off until you need it, then on. Verbose upload is how you see the exact command the IDE ran when a board will not flash. The uploader programs themselves have names like
avrdude(for Uno-style AVR chips) andesptool(for ESP32 and ESP8266), and those names are what you search for when you are hunting an error message online. -
Additional boards manager URLs. This is the ESP32/ESP8266 field. Paste one URL per line, or comma-separated, depending on the dialog.
-
Language / theme. Cosmetic. Set them and move on.
-
Auto-save / auto-format. Auto-format rewrites your spacing and indentation. On a sketch you share with other people (in Git, for example), that means every file you touch shows dozens of changed lines that are only whitespace, which makes the real changes hard to find. I keep auto-format manual (the wand / Shift+Alt+F) unless I am alone in the file.
You do not need to touch compiler warnings until you are comfortable. When you are, "More" warnings will nag you about things that are real bugs. That nagging is useful.
Third-party boards, including ESP32 and ESP8266
"Third-party" here means a core Arduino does not ship in the default index: Espressif's ESP32 package, the ESP8266 community package, some RP2040 packs, and a long tail of vendor boards.
The extra step is always the same.
- Find the Board Manager URL in the vendor's current docs (not in a 2017 blog comment).
- Paste it into Preferences → Additional boards manager URLs.
- Open Board Manager, search, install.
- Pick the exact board (or a close Dev Module) and the port.
- Install USB drivers if Windows still shows a yellow triangle.
For ESP32, Espressif's current package is what you want, installed from their index URL. For ESP8266, the community ESP8266 core is still the usual path for a NodeMCU or Wemos D1. Those URLs change rarely, but they do change. I am not going to hard-code a URL here that will rot; use the vendor's install page on the day you install. A dedicated "How to add ESP32 and ESP8266 boards" article in this cluster will walk it click by click with screenshots.
Once the core is in, ESP32/ESP8266 development in IDE 2 feels like Arduino C++ with extra menus: partition scheme (how the chip's flash memory is divided between your program, stored files, and over-the-air update space), upload speed, flash size. Those extra menus are why a sketch that compiled for Uno can fail for ESP32 even when the code looks portable. analogWrite on ESP32, pin numbers, and 3.3 V logic are board-family issues. The IDE is doing its job when it compiles what you asked for.
If upload to an ESP board fails at "Connecting...," use a data cable, a USB jack on the PC, the BOOT button dance above, and a slower upload speed in Tools. Do not jump to reinstalling the IDE.
Troubleshooting
| Symptom | Likely cause | Fix |
|---|---|---|
| Tools → Port is empty | Charge-only cable, hub, missing driver, board not enumerating | Try a known-data cable, a rear USB jack, Device Manager. Install CH340/CP210x/FTDI driver if the chip needs one. |
| Port is there, Upload fails immediately | Wrong board selected, wrong port, another app holding the port | Match Tools → Board to the silkscreen. Close other serial programs. |
| Upload hangs on Connecting... (ESP) | Auto-reset circuit, timing | Hold BOOT, click Upload, release when traffic starts. Slow the upload speed. |
Compile error No such file or directory |
Library missing or nested folder | Install from Library Manager, or fix the folder under Arduino\libraries. |
| Sketch compiles, board does nothing | Uploaded to a different port, or an old sketch is still running | Unique setup() banner over Serial. Confirm the COM number in Device Manager during upload. |
| Serial garbage | Baud mismatch | Match Monitor to Serial.begin. |
| Autocomplete dead | No board selected, language server still indexing | Select a board, wait, restart IDE once. |
| "It worked yesterday" | Stale compile cache, core update, cable moved | Shift-click Verify. Check the port. Reseat the cable. |
| IDE 2 will not start | Incomplete first-launch download, GPU/Electron glitch | Relaunch, wait. Update graphics driver. Try the ZIP portable build as a comparison. |
If none of that matches, treat it as a USB problem until proven otherwise. Reinstalling IDE 2 is a weak first step. It feels productive and rarely fixes a CH340 driver.
Wrap-up
Arduino IDE 2 is the default desktop workshop for Arduino C++: editor, Board Manager, Library Manager, Verify, Upload, Serial Monitor, Serial Plotter, autocomplete, and (on supported hardware) a real debugger. It sits on top of Arduino CLI, which is why learning this window still counts if you later move to VS Code or a build server.
Install the current 2.3.x from Arduino's software page. Pick the board and a data-capable cable before you assume the compiler is broken. Add cores and libraries when the project needs them. Make the board print a boot banner so you know the sketch you are looking at is the sketch that is running.
The next articles in this cluster go deeper on COM ports, ESP32/ESP8266 board packages, Board Manager, Library Manager, Serial Monitor, and Serial Plotter. The Mastery Series is still the place to learn what to write in this editor.
Hack The World and Make Awesome.




