

How Voltage Works: Mastering Fundamental Electronics Part 01
Picture a ball sitting at the top of a hill. Nothing is happening to it yet, but you can feel that something could. Give it a nudge and it rolls, picking up speed, carrying energy all the way to the bottom. Now picture a second ball sitting at the bottom of that same hill. Nudge it as hard as you like and it goes nowhere interesting. What mattered was the height difference between where the first ball sat and where it could go.
Voltage is the electrical version of that height difference. When you see "1.5 V" printed on an AA battery or "5 V" on a USB charger, that number tells you how much "hill" the electric charge in that device can roll down. It is one of the first ideas in electronics, and one that many people get wrong.
In this article I'll walk you through what a volt really is, why voltage always needs two points, how batteries and generators create it, what happens when a battery is under load, and how to measure it safely with a multimeter. I'll lean on the hill picture early and then tell you where it stops being accurate. You don't need any background to follow along.
What a Volt Measures
Start with electric charge, a property of matter that comes in two kinds, positive and negative. Electrons carry negative charge, and the protons in the center of an atom carry positive charge. Charge is measured in coulombs (abbreviated C). One coulomb is a lot: it is roughly 6.24 billion billion electrons' worth of charge, or 6.24 × 10¹⁸ if you prefer scientific notation.
Charge pulled away from its opposite stores potential energy, the energy something has because of where it sits, the way the ball on the hilltop has gravitational potential energy. Energy is measured in joules (J). To give you a feel for the size, lifting a small apple (about 100 grams) one meter off a table takes roughly one joule.
Now the key definition. Voltage is the energy change per unit of charge:
ΔV = ΔU / q
Here ΔV is the voltage in volts (V), ΔU is the change in potential energy in joules, and q is the charge in coulombs. The Greek letter Δ (delta) just means "change in." Rearrange the units and you get the definition of the volt itself:
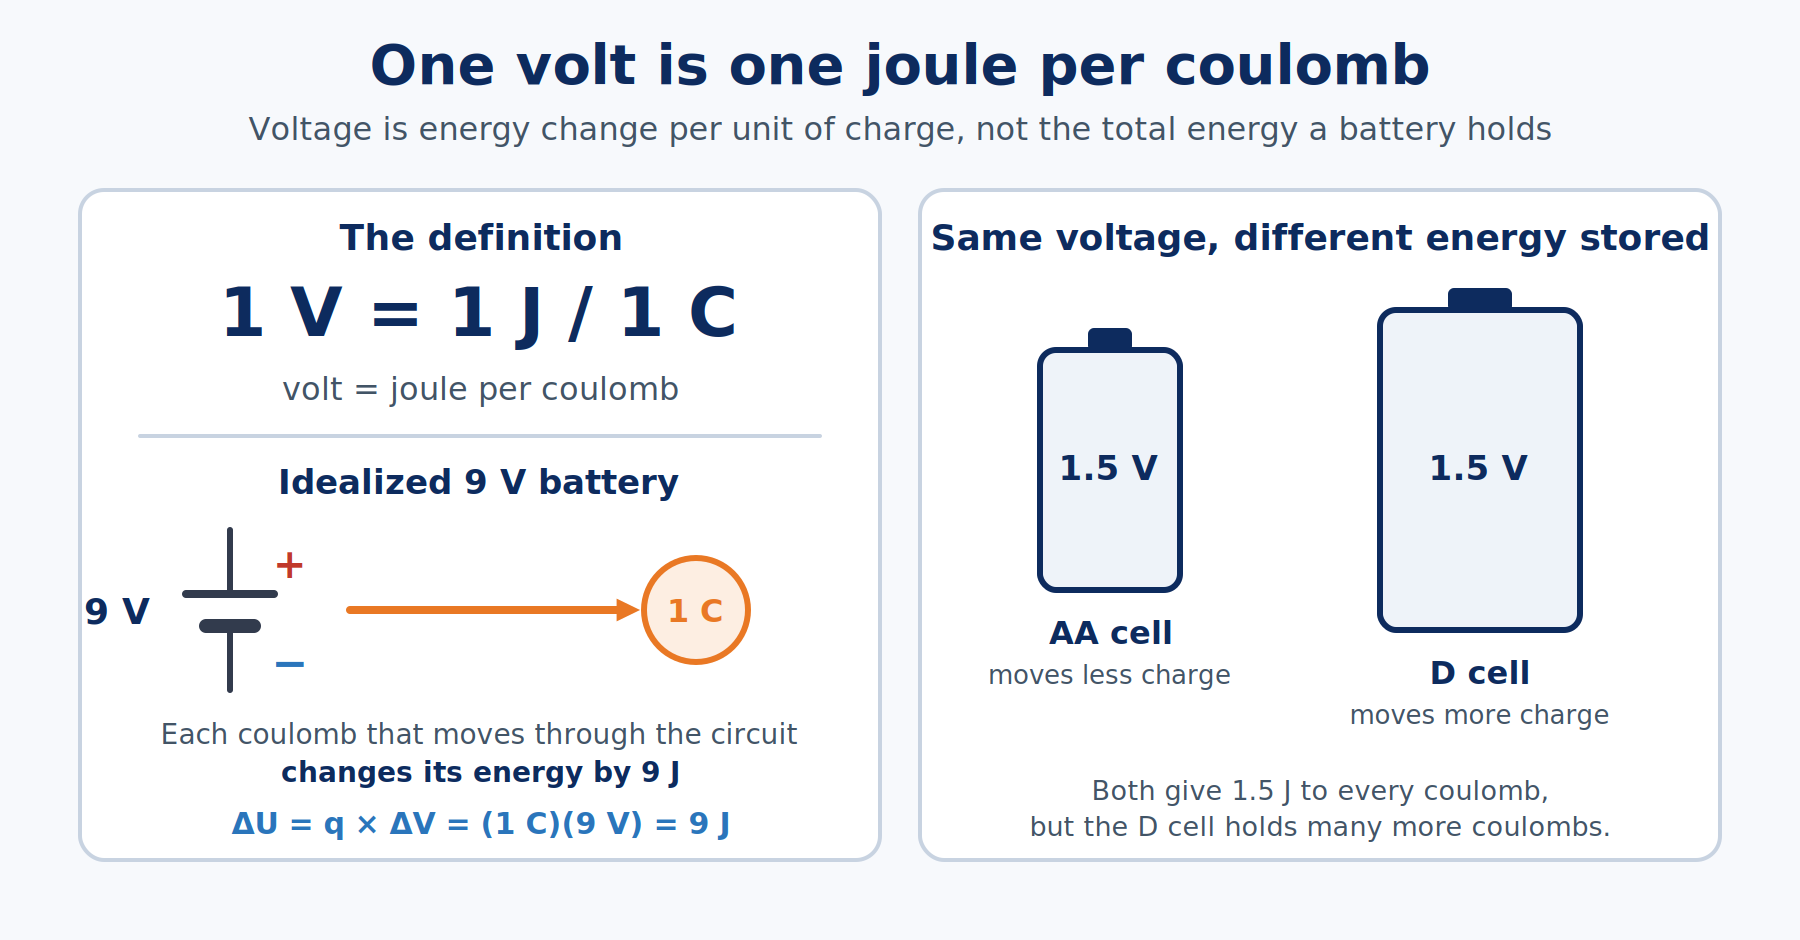
1 volt = 1 joule per coulomb
Say a battery is labeled 9 V. In an idealized model, that means every coulomb of charge that travels through the outside circuit changes its energy by 9 joules:
ΔU = q × ΔV = (1 C) × (9 V) = 9 J
That does not mean the battery holds only 9 joules in total. It means each coulomb that moves picks up or gives up 9 joules, and the battery can move a great many coulombs before it is empty. This is why voltage and stored energy are different things. An AA cell and a D cell are both 1.5 V, but the D cell holds several times more energy because it can move far more charge at that same 1.5 joules per coulomb.
So a volt is a piece of bookkeeping: energy per coulomb. What it doesn't say is where that energy difference lives, and that turns out to be the part most people trip over.
Voltage Needs Two Points
This idea clears up most of the confusion: there is no such thing as the voltage at a single point. Voltage is always a difference between two points.
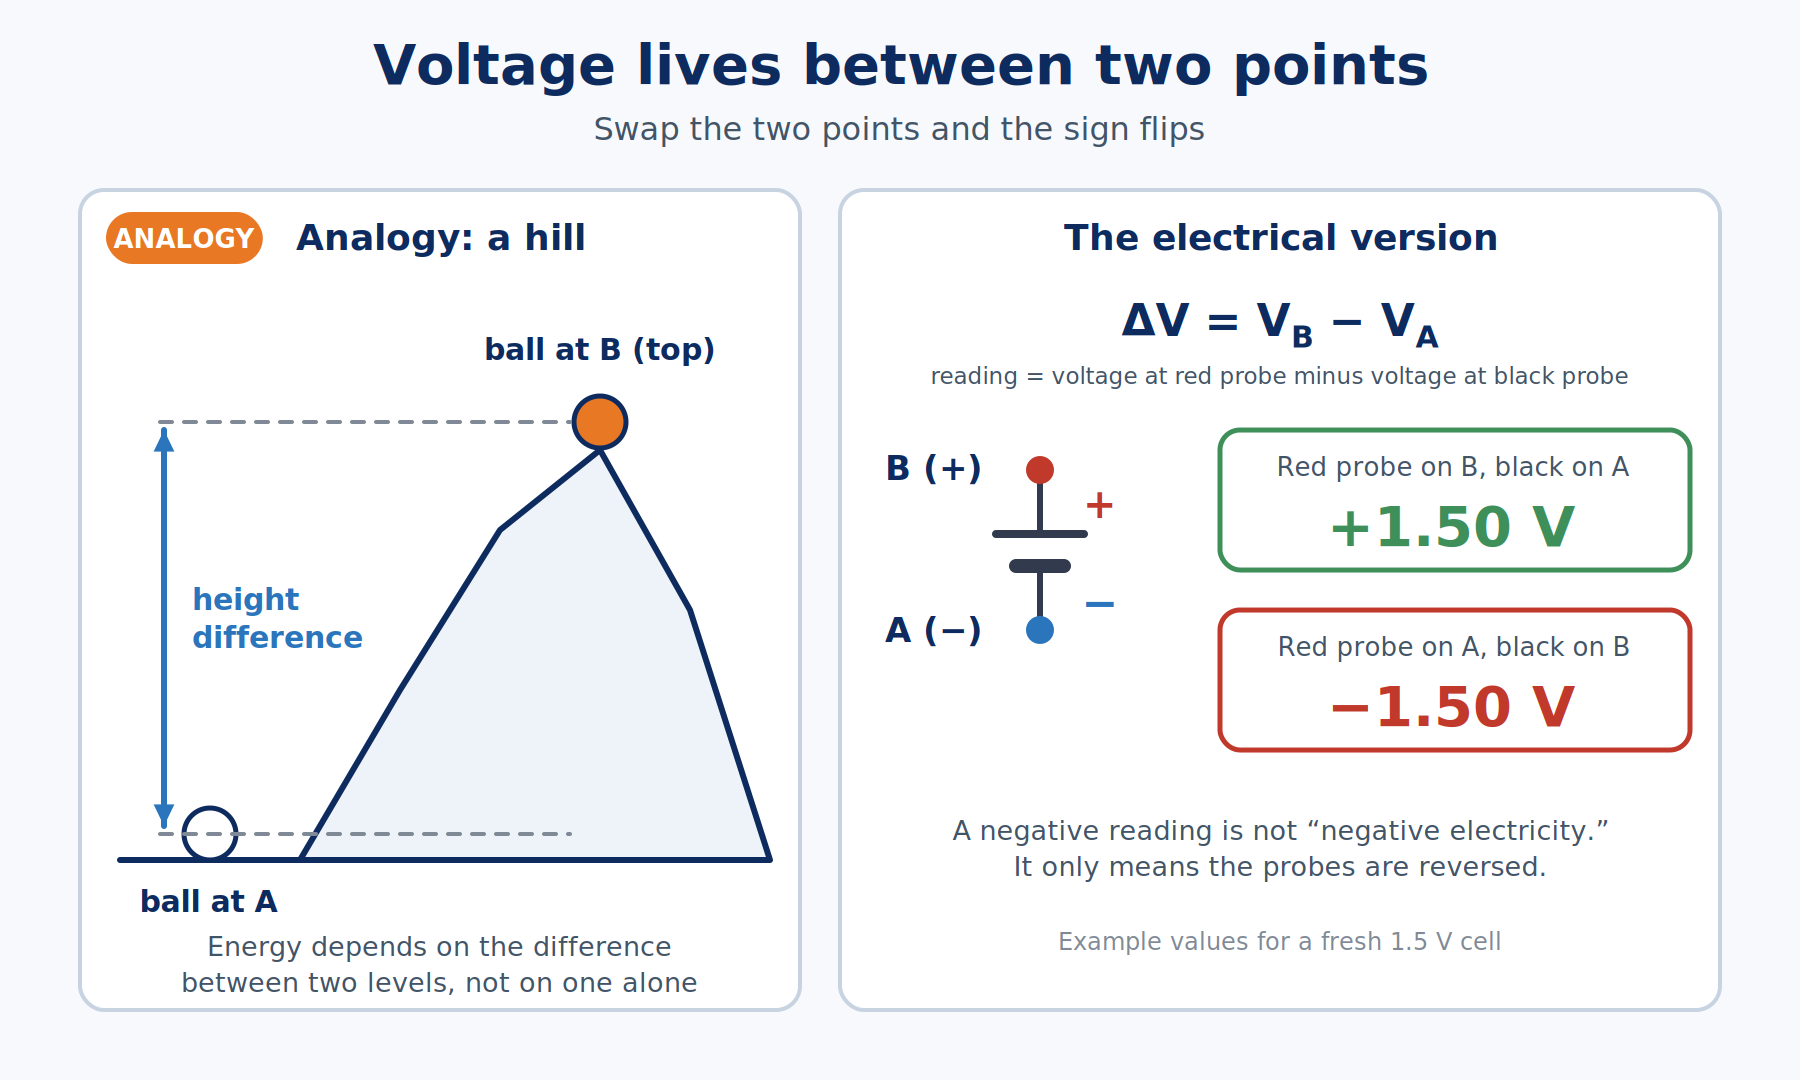
Think about the hilltop again. If I tell you a hill is "300 feet high," I'm quietly comparing it with something, usually sea level. Ask how high the hill is compared with the valley next to it and you may get a different number. Neither answer is wrong, because height only means something relative to a starting level. Voltage works the same way.
When a meter reads 5.00 V, it is reporting how much higher the electric potential is at one probe than at the other. In symbols, if you put the red probe on point B and the black probe on point A:
ΔV = VB − VA
Swap the probes and the sign flips. A reading of −1.52 V does not mean the battery contains "negative electricity." It means the red probe is sitting on the lower-potential point, so your measurement runs uphill instead of downhill.
The hill picture has limits, and I want to be upfront about them. Height difference makes a ball roll because gravity pulls on it. Voltage makes charge move because of an electric field, a region where charges feel a push. Voltage is not a pressure, and it isn't a substance that flows through the wire. You may hear "voltage flows" or "voltage pushes current." Both phrases are shorthand that falls apart quickly. The thing that moves is charge, and I'll cover that in the next article, How Electric Current Works.
The hill picture also makes something else obvious. Somebody has to build the hill, and in a circuit that job belongs to the source.
Where Voltage Comes From
A voltage does not appear on its own. Something has to do work to keep positive and negative charge separated, and that something is called a source.
In a battery, chemical reactions do the work. Inside a standard AA cell, one chemical ingredient gives up electrons and another accepts them, so electrons pile up on the negative terminal and a shortage develops at the positive terminal. The chemistry keeps this separation going until the ingredients wear out.
In a generator, motion does the work. A magnet moving past a coil of wire pushes charge through the wire, a principle called electromagnetic induction. This is how power plants, car alternators, and the little dynamo on an old bicycle light make electricity.
All of these work differently inside, yet each one produces the same measurable thing: a potential difference between two terminals. The old name for what a source provides is electromotive force, abbreviated emf and written with the Greek letter ε (epsilon). Despite the name, emf is not a force in the push-and-pull sense. It is measured in volts and is simply the voltage a source can supply when nothing is drawing current from it.
A source makes the difference. Once it is wired into a circuit, that difference gets spent in steps, and the vocabulary for those steps is worth learning early.
Rises, Drops, and Reference Points
Once a source is connected to something, you will hear people talk about voltage rises and voltage drops. These are the same hill idea applied around a circuit. Going through the battery from its negative terminal to its positive terminal, you climb: that's a rise. Going through a resistor (a component that opposes charge movement, covered in How Electrical Resistance Works) in the direction the charge is moving, you slide downhill: that's a drop.
To talk about voltage at all, you need a starting level, and circuits borrow the sea-level idea with a reference node, a point chosen to be called 0 V. In schematics that point is usually labeled "ground." Be careful here. In many battery projects, "ground" just means "the point I chose as my zero." It isn't necessarily connected to the Earth. The full story is in How Electrical Ground Works (coming soon).
In a simple loop, the rises from the source and the drops across the other parts add up to the same total. That bookkeeping rule is called Kirchhoff's voltage law, and it gets its own article: How Kirchhoff's Circuit Laws Work.
So far, voltage is energy per coulomb, it always needs two points, a source keeps charge separated to create it, and around a circuit it rises across the source and drops across everything else. All of that assumed a perfect source, and real ones are not perfect.
Real Batteries and Internal Resistance
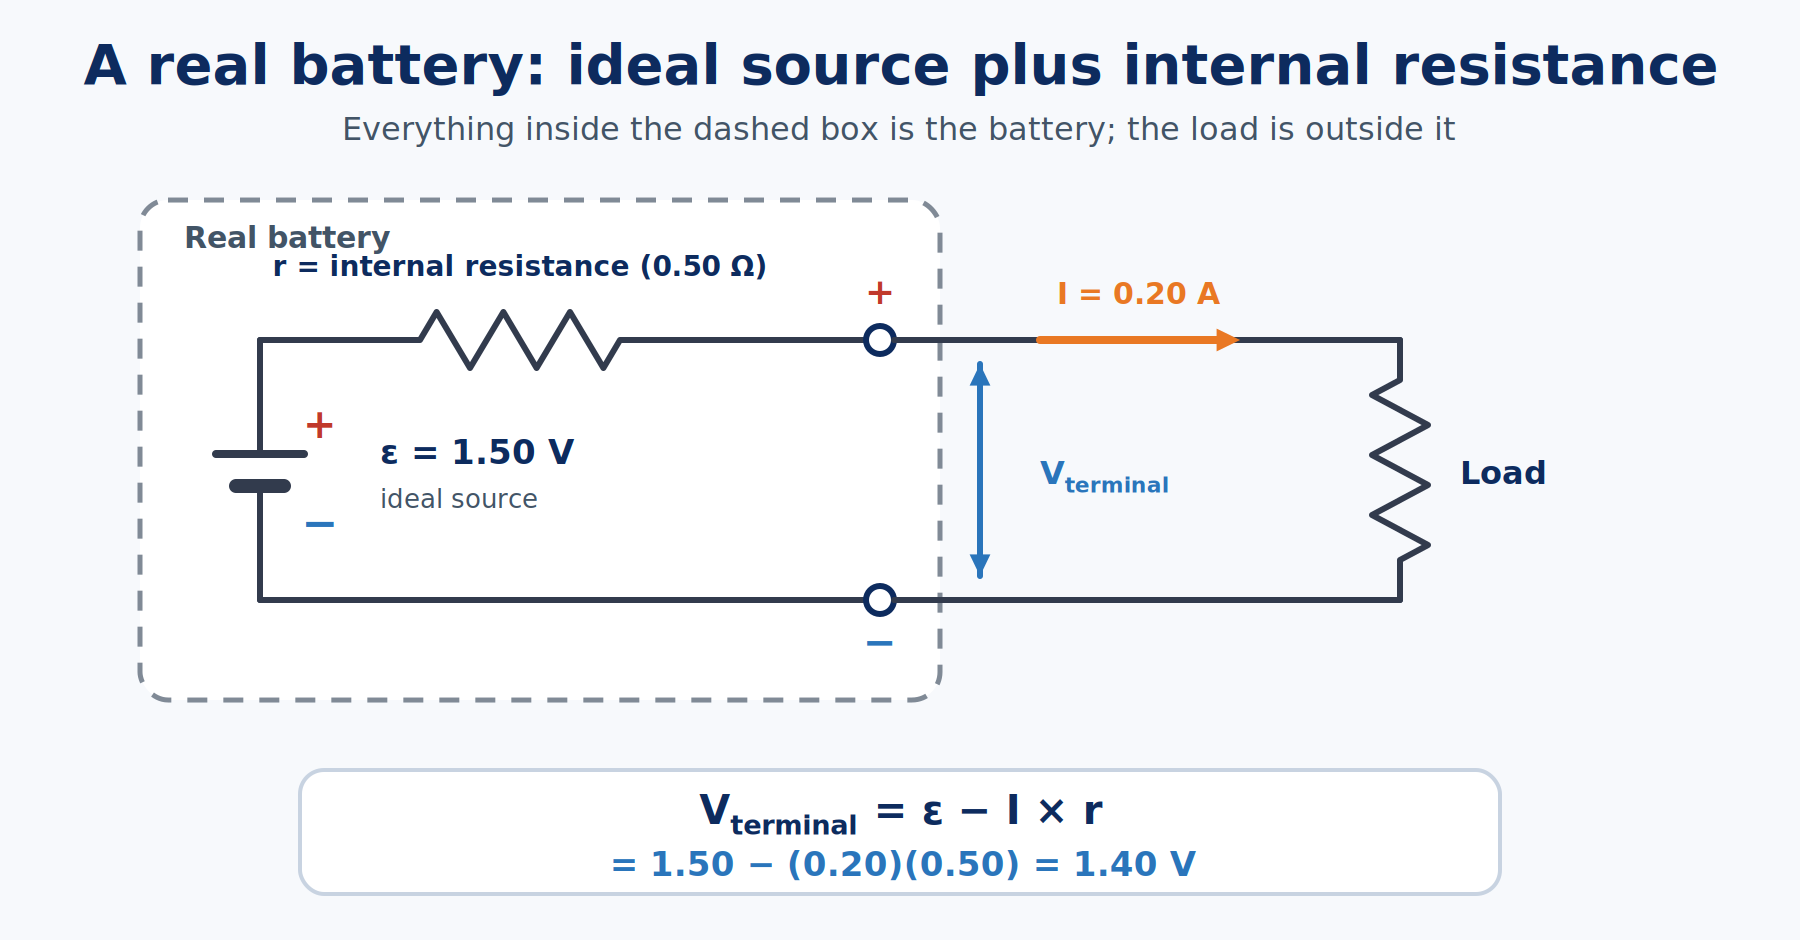
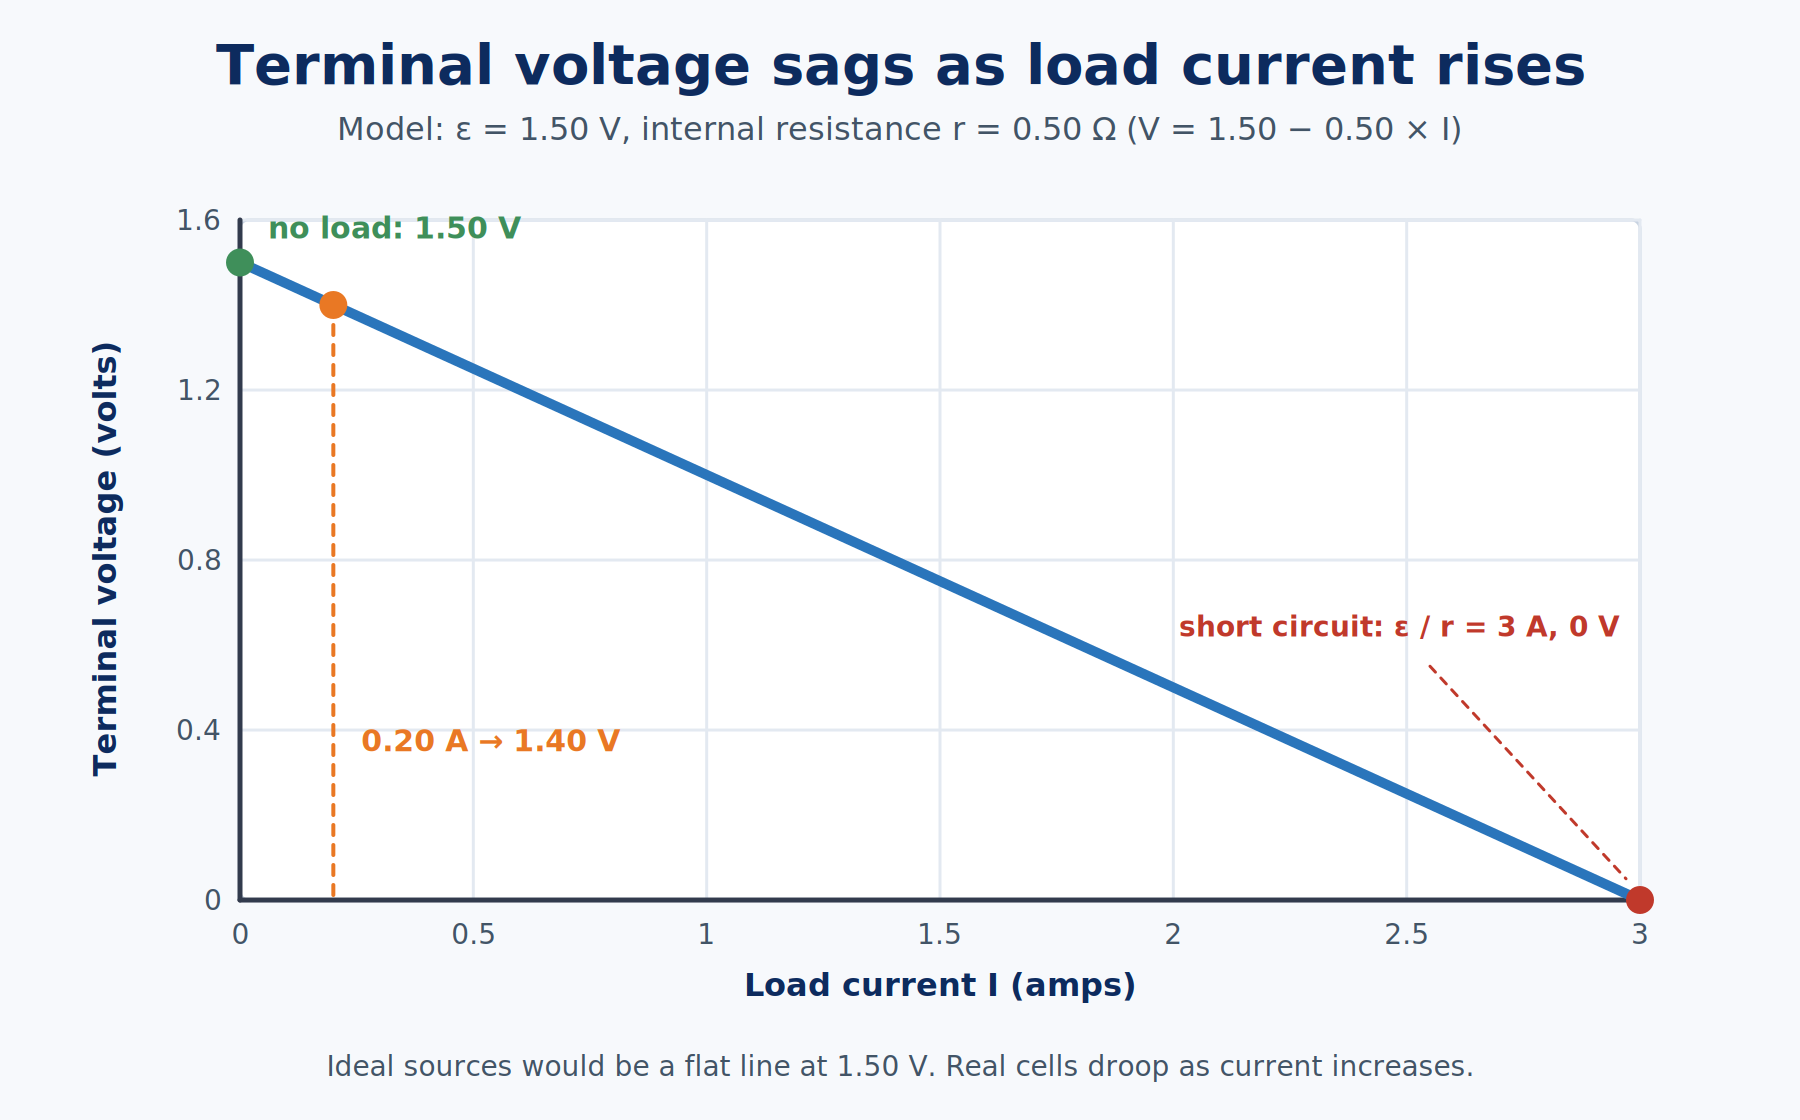
An ideal voltage source holds its stated voltage no matter how much current you draw. No real battery does that. Every real battery has internal resistance, a small opposition to current inside the battery itself. A common way to model it is an ideal source (ε) in series with a small resistor (r).
When a current I flows out of the battery, part of the battery's voltage is dropped across the internal resistance as it pushes that current through. What you can measure at the terminals is what is left:
Vterminal = ε − I × r
Try it with numbers. Say a cell has ε = 1.50 V and r = 0.50 Ω (the symbol Ω is "ohms," the unit of resistance), and it is supplying 0.20 A (amps, the unit of current):
Vterminal = 1.50 − (0.20)(0.50) = 1.40 V
I picked 0.50 Ω to keep the arithmetic clean. A fresh AA is usually lower and a worn-out one higher, so treat this as a model, not a measurement. The pattern is what matters: the harder you load a battery, the more its terminal voltage sags.
This explains something that puzzles many beginners. A battery can read a healthy 1.5 V on a meter with nothing attached, then drop sharply the moment it tries to run a motor. The meter had been measuring almost the full emf. The motor demanded real current, and the internal resistance ate part of the voltage. Temperature, state of charge, and chemistry all shift the numbers too, so a "9 V" battery is not exactly 9 V in every situation.
That is the theory. Now for the part where you can see a voltage for yourself.
Measuring Voltage with a Multimeter
A multimeter is a handheld instrument that can measure several electrical quantities. When you set it to measure volts, it works as a voltmeter. To measure the voltage across something, you touch the probes to the two points you care about. Electricians say the meter is connected in parallel with the part, meaning it spans across it, like a bridge over a river rather than a gate in the river's path.
Digital meters are built with very high input resistance (commonly around 10 million ohms) so they pull almost no current from what they're measuring. That is why they can sit across a circuit without disturbing it much.
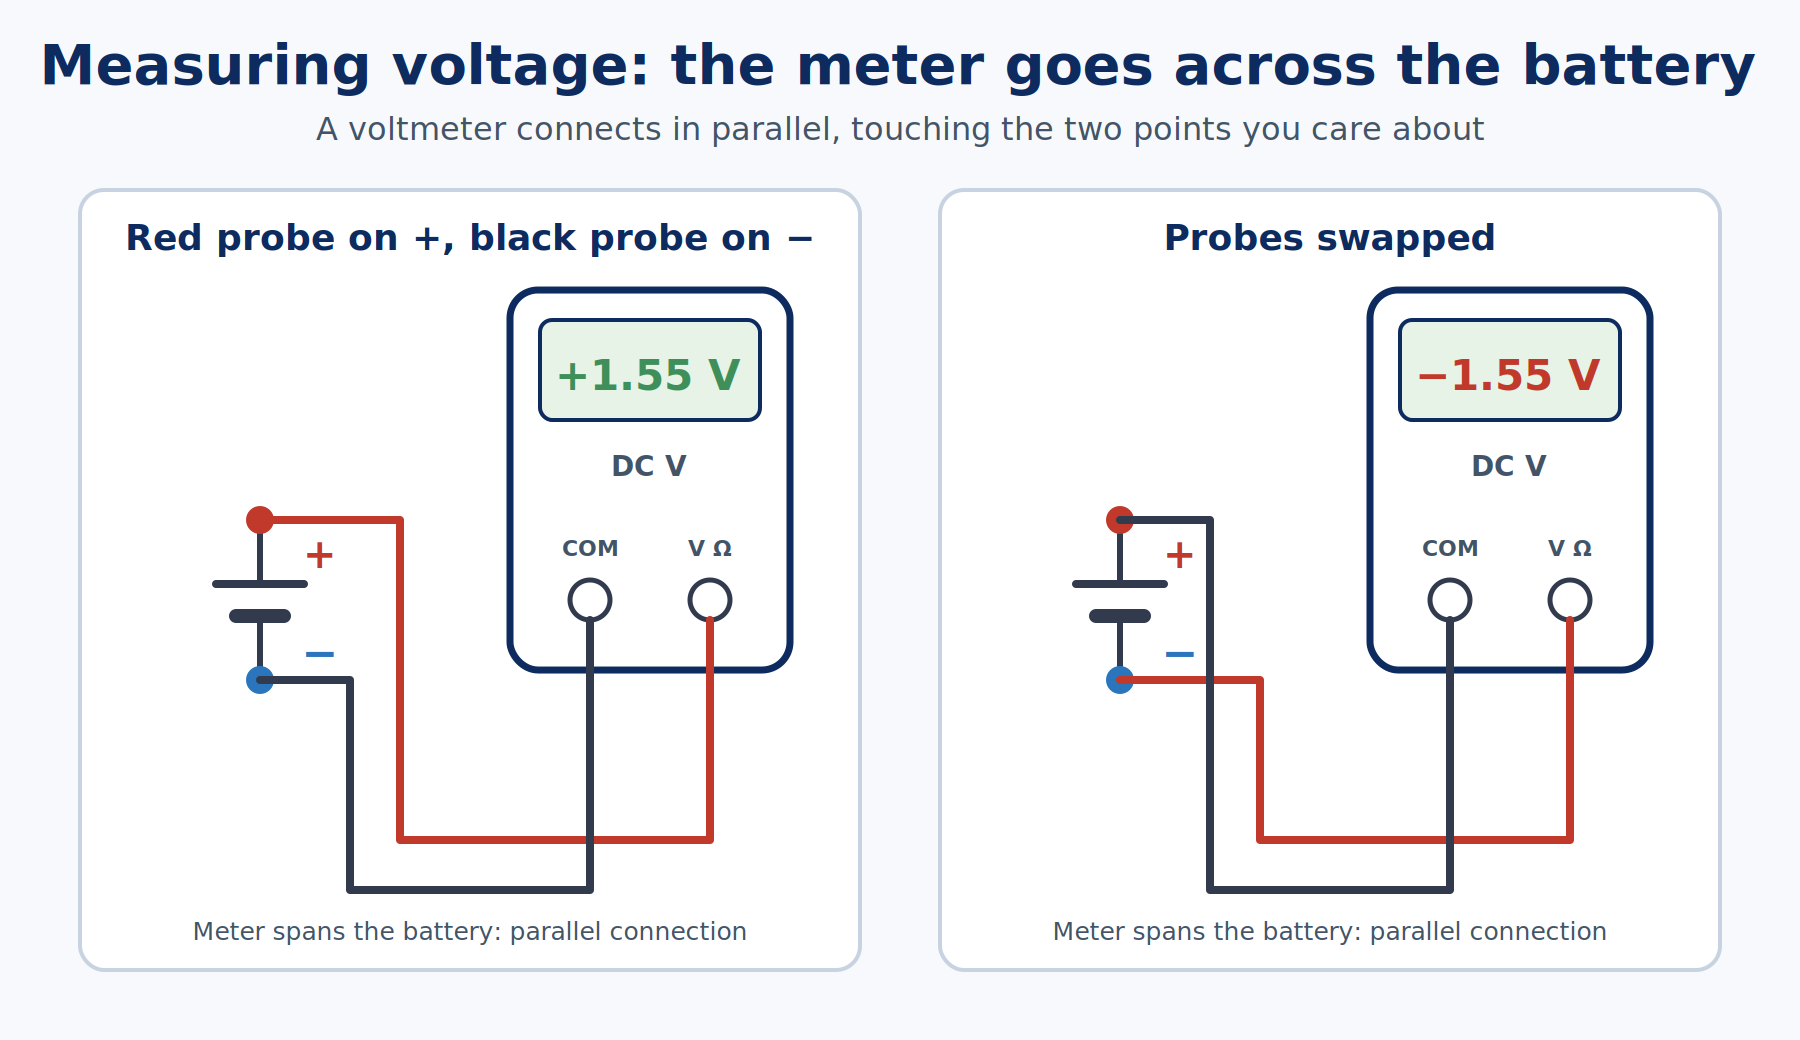
A safe first measurement uses a single AA or AAA battery:
- Set the dial to DC volts. The symbol is a V next to a straight line with a dashed line under it. (A V with a wavy line is AC volts, which you do not want for a battery.)
- Put the black lead in the jack marked COM and the red lead in the jack marked V, usually labeled with V and Ω.
- If the meter isn't autoranging, choose a range above the expected voltage, such as 2 V or 20 V.
- Touch the black probe to the negative end and the red probe to the positive end.
- Read the number and the unit. A fresh alkaline cell usually reads somewhere around 1.5 to 1.6 V.
- Swap the probes. The size of the reading stays about the same and a minus sign appears. That is the sign flip from earlier.
One gotcha deserves a warning before you hit it. Many meters have a separate jack for measuring current, often marked A or mA. If a red lead is left in that jack and you touch the probes across a battery, you have just connected a very low-resistance path straight across the cell. It can blow the meter's fuse and heat the battery. Always check that the red lead is in the voltage jack before measuring voltage.
Keep these first experiments on batteries and low-voltage electronics. This article is about low-voltage DC, so never push probes into a wall outlet or open up equipment that plugs into one. If you don't have a meter yet, the Circuit Lab section below lets you measure a simulated circuit with a virtual voltmeter.
Try Voltage in the Circuit Lab
This is the idea of voltage between two points, built so you can measure it without a battery or a meter. A 12 V supply feeds four 1 kΩ resistors in a row (a resistor is a part that resists the flow of current, and 1 kΩ is 1,000 ohms), so the voltage steps down 3 V at each one. What to look for: the same circuit gives different readings depending on which two points you pick, and swapping the probes flips the sign.
If you can't run it, here is what it does. Current flows from the supply down through the four resistors and back, and the 12 V is spent in four equal steps. Measured from the bottom (the 0 V reference), the points between the resistors sit at 9 V, 6 V, and 3 V, and the top sits at 12 V.
The Circuit Lab circuit is connected like this:
| Net | Connects | Why |
|---|---|---|
| TOP | Supply + and R1 pin 1 | The 12 V end of the ladder |
| NINE_VOLT_POINT | R1 pin 2 and R2 pin 1 | The point after the first step down |
| SIX_VOLT_POINT | R2 pin 2 and R3 pin 1 | The halfway point |
| THREE_VOLT_POINT | R3 pin 2 and R4 pin 1 | The point before the last step |
| GROUND | R4 pin 2 and supply − | The 0 V reference everything is measured from |
The supply is set to 12 V and R1 through R4 are each 1 kΩ.
Using the Circuit Lab
- Run, the green button in the toolbar, starts the simulation. Reset at the top right puts the circuit back the way it started (it asks you to confirm first).
- The multimeter is the meter icon in the toolbar. To move a probe, click the Red or Black button on the meter, then click a part's lead or a hole on the desk. The reading is the red probe's point minus the black probe's point, so swapping the probes flips the sign. In this lab the meter opens already connected. Drag the meter by its title bar (the word Multimeter) to move it, so it does not sit on top of the circuit, and use the × to close it.
- Zoom by holding Ctrl (Command on a Mac) and turning the mouse wheel over the desk. Turning the wheel without a key pans the desk instead.
- Open full workbench, at the top right, opens the same circuit on its own page, where you can add parts and wires.
To use the voltage ladder, follow these steps:
- Press Run.
- The multimeter is already open in V DC mode, with the red probe on the top of the ladder and the black probe on the bottom. It should read about 12 V, the full rise across the supply.
- Leave black where it is and click the red probe onto the other resistor leads, one at a time. The resistors are not laid out in ladder order on the board, and leads wired together read the same, so you will find three new readings: about 9 V, 6 V, and 3 V. Each resistor is a 3 V drop.
- Now move the black probe to a lead that read 6 V and put red back on the lead that read 12 V. The reading is about 6 V. The top of the ladder did not change, but the answer did, because you changed the second point.
- Put red on a lead that read 3 V and black on a lead that read 9 V. The reading is about −6 V. Swap them and it becomes 6 V.
You should have seen that a voltage is always a difference between two points, that the ladder's points step down by equal amounts, and that reversing the probes reverses the sign.
A short history of the volt
The unit is named for Alessandro Volta, an Italian physicist who built the first practical battery around 1799 and announced it in 1800. His "voltaic pile" was a stack of alternating zinc and copper discs separated by cloth or cardboard soaked in salt water. Stack more layers and you got more voltage. Before the pile, experimenters had only static electricity, which discharges in a flash. Volta's pile delivered a small but steady flow, which opened the door to the rest of electrical science. The unit of electric potential difference was later named the volt in his honor.
Common Misconceptions
- "Voltage flows." Charge flows. Voltage is the difference in electric potential that makes it do so.
- "A point in a circuit has a voltage all by itself." Every voltage is relative to some other point, even when that reference is only implied.
- "More volts always means more stored energy." A big battery and a small one can share the same voltage. Capacity, not voltage alone, decides how long the energy lasts.
- "Ground always means Earth." In a battery circuit, ground is often just the zero-volt point you picked.
- "A 9 V battery is exactly 9 V." The label is a nominal value. Load, charge level, temperature, and chemistry all move it.
Related articles
- How Electric Current Works covers the charge that moves when a voltage is applied.
- How Electrical Resistance Works explains what opposes that movement and why it matters.
- How Ohm's Law Works ties voltage, current, and resistance into one equation.
- How Kirchhoff's Circuit Laws Work shows how rises and drops balance around a loop.
- How Electrical Ground Works (coming soon) clears up what "ground" really means.
Wrapping up
Voltage is the energy change per unit of charge between two points, measured in volts, where one volt is one joule per coulomb. It always needs a pair of points, and swapping them flips the sign. Batteries, generators, and other sources create it by doing work to keep charge separated, and real sources lose a little of it to their own internal resistance when they supply current. To measure it, put the meter in parallel with the thing you care about, keep the red lead in the voltage jack, and start with a battery.
Hack The World and Make Awesome.