

You plugged the board in. The power LED came on. You opened Arduino IDE 2, went to Tools → Port, and the list was empty. Or it showed COM1, which on most Windows machines is a leftover from the 1990s and is not your Arduino. Upload then fails with a message about the port, or it sits there until it times out.
This is the most common "my software is broken" report I hear, and it is usually not the software. The IDE can only talk to a serial device the operating system already knows about. If Windows (or macOS, or Linux) never created that device, Tools → Port has nothing honest to show you.
A COM port, on Windows, is the operating system's name for a serial connection. Serial, here, means a stream of bytes, one after another, over a pair of wires. USB made those wires look like a plug you already have, but the IDE is still doing serial. No COM port means the OS never finished that handshake.
This guide is the full pass: what a COM port is, how Arduino boards pretend to be one, the charge-only cable trap, Device Manager, the three USB-UART chips you will keep meeting (CH340, CP210x, FTDI), bootloader and download modes, ESP32/ESP8266 quirks, port conflicts, a short macOS and Linux section, and a blink test that proves the path. I am going to be Windows-first, because that is where Device Manager and these driver names live. The same physics apply on the other operating systems.
If you already have a port and the sketch runs but behaves wrong, that is a different problem. Part 7 of the Mastering Arduino series is the method for that. This article is the article for "the IDE cannot even see the board."
What is a COM port?
Picture a numbered mailbox on the side of your computer. Software writes a letter, drops it in box 7, and some piece of hardware on the other end of that box reads it. Windows calls those boxes COM1, COM3, COM7, and so on. The number is not magic. It is just an index. Plug the same board into a different USB jack and you may get a different number. That is normal.
On macOS the same idea shows up as a device file, usually /dev/cu.usbmodem1101 or /dev/cu.usbserial-.... On Linux it is usually /dev/ttyACM0 (native USB boards) or /dev/ttyUSB0 (USB-UART bridges). Arduino IDE 2 lists whatever the OS handed it. It does not invent a port.
Two kinds of Arduino-class boards create that mailbox in two different ways.
Native USB. The microcontroller itself speaks USB. Arduino Leonardo, Micro, most SAMD boards, and several newer official boards work this way. When the chip is running your sketch, it appears as a serial device. When it resets into the bootloader (the tiny program that accepts a new sketch), that serial device can disappear for a second and come back, sometimes with a different COM number. That disappearing act is why an upload to a Leonardo can look scarier than an upload to an Uno, even when it works.
USB-UART bridge. A second chip on the board translates USB on one side to UART on the other. UART, Universal Asynchronous Receiver/Transmitter, is the old two-wire serial: TX (transmit) and RX (receive). A classic Uno (ATmega328P plus a separate USB chip), most Nano clones, most ESP32 DevKit boards, and most NodeMCU / Wemos D1 boards work this way. The microcontroller never speaks USB. The bridge chip does. If the bridge has no driver, the OS sees "unknown USB device" or a yellow triangle, and the IDE sees nothing.
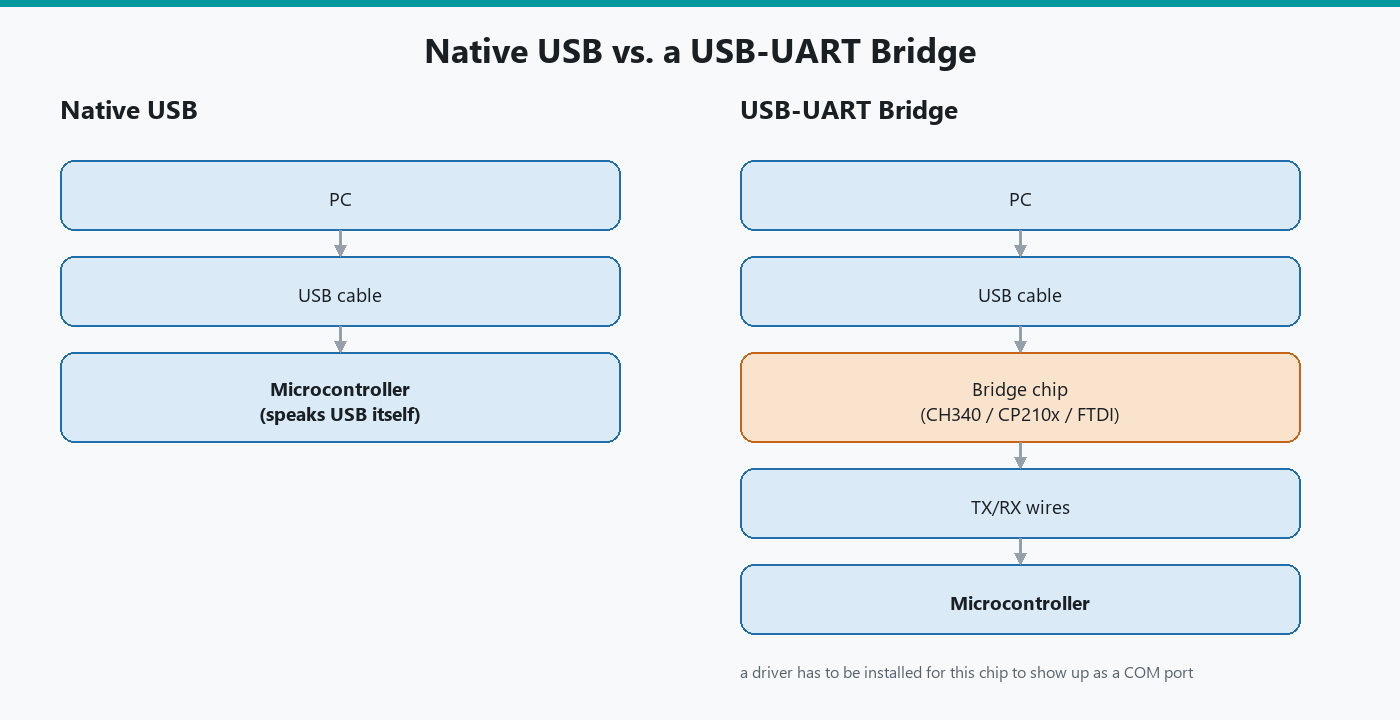
Knowing which kind you have saves you from installing a CH340 driver on a Leonardo, or from hunting bootloader timing on a board that is really a missing cable.
How does the IDE use that port?
When you click Upload, Arduino IDE 2 asks Arduino CLI (the command-line engine under the window) to compile, then to open the selected serial port and run an uploader. On AVR Unos that uploader is often avrdude. On ESP32 it is esptool. The uploader resets the board (or asks you to), the bootloader listens, the new firmware goes down the wire, the board reboots into your sketch.
Serial Monitor uses the same port afterward. It opens the mailbox and prints whatever the sketch writes with Serial.println(). Only one program can own the port at a time on Windows. If Monitor, Plotter, another IDE, or a Python script is holding COM7, Upload will fail even though Device Manager looks perfect.
That is the whole chain: cable → USB jack → OS driver → COM device → IDE port menu → uploader or Monitor. Break any link and the symptom is "can't find the port" or "can't open the port."
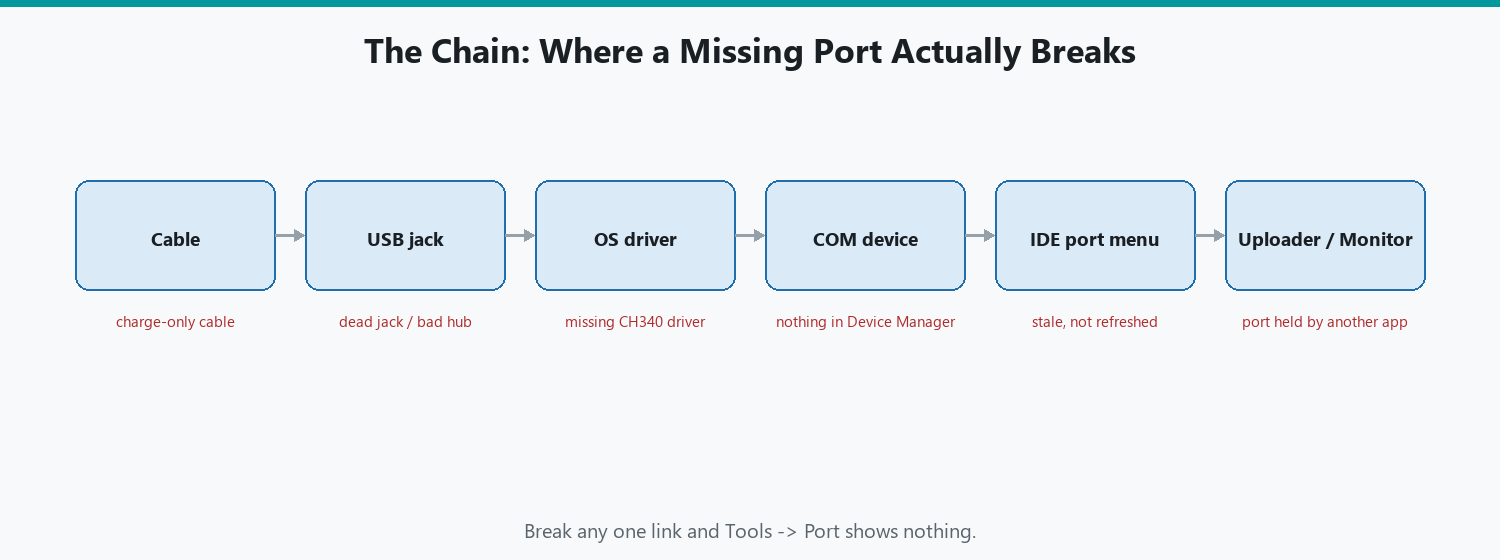
The 60-second check
Do this before you reinstall the IDE. Reinstalling IDE 2 almost never creates a COM port that was not there.
- Unplug the board. Watch Tools → Port. Note what is listed.
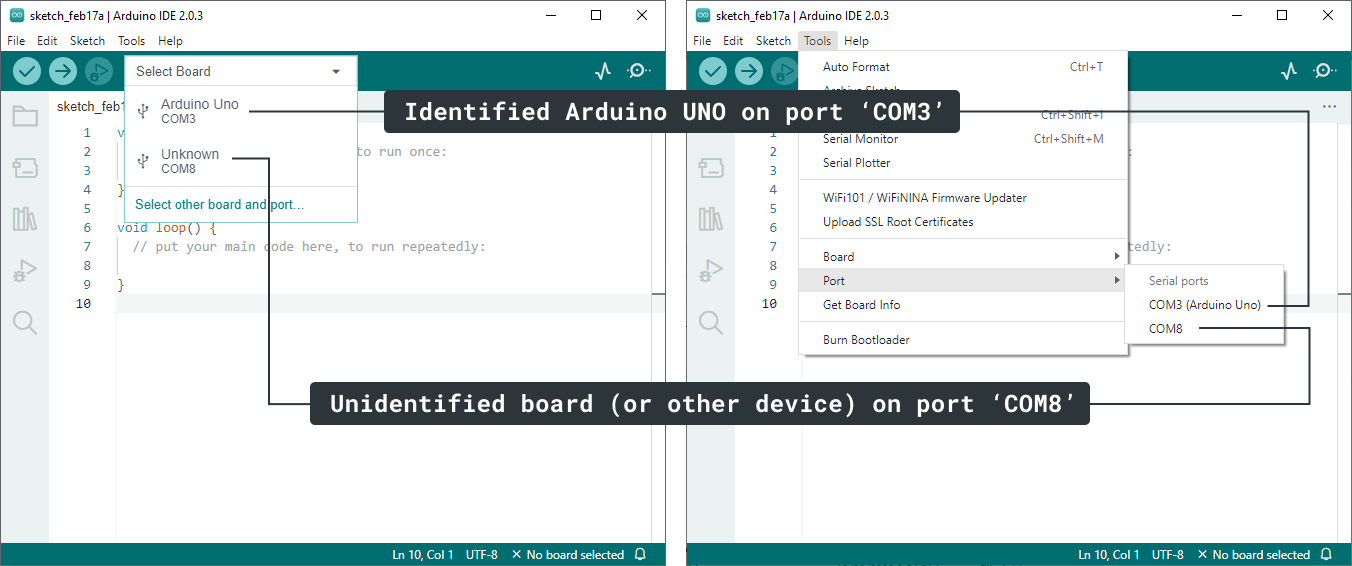
- Plug the board in with the cable you have. Wait five seconds. Open Tools → Port again. A new name should appear. On Windows, also open Device Manager (right-click Start → Device Manager) and look under Ports (COM & LPT).
- If a new COM number appeared in Device Manager and in the IDE, the path is fine. Pick that port and skip to the blink test at the end.
- If Device Manager shows a new device with a yellow triangle, you have a driver problem. Jump to the chip-driver section.
- If Device Manager does not change at all when you plug in, you have a cable, a dead USB jack, a board that is not enumerating, or (on some ESP boards) a board sitting in a mode that does not present serial. Jump to cables, then to boot modes.
If the IDE port list did not refresh, close the Tools menu and open it again. IDE 2 does not always live-update an already-open list.
Charge-only cables
This is the first thing I ask about, because it fools everyone once, including me.
USB cables come in two practical kinds. A data cable has the power wires (5 V and ground) and the D+ / D− data pair. A charge-only cable has power and ground, and the data pair is missing or not connected. Phone chargers, cheap "power only" cords, and some cables that came with a gadget you never used for files are charge-only.
A charge-only cable will light the Arduino's power LED. The board looks alive. The OS never sees a USB device, because there is no data path. Device Manager does not blink. Tools → Port stays empty.
How to tell:
-
Use a cable that has transferred files to a phone or a USB stick. If it can copy a photo, it has data wires.
-
Try a second cable before you try a second board.
-
Prefer a USB jack on the computer itself, not a cheap unpowered hub. Hubs add their own failures (not enough power, flaky data). A powered hub that you trust is fine. A four-port thing from a junk drawer is not where I start.
-
USB-C to USB-A adapters and front-panel jacks on a desktop are extra links. If the port is empty, move to a jack on the back of the PC.
I keep one ugly, slightly too short cable on the bench that I have already proven. When a student says the IDE is broken, that cable is the first swap.
What Device Manager should show
On Windows 11, right-click the Start button and choose Device Manager. Expand Ports (COM & LPT). Plug the board in.
A healthy official Uno often shows up with an Arduino-ish name and a COM number, for example Arduino Uno (COM5). Many clones and most ESP boards show the bridge chip instead:
-
USB-SERIAL CH340 (COM7) -
Silicon Labs CP210x USB to UART Bridge (COM4) -
USB Serial Port (COMx)for some FTDI devices, orUSB Serial Converterunder Universal Serial Bus devices before the COM port appears
Also expand Other devices and Universal Serial Bus devices. A yellow triangle, "Unknown device," or "USB Serial Device" with a warning means Windows saw the plug-in and does not have a driver it likes.
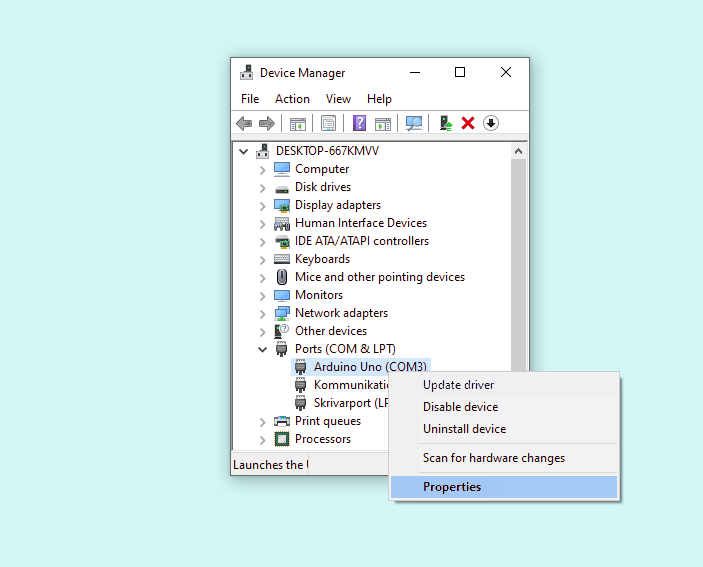
Click View → Show hidden devices if you are hunting a COM port that existed yesterday. Windows keeps "ghost" ports for boards you unplugged. They do not help Upload. They do clutter the IDE list. Uninstalling a ghost (right-click → Uninstall device) is safe if the board is unplugged.
Device Manager is the source of truth. If it has no COM port, Arduino IDE 2 cannot invent one. If it has a COM port and the IDE does not list it, restart the IDE once, then check that you are looking at Tools → Port and not an old board-picker cache. I have also seen IDE 2 hide ports until a board is selected in the board drop-down. Select Arduino Uno (or your real board) first, then open Port.
CH340, CP210x, and FTDI: the three chips you will keep meeting
A USB-UART bridge is a small translator IC (integrated circuit, which is the formal name for a chip). Three families cover almost every clone and ESP board in a parts drawer.
WCH CH340 (and CH341). Very common on cheap Nano clones, many ESP8266 NodeMCU boards, and a lot of ESP32 DevKit clones. Windows 10 and 11 sometimes load a driver automatically, and sometimes they do not. When they do not, Device Manager shows an unknown serial device. Install the driver from WCH, the chip maker, not from the first random "CH340 driver" search result. After install, unplug and replug. You want to see USB-SERIAL CH340 (COMx) with no triangle.
Silicon Labs CP2102 / CP2104 / CP210x. Common on older NodeMCU boards, some official-adjacent modules, and a lot of "CP2102" USB-serial dongles. Silicon Labs publishes a CP210x Universal Windows Driver. Same ritual: install, unplug, replug, look for the Silicon Labs name and a COM number.
FTDI FT232 and related chips. Common on older Arduino-compatible boards, many quality USB-serial cables, and some official Arduino products from the FTDI era. Windows usually has a driver. FTDI's own driver page is the fallback. One historical mess: around 2014, FTDI's Windows driver bricked counterfeit chips on purpose. If you have a very old "FTDI" clone, a current official driver can still make it vanish. Genuine FTDI cables are the path I trust. Counterfeit FTDI chips are a reason to switch to a known CP2102 or CH340 dongle rather than fight 2014.
How to tell which chip you have without a microscope:
- Read the silkscreen on the USB-end chip. CH340G, CP2102, and FT232RL are printed on the package more often than you expect.
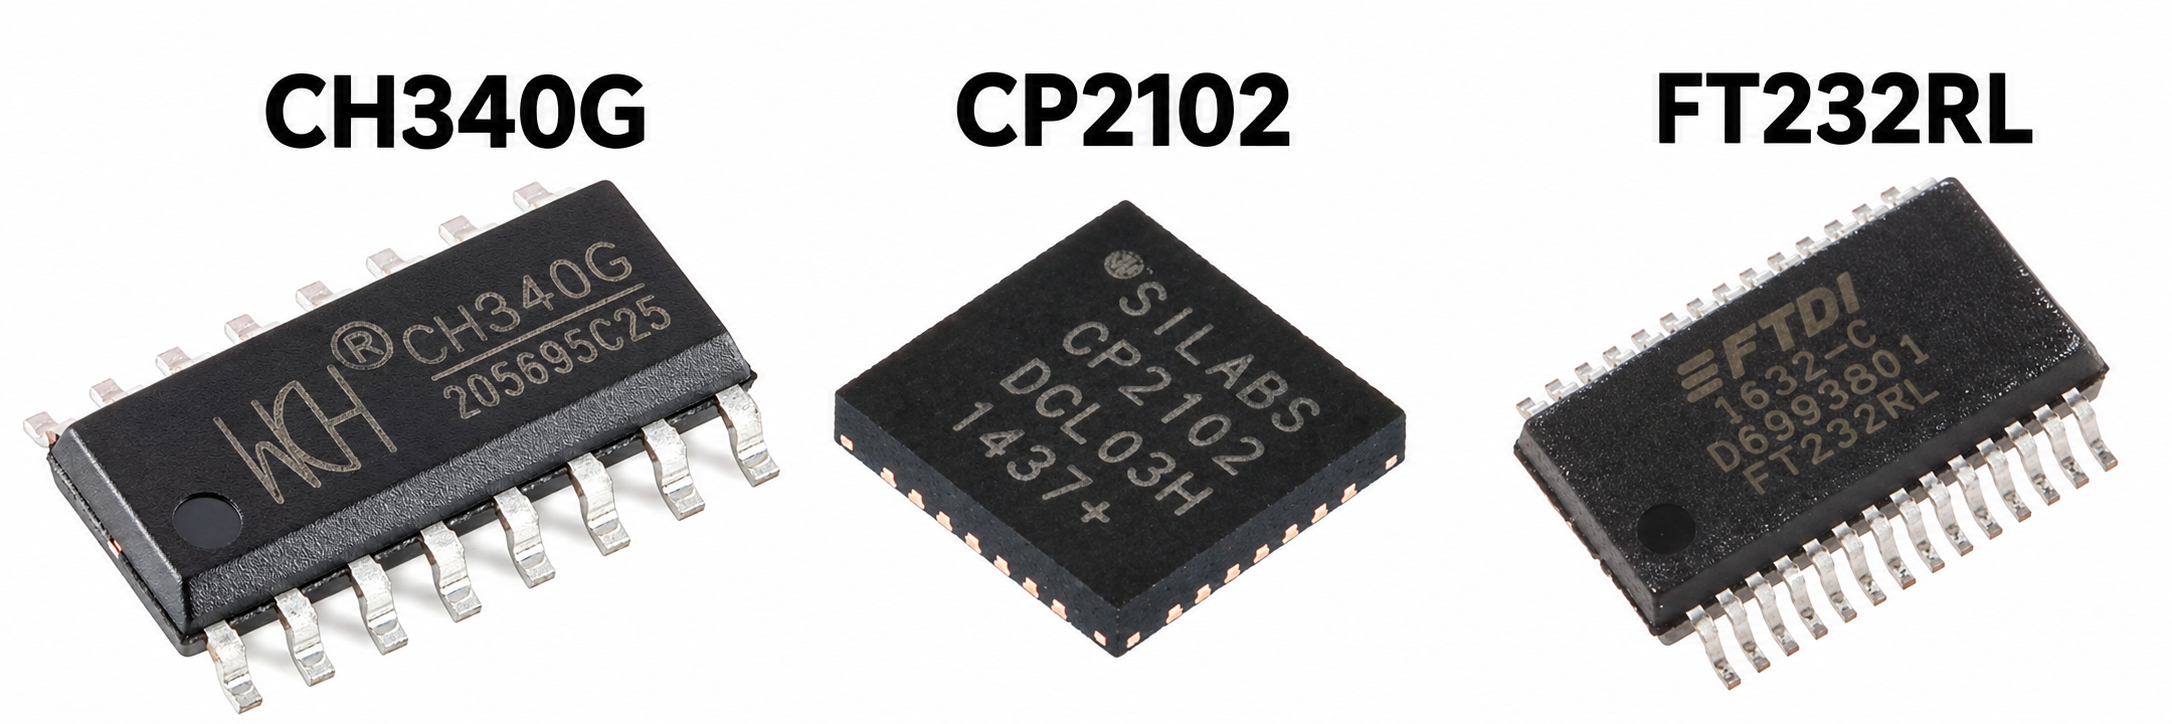
- Read Device Manager's Hardware Ids (right-click the device → Properties → Details → Hardware Ids). USB vendor IDs you will see a lot:
1A86is WCH (CH340),10C4is Silicon Labs,0403is FTDI,2341is Arduino. You do not need to memorize those. Matching the name in Device Manager to the driver you install is enough.
Install one driver that matches the chip. Stacking three "Arduino driver packs" from random sites is how you get a COM port that appears and then bluescreens. Official Arduino boards usually do not need a third-party pack at all. The IDE installer already offered USB drivers on Windows. If you skipped that prompt, re-run the IDE installer and allow it, or plug an official Uno into a second PC to confirm the board is fine.
A USB-serial dongle (a small USB stick with TX, RX, GND, and sometimes DTR, a control line used to reset the board automatically) is the same chips in a different plastic. People use them to program bare modules, or to get a serial console on a board whose USB jack died. The IDE sees the dongle's COM port, not "the Arduino." You still pick that port, and you still have to wire TX/RX correctly (TX on the dongle goes to RX on the MCU, and the other way around). 3.3 V vs 5 V logic on those dongles is a hardware gotcha, so check the jumper or label on the dongle before you wire anything. A 5 V dongle's TX pin wired straight into a 3.3 V ESP32's RX pin can damage the ESP32. That is a painful way to lose a board while "just troubleshooting the port."
The board is on, and Device Manager still does not blink
Power LED is not USB enumeration. Enumeration is the USB conversation where the device introduces itself. If that conversation never starts, check these in order.
The board is dead, or only half alive. Try a different USB jack. Try a different computer if you have one. Try a known-good cable. If a second PC also sees nothing, the USB jack on the board, the bridge chip, or the fuse (some Unos have a tiny resettable polyfuse on USB 5 V) may have given up. A board that runs from a barrel jack or VIN but not from USB is a hardware repair, not an IDE setting.
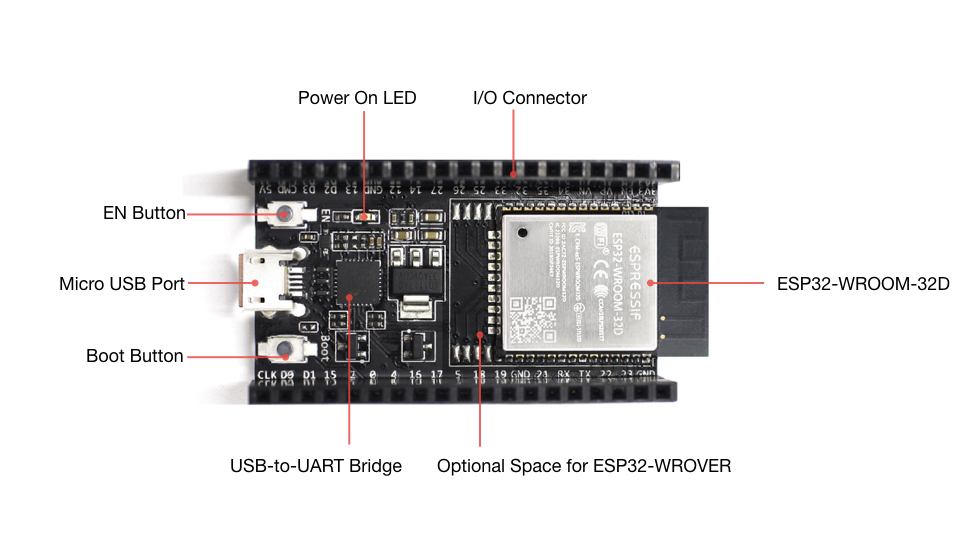
You are in a boot or download mode that does not present the usual serial device. This is rare on a classic Uno. It is common on ESP32 and some STM32 boards. ESP32's download mode is meant for esptool. Most DevKit boards still show the CP210x/CH340 COM port even in download mode, because the bridge chip is separate from the ESP. A board that uses native USB (ESP32-S2/S3 in some modes, some RP2040 boards) can change identity when you hold BOOT. An RP2040 board held in BOOTSEL mode, for example, shows up as a USB drive instead of a COM port. Unplug, hold the BOOT (or FLASH) button, plug in, then look at Device Manager again. If a new device appeared, you found a mode issue. Release BOOT after Windows sees it, or follow that board's manual.
Windows "USB Selective Suspend" or a flaky hub dropped the device. Unplug the hub. Plug into the PC. Disable selective suspend in Power Options if the port vanishes when the machine sleeps. This is an occasional laptop problem, not the first thing I chase.
Wrong device class. Some boards show up as a COM port only after you install the driver, and until then they sit under Other devices. This is the yellow-triangle case. It looks like "nothing happened" if you only looked at Ports.
ESP32 and ESP8266: the port is there, upload still fails
ESP boards deserve their own paragraph because the symptom is often "can't find the port" when the port is sitting right there and the upload is what fails.
On many ESP32 DevKit and ESP8266 NodeMCU boards, the USB-UART chip is fine. Device Manager shows COM7. The IDE lists COM7. Upload then hangs on Connecting........_____..... until it times out. That is the auto-reset circuit failing to put the ESP into download mode in time. On these boards the USB chip is supposed to do the button-pressing for you: it wiggles two control lines (DTR and RTS) that are wired to the ESP's reset pin (EN) and its boot-mode pin (IO0). When a board's timing is a little off, the wiggle comes too early or too late, and the ESP boots your old sketch instead of listening for a new one.
Fix, in order:
- Close Serial Monitor and Serial Plotter. They own the port.
- Lower Tools → Upload Speed. 115200 is more reliable than 921600 on a long cable.
- Hold the BOOT (or FLASH) button, click Upload, and release BOOT when the terminal starts printing instead of dots. Some cheap boards need BOOT held the whole time, plus a tap on EN (reset).
- Use a short data cable and a USB jack on the PC. ESP32 is pickier about USB power than an Uno.
The dedicated "add ESP32 and ESP8266 boards" article in this cluster covers cores and Board Manager URLs. You still need a visible COM port before any of that matters. If Tools → Port is empty on an ESP board, it is the same cable/driver path as an Uno clone, because it is often the same CH340 or CP2102 chip.
A second ESP confusion: some ESP32-S2 and ESP32-S3 boards can present as native USB (CDC, the standard USB "communications device" type that shows up as a serial port without a special driver) instead of, or in addition to, a separate bridge. You may see two ports. One is the serial/USB console, one is for upload, depending on the USB mode in Tools. If upload hits the wrong one, pick the other. This is annoying and it is not you failing at Device Manager.
COM port conflicts
Windows will not let two programs open the same COM port cleanly. If Upload says the port is busy, or Monitor opens and immediately dies, something else has it.
Usual suspects:
-
Serial Monitor or Serial Plotter in IDE 2 (close the tab, not just the pane)
-
A second Arduino IDE window, including Legacy 1.8.19
-
VS Code / PlatformIO serial monitor
-
A Python script (
pyserial), PuTTY, Tera Term -
Phone tethering or another USB gadget that stole a COM number you thought was the Arduino
-
A failed upload that left the uploader stuck. Unplug the board, close the IDE, plug back in, reopen.
On native-USB boards (Leonardo, Micro), opening Monitor at the wrong moment resets the board. Native USB boards are designed that way. The COM port is not broken. Wait for setup() to run, then open Monitor, or have the sketch wait with while (!Serial) only on those boards.
A source of confusion worth naming on its own: Windows can list Bluetooth-paired devices as COM ports too, standard COM1/COM2-style entries with names like "Standard Serial over Bluetooth link," left over from pairing a phone, a headset, or an old printer years ago. Those show up in the exact same Tools → Port list an Arduino would, with no visual difference telling you which is which, and clicking one that is not your board just gets you a timeout, not a helpful error. If your port list has more entries than you plugged in devices, count the ones present before you plugged the board in versus after; the new one that appeared is almost always the real one.
Arduino IDE 1.8 vs IDE 2, for this problem
Both IDEs read the same OS port list. Switching from 2.3.10 to Legacy 1.8.19 will not create a CH340 driver. If 1.8.19 sees COM7 and IDE 2 does not, restart IDE 2, select a board first, and check that you are not filtering ports in some board-specific way. If neither sees a port, stop blaming the editor.
IDE 2 docks Serial Monitor in the same window. People leave it open, then Board Manager installs hang, or Upload cannot grab the port. Close Monitor before a long Board Manager install, and before a fussy ESP upload. It is a habit worth building specifically in IDE 2, because 1.8 never docked the Monitor.
macOS and Linux, short version
macOS. After you plug in, open Terminal and run ls /dev/cu.*. You want a new cu.usbmodem* (native USB) or cu.usbserial* / cu.wchusbserial* (bridges). If nothing new appears, it is the cable or the chip. CH340 on macOS has had driver drama across OS versions. A CP2102 or genuine FTDI cable is often less pain on a new Mac. In the IDE, pick the cu. device, not the tty. twin.
Linux. Plug in, run dmesg | tail (which prints the last few messages from the kernel, including "new USB device found" lines) and ls /dev/ttyACM* /dev/ttyUSB*. Permission denied on upload means your user is not in dialout (and sometimes plugdev).
# See which serial devices exist right now
ls -l /dev/ttyACM* /dev/ttyUSB*

# Add your account to the group that is allowed to open serial ports
sudo usermod -aG dialout $USER
Log out and back in after the group change. A new group does not apply to terminals you already had open. udev rules (the Linux settings files that decide who gets access to a newly plugged-in device) for CH340 are usually already included with the distribution. If dmesg shows a new device and the IDE does not, restart the IDE.
A blink test that proves the port
Once Device Manager shows a COM port and the IDE lists it, prove the whole path with the smallest sketch that can only work if Upload succeeded. On a classic Uno, the built-in LED is on pin 13. On a Nano it is usually 13 as well. On ESP8266 NodeMCU the built-in LED is often GPIO 2, and it is often active-low (the LED turns on when the pin is LOW). If you are on an Uno, this is enough:
void setup() {
  // LED_BUILTIN is the onboard LED (pin 13 on Uno / classic Nano)
  pinMode(LED_BUILTIN, OUTPUT);  // Let the pin drive the LED
  Serial.begin(115200);          // Open the same port at 115200 baud
  // One-time banner, so you know THIS sketch is the one running
  Serial.println(F("boot: blink test"));
}

void loop() {
  digitalWrite(LED_BUILTIN, HIGH);  // LED on
  delay(250);                       // Wait a quarter second
  digitalWrite(LED_BUILTIN, LOW);   // LED off
  delay(250);                       // Fast blink: easy to tell apart from the factory 1-second blink
}
LED_BUILTIN is a name the core provides for that board's onboard LED. I use it instead of a raw 13 because boards disagree about which pin the LED is on. If you type 13 and then move this test to a different board, you may end up blinking a pin with nothing attached and deciding the upload failed when it did not.
I also made the blink fast on purpose. A brand-new Uno ships running a slow one-second blink from the factory, so a quarter-second blink proves your upload replaced it.
Select the board, select the new COM port, click Upload. When the bottom pane says you are done, the LED should blink, and Serial Monitor at 115200 should show the boot line after you press reset (or after Monitor reopens the port). If the LED blinks, the COM port is not your problem anymore. If Upload succeeded and nothing blinks, you may have the wrong board selected (a Mega sketch on an Uno, an ESP core on an AVR), or you are looking at the wrong LED. You now have a board-selection or wiring question, not a port question. Part 6 is the place digital pins get taught properly.
Troubleshooting table
| Symptom | Likely cause | Fix |
|---|---|---|
| Tools → Port empty, Device Manager unchanged when you plug in | Charge-only cable, dead jack, dead board USB | Proven data cable, jack on the PC, second computer |
| Device Manager yellow triangle | Missing or wrong driver | Identify CH340 / CP210x / FTDI, install that maker's driver, replug |
| Port appears, Upload "can't open" | Another program owns the port | Close Monitor, Plotter, other IDEs, Python serial, unplug/replug |
| COM1 only | You are not looking at the Arduino | COM1 is almost never the board. Plug in and watch for a new number |
| Port number changes every plug-in | Different USB jack, Windows assigning a new index | Normal. Pick the new port. Prefer one jack and stay there |
| Leonardo/Micro port vanishes during Upload | Native USB reboot into bootloader | Normal. Let Upload finish. Do not yank the cable |
ESP Connecting...... timeout |
Auto-reset / download mode | Hold BOOT, click Upload, slower upload speed, short cable |
| Two ports on one ESP32-S2/S3 | Native USB plus (or instead of) a bridge | Try the other port. Check USB CDC mode in Tools |
| Works in 1.8.19, not in IDE 2 | Monitor holding the port, board not selected, stale UI | Close Monitor, select board, restart IDE 2. Do not expect 1.8 to "fix" drivers |
| Linux permission denied | User not in dialout |
usermod -aG dialout, then log out and in |
macOS no /dev/cu.usb* |
Cable or CH340 driver | Data cable first. Try a CP2102 cable if CH340 is the chip |
Wrap-up
Arduino IDE 2 can only list serial devices the operating system already created. An empty Tools → Port menu is a cable, a USB jack, a missing bridge-chip driver, a board that is not enumerating, or a mode that does not present serial. It is almost never a reason to reinstall the IDE.
Prove the cable with a file-transfer cord. Believe Device Manager over the Port menu. Match CH340, CP210x, or FTDI to the chip you have. Close anything else that might own the port. On ESP boards, treat Connecting... as a download-mode problem once the COM number exists.
When the LED blinks and a boot banner prints, the port is done. Anything after that is the sketch, and that is Part 7's job.
Hack The World and Make Awesome.




