

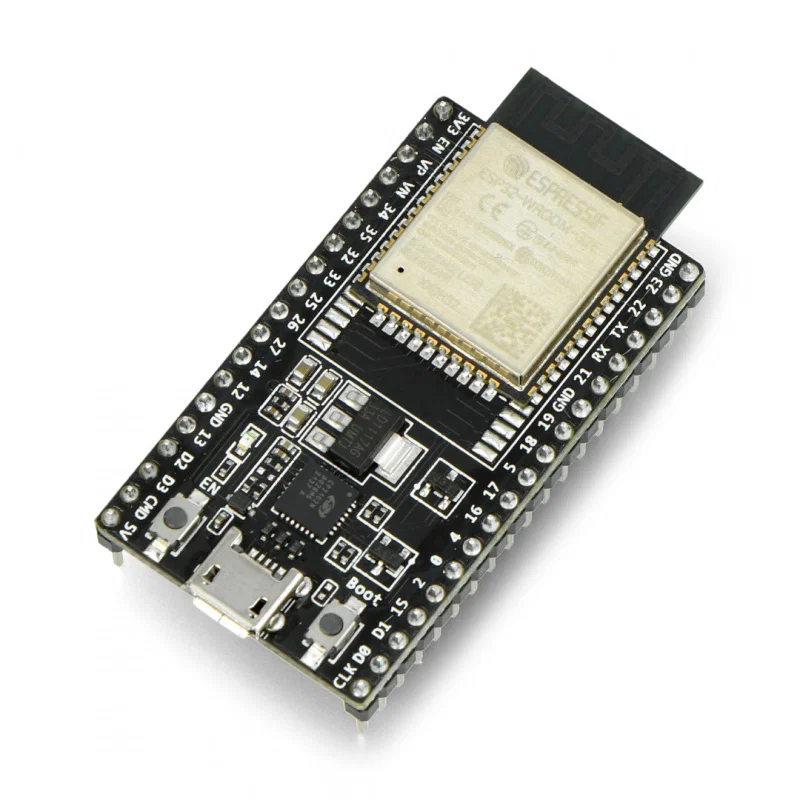
You installed Arduino IDE 2, plugged in an ESP32 DevKit or a NodeMCU, opened Tools → Board, and scrolled. Uno, Mega, Leonardo, a pile of official names. No ESP32. No ESP8266. No NodeMCU. It feels like the IDE is incomplete. It is not. Official AVR boards (Uno, classic Nano, Mega) ship with a core already installed. ESP32 and ESP8266 live in someone else's package, and Board Manager will not search that package until you give it a URL.
A core, in Arduino language, is the board-support package for a chip family: the compiler, the upload tool, the pin names, and the menus (flash size, partition scheme, upload speed) that family needs. Espressif Systems makes the ESP32 chip and maintains the Arduino-ESP32 core. The ESP8266 core is a community project that Arduino's own docs still point at. Neither one is hiding in a checkbox you missed. They are extra indexes.
This article is the full install: what that URL is doing, how to add both indexes in IDE 2, how to install each package, how to pick a board name that matches the module on the bench, drivers, a first Blink, and the 3.3 V / BOOT-button traps that show up immediately after a "successful" install. It assumes Arduino IDE 2.3.x on Windows, which is the path I use daily. macOS and Linux are the same menus with one extra permission step on Linux.
If you are still choosing between an Uno and an ESP board in the first place, Part 2 of the Mastering Arduino series is the board-family conversation. This page is "I already bought the ESP, make the IDE talk to it."
Image: Arduino
Why are they missing on day one?
Arduino IDE 2 comes with a default index of packages Arduino maintains. Think of it as the house catalog in a hardware store. Uno and Mega are on those shelves. ESP32 is made by Espressif. The Arduino-ESP32 core lives in Espressif's catalog. ESP8266 support lives in the ESP8266 community catalog. Board Manager will not browse those catalogs until you put their address in File → Preferences → Additional boards manager URLs.
Search Board Manager for esp32 before you add the URL and you get zero results, or you get an official Arduino board (Nano ESP32) and think you installed support for every ESP32 module you own. Nano ESP32 is a specific Arduino product. A generic ESP32-WROOM DevKit is not that product. You still want Espressif's esp32 by Espressif Systems package for the generic modules.
Gotcha, up front: you need a working internet connection the first time. The ESP32 package is large (compilers, tools, on the order of a couple hundred megabytes). A flaky cafe Wi-Fi will sit on "Downloading..." until you believe the IDE froze. It is downloading. Let it finish. Close Serial Monitor first. IDE 2.3.x has a known habit of stalling package installs while Monitor is open.
What is a Board Manager URL?
A Board Manager URL points at a JSON index. JSON is a text format for structured data. That index lists package names, versions, and the zip files to download. When you paste Espressif's URL into Preferences, IDE 2 starts fetching that index alongside Arduino's own. Board Manager search can then see esp32 by Espressif Systems.
The current official URLs, as of this writing (September 2026):
# ESP32 stable core, maintained by Espressif
https://espressif.github.io/arduino-esp32/package_esp32_index.json

# ESP8266 stable core, ESP8266 community
https://arduino.esp8266.com/stable/package_esp8266com_index.json
Espressif also publishes a dev index (package_esp32_dev_index.json) for pre-release cores. Skip it unless you were asked to test a fix. The stable index is the one for a working bench.
Older tutorials still quote https://dl.espressif.com/dl/package_esp32_index.json or a raw.githubusercontent.com/.../gh-pages/ URL. Prefer the espressif.github.io address from Espressif's current getting-started docs. If a URL in this article ages, trust Espressif's page and the ESP8266 core's installing page over a cached copy of mine.
You can put both URLs in the same Preferences field. IDE 2 has a small icon on the right of that field that opens a multi-line editor. One URL per line. Comma-separated on one line also works. I use one per line because you can see a typo.
Do not paste a GitHub repo URL (https://github.com/espressif/arduino-esp32). That is source code. Board Manager wants the JSON index.
What you need before you click Install
-
Arduino IDE 2.3.x from arduino.cc/en/software. Legacy 1.8.19 can install these cores too. The screenshots and sidebar icons below are IDE 2.
-
The board, and a data-capable USB cable. Charge-only cables light the LED and never make a COM port. If Tools → Port is empty after the core installs, that is the cable/driver article in this cluster, not a failed ESP package.
-
For Windows clones: a driver matching the USB-UART chip (CH340, CP210x, or FTDI). Official Arduino boards usually do not need this extra step. Cheap DevKits do.
-
Time and disk. ESP32 is the big one. Do not start the install five minutes before you have to leave.
How to add the URLs in Arduino IDE 2
- Open Arduino IDE 2.
- File → Preferences (Windows/Linux). On macOS, Arduino IDE → Settings.
- Find Additional boards manager URLs near the bottom.
- Click the icon at the right of the field to open the list editor.
- Paste the ESP32 URL on one line and the ESP8266 URL on the next, if you want both. If you only own ESP32, you only need Espressif's line.
- Click OK, then OK again.
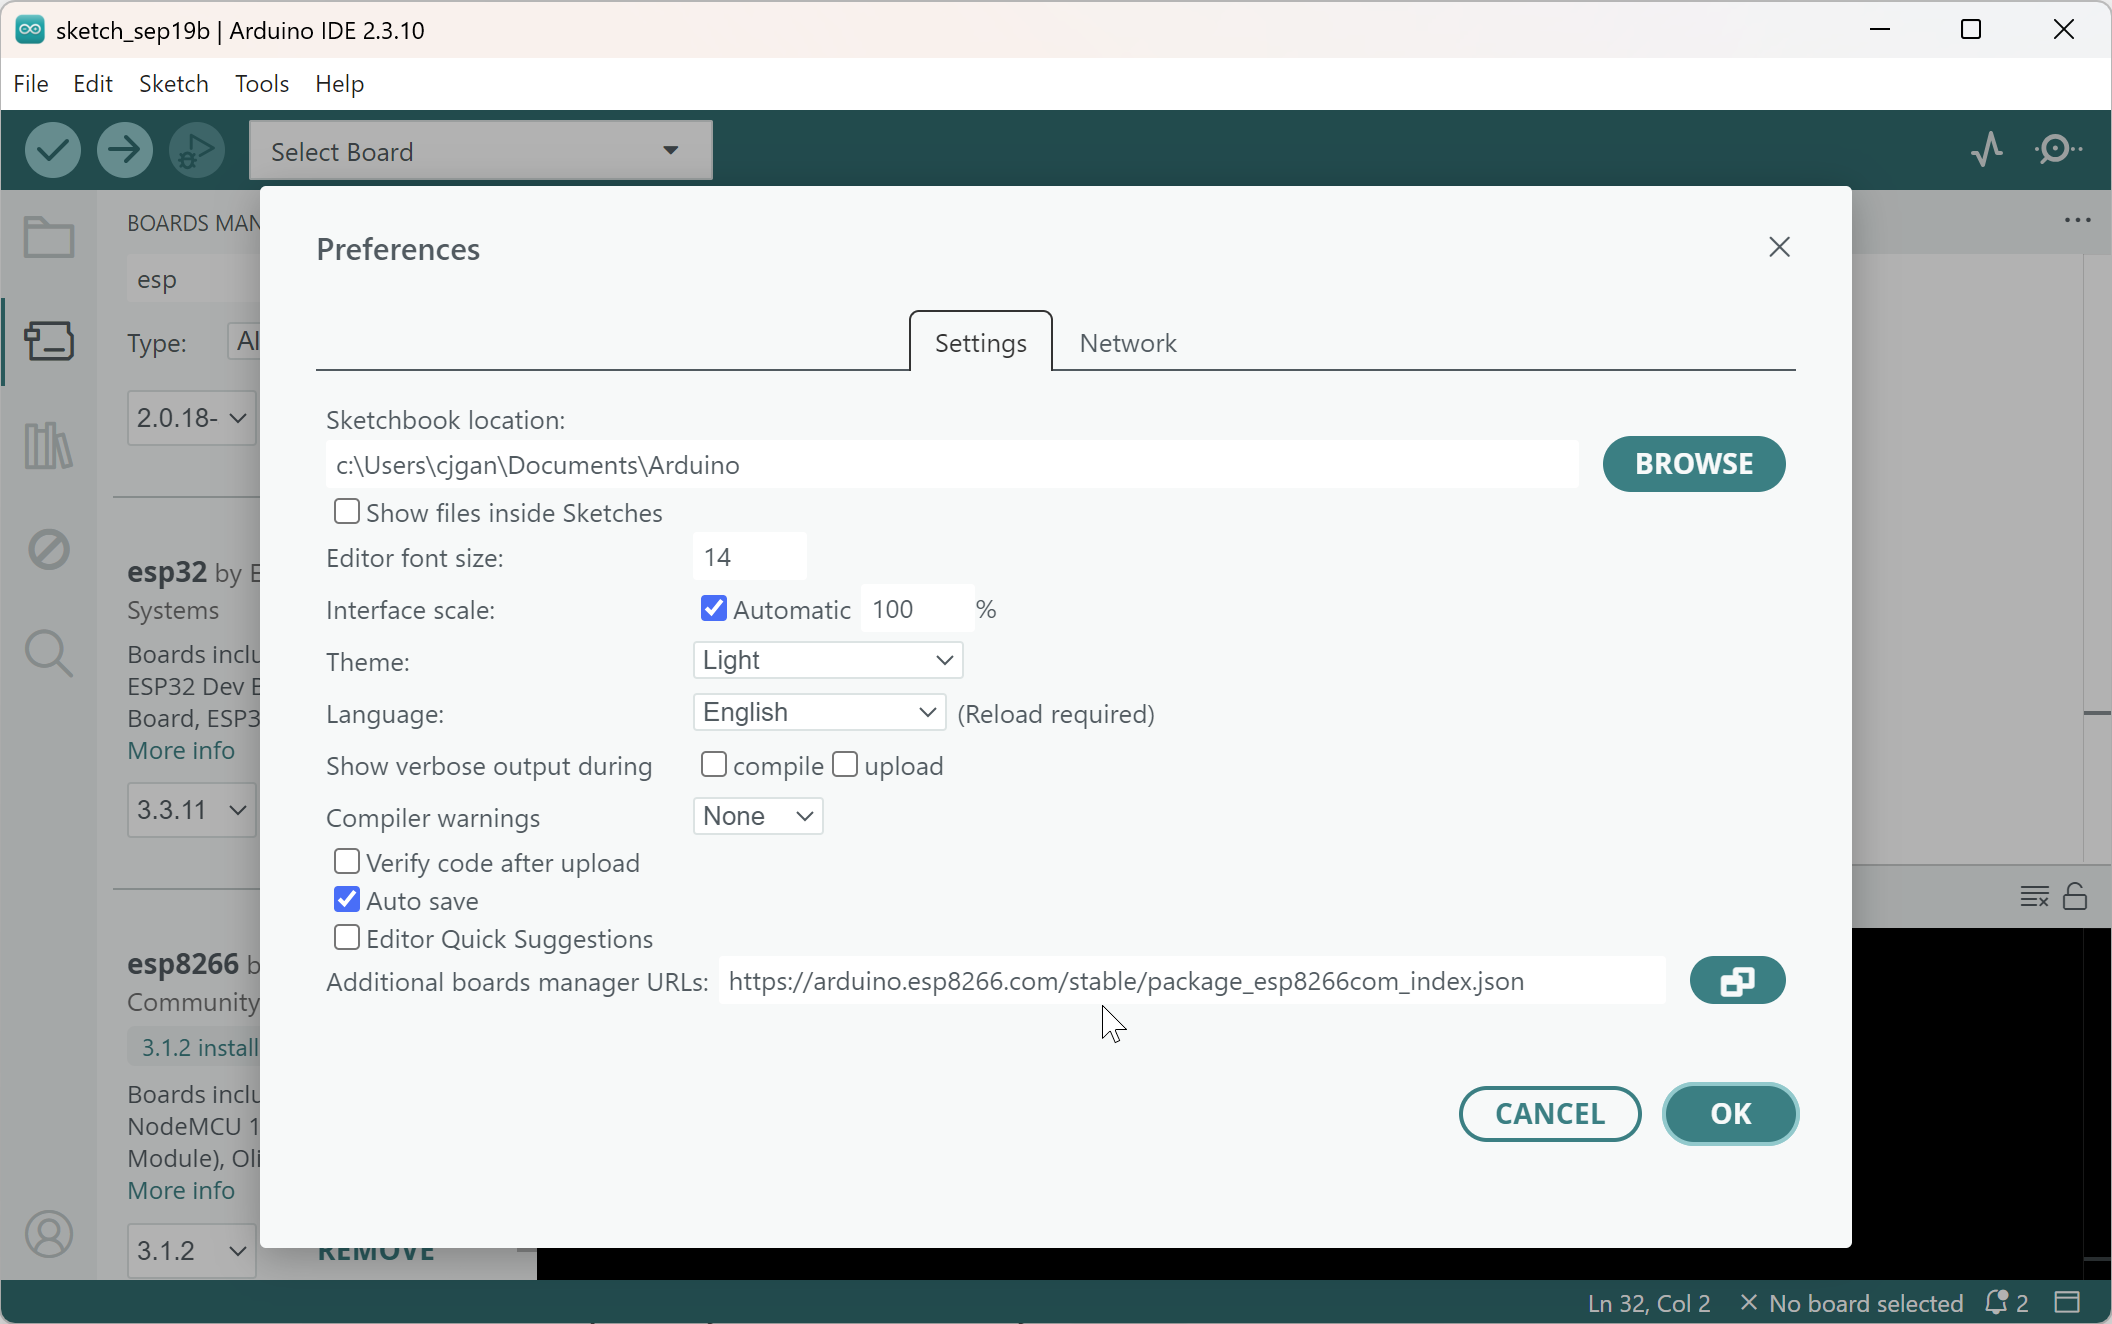
Wait for the bottom-right notification that indexes are downloading. If that hangs, close Serial Monitor and Serial Plotter, then open Preferences and OK again to retrigger. A corporate firewall that blocks github.io will also hang this step. In that case you need a network that can reach Espressif's index, or a manual install that is out of scope for a first-time setup.
How to install the ESP32 core
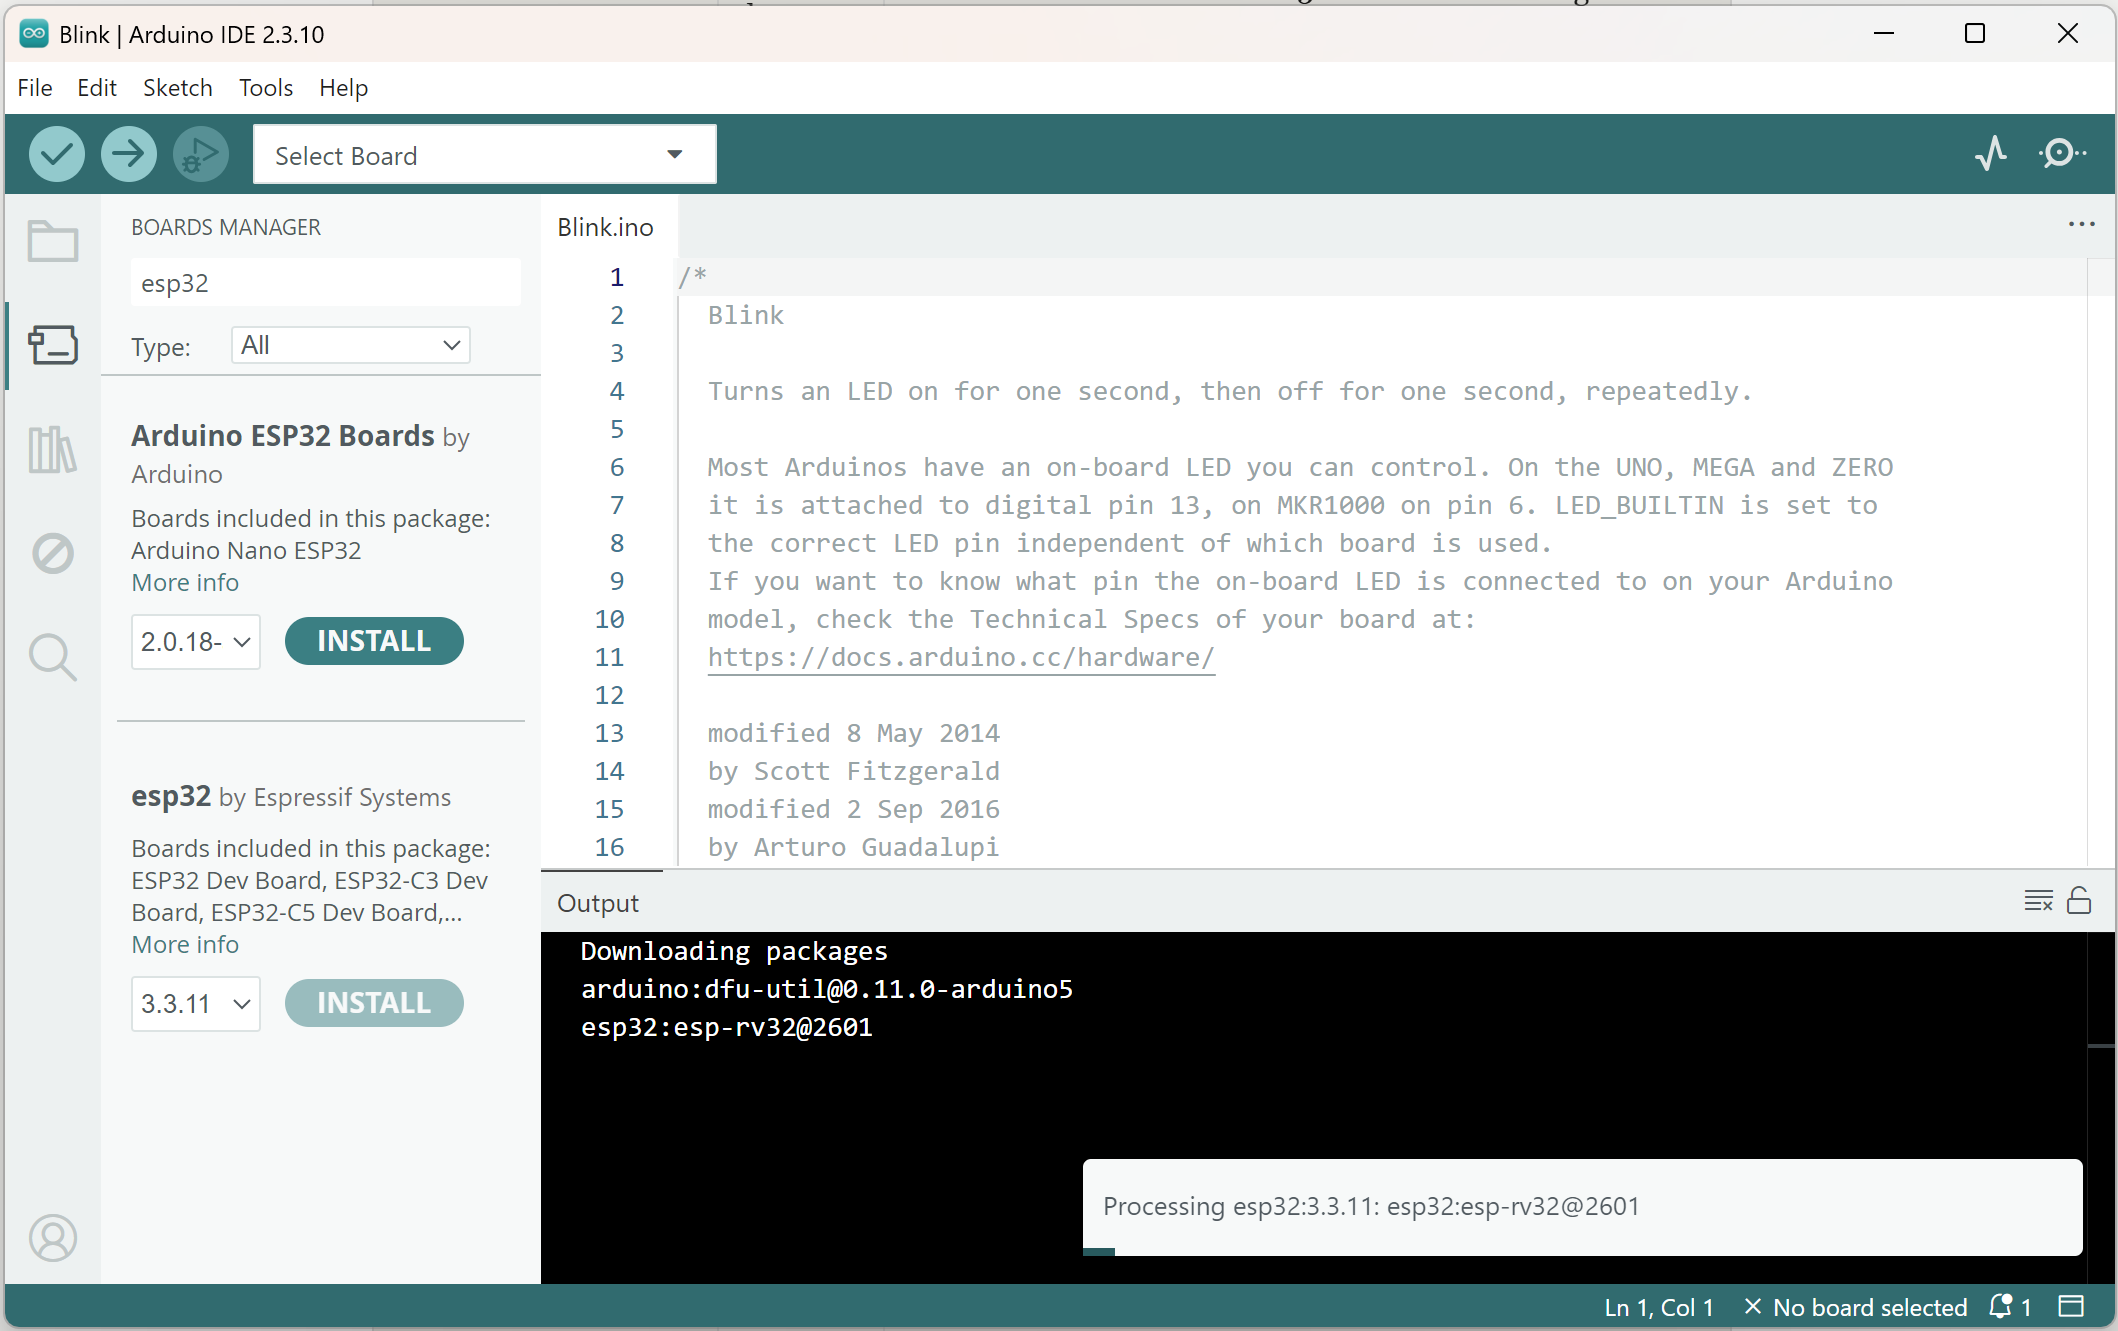
- Open Board Manager. In IDE 2 that is the board-on-a-chip icon in the left sidebar, or Tools → Board → Boards Manager.
- Wait until the download spinner at the bottom finishes. Searching too early returns stale nothing.
- Search
esp32. - Find esp32 by Espressif Systems. Not a random third-party fork, not "Arduino ESP32 Boards" unless you are specifically installing Arduino's own Nano ESP32 support and you know that is what you bought.
- Click Install on the latest stable version. The version number moves. You do not need to chase nightlies.
- Wait. First install pulls a compiler toolchain (Xtensa and/or RISC-V, depending on which ESP32 family the package now ships). Windows may look idle. The bottom pane is the truth.
When it is done, the entry shows INSTALLED. Tools → Board now has an esp32 section with a long list: ESP32 Dev Module, ESP32-S2, ESP32-S3, ESP32-C3, ESP32-C6, and many vendor boards. That list is the core, not a sign you picked a board yet. You still have to choose the one that matches the module.
Where the files went, if you ever need to delete a bad install: on Windows, C:\Users\<you>\AppData\Local\Arduino15\packages\esp32\. You rarely open that folder. You need to know it exists so you do not delete it by accident, and so you can delete packages\esp32 plus the staging folder if an install corrupts and Board Manager will not repair it.
How to install the ESP8266 core
Same Board Manager, different search.
- Confirm the ESP8266 URL is in Preferences (the
arduino.esp8266.com/stable/...line). - Open Board Manager, search
esp8266. - Find esp8266 by ESP8266 Community.
- Install the latest stable version from the dropdown.
- Wait it out. This package is smaller than ESP32, and still not instant.
Tools → Board should now show an ESP8266 Boards section: NodeMCU 1.0 (ESP-12E Module), Generic ESP8266 Module, LOLIN(WEMOS) D1 R2 & mini, and friends.
Linux and macOS: the ESP8266 core's own installing page asks for Python 3.7 or newer on those operating systems. Windows users usually do not have to think about that. If a post-install tool fails on Linux with a Python error, install Python 3 from your package manager and try again.
Which board name should you pick?
This is where a successful core install still produces a failed upload.
Generic ESP32 DevKit (ESP32-WROOM-32, 30-pin or 38-pin "Dev Module"). Start with ESP32 Dev Module. That is the generic recipe. It is the right first try when the silkscreen says ESP32-WROOM-32 and there is no famous vendor name.
ESP32-S2, S3, C3, C6, H2, P4. These are different chips. Picking "ESP32 Dev Module" for an ESP32-C3 will compile the wrong architecture and fail in confusing ways. Match the family on the metal can or the listing you bought. S3 has more pins and often native USB. C3 is RISC-V. The core supports them. The menu item has to match.
Arduino Nano ESP32. This is an official Arduino board. It may appear under Arduino's own boards as well as under Espressif. Use the Arduino Nano ESP32 board entry if that is the hardware. Do not use ESP32 Dev Module for it and then wonder why the pin numbers in a tutorial do not match.
NodeMCU ESP8266 (ESP-12E). NodeMCU 1.0 (ESP-12E Module) is the usual pick. Older NodeMCU 0.9 boards exist. If Upload works and the onboard LED is on the wrong pin, you may have the other revision.
Wemos / LOLIN D1 Mini (ESP8266). LOLIN(WEMOS) D1 R2 & mini (the exact label shifts slightly by core version). "Generic ESP8266 Module" works as a blunt instrument and then you will fight flash size and reset method.
Flash size, partition scheme, upload speed. Once a board is selected, Tools grows extra items.
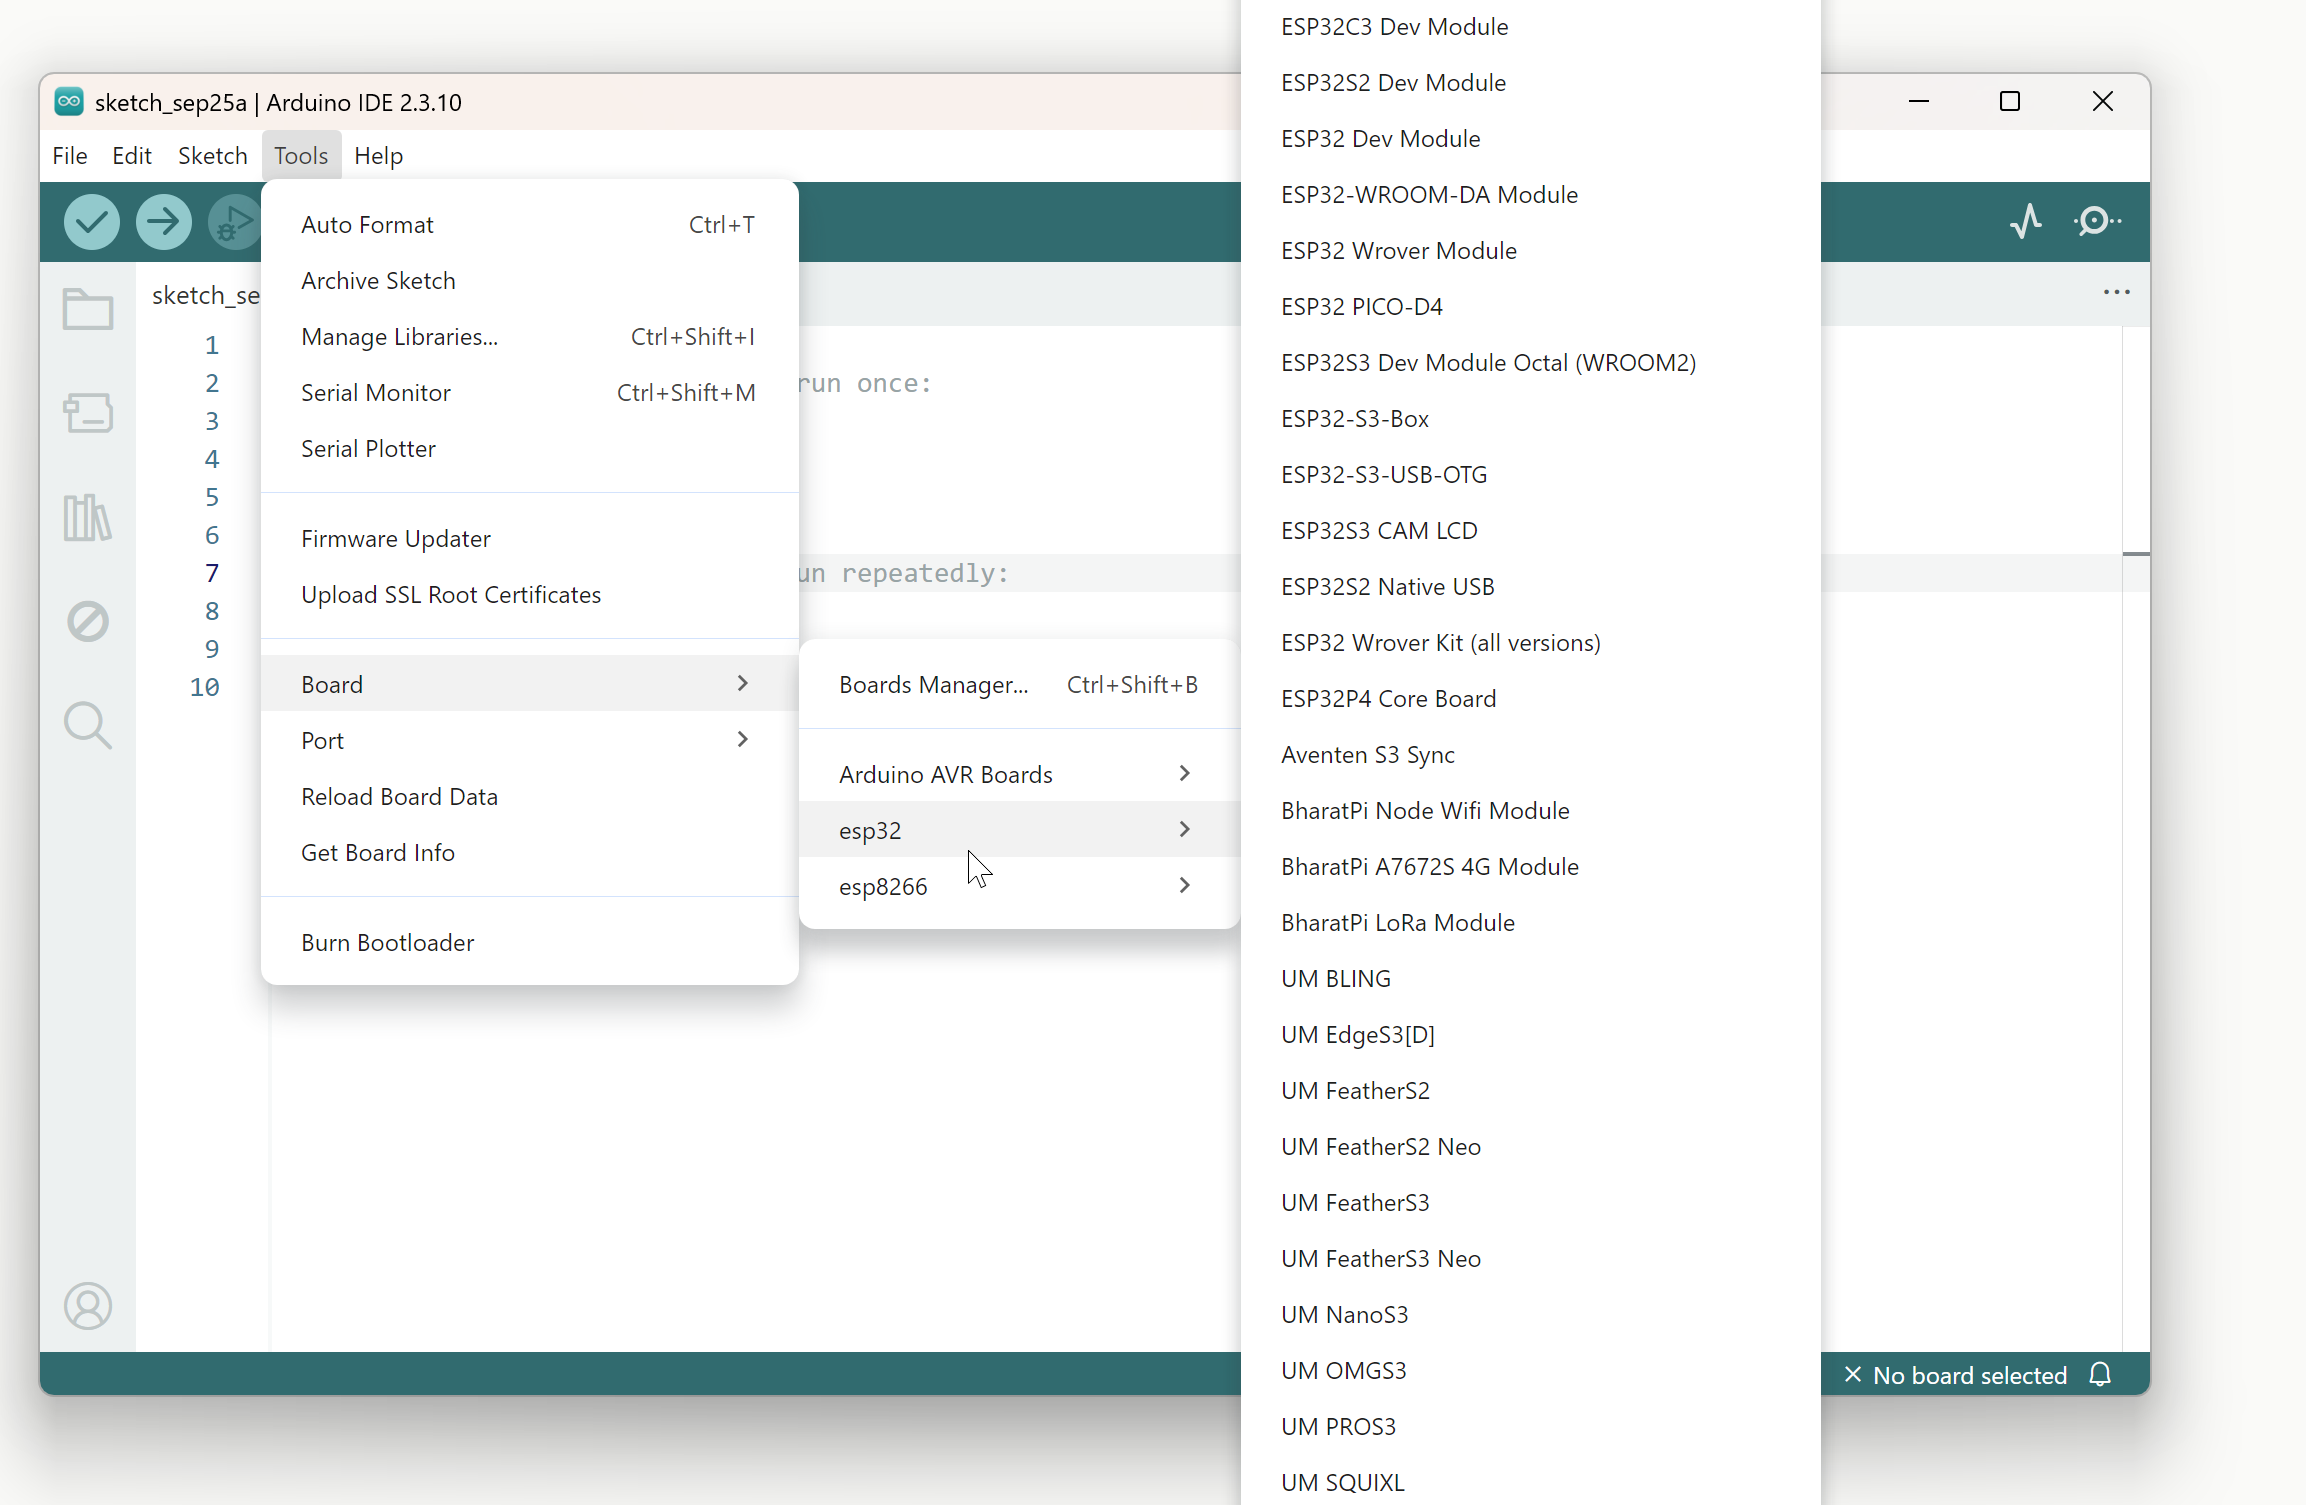
For a first Blink, leave partition scheme at the default and drop Upload Speed to 115200 if 921600 fails. Flash size should match the module (4 MB is common). Wrong flash size can upload and then crash at boot. If you do not know, 4 MB and default partitions are the place to start on a typical DevKit.
If you only remember one rule: pick the family that matches the chip, then the closest named board, then slow the upload speed before you reinstall the core.
Drivers, COM ports, and the cable (again)
Installing the core does not install a CH340 driver. The core is compilers and recipes. The COM port is still the USB-UART chip plus Windows.
After the package is installed:
- Plug the ESP in with a data cable.
- Device Manager should show a new COM port (CH340, CP210x, or similar).
- Tools → Port should list that COM number.
- If Port is empty, stop. Do not keep clicking Upload. Fix the cable and driver first. The COM-port article in this cluster is that path.
ESP32-S2/S3 native USB can show two ports. Try the other one if Upload cannot connect.
Your first ESP Blink
Use this to prove the core, the board name, the port, and the uploader. We are not turning on Wi-Fi yet. Wi-Fi is a later project. Blink is the "did Upload really work" test.
A quick word on names first. ESP boards number their pins as GPIOs (general-purpose input/output pins), so "GPIO 2" is the chip's pin 2, which is not always the pin printed as "D2" on the board. Many ESP8266 NodeMCU boards wire the onboard LED to GPIO 2, and it is often active-low (LOW turns the LED on). Many ESP32 DevKits have an LED on GPIO 2 as well, and some have it on GPIO 5, and some have no onboard LED except a power light that will not blink. If nothing blinks after a successful upload, add an external LED on a known GPIO with a resistor, or watch Serial instead.
// First-upload test for ESP32 or ESP8266 in Arduino IDE 2.
// If the onboard LED does not toggle, you still have Serial proof.

// GPIO 2 is the usual onboard LED on NodeMCU (ESP8266) and on many ESP32 DevKits.
// Change this if your silkscreen marks a different LED pin.
const uint8_t LED_PIN = 2;

void setup() {
  pinMode(LED_PIN, OUTPUT);  // Let the LED pin drive current
  Serial.begin(115200);      // Serial Monitor must be set to 115200 too
  // Give USB-serial a moment on chips that enumerate native USB
  delay(200);
  Serial.println();          // Blank line to push past the ESP's own boot messages
  Serial.println(F("boot: ESP blink test"));  // Your proof this sketch is running
}

void loop() {
  digitalWrite(LED_PIN, LOW);   // On for many ESP8266 onboard LEDs (active-low)
  Serial.println(F("led=on (LOW)"));   // Report what we just did
  delay(400);                   // Hold for 0.4 seconds
  digitalWrite(LED_PIN, HIGH);  // Off for those same LEDs
  Serial.println(F("led=off (HIGH)"));
  delay(400);                   // Then loop() starts over
}
If you are on an ESP32 DevKit whose LED is active-high, swap the HIGH/LOW or watch Serial. The boot line at 115200 is the proof that matters.
Upload:
- Tools → Board → the matching ESP32 or ESP8266 entry.
- Tools → Port → the COM port Device Manager showed.
- Tools → Upload Speed → 115200 if you have already failed at a higher speed.
- Click Upload.
- If it hangs on
Connecting........, hold BOOT (FLASH on some ESP8266 boards), click Upload, release when the log starts moving. Some boards want a tap on EN (reset) while BOOT is held.
Success looks like esptool (the ESP upload program) writing at a percentage, then a reset, then your LED or your Serial banner. Open Serial Monitor at 115200. Disconnect Monitor before the next upload if the next upload cannot open the port.
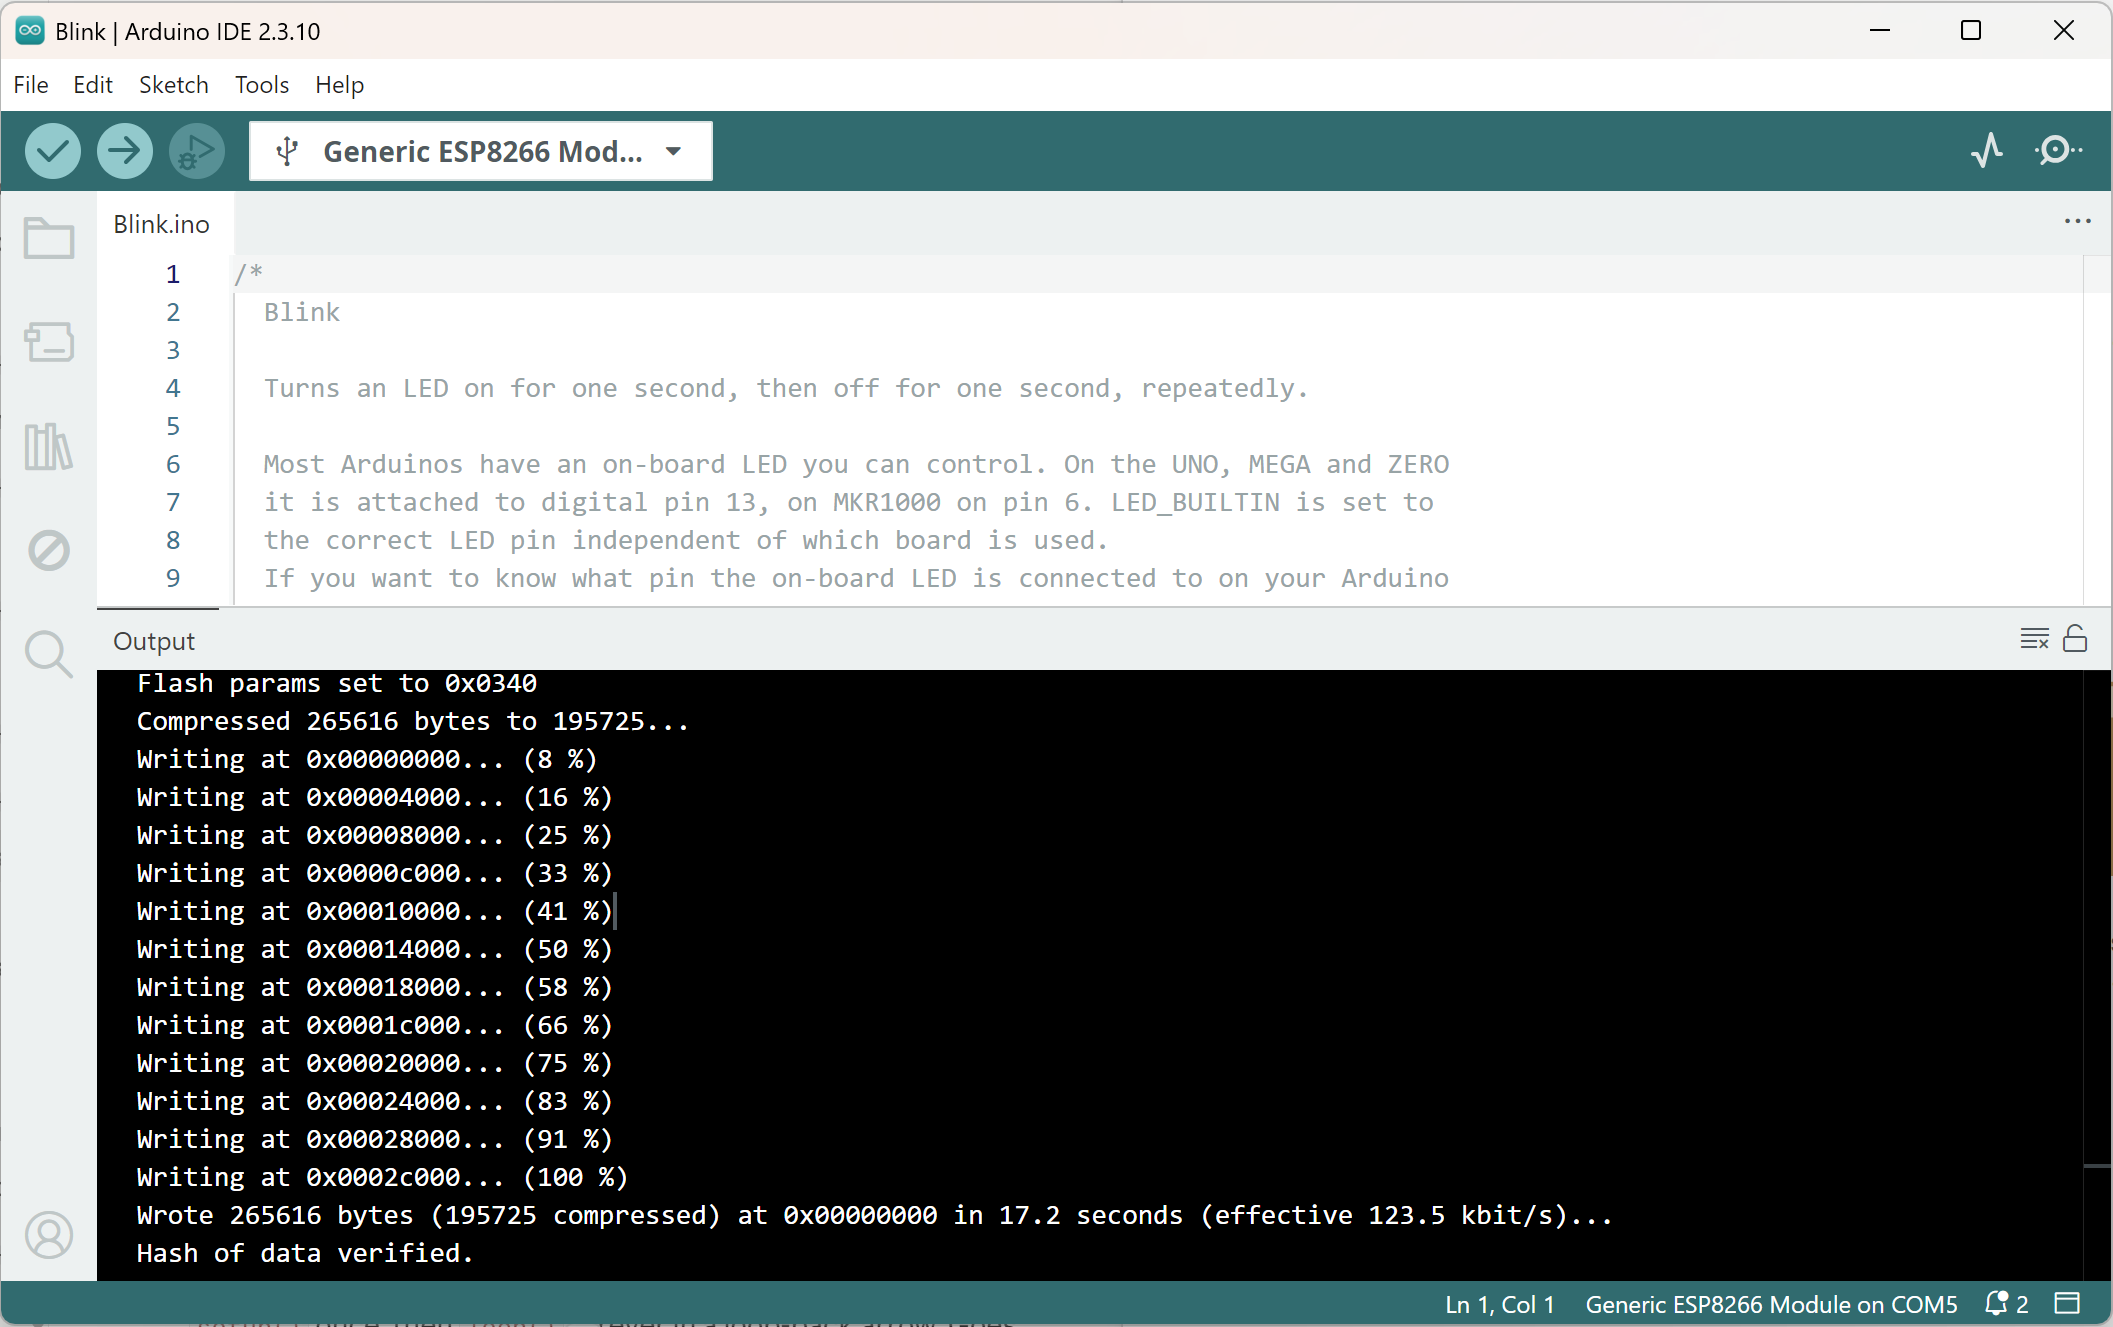
This is still Arduino C++ in a sketch, the same setup() / loop() shape Part 3 taught on Uno. The core is what made ESP32 Dev Module a legal target for that shape.
What is different from an Uno once the core is in?
The sketch still has setup() and loop(). That is why this feels like Arduino. A few things are not Uno, and they bite the first week.
ESP8266 vs ESP32 is not a speed bump. ESP8266 is the older Wi-Fi chip (a single processor core, less RAM, no Bluetooth). ESP32 is a family: original ESP32 with Bluetooth and more RAM, then S2/S3/C3 and the rest. A library or tutorial that says "ESP8266 only" will not compile for ESP32, and the other way around is also true. The Wi-Fi include names are the obvious example. On ESP32 you write #include <WiFi.h>. On ESP8266 you write #include <ESP8266WiFi.h>. Copying the wrong one is a compile error, not a radio error.
There is still no 5 V GPIO. The USB jack can be 5 V. The pins are 3.3 V. If the other device is a 5 V sensor that was happy on an Uno, you need a level shifter between them. A level shifter is a small, cheap board that translates signals between 5 V and 3.3 V in both directions, so each side sees the voltage it expects.
Some Uno libraries are AVR-only. They talk directly to registers (the chip's internal control switches) that only exist on AVR chips, and those registers are simply not there on an ESP32's Xtensa or RISC-V processor. The Library Manager will still let you install them. Compile will then fail. Look for an ESP-aware fork, or read the library's documented boards.
Flash memory is laid out differently than on an Uno. Your sketch plus Wi-Fi stacks plus a filesystem (SPIFFS or LittleFS, which are ways to store files in leftover flash) share a partition map you picked in Tools. The default is fine for Blink. If you start storing web pages on the chip, you will need a different partition scheme. Change it in Tools, then upload again.
Reset and Serial are noisier. ESP boards print bootloader messages at a baud rate that may not be 115200 before your sketch starts. Garbage on Monitor for a second after reset is often that boot log, not a broken sketch. Match baud, wait for your own banner.
You do not need to master any of that to finish this article. You need it so the first real project after Blink does not send you back here to "reinstall the core" when the core is not the problem.
Things that break right after a clean install
3.3 V logic. ESP32 and ESP8266 are 3.3 V chips. Do not feed 5 V into a GPIO pin. It can permanently damage the chip. Do not assume a 5 V sensor module is safe on those pins. 5 V on the USB jack is normal (the board regulates down). 5 V on RX or on a GPIO is how you get a board that enumerated once and never again.
Pin numbers are not Uno pin numbers. digitalWrite(13, HIGH) on an ESP32 is GPIO 13, which may not be an LED and may be used for flash on some modules. Use the pinout for your DevKit. LED_BUILTIN exists on some ESP cores and points at different GPIOs depending on the board entry you picked. When Blink "fails" after a perfect upload, you blinked a pin with no LED.
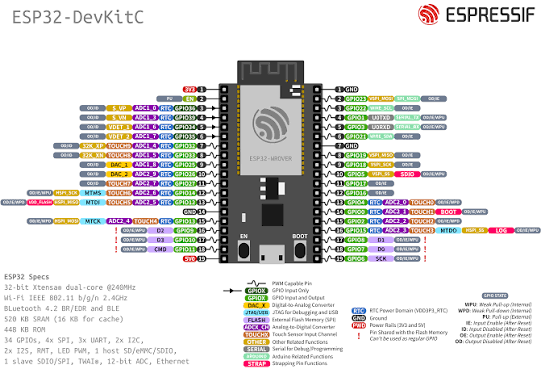
Image: Espressif
Wi-Fi libraries compile, then the board resets in a loop. That is often power. When the Wi-Fi radio switches on, the ESP32 briefly pulls a lot more current. If the supply cannot keep up, the voltage sags for a moment (a "brownout"), and the chip resets itself to be safe. Those spikes will brown out a weak USB hub or a tired charge-only cable that barely enumerates. Use a short data cable on a PC jack. This article's Blink does not enable Wi-Fi, so if Blink is stable and a Wi-Fi sketch is not, suspect power before you reinstall the core.
Core 3.x vs old sketches. Espressif's Arduino-ESP32 3.x (the 3.0+ line that has been current for a while) changed some APIs versus 2.x. A 2019 blog sketch may fail to compile with errors about ledcSetup or similar (ledcSetup was the old 2.x way to set up PWM, the fast on-off switching used to dim LEDs, and 3.x replaced it). That is not a bad Board Manager install. It is an old sketch. For a first Blink you will not hit this. When you copy ancient example code, read the compile error before you delete Arduino15.
Board Manager hangs at the end of install. Close Serial Monitor. Run the IDE as a normal user, not from a weird controlled folder. If it still dies, close the IDE, delete Arduino15\staging and Arduino15\packages\esp32 (only that vendor folder), reopen, install again. Do not delete your sketchbook.
Switching versions or removing a core
Board Manager keeps more than one version of a package available side by side. If a specific project's example code was written against an older Arduino-ESP32 release and refuses to compile against whatever is current, open Board Manager, search esp32 again, and use the version dropdown next to Install to pick an older release instead of the latest one. You do not need to uninstall first; selecting a different version and clicking Install (or the button that now reads something like "Select version") switches the active one for you.
Removing a core outright, rather than just changing its version, is the same Board Manager entry with an Uninstall/Remove button once it is installed. That is the clean way to do it, safer than deleting the packages\esp32 folder by hand unless Board Manager itself refuses to cooperate (the situation the "hangs at the end of install" fix above already covers). A plain uninstall through the UI leaves your sketches and your other installed cores untouched; it only removes that one package's compiler and board definitions.
Troubleshooting table
| Symptom | Likely cause | Fix |
|---|---|---|
Board Manager search for esp32 is empty |
URL not in Preferences, or index still downloading | Paste the Espressif JSON URL, wait for the index fetch, search again |
| Install sits on Downloading | Monitor open, slow network, firewall | Close Serial Monitor. Wait. Try a less filtered network |
| Tools → Board has no ESP section after INSTALLED | Wrong package, or IDE not restarted | Confirm "esp32 by Espressif Systems". Restart IDE 2 |
Upload timeout Connecting... |
Auto-reset / BOOT timing, speed, cable | Hold BOOT, slower upload, data cable on a PC jack |
| Tools → Port empty | Cable or USB-UART driver, not the core | Data cable, CH340/CP210x driver, Device Manager |
| Compiles, LED does nothing | Wrong GPIO, active-low LED, no onboard LED | Use the Serial banner. Check the DevKit pinout. Try GPIO 2 vs the marked LED |
| Sketch for Uno fails to compile for ESP | AVR-only library or pin assumptions | Use an ESP-aware library. Do not expect every Uno library to build |
| Nano ESP32 vs generic DevKit confusion | Official Arduino board vs Espressif generic | Pick Arduino Nano ESP32 only if that is the hardware |
| Linux upload permission denied | User not in dialout |
Add the user to dialout, log out and in |
Wrap-up
ESP32 and ESP8266 are missing from a fresh Arduino IDE 2 because they are third-party cores. You add a Board Manager URL so IDE 2 can see Espressif's catalog and the ESP8266 community catalog, you install those packages, you pick a board name that matches the chip on the bench, and you upload Blink over a real data cable.
The URLs to paste, today:
https://espressif.github.io/arduino-esp32/package_esp32_index.json
https://arduino.esp8266.com/stable/package_esp8266com_index.json
If Tools → Port is empty, that is USB, not Board Manager. If Port is present and Connecting... never finishes, that is BOOT and upload speed. If Upload succeeds and nothing blinks, believe Serial before you reinstall the core.
Once Blink runs, you have a second Arduino-shaped platform with Wi-Fi on the chip. The next sketches you write are still sketches. The core is what made the IDE willing to build them.
Hack The World and Make Awesome.




